> ## Documentation Index
> Fetch the complete documentation index at: https://docs.bytebase.com/llms.txt
> Use this file to discover all available pages before exploring further.
# OAuth 2.0
OAuth is an open standard for token-based authentication and authorization which is used to provide Single Sign-On (SSO). Bytebase supports popular OAuth 2.0 providers (GitHub, Google, GitLab) and custom providers.
## Overview
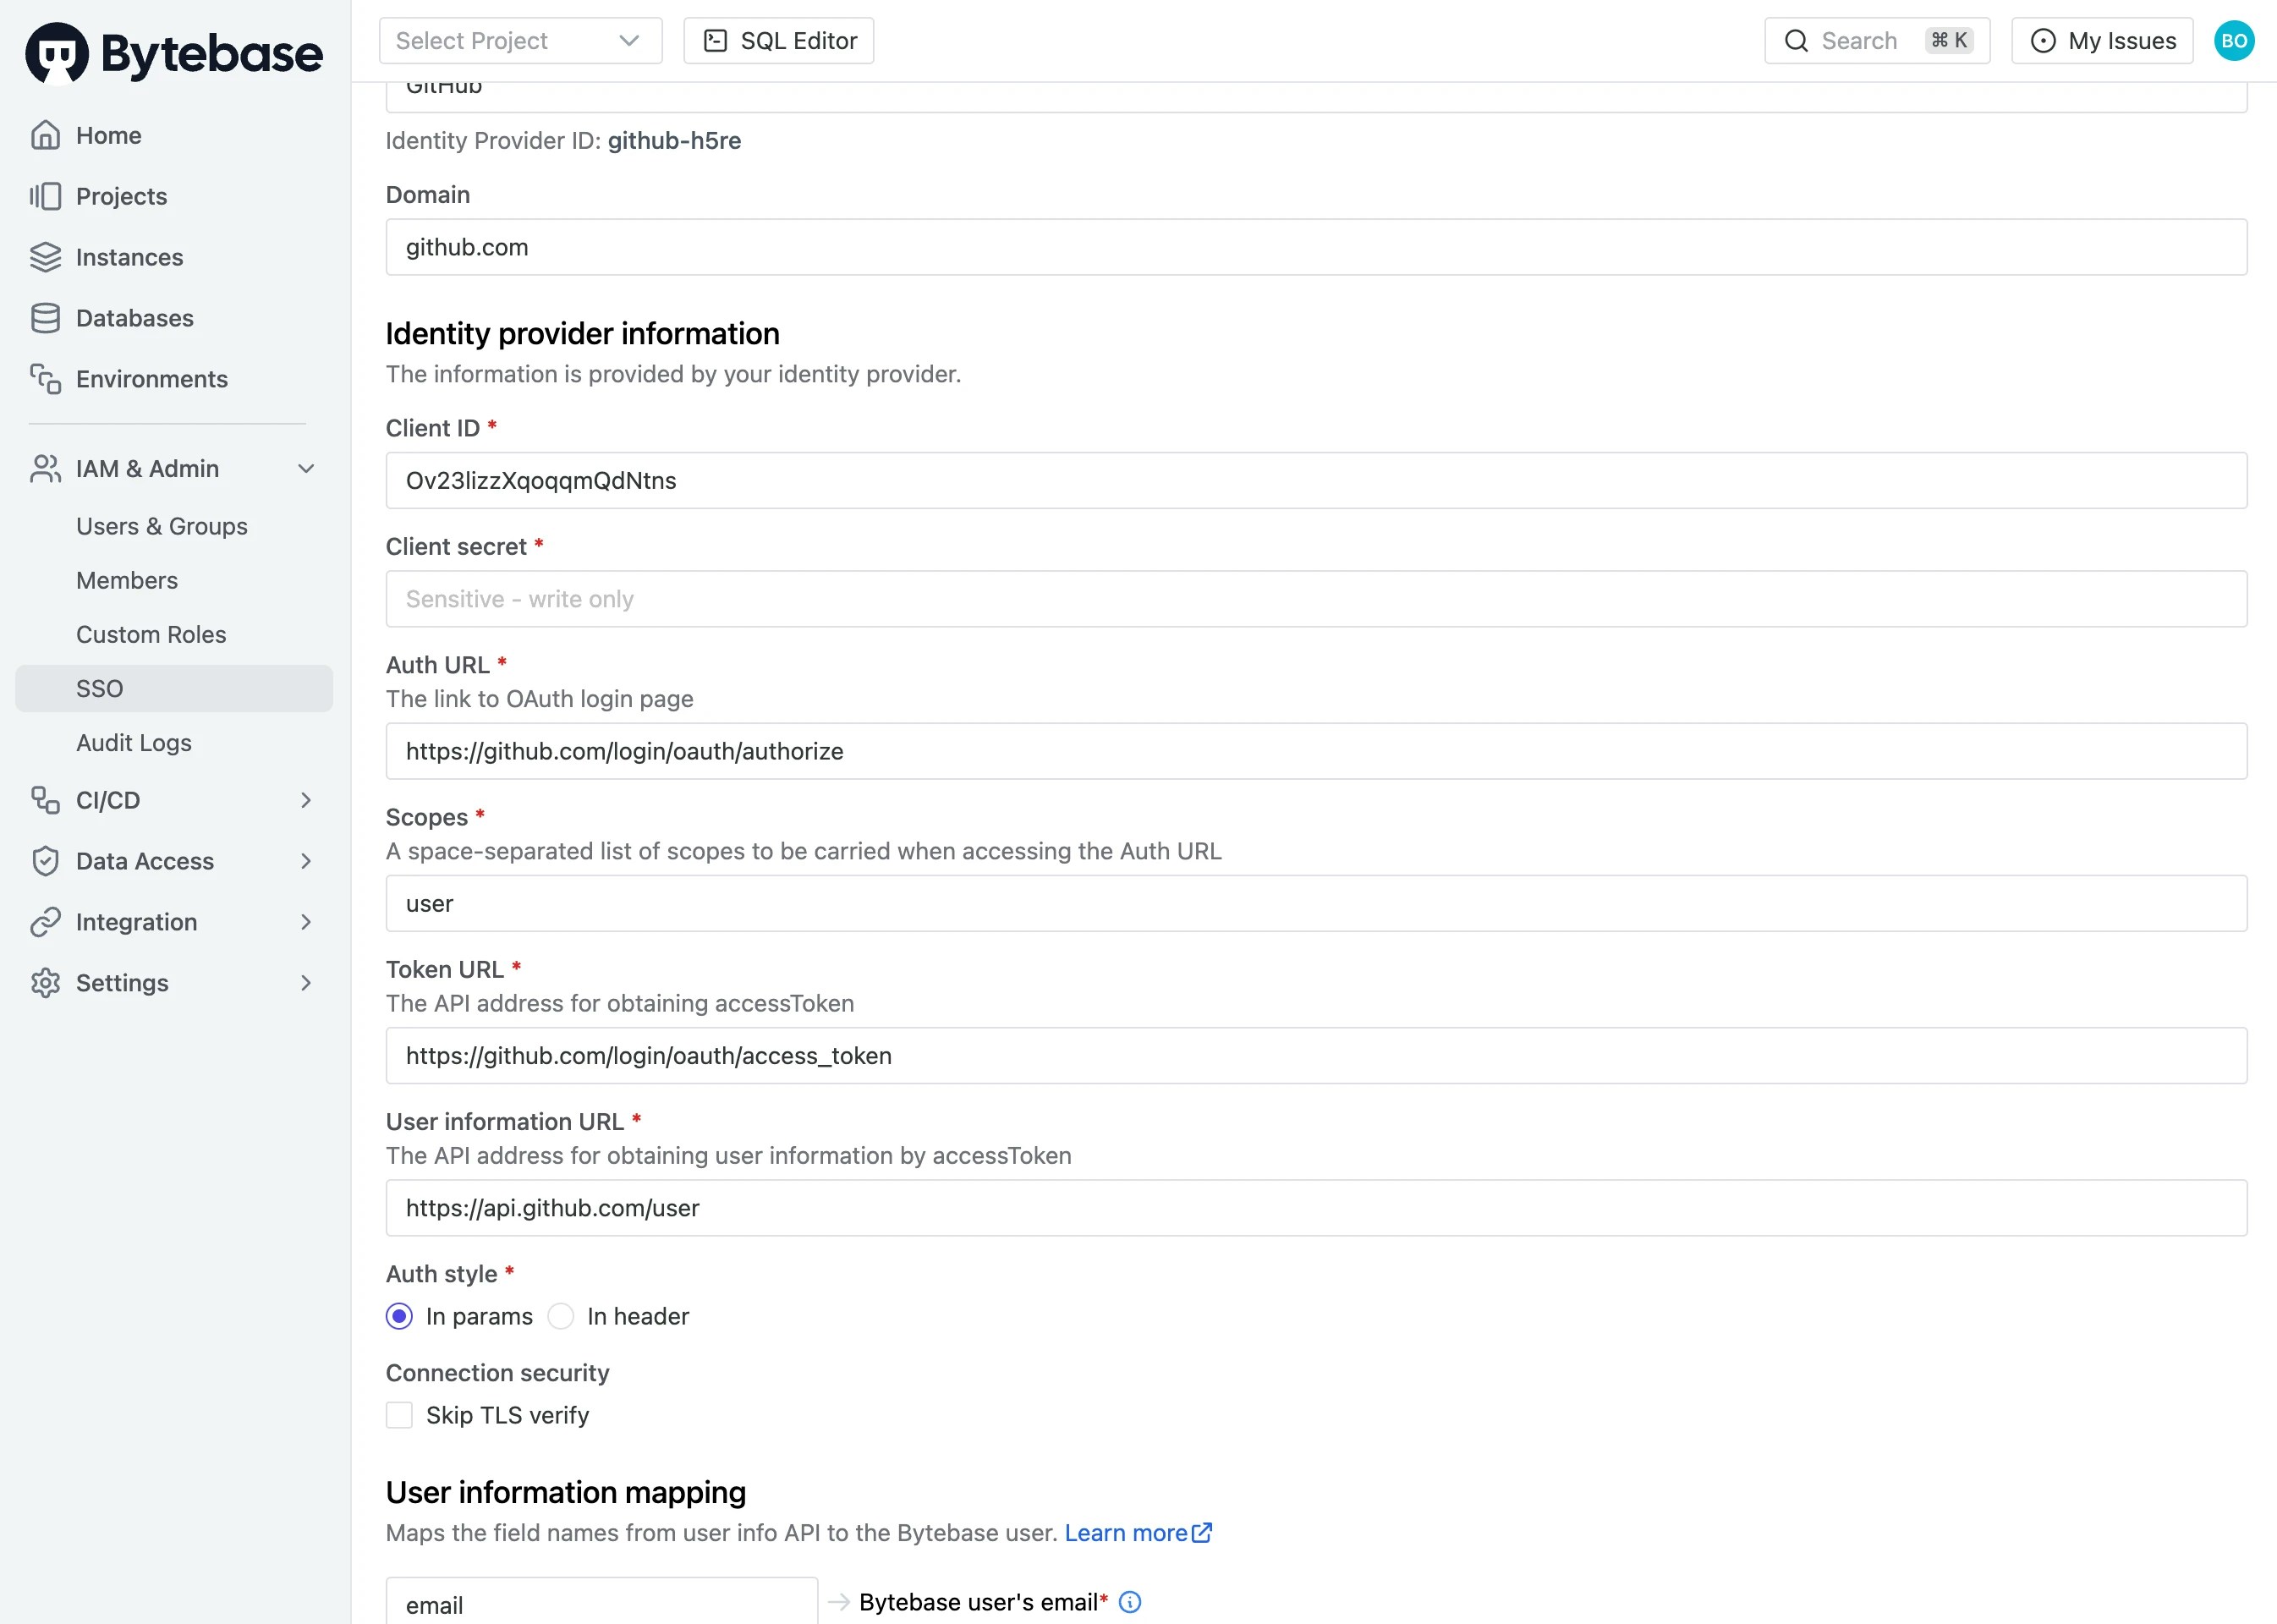 In the creating SSO dialog, you need to fill following fields:
### Basic information
In the creating SSO dialog, you need to fill following fields:
### Basic information
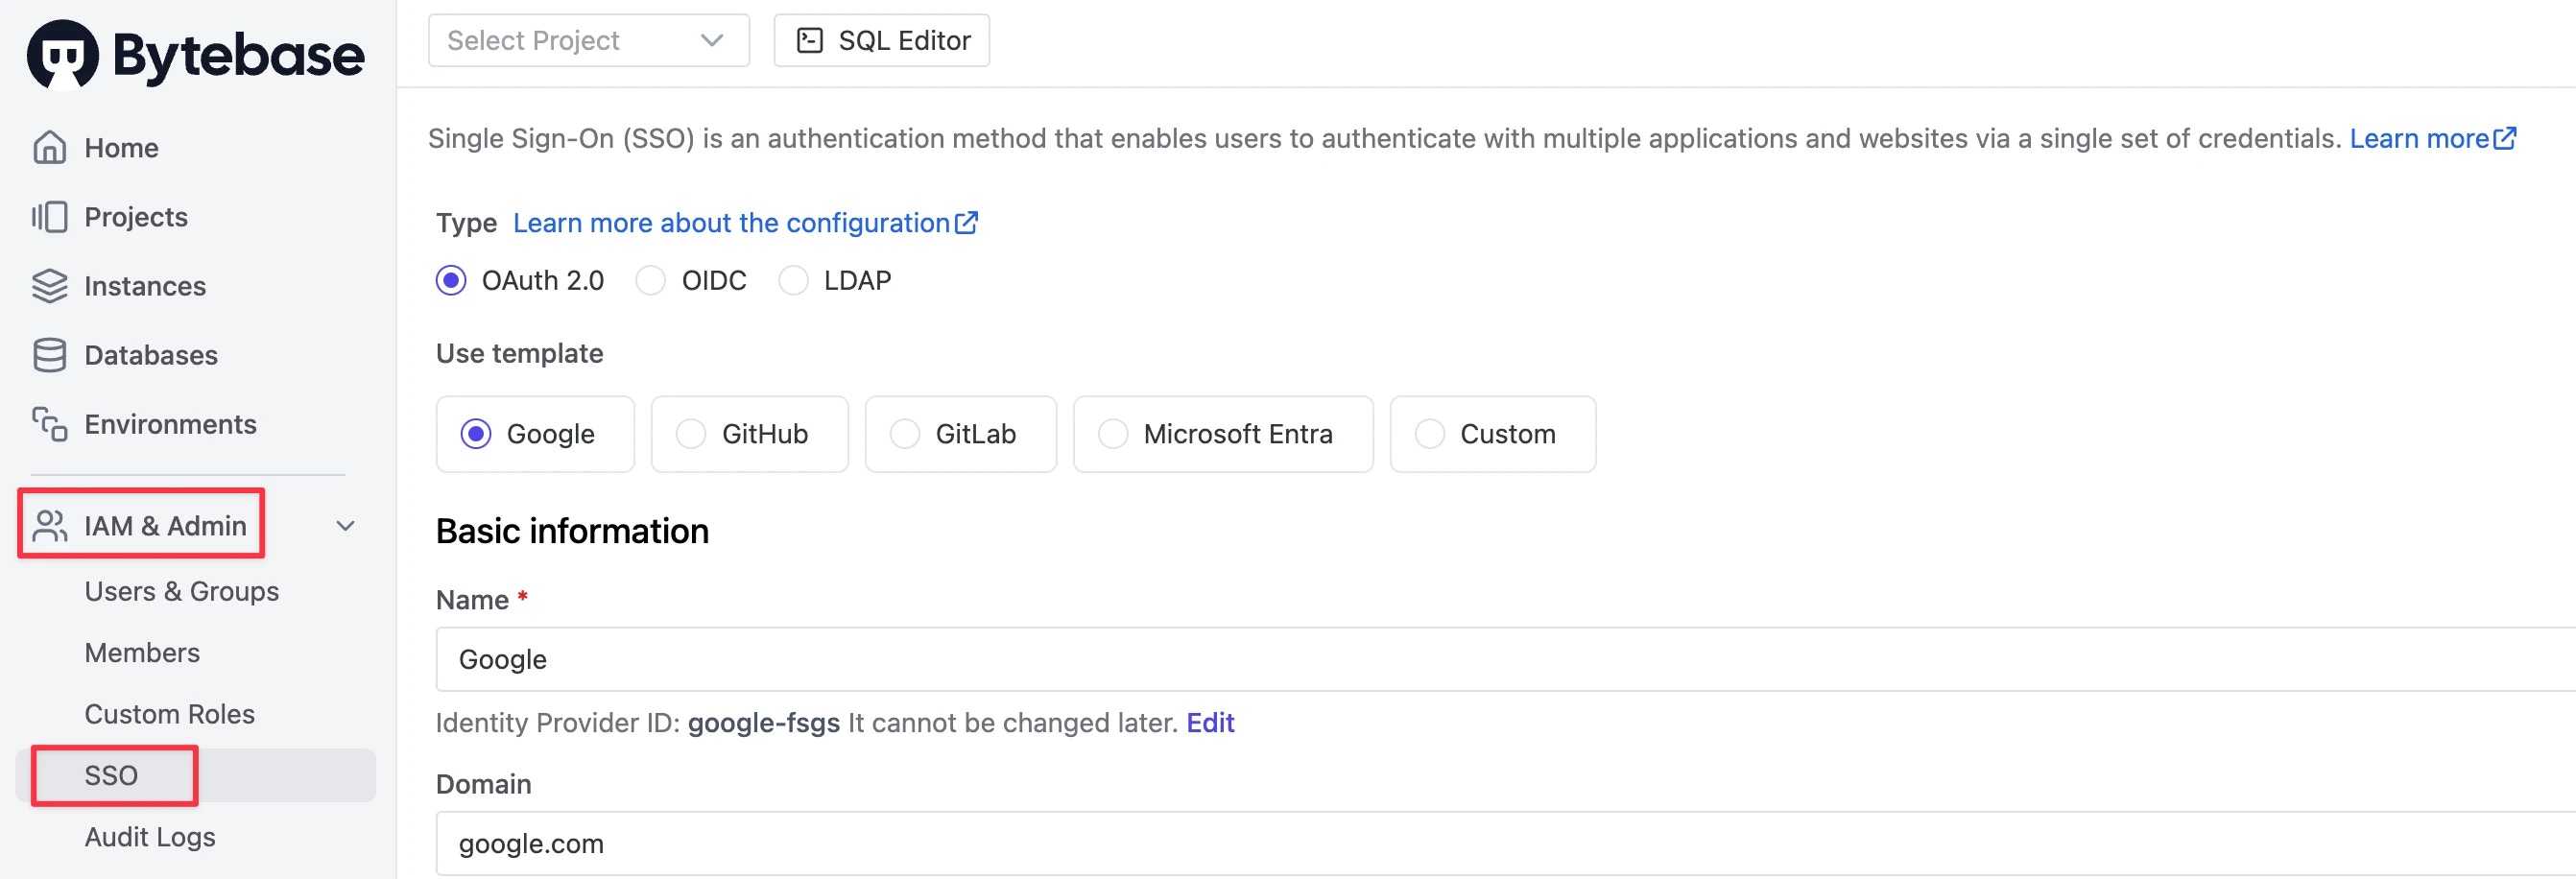 * **Name**: the display name shown to your users (e.g. `Google` will be shown as `Sign in with Google`)
* **Identity Provider ID**: a human-readable unique string, only lower-case alphabets and hyphens are allowed (e.g. `google-fsgs`)
* **Domain**: the domain name to scope associated users (e.g. `google.com`, optional)
### Identity provider information
The information is the base concept of [OAuth 2.0](https://oauth.net/2) and comes from your provider.
* **Name**: the display name shown to your users (e.g. `Google` will be shown as `Sign in with Google`)
* **Identity Provider ID**: a human-readable unique string, only lower-case alphabets and hyphens are allowed (e.g. `google-fsgs`)
* **Domain**: the domain name to scope associated users (e.g. `google.com`, optional)
### Identity provider information
The information is the base concept of [OAuth 2.0](https://oauth.net/2) and comes from your provider.
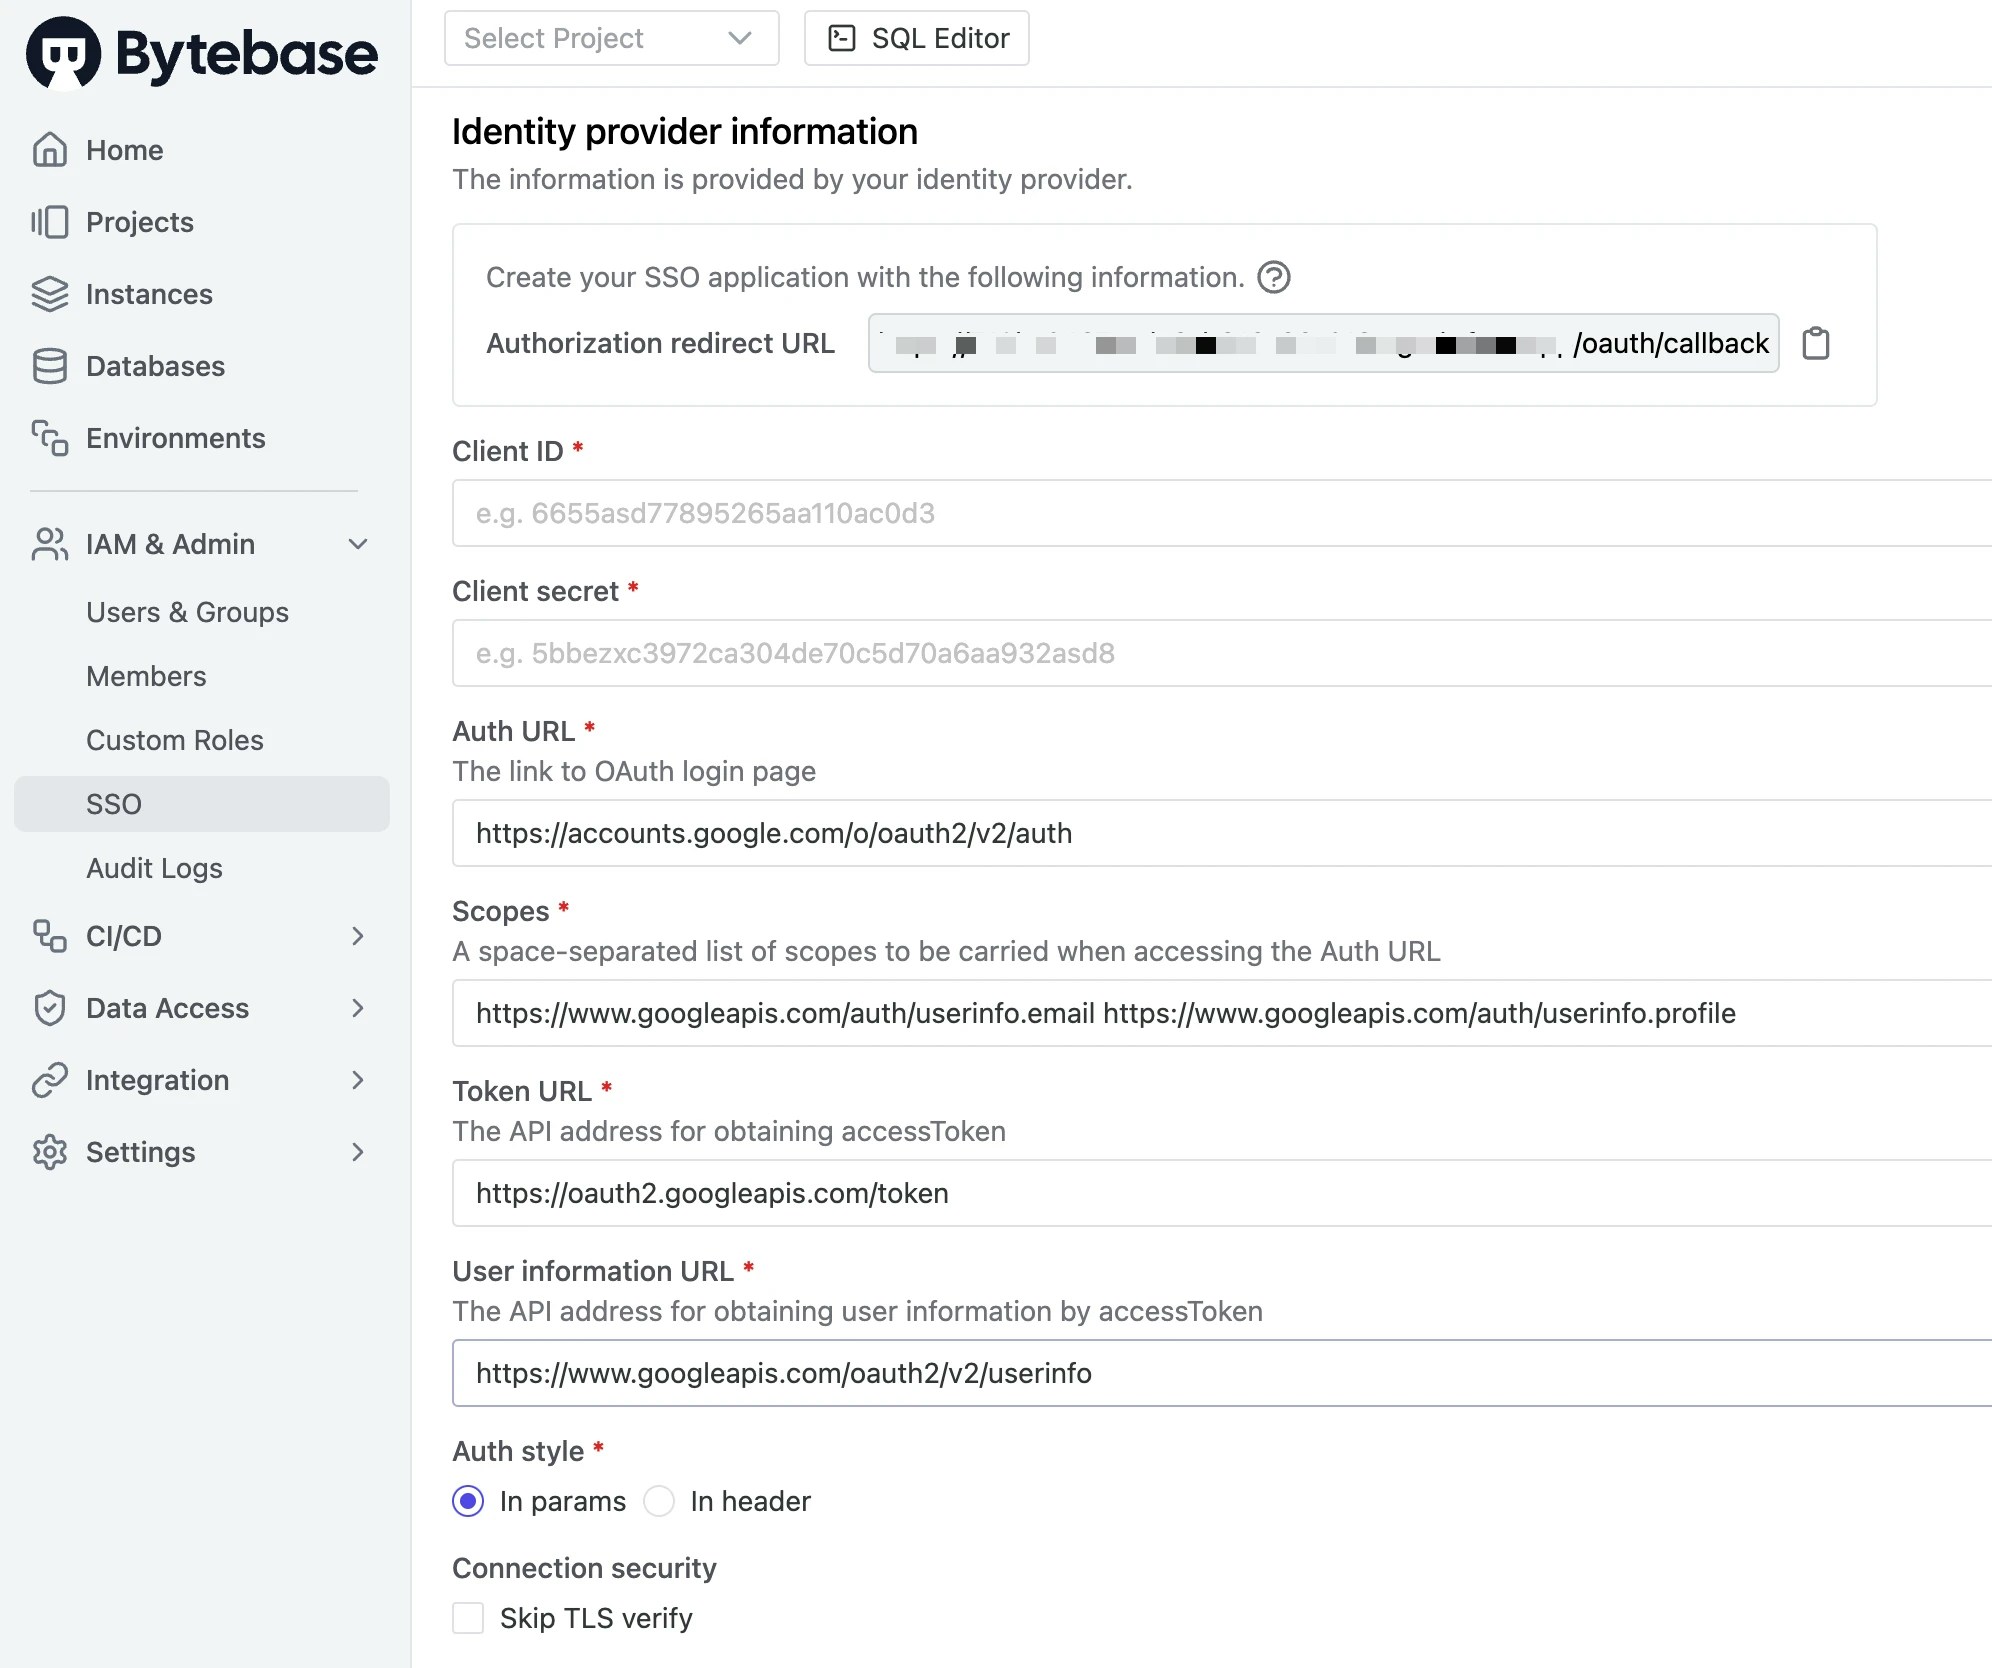 * **Client ID** is a public identifier of the custom provider;
* **Client Secret** is the OAuth2 client secret from identity provider;
* **Auth URL** is the custom provider's OAuth2 login page address;
* **Scopes** is the scope parameter carried when accessing the OAuth2 URL, which is filled in according to the custom provider;
* **Token URL** is the API address for obtaining access token;
* **User information URL** is the API address for obtaining user information by access token;
* **Auth style** specifies how the endpoint wants the client ID & client secret sent.
* **In params**: The `client_id` and `client_secret` will be sending in the POST body as application/x-www-form-urlencoded parameters.
* **In header**: The `client_id` and `client_secret` will be sending in HTTP Basic Authorization. This is an optional style described in the OAuth2 RFC 6749 section 2.3.1.
### User information mapping
For different providers, the structures returned by their user information API are usually not the same. That's why you need to fill an information mapping form for mapping user information into Bytebase user fields.
Bytebase uses the mapping to import user profile fields when creating new accounts.
The most important information is `Bytebase user's email`. It identifies the Bytebase account associated with the OAuth 2.0 login.
* **Client ID** is a public identifier of the custom provider;
* **Client Secret** is the OAuth2 client secret from identity provider;
* **Auth URL** is the custom provider's OAuth2 login page address;
* **Scopes** is the scope parameter carried when accessing the OAuth2 URL, which is filled in according to the custom provider;
* **Token URL** is the API address for obtaining access token;
* **User information URL** is the API address for obtaining user information by access token;
* **Auth style** specifies how the endpoint wants the client ID & client secret sent.
* **In params**: The `client_id` and `client_secret` will be sending in the POST body as application/x-www-form-urlencoded parameters.
* **In header**: The `client_id` and `client_secret` will be sending in HTTP Basic Authorization. This is an optional style described in the OAuth2 RFC 6749 section 2.3.1.
### User information mapping
For different providers, the structures returned by their user information API are usually not the same. That's why you need to fill an information mapping form for mapping user information into Bytebase user fields.
Bytebase uses the mapping to import user profile fields when creating new accounts.
The most important information is `Bytebase user's email`. It identifies the Bytebase account associated with the OAuth 2.0 login.
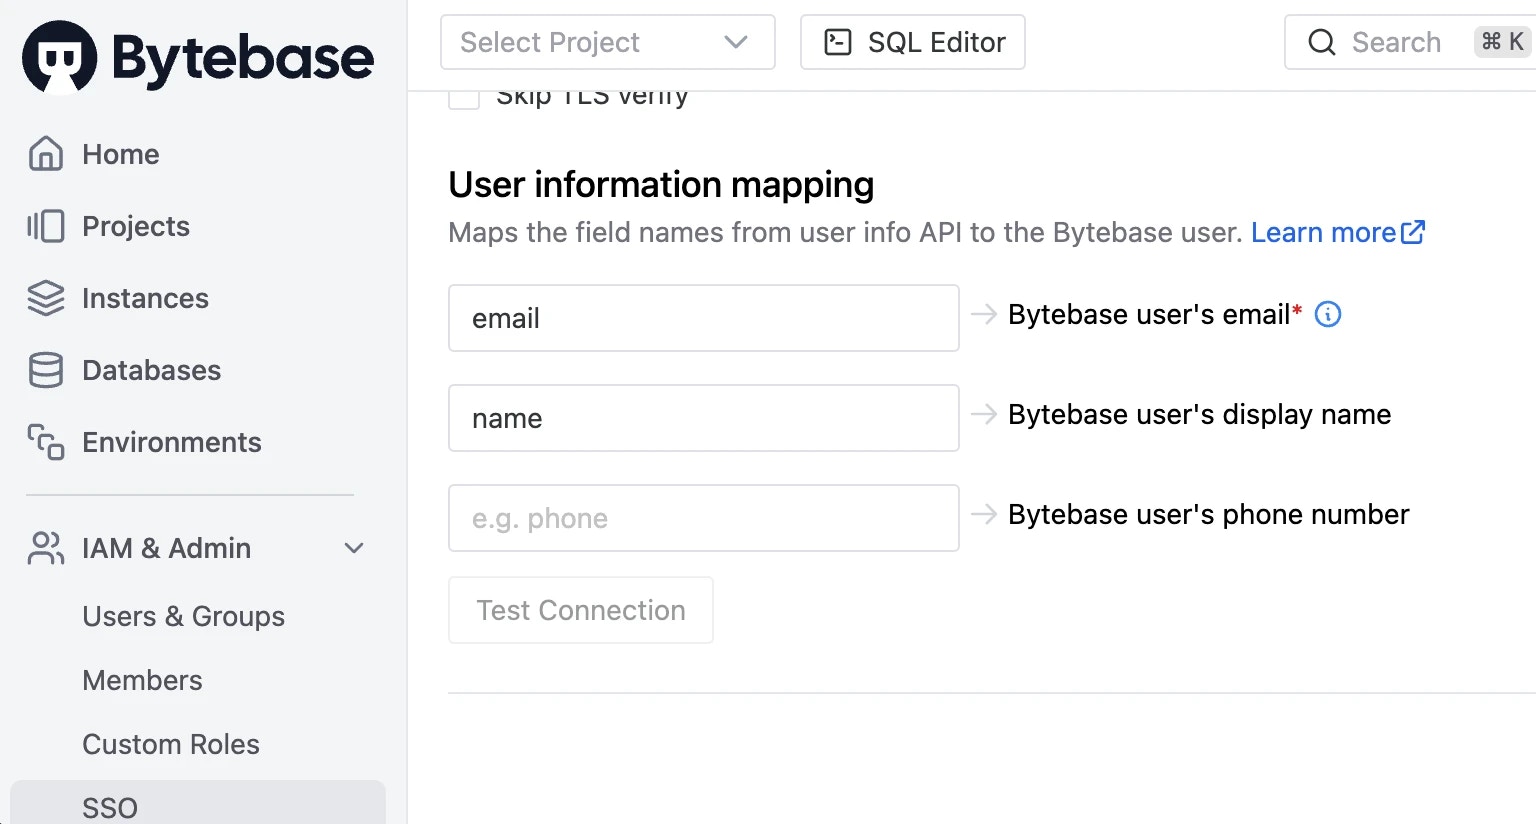 * **Email** is the field name of primary email in 3rd-party user info;
* **DisplayName** is the field name of display name in 3rd-party user info (optional);
- **Phone**: is the field name of phone number in 3rd-party user info (optional).
## Built-in OAuth Provider
OAuth 2.0 usually requires an authorization callback url in the configuration. Please make sure the [`--external-url`](/get-started/self-host/external-url) is set correctly.
If you start Bytebase with `--external-url http://bytebase.example.com`, then the **authorization callback URL** will be `http://bytebase.example.com/oauth/callback`.
Bytebase provides templates for configuring built-in OAuth providers.
### Google
1. Follow the [Using OAuth 2.0 to Access Google APIs](https://developers.google.com/identity/protocols/oauth2) to create OAuth 2.0 client credentials in [Google API Console](https://console.developers.google.com/).
* **Email** is the field name of primary email in 3rd-party user info;
* **DisplayName** is the field name of display name in 3rd-party user info (optional);
- **Phone**: is the field name of phone number in 3rd-party user info (optional).
## Built-in OAuth Provider
OAuth 2.0 usually requires an authorization callback url in the configuration. Please make sure the [`--external-url`](/get-started/self-host/external-url) is set correctly.
If you start Bytebase with `--external-url http://bytebase.example.com`, then the **authorization callback URL** will be `http://bytebase.example.com/oauth/callback`.
Bytebase provides templates for configuring built-in OAuth providers.
### Google
1. Follow the [Using OAuth 2.0 to Access Google APIs](https://developers.google.com/identity/protocols/oauth2) to create OAuth 2.0 client credentials in [Google API Console](https://console.developers.google.com/).
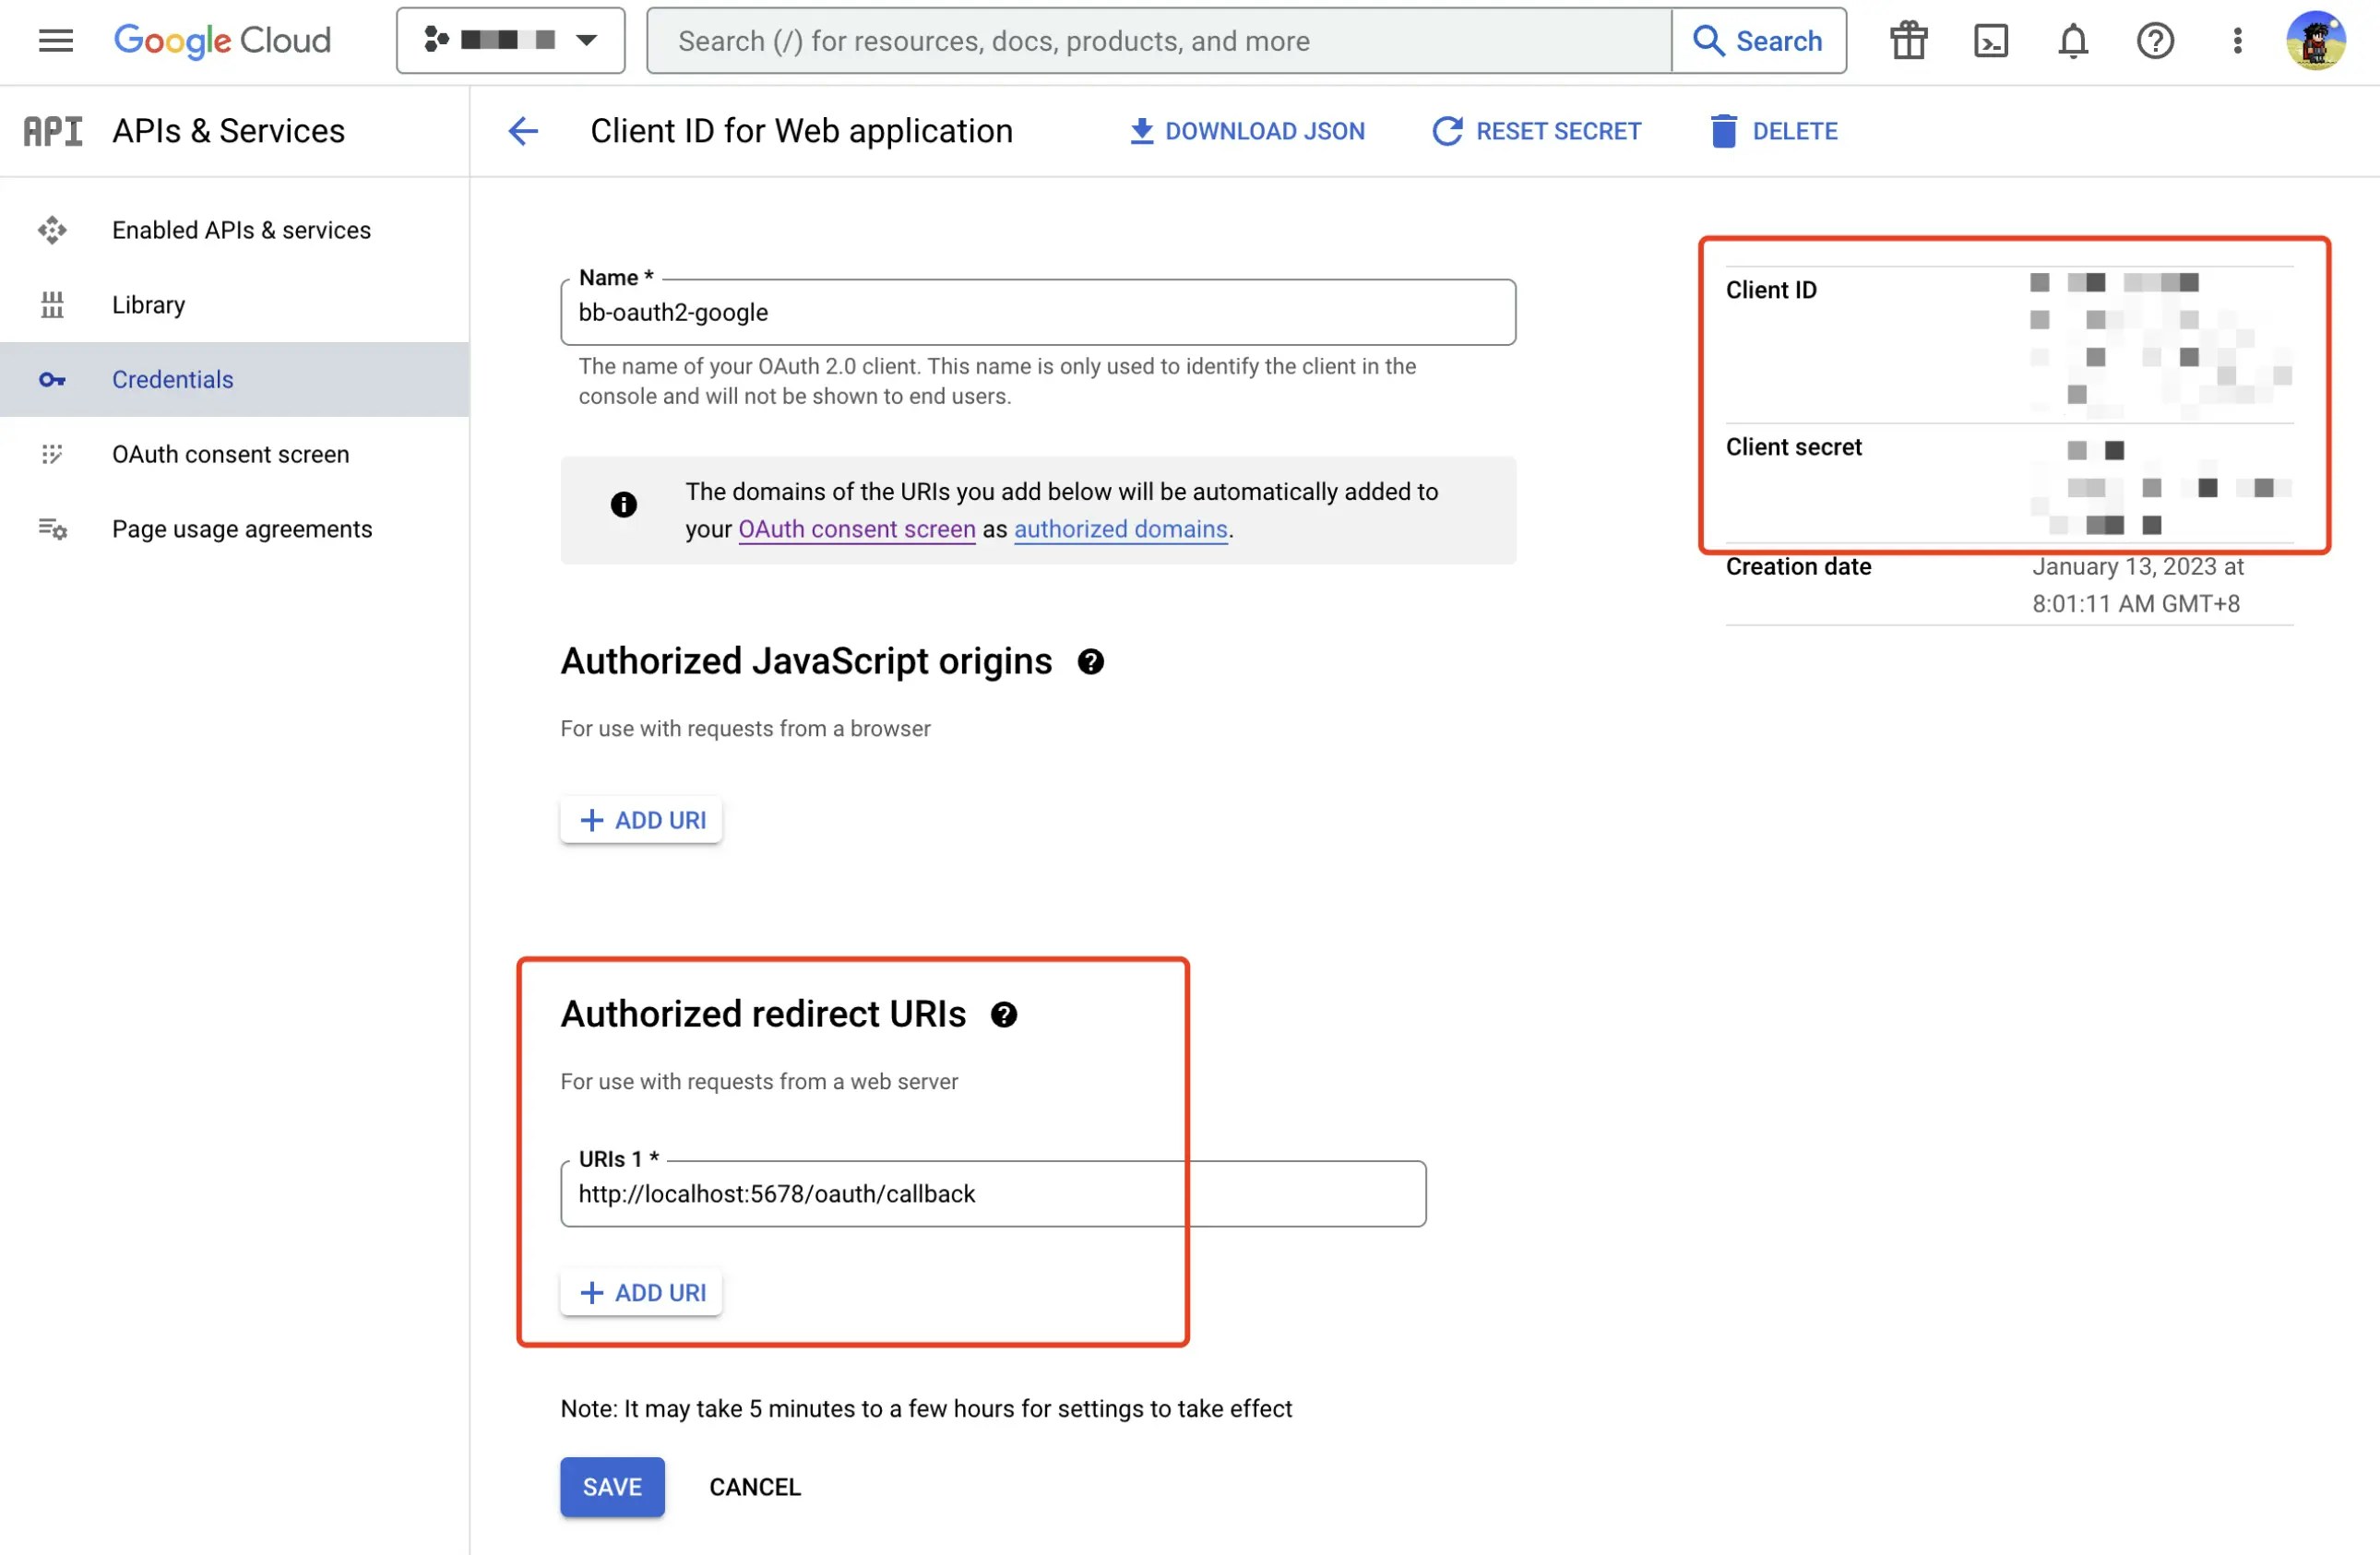 2. Open creating SSO dialog and select the **Google** template.
3. Update the **Client ID** and **Client secret** fields with the OAuth 2.0 client credential you just created.
4. After filling in all the required fields, try to click **Test connection**.
5. If everything is OK, click the **Create** button.
### GitHub
1. Follow [Creating an OAuth App in GitHub](https://docs.github.com/en/developers/apps/building-oauth-apps/creating-an-oauth-app) to create an OAuth app in GitHub, where you replace `YOUR_EXTERNAL_URL` in the image below with the external URL you [configured](https://www.bytebase.com/docs/get-started/self-host/external-url) in Bytebase Workspace.
2. Open creating SSO dialog and select the **Google** template.
3. Update the **Client ID** and **Client secret** fields with the OAuth 2.0 client credential you just created.
4. After filling in all the required fields, try to click **Test connection**.
5. If everything is OK, click the **Create** button.
### GitHub
1. Follow [Creating an OAuth App in GitHub](https://docs.github.com/en/developers/apps/building-oauth-apps/creating-an-oauth-app) to create an OAuth app in GitHub, where you replace `YOUR_EXTERNAL_URL` in the image below with the external URL you [configured](https://www.bytebase.com/docs/get-started/self-host/external-url) in Bytebase Workspace.
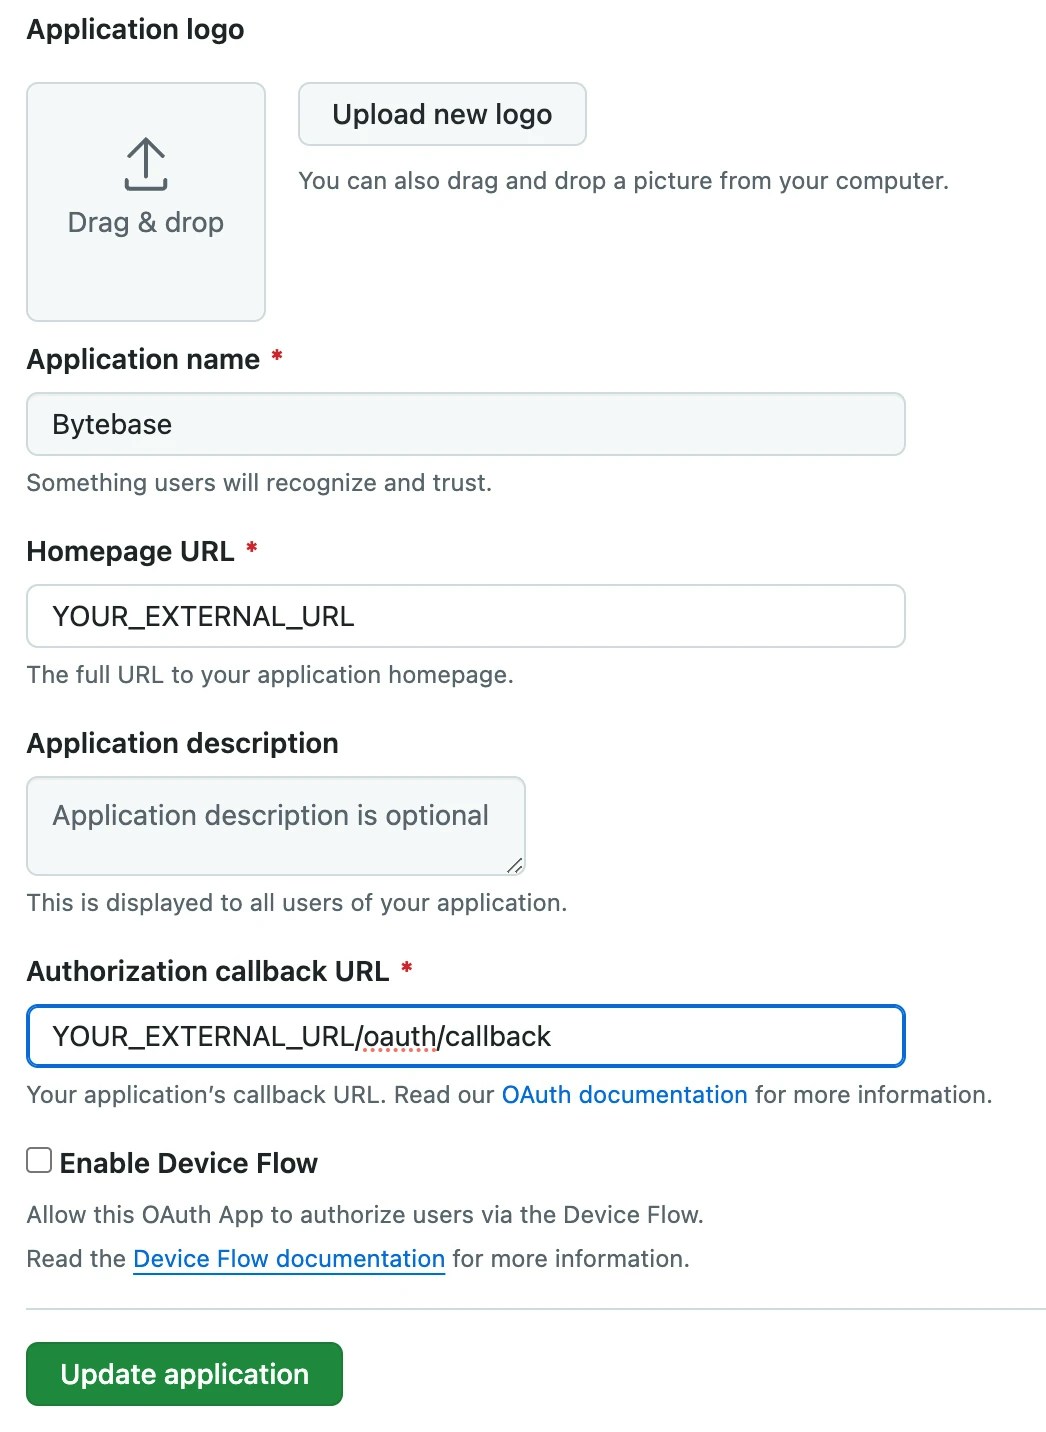 2. Open creating SSO dialog and select the **GitHub** template.
3. Update the **Client ID** and **Client secret** fields with the GitHub OAuth App you just created.
4. After filling in all the required fields, try to click **Test connection**.
5. If everything is OK, click the **Create** button.
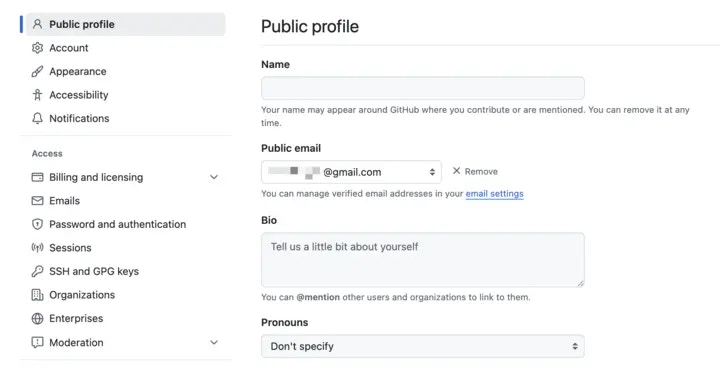
6. Go to your GitHub [Public profile](https://github.com/settings/profile), make sure your **Public email** is set to the email you intend to use for SSO. Otherwise, the SSO will not work.
2. Open creating SSO dialog and select the **GitHub** template.
3. Update the **Client ID** and **Client secret** fields with the GitHub OAuth App you just created.
4. After filling in all the required fields, try to click **Test connection**.
5. If everything is OK, click the **Create** button.
6. Go to your GitHub [Public profile](https://github.com/settings/profile), make sure your **Public email** is set to the email you intend to use for SSO. Otherwise, the SSO will not work.
 ### GitLab
1. Follow [Configure GitLab as an OAuth 2.0 authentication identity provider](https://docs.gitlab.com/ee/integration/oauth_provider.html) to create an OAuth 2 application in GitLab.
### GitLab
1. Follow [Configure GitLab as an OAuth 2.0 authentication identity provider](https://docs.gitlab.com/ee/integration/oauth_provider.html) to create an OAuth 2 application in GitLab.
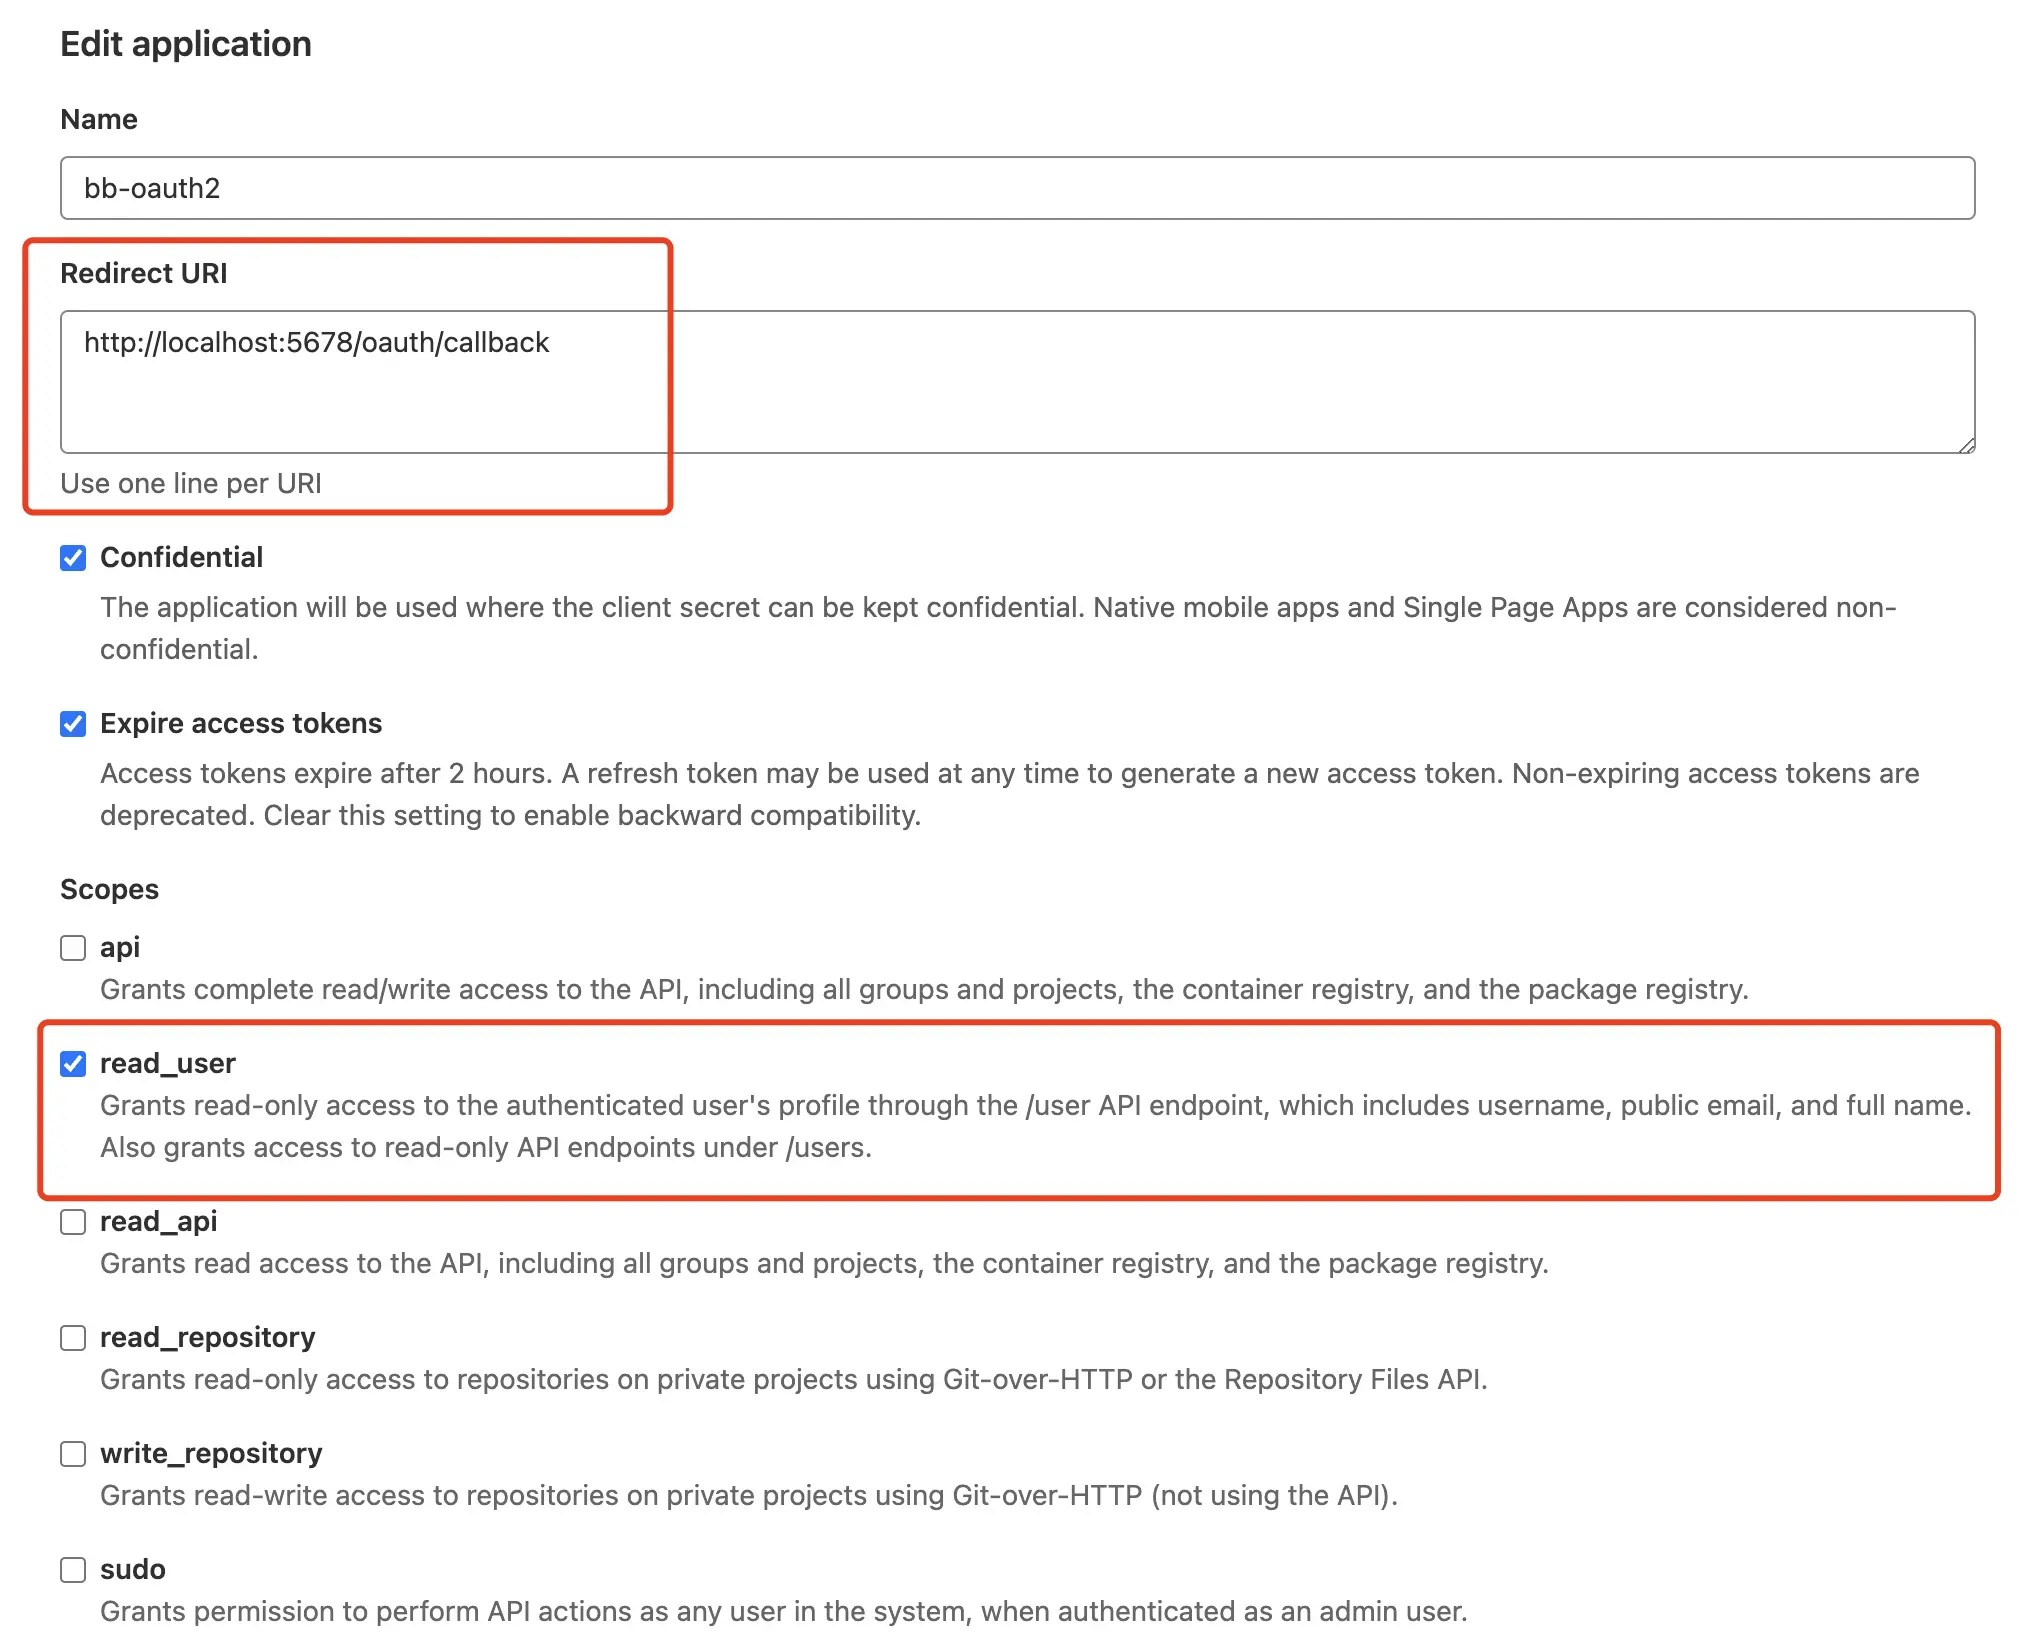 2. Open creating SSO dialog and select the **GitLab** template.
3. Update the **Client ID** and **Client secret** fields with the GitLab OAuth 2 application you just created.
4. After filling in all the required fields, try to click **Test connection**.
5. If everything is OK, click the **Create** button.
### Microsoft Entra (Azure AD)
1. Follow the [Register an application with the Microsoft identity platform](https://learn.microsoft.com/en-us/entra/identity-platform/quickstart-register-app) to create an Application in [Microsoft Entra admin center](https://entra.microsoft.com/).
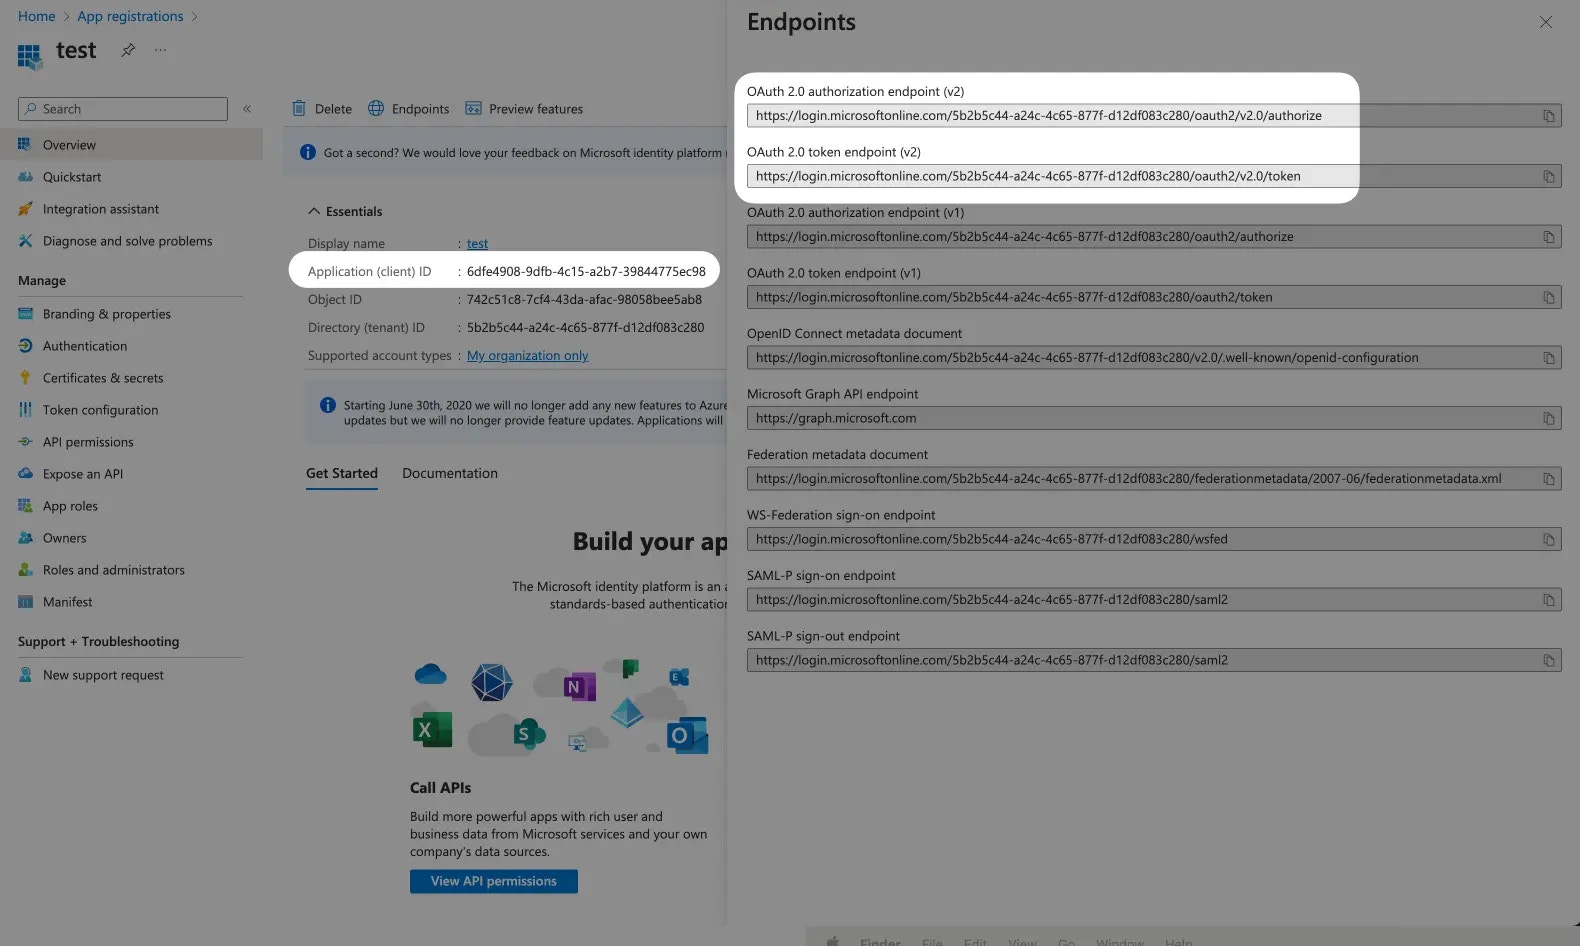
2. Note the **Application ID** for later use. Click the **Endpoints** tab and note both the **OAuth 2.0 authorization endpoint** and **OAuth 2.0 token endpoint**.
2. Open creating SSO dialog and select the **GitLab** template.
3. Update the **Client ID** and **Client secret** fields with the GitLab OAuth 2 application you just created.
4. After filling in all the required fields, try to click **Test connection**.
5. If everything is OK, click the **Create** button.
### Microsoft Entra (Azure AD)
1. Follow the [Register an application with the Microsoft identity platform](https://learn.microsoft.com/en-us/entra/identity-platform/quickstart-register-app) to create an Application in [Microsoft Entra admin center](https://entra.microsoft.com/).
2. Note the **Application ID** for later use. Click the **Endpoints** tab and note both the **OAuth 2.0 authorization endpoint** and **OAuth 2.0 token endpoint**.
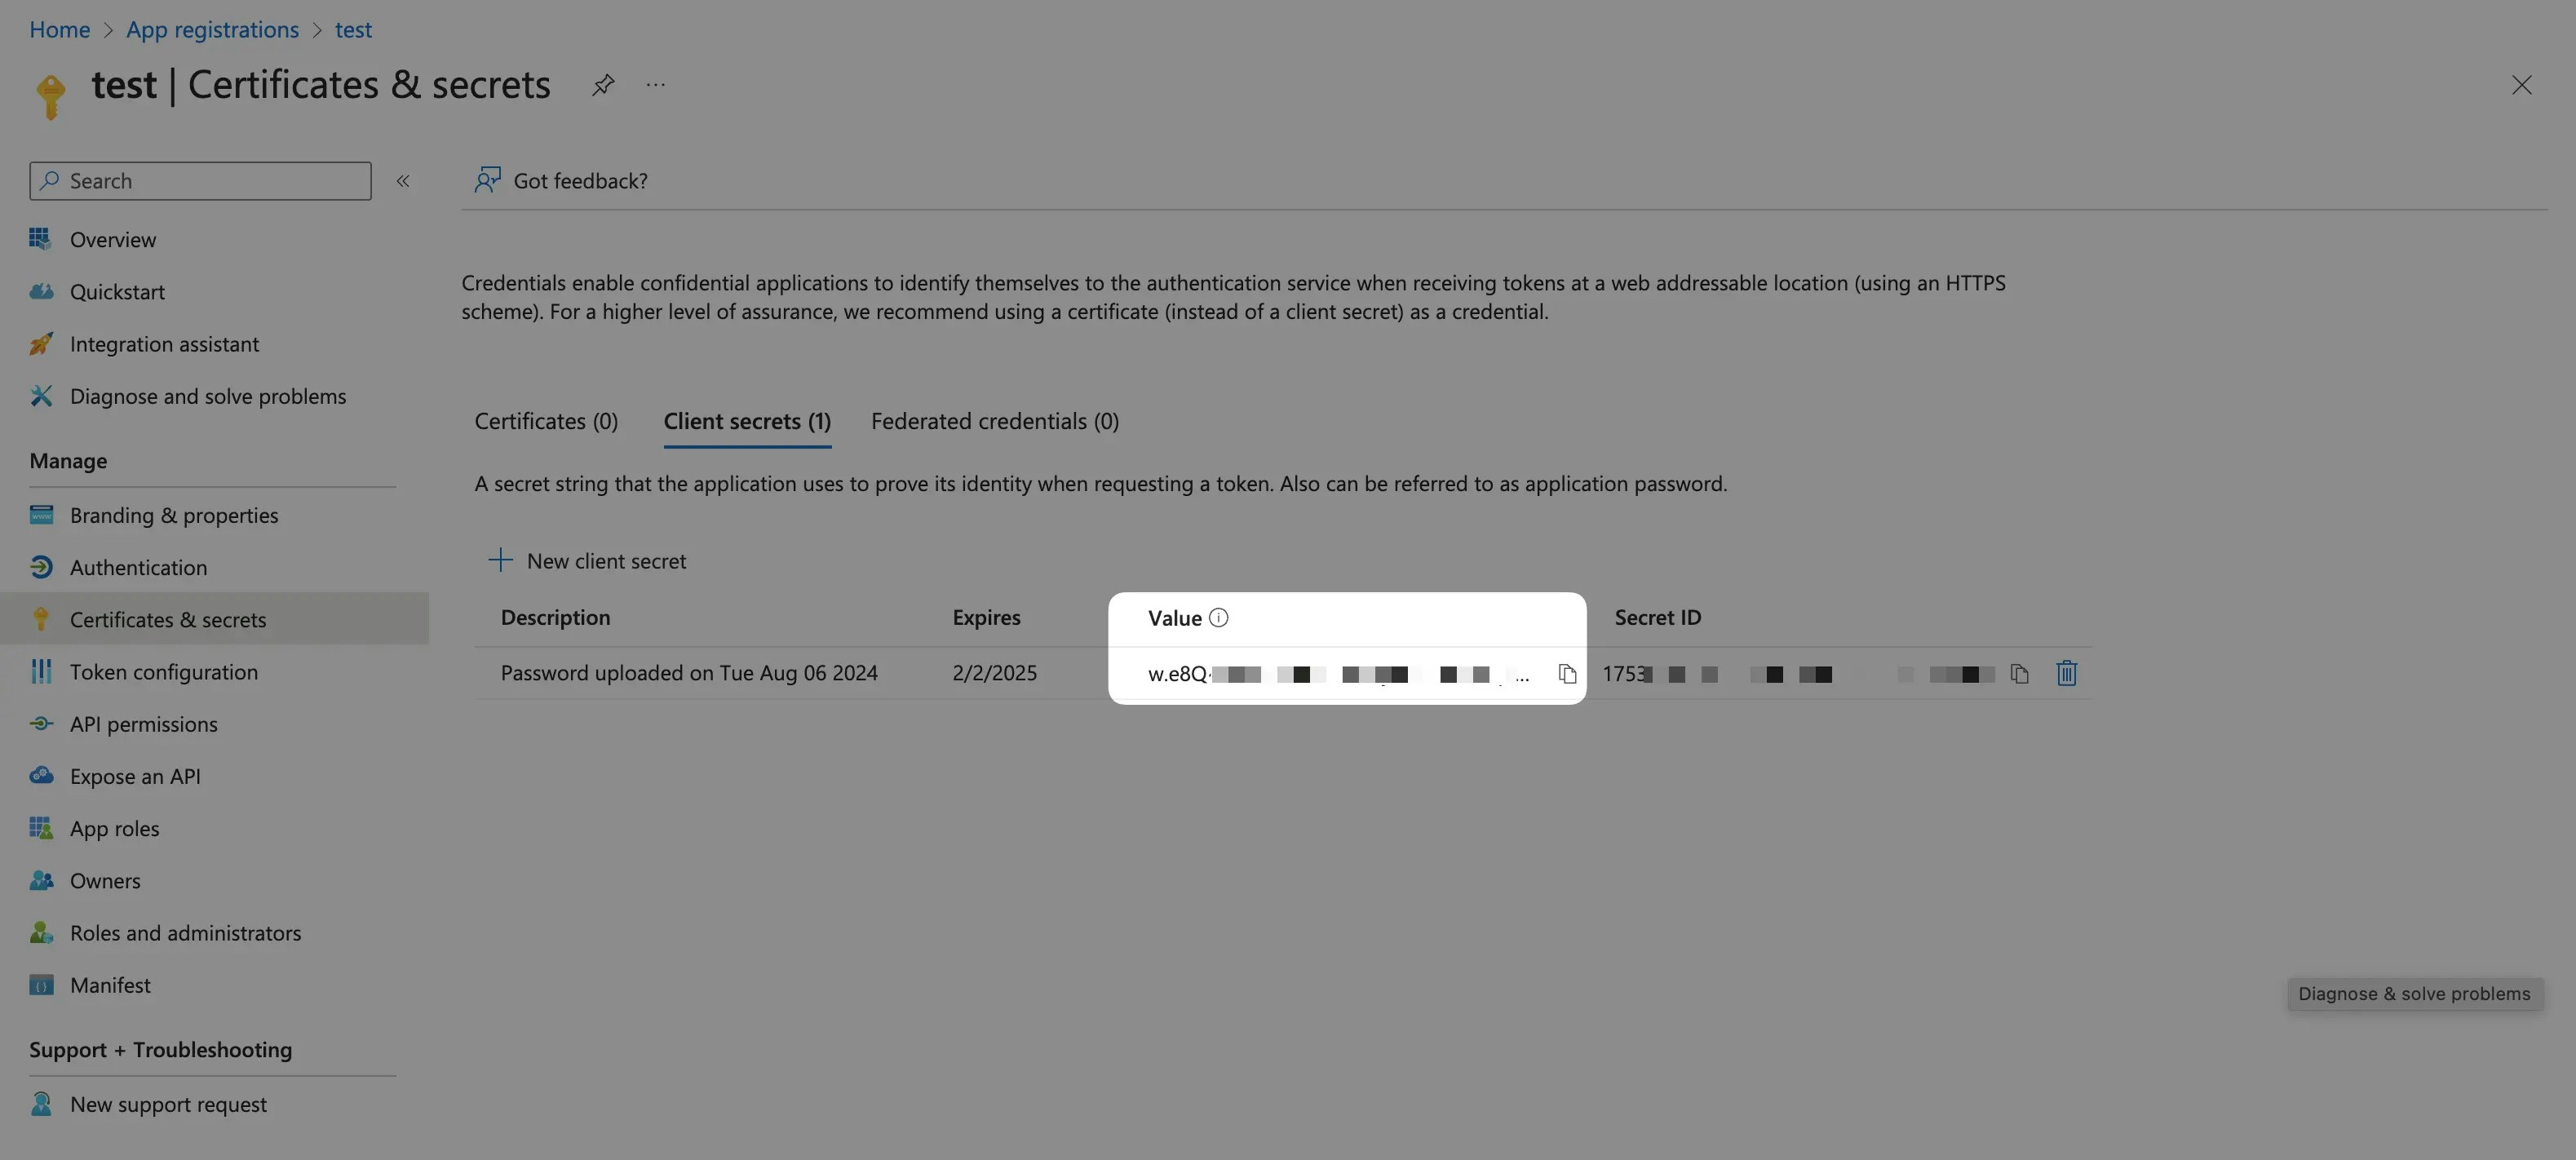
 3. Create a client secret in the **Client credentials** tab and note the **Value** for later use.
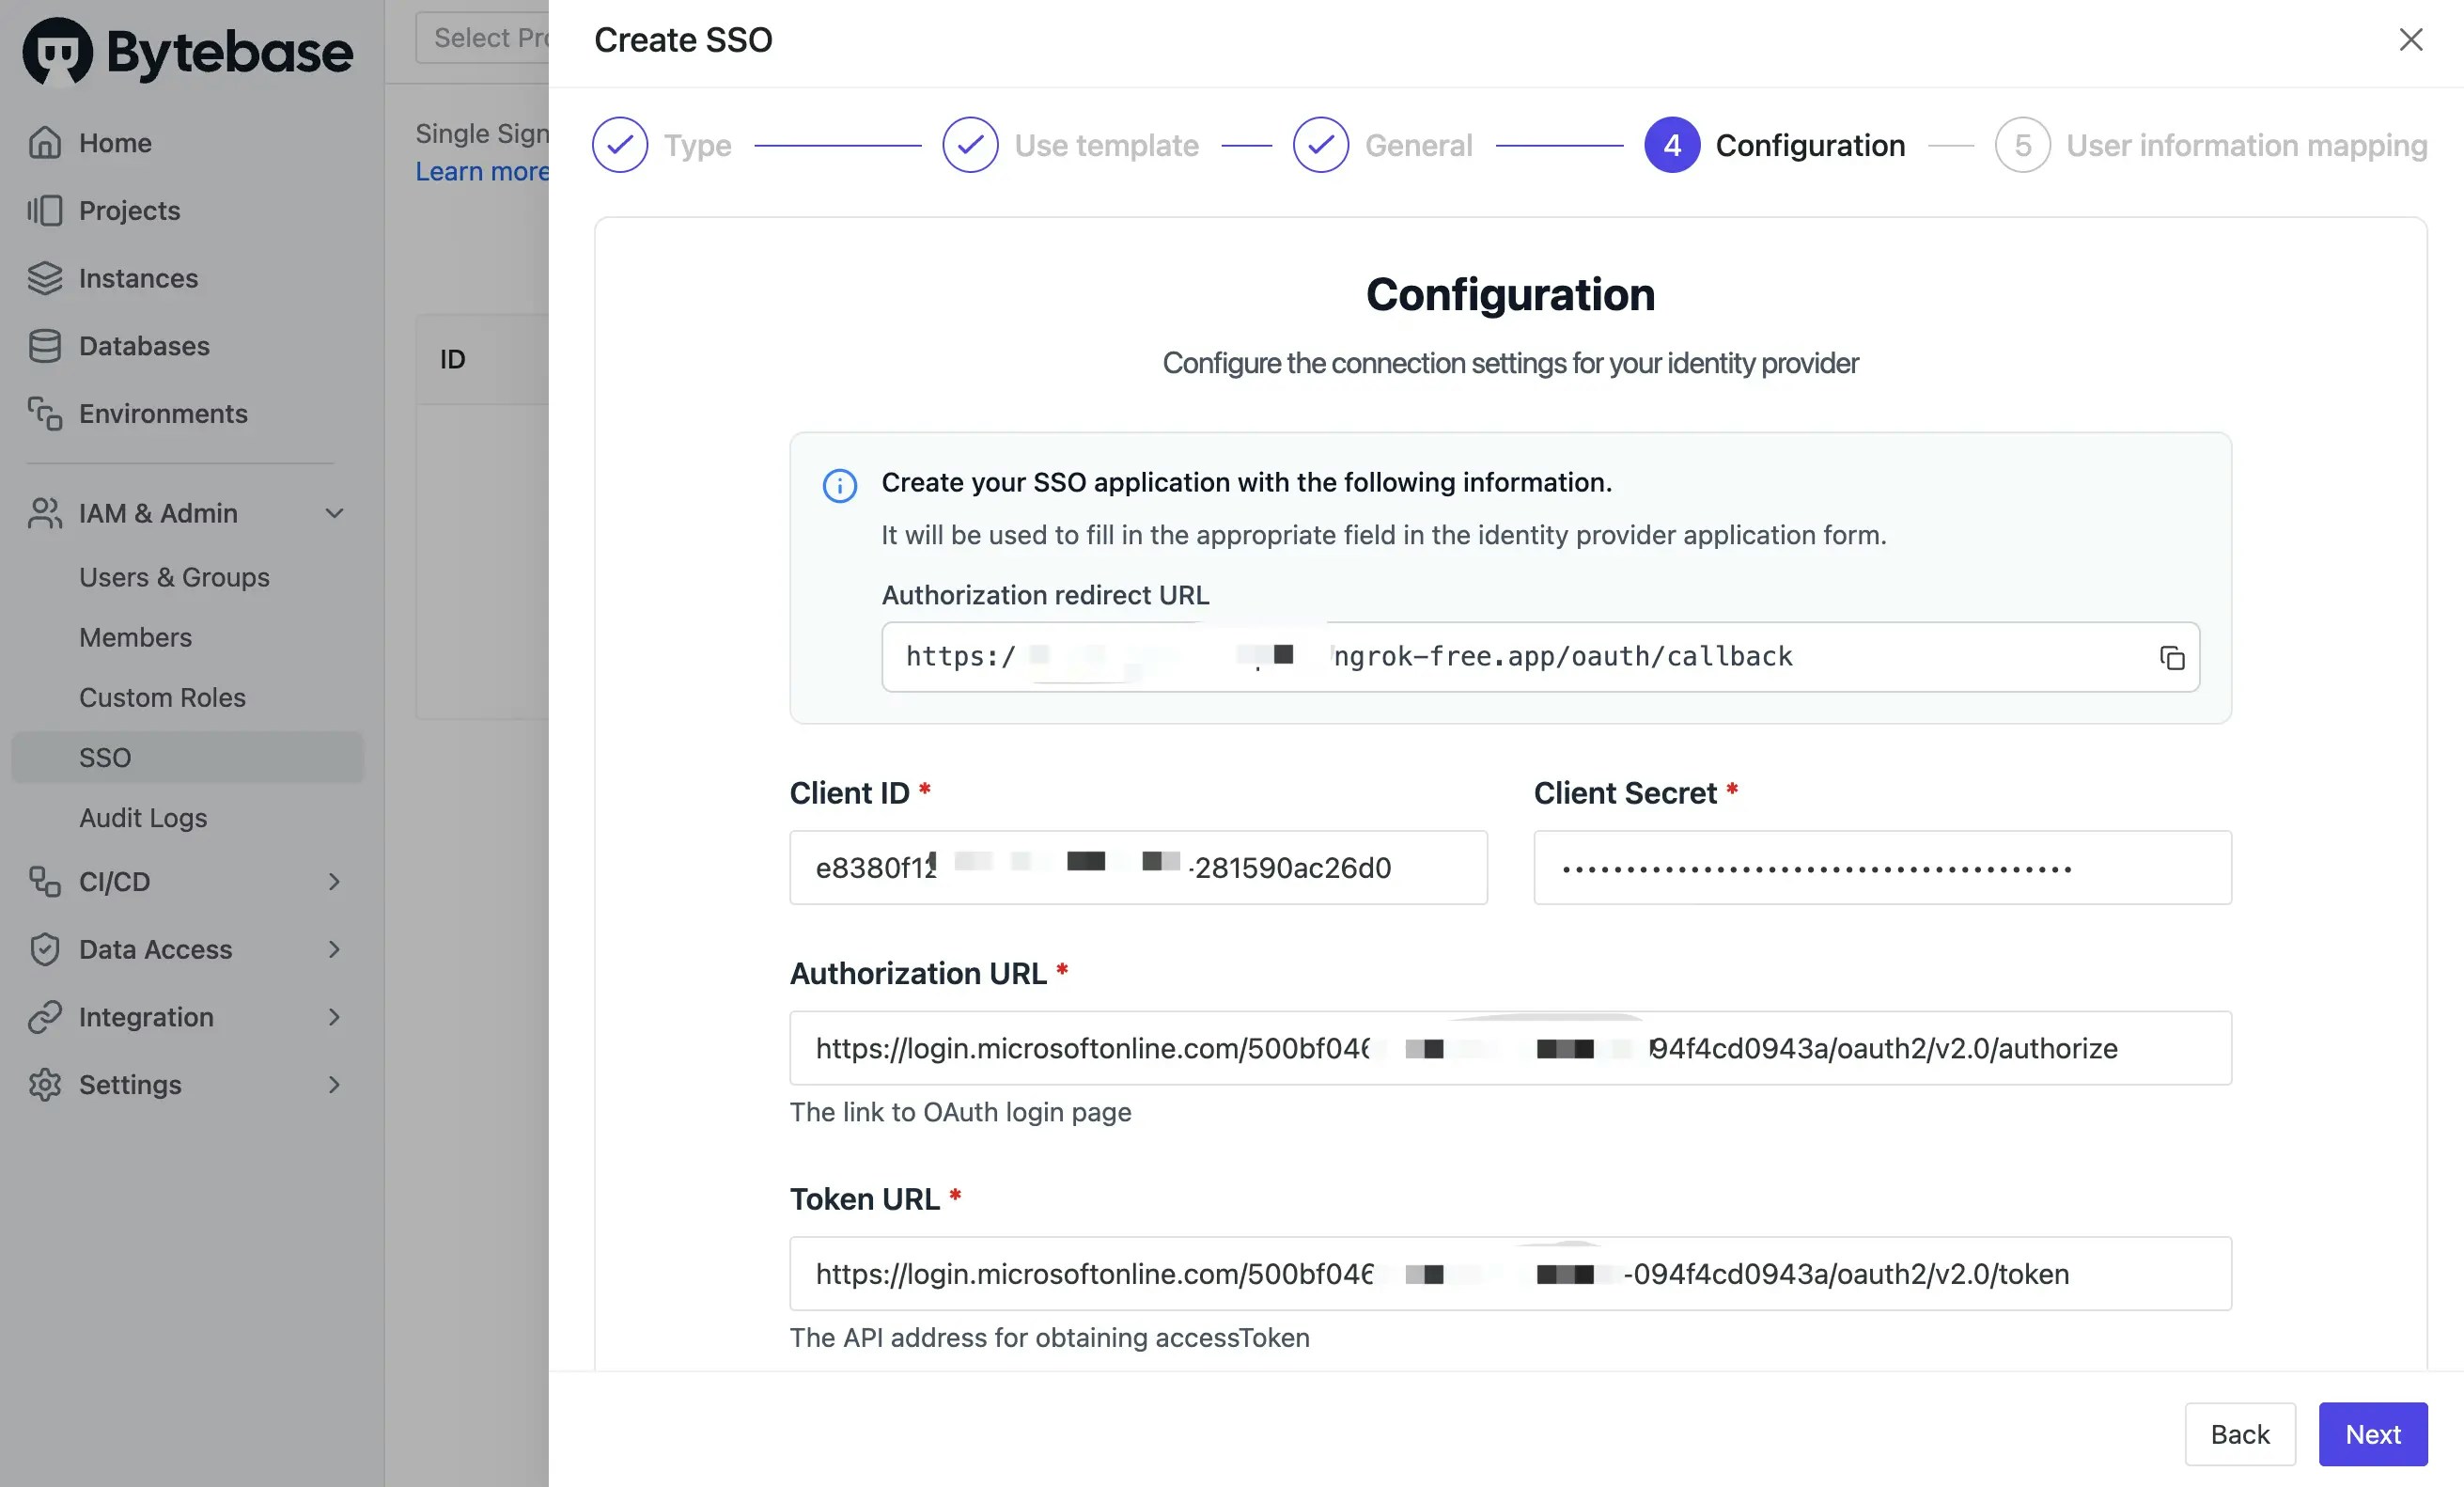
 4. Click **IAM & Admin > SSO** in Bytebase workspace, then click **+ Create SSO**. Choose **OAuth 2.0** and select **Microsoft Entra** template.
5. Name it as you want, update the **Client ID**, **Client secret** and the **Endpoints** fields with the OAuth 2.0 client credential you just created.
4. Click **IAM & Admin > SSO** in Bytebase workspace, then click **+ Create SSO**. Choose **OAuth 2.0** and select **Microsoft Entra** template.
5. Name it as you want, update the **Client ID**, **Client secret** and the **Endpoints** fields with the OAuth 2.0 client credential you just created.
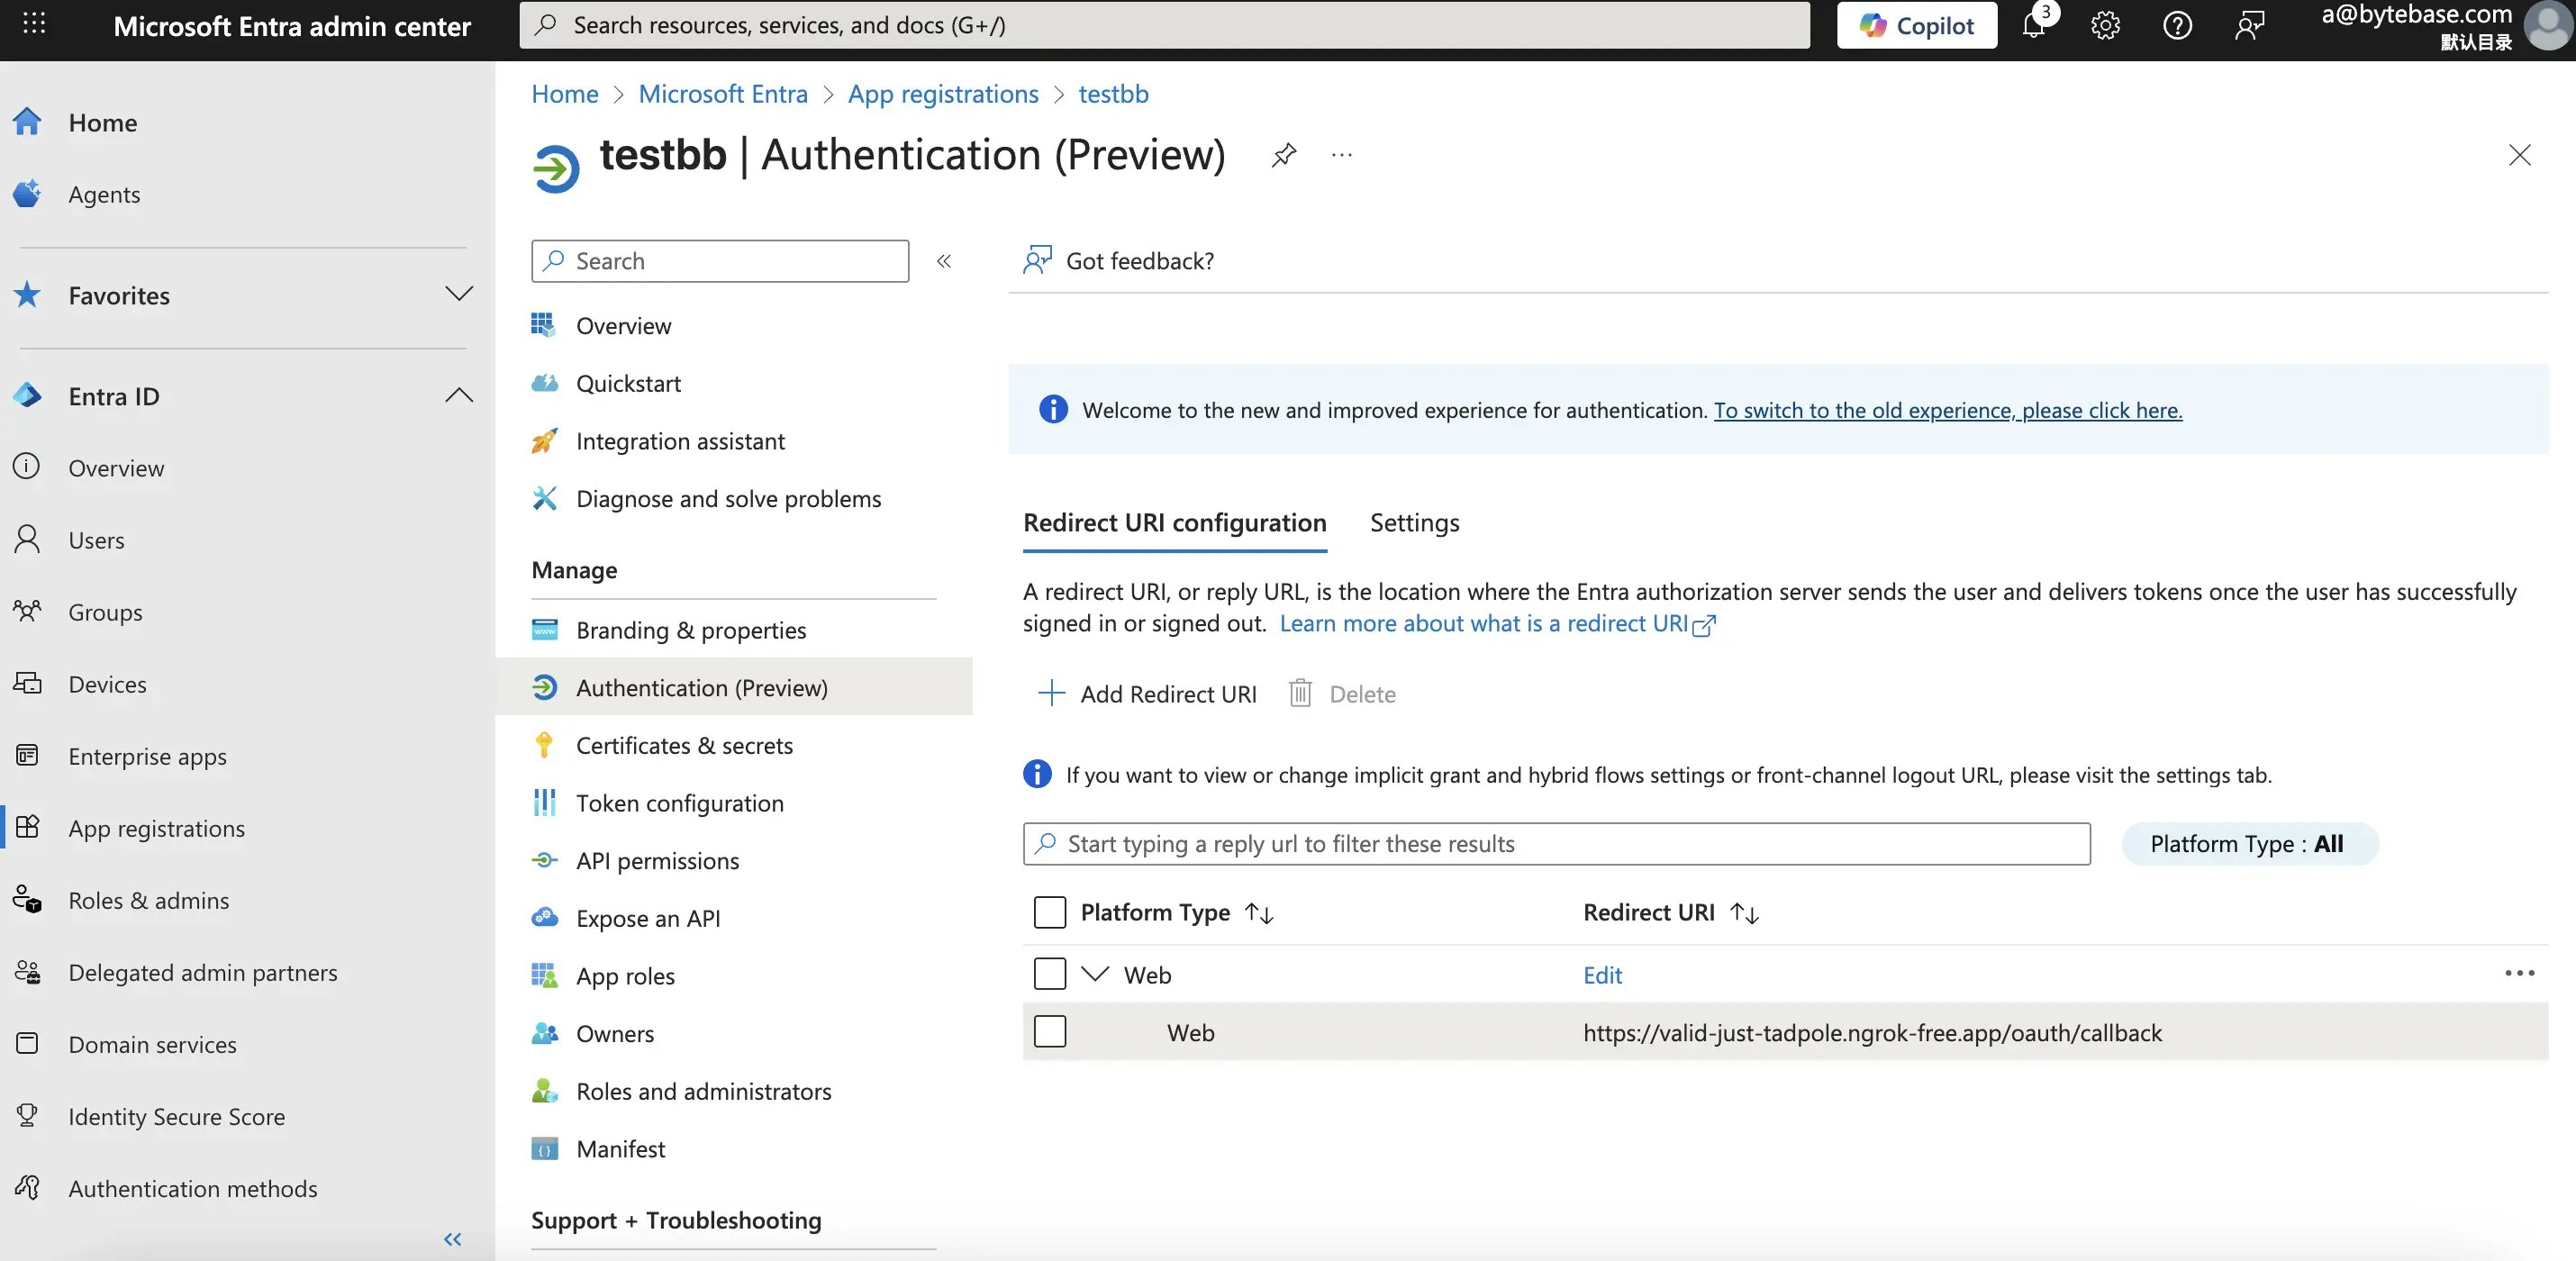
 6. We will need to copy the **Authorization Redirect URL** and add it back to the **Redirect URIs** in the Microsoft Entra application.
 7. After filling in all the required fields, try to click **Test connection**.
8. If everything is OK, click the **Create** button.
7. After filling in all the required fields, try to click **Test connection**.
8. If everything is OK, click the **Create** button.