> ## Documentation Index
> Fetch the complete documentation index at: https://docs.bytebase.com/llms.txt
> Use this file to discover all available pages before exploring further.
# Webhook
User can configure project-level webhooks to let Bytebase post messages to the configured webhook endpoint upon various events.
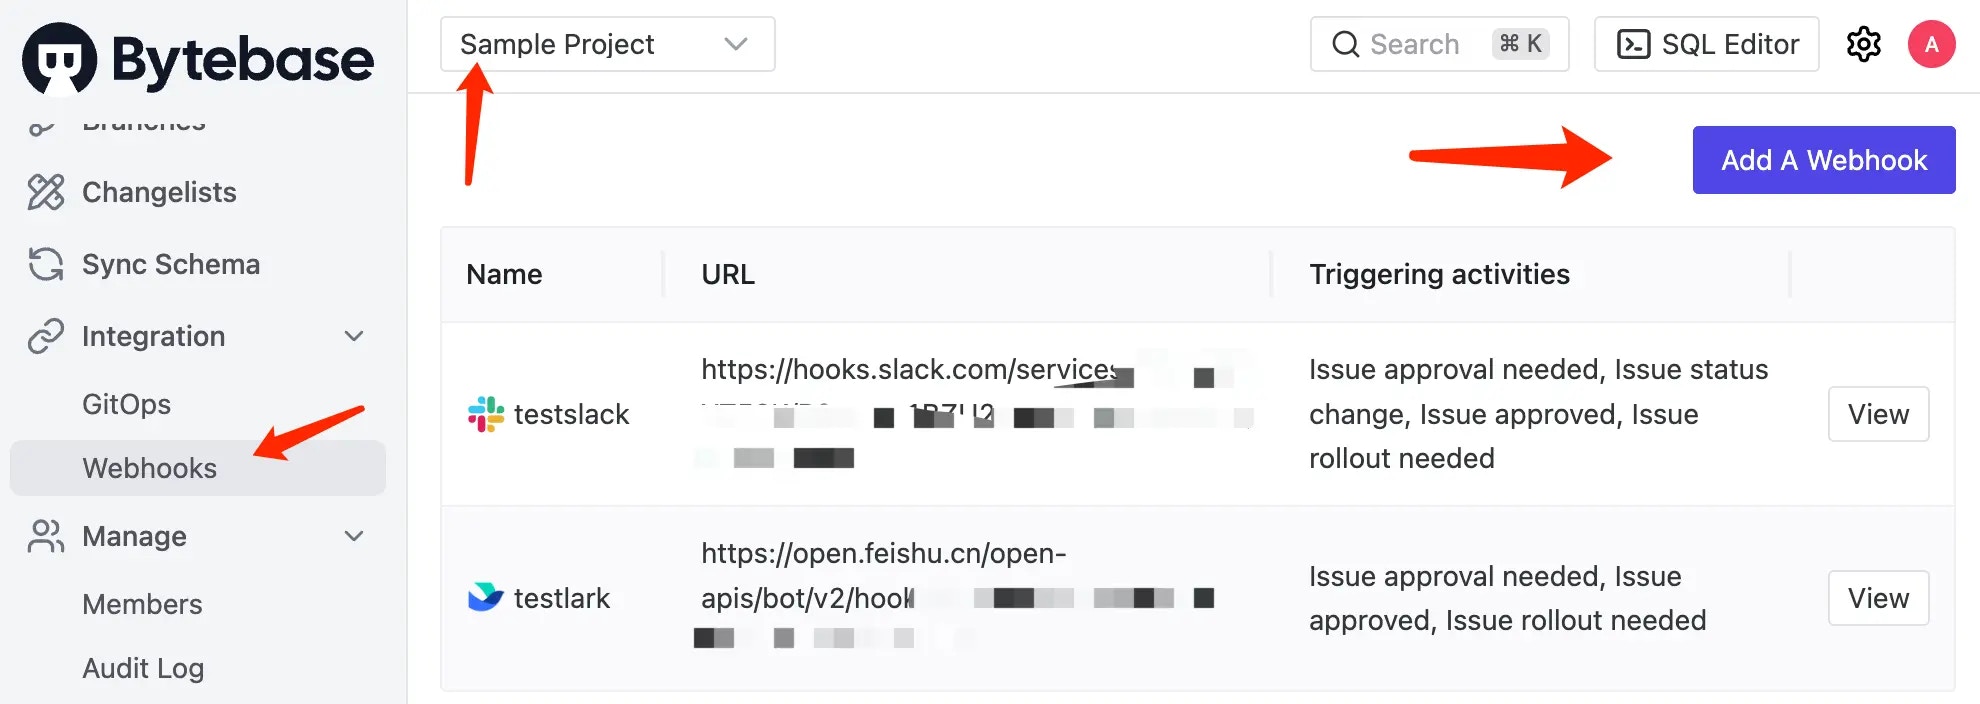 ## Supported events
* `Issue created` - Post message when a new issue has been created.
* `Issue approval requested` - Post message when an approval request has been made.
* `Issue sent back` - Post message when an issue has been sent back by an approver.
* `Pipeline failed` - Post message when a pipeline has failed.
* `Pipeline completed` - Post message when a pipeline has completed successfully.
### Direct message
With `Direct Message` enabled, Bytebase delivers messages to matched users; if none match, it falls back to the configured webhook.
The following events support sending direct messages/notifications to related users, make sure you have:
1. enabled the `Enable direct messages` option to enable this feature.
2. configured the `IM` integration to send messages to related users.
* `Issue approval requested`
## Supported webhook endpoints
### Slack
[Official guide](https://api.slack.com/messaging/webhooks)
#### Configure sending direct messages to related users
1. Go to [https://api.slack.com/apps](https://api.slack.com/apps).
2. Click **Create New App**.
3. Choose **From an app manifest**.
4. Pick your workspace to develop the app and click **Next**.
5. Replace the existing JSON with this manifest content and click **Next**.
```JSON theme={null}
{
"display_information": {
"name": "Bytebase Bot"
},
"features": {
"bot_user": {
"display_name": "Bytebase Bot",
"always_online": false
}
},
"oauth_config": {
"scopes": {
"bot": [
"users:read",
"users:read.email",
"channels:manage",
"groups:write",
"im:write",
"chat:write",
"mpim:write"
]
}
},
"settings": {
"org_deploy_enabled": false,
"socket_mode_enabled": false,
"token_rotation_enabled": false
}
}
```
6. Click **Create**.
7. Click **Install to Workspace** and click **Allow**.
8. Go to **Features > OAuth & Permissions** and copy the **Bot User OAuth Token**.
9. Go back to Bytebase and paste the **Bot User OAuth Token** to the **Token** field under **Integration > IM**.
10. Go to **Integration > Webhooks** in a project, add a webhook, check all the events you want to send direct messages, and click **Create**.
### Discord
[Official guide](https://support.discord.com/hc/en-us/articles/228383668-Intro-to-Webhooks)
### Microsoft Teams
[Official guide](https://support.microsoft.com/en-us/office/create-incoming-webhooks-with-workflows-for-microsoft-teams-8ae491c7-0394-4861-ba59-055e33f75498)
Microsoft has [retired Office 365 Connectors](https://devblogs.microsoft.com/microsoft365dev/retirement-of-office-365-connectors-within-microsoft-teams/) in Teams. Use **Power Automate Workflows** to create incoming webhooks instead.
1. In Microsoft Teams, select **More options (⋯)** next to the channel you want to post to, then select **Workflows**.
2. Choose **Post to a channel when a webhook request is received**.
3. Authenticate with your account and select the Team and Channel, then click **Add workflow**.
4. Copy the generated webhook URL (it looks like `https://xxx.environment.api.powerplatform.com:443/powerautomate/automations/direct/workflows/...`).
5. Go to Bytebase **Integration > Webhooks** in a project, paste the URL and create the webhook.
#### Configure sending direct messages to related users
##### Option 1: Chat Webhook via Power Automate
You can use the **Post to a chat when a webhook request is received** workflow template to send alerts to a chat via the Flow bot.
This template may not be available depending on your organization type, tenant configuration, or admin policies. Contact your IT admin if you don't see it. For a universally available approach, use Option 2.
1. In Microsoft Teams, select **More options (⋯)** next to a chat, then select **Workflows**.
2. Choose **Post to a chat when a webhook request is received**. If the template is not listed, you can build the flow manually in [Power Automate](https://make.powerautomate.com/) using the **When a Teams webhook request is received** trigger and the **Post card in a chat or channel** action.
3. Authenticate with your account and select the chat, then click **Add workflow**.
4. Copy the generated webhook URL.
5. Go to Bytebase **Integration > Webhooks** in a project, paste the URL and create the webhook.
##### Option 2: Azure AD Bot Framework (recommended)
Register an Azure AD application with Bot Framework capabilities. This allows Bytebase to send 1:1 direct messages to any user matched by email without per-user workflow setup.
1. Go to [Azure Portal](https://portal.azure.com/) and navigate to **Microsoft Entra ID > App registrations**.
2. Click **New registration**, give it a name (e.g., "Bytebase Bot"), and register.
3. Note the **Application (client) ID** and **Directory (tenant) ID**.
4. Go to **Certificates & secrets**, click **New client secret**, and copy the **Secret value**.
5. Go to [Bot Framework Registration](https://dev.botframework.com/bots/new) or use the **Azure Bot** resource in Azure Portal to register a bot using the same Application ID.
6. In the bot's **Channels** settings, enable the **Microsoft Teams** channel.
7. Grant the following **Microsoft Graph API application permissions** to the app:
* `User.Read.All` — to look up users by email
* `TeamsAppInstallation.ReadWriteForUser.All` — to install the app for users
* `Chat.Create` and `Chat.ReadWrite.All` — to get chat IDs for direct messaging
8. Click **Grant admin consent** for the permissions.
9. Go back to Bytebase and fill **Tenant ID**, **Client ID**, and **Client Secret** fields under **Integration > IM**.
10. Go to **Integration > Webhooks** in a project, add a webhook, check the events you want to send direct messages for, enable **Direct Messages**, and click **Create**.
### DingTalk
[Official guide](https://developers.dingtalk.com/document/robots/custom-robot-access)
#### Configure sending direct messages to related users
1. Go to [https://open-dev.dingtalk.com/](https://open-dev.dingtalk.com/).
2. Select **Application Development**, click **Create Application**.
3. Select **Credentials and Basic Information** on the left sidebar. Obtain the **Client ID** and **Client Secret**.
4. Select **Permission Management**, grant the following permissions:
* `qyapi_get_member_by_mobile`
* `qyapi_robot_sendmsg`
5. Select **Add Application Capability**, add the **Robot** capability. Configure the robot, and for **Message receiving mode** select `Stream mode`. In "Robot Configuration", click **Copy RobotCode** to obtain the **Robot Code**. Publish the robot.
6. Select **Version Management and Release**. Click **Create New Version**. Fill in the relevant information, then **Save** and **Directly Publish**.
7. Go back to Bytebase and fill **Client ID**, **Client Secret** and **Robot Code** fields under **Integration > IM**.
8. Go to **Integration > Webhooks** in a project, add a webhook, check all the events you want to send direct messages, and click **Create**.
DingTalk allows to specify a list of keywords in the [security setting](https://developers.dingtalk.com/document/robots/customize-robot-security-settings) to protect webhook endpoint. You can add "Bytebase" to that keyword list.
### Feishu (Lark)
[Official guide](https://www.feishu.cn/hc/zh-CN/articles/360024984973)
Feishu (Lark) allows to specify a list of keywords in the [security setting](https://www.feishu.cn/hc/zh-CN/articles/360024984973#lineguid-RahdJr) to protect webhook endpoint. You can add "Bytebase" to that keyword list.
#### Configure sending direct notifications to related users
1. Go to [https://open.feishu.cn/app](https://open.feishu.cn/app).
2. Click **Create Custom App**, fill the form and click **Create**.
3. Click **Add Features** on the left sidebar, add the **Bot** feature.
4. Click **Permissions & Scopes** on the left sidebar, find and add the following permissions:
* `contact:user.id:readonly`
* `im:message:send_as_bot`
5. Click **Create Version**.
6. Configure [availability](https://open.feishu.cn/document/home/introduction-to-scope-and-authorization/availability).
7. Go back to Bytebase and fill **App Id** and **App Secret** fields under **Integration > IM**.
8. Go to **Integration > Webhooks** in a project, add a webhook, check all the events you want to send direct messages, and click **Create**.
### WeCom
WeCom does not provide its own official guide. Please follow this similar [setup](https://intl.cloud.tencent.com/zh/document/product/614/39581) from Tencent Cloud instead.
#### Configure sending direct messages to related users
1. Go to [https://work.weixin.qq.com/wework\_admin/frame#apps](https://work.weixin.qq.com/wework_admin/frame#apps).
2. Click the tab **My Company**, and then you can find **Company ID** in the **Company Information**.
3. Click the tab **App Management**, and choose **Create an app** under **Self-built**.
4. Open the app,
1. Find **AgentId** and **Secret**.
2. Configure **Allowed users**.
3. Configure **Company's Trusted IP** to your Bytebase workspace IP.
5. Make sure the user's email in Bytebase is the same as the user's email (not External account) in WeCom.
6. Go back to Bytebase and fill **Corp Id**, **Agent Id** and **Secret** fields under **Integration > IM**.
7. Go to **Integration > Webhooks** in a project, add a webhook, check all the events you want to send direct messages, and click **Create**.
## Supported events
* `Issue created` - Post message when a new issue has been created.
* `Issue approval requested` - Post message when an approval request has been made.
* `Issue sent back` - Post message when an issue has been sent back by an approver.
* `Pipeline failed` - Post message when a pipeline has failed.
* `Pipeline completed` - Post message when a pipeline has completed successfully.
### Direct message
With `Direct Message` enabled, Bytebase delivers messages to matched users; if none match, it falls back to the configured webhook.
The following events support sending direct messages/notifications to related users, make sure you have:
1. enabled the `Enable direct messages` option to enable this feature.
2. configured the `IM` integration to send messages to related users.
* `Issue approval requested`
## Supported webhook endpoints
### Slack
[Official guide](https://api.slack.com/messaging/webhooks)
#### Configure sending direct messages to related users
1. Go to [https://api.slack.com/apps](https://api.slack.com/apps).
2. Click **Create New App**.
3. Choose **From an app manifest**.
4. Pick your workspace to develop the app and click **Next**.
5. Replace the existing JSON with this manifest content and click **Next**.
```JSON theme={null}
{
"display_information": {
"name": "Bytebase Bot"
},
"features": {
"bot_user": {
"display_name": "Bytebase Bot",
"always_online": false
}
},
"oauth_config": {
"scopes": {
"bot": [
"users:read",
"users:read.email",
"channels:manage",
"groups:write",
"im:write",
"chat:write",
"mpim:write"
]
}
},
"settings": {
"org_deploy_enabled": false,
"socket_mode_enabled": false,
"token_rotation_enabled": false
}
}
```
6. Click **Create**.
7. Click **Install to Workspace** and click **Allow**.
8. Go to **Features > OAuth & Permissions** and copy the **Bot User OAuth Token**.
9. Go back to Bytebase and paste the **Bot User OAuth Token** to the **Token** field under **Integration > IM**.
10. Go to **Integration > Webhooks** in a project, add a webhook, check all the events you want to send direct messages, and click **Create**.
### Discord
[Official guide](https://support.discord.com/hc/en-us/articles/228383668-Intro-to-Webhooks)
### Microsoft Teams
[Official guide](https://support.microsoft.com/en-us/office/create-incoming-webhooks-with-workflows-for-microsoft-teams-8ae491c7-0394-4861-ba59-055e33f75498)
Microsoft has [retired Office 365 Connectors](https://devblogs.microsoft.com/microsoft365dev/retirement-of-office-365-connectors-within-microsoft-teams/) in Teams. Use **Power Automate Workflows** to create incoming webhooks instead.
1. In Microsoft Teams, select **More options (⋯)** next to the channel you want to post to, then select **Workflows**.
2. Choose **Post to a channel when a webhook request is received**.
3. Authenticate with your account and select the Team and Channel, then click **Add workflow**.
4. Copy the generated webhook URL (it looks like `https://xxx.environment.api.powerplatform.com:443/powerautomate/automations/direct/workflows/...`).
5. Go to Bytebase **Integration > Webhooks** in a project, paste the URL and create the webhook.
#### Configure sending direct messages to related users
##### Option 1: Chat Webhook via Power Automate
You can use the **Post to a chat when a webhook request is received** workflow template to send alerts to a chat via the Flow bot.
This template may not be available depending on your organization type, tenant configuration, or admin policies. Contact your IT admin if you don't see it. For a universally available approach, use Option 2.
1. In Microsoft Teams, select **More options (⋯)** next to a chat, then select **Workflows**.
2. Choose **Post to a chat when a webhook request is received**. If the template is not listed, you can build the flow manually in [Power Automate](https://make.powerautomate.com/) using the **When a Teams webhook request is received** trigger and the **Post card in a chat or channel** action.
3. Authenticate with your account and select the chat, then click **Add workflow**.
4. Copy the generated webhook URL.
5. Go to Bytebase **Integration > Webhooks** in a project, paste the URL and create the webhook.
##### Option 2: Azure AD Bot Framework (recommended)
Register an Azure AD application with Bot Framework capabilities. This allows Bytebase to send 1:1 direct messages to any user matched by email without per-user workflow setup.
1. Go to [Azure Portal](https://portal.azure.com/) and navigate to **Microsoft Entra ID > App registrations**.
2. Click **New registration**, give it a name (e.g., "Bytebase Bot"), and register.
3. Note the **Application (client) ID** and **Directory (tenant) ID**.
4. Go to **Certificates & secrets**, click **New client secret**, and copy the **Secret value**.
5. Go to [Bot Framework Registration](https://dev.botframework.com/bots/new) or use the **Azure Bot** resource in Azure Portal to register a bot using the same Application ID.
6. In the bot's **Channels** settings, enable the **Microsoft Teams** channel.
7. Grant the following **Microsoft Graph API application permissions** to the app:
* `User.Read.All` — to look up users by email
* `TeamsAppInstallation.ReadWriteForUser.All` — to install the app for users
* `Chat.Create` and `Chat.ReadWrite.All` — to get chat IDs for direct messaging
8. Click **Grant admin consent** for the permissions.
9. Go back to Bytebase and fill **Tenant ID**, **Client ID**, and **Client Secret** fields under **Integration > IM**.
10. Go to **Integration > Webhooks** in a project, add a webhook, check the events you want to send direct messages for, enable **Direct Messages**, and click **Create**.
### DingTalk
[Official guide](https://developers.dingtalk.com/document/robots/custom-robot-access)
#### Configure sending direct messages to related users
1. Go to [https://open-dev.dingtalk.com/](https://open-dev.dingtalk.com/).
2. Select **Application Development**, click **Create Application**.
3. Select **Credentials and Basic Information** on the left sidebar. Obtain the **Client ID** and **Client Secret**.
4. Select **Permission Management**, grant the following permissions:
* `qyapi_get_member_by_mobile`
* `qyapi_robot_sendmsg`
5. Select **Add Application Capability**, add the **Robot** capability. Configure the robot, and for **Message receiving mode** select `Stream mode`. In "Robot Configuration", click **Copy RobotCode** to obtain the **Robot Code**. Publish the robot.
6. Select **Version Management and Release**. Click **Create New Version**. Fill in the relevant information, then **Save** and **Directly Publish**.
7. Go back to Bytebase and fill **Client ID**, **Client Secret** and **Robot Code** fields under **Integration > IM**.
8. Go to **Integration > Webhooks** in a project, add a webhook, check all the events you want to send direct messages, and click **Create**.
DingTalk allows to specify a list of keywords in the [security setting](https://developers.dingtalk.com/document/robots/customize-robot-security-settings) to protect webhook endpoint. You can add "Bytebase" to that keyword list.
### Feishu (Lark)
[Official guide](https://www.feishu.cn/hc/zh-CN/articles/360024984973)
Feishu (Lark) allows to specify a list of keywords in the [security setting](https://www.feishu.cn/hc/zh-CN/articles/360024984973#lineguid-RahdJr) to protect webhook endpoint. You can add "Bytebase" to that keyword list.
#### Configure sending direct notifications to related users
1. Go to [https://open.feishu.cn/app](https://open.feishu.cn/app).
2. Click **Create Custom App**, fill the form and click **Create**.
3. Click **Add Features** on the left sidebar, add the **Bot** feature.
4. Click **Permissions & Scopes** on the left sidebar, find and add the following permissions:
* `contact:user.id:readonly`
* `im:message:send_as_bot`
5. Click **Create Version**.
6. Configure [availability](https://open.feishu.cn/document/home/introduction-to-scope-and-authorization/availability).
7. Go back to Bytebase and fill **App Id** and **App Secret** fields under **Integration > IM**.
8. Go to **Integration > Webhooks** in a project, add a webhook, check all the events you want to send direct messages, and click **Create**.
### WeCom
WeCom does not provide its own official guide. Please follow this similar [setup](https://intl.cloud.tencent.com/zh/document/product/614/39581) from Tencent Cloud instead.
#### Configure sending direct messages to related users
1. Go to [https://work.weixin.qq.com/wework\_admin/frame#apps](https://work.weixin.qq.com/wework_admin/frame#apps).
2. Click the tab **My Company**, and then you can find **Company ID** in the **Company Information**.
3. Click the tab **App Management**, and choose **Create an app** under **Self-built**.
4. Open the app,
1. Find **AgentId** and **Secret**.
2. Configure **Allowed users**.
3. Configure **Company's Trusted IP** to your Bytebase workspace IP.
5. Make sure the user's email in Bytebase is the same as the user's email (not External account) in WeCom.
6. Go back to Bytebase and fill **Corp Id**, **Agent Id** and **Secret** fields under **Integration > IM**.
7. Go to **Integration > Webhooks** in a project, add a webhook, check all the events you want to send direct messages, and click **Create**.