> ## Documentation Index
> Fetch the complete documentation index at: https://docs.bytebase.com/llms.txt
> Use this file to discover all available pages before exploring further.
# User and Database Permissions with Bytebase API
> Learn how to use the Bytebase API to inspect user and database permissions.
Bytebase is a database DevSecOps platform designed for developers, security, DBA, and platform engineering teams. While it offers an intuitive GUI for managing database schema changes and access control, some teams may want to integrate Bytebase into their existing DevOps platforms using the [Bytebase API](/integrations/api/overview/).
 In our [previous tutorial](/tutorials/api-issue), we demonstrated how to create a schema change using the Bytebase API. This tutorial will focus on inspect user and database permissions in Bytebase, it's OK if you haven't gone through the previous tutorial.
By following this guide, you'll learn how to:
* Set up and configure API access.
* For a given database, which users have been granted permissions?
* For a given user, which databases have been granted permissions?
## Repository
[https://github.com/bytebase/example-api/tree/main/permission-check](https://github.com/bytebase/example-api/tree/main/permission-check)
## Prerequisites
1. [Docker](https://www.docker.com/) installed
2. Node.js >= v18
## Start Bytebase
Make sure your Docker daemon is running. Copy and paste the commands to start Bytebase.
```bash theme={null}
docker run --rm --init \
--name bytebase \
--publish 8080:8080 --pull always \
--volume ~/.bytebase/data:/var/opt/bytebase \
bytebase/bytebase:latest
```
Bytebase is now running via Docker, and you can access it via `localhost:8080`. Register the first admin account which will be granted [`Workspace Admin`](/administration/roles).
## Create Service Account
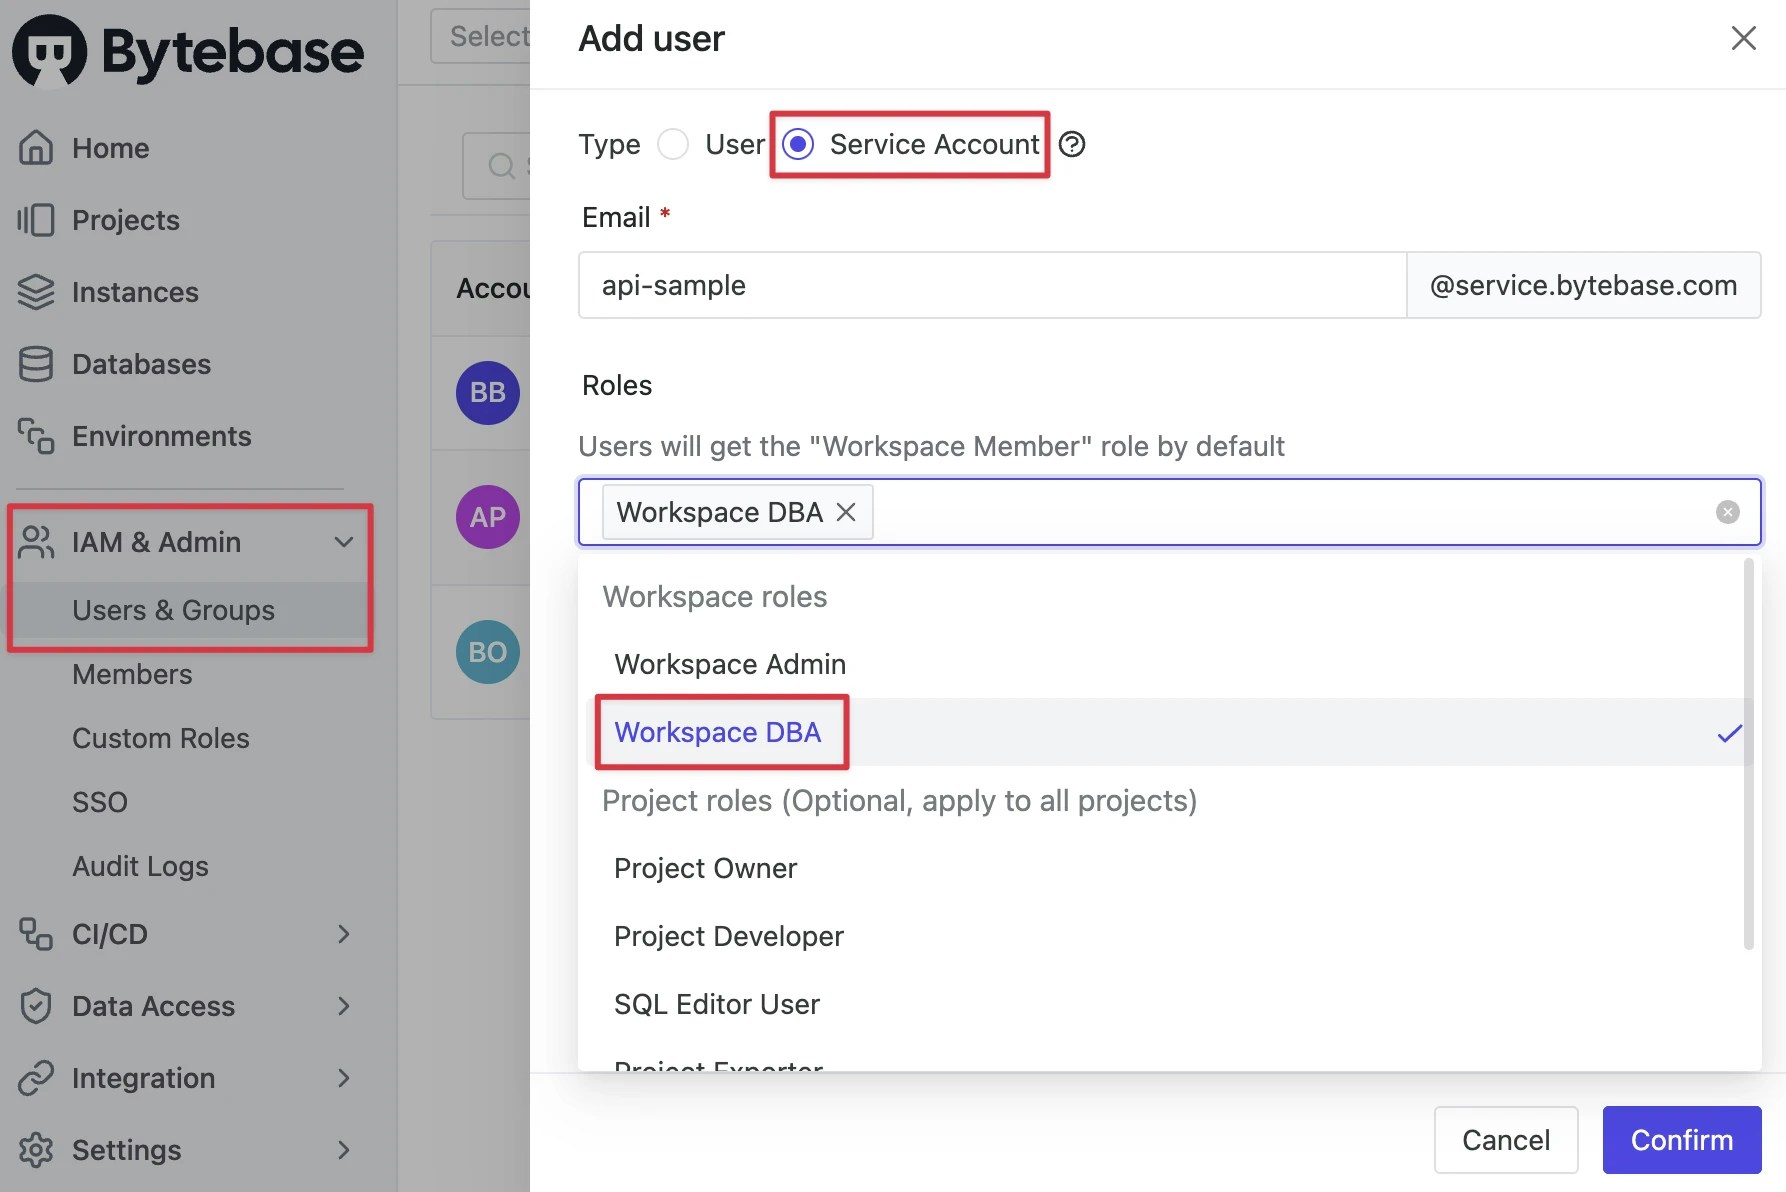
1. Log in as `Workspace Admin`, and go to **IAM & Admin** > **Users & Groups**. Click **+ Add User**, fill in with `api-sample`, choose the `Workspace DBA` role sufficient for this tutorial and click **Confirm**.
In our [previous tutorial](/tutorials/api-issue), we demonstrated how to create a schema change using the Bytebase API. This tutorial will focus on inspect user and database permissions in Bytebase, it's OK if you haven't gone through the previous tutorial.
By following this guide, you'll learn how to:
* Set up and configure API access.
* For a given database, which users have been granted permissions?
* For a given user, which databases have been granted permissions?
## Repository
[https://github.com/bytebase/example-api/tree/main/permission-check](https://github.com/bytebase/example-api/tree/main/permission-check)
## Prerequisites
1. [Docker](https://www.docker.com/) installed
2. Node.js >= v18
## Start Bytebase
Make sure your Docker daemon is running. Copy and paste the commands to start Bytebase.
```bash theme={null}
docker run --rm --init \
--name bytebase \
--publish 8080:8080 --pull always \
--volume ~/.bytebase/data:/var/opt/bytebase \
bytebase/bytebase:latest
```
Bytebase is now running via Docker, and you can access it via `localhost:8080`. Register the first admin account which will be granted [`Workspace Admin`](/administration/roles).
## Create Service Account
1. Log in as `Workspace Admin`, and go to **IAM & Admin** > **Users & Groups**. Click **+ Add User**, fill in with `api-sample`, choose the `Workspace DBA` role sufficient for this tutorial and click **Confirm**.
 2. Find the newly created service account and **Copy Service Key**. We will use this token to authenticate the API calls.
 ## Run Demo
1. Go to [Bytebase API Example
repo](https://github.com/bytebase/example-api) and clone it.
2. Copy `env-template.local` to `.env.local`.Update the variables.
* `NEXT_PUBLIC_BB_URL`: `http://localhost:8080`
* `NEXT_PUBLIC_BB_SERVICE_ACCOUNT`: `api-example`
* `NEXT_PUBLIC_BB_SERVICE_KEY`: service key copied in previous step
3. Go to subfolder `permission-check`, and run the following commands to start the demo application.
```bash theme={null}
pnpm i && pnpm dev
```
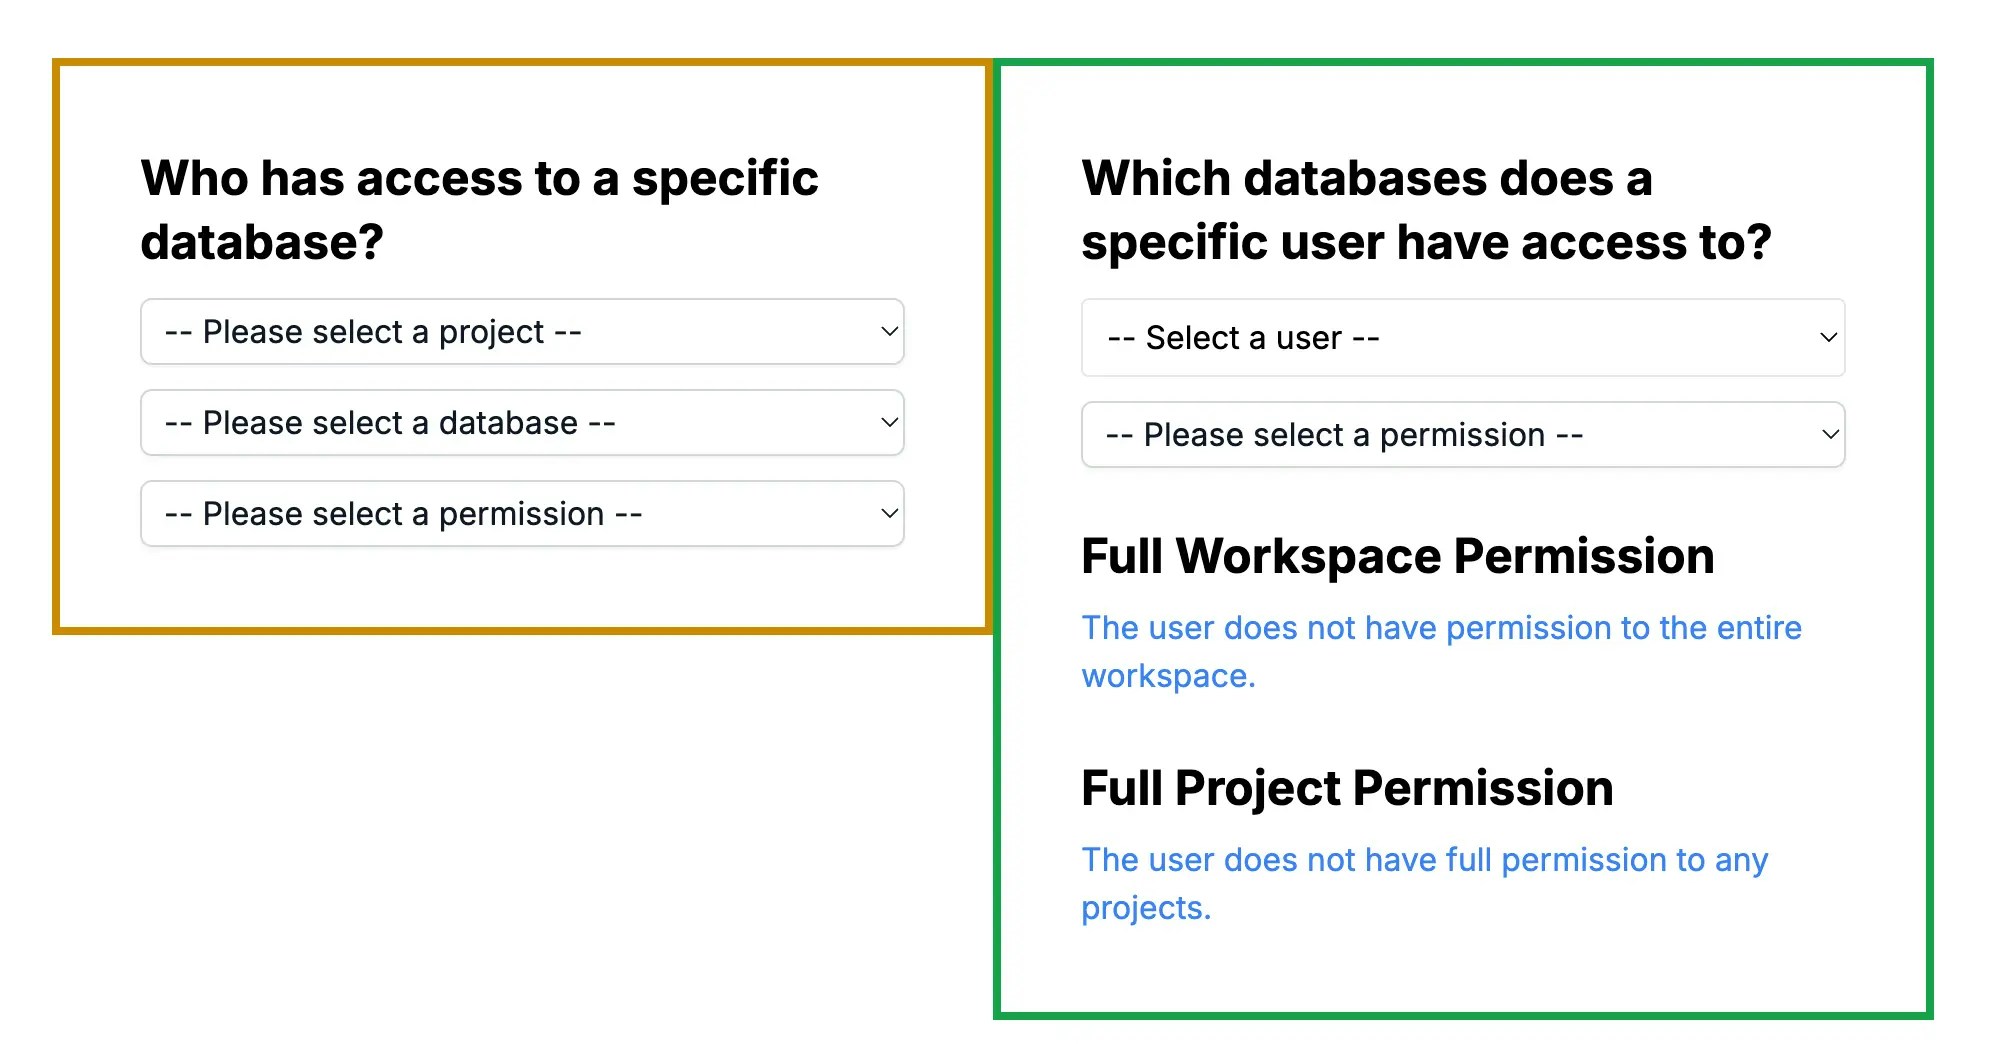
4. Open the demo in your browser, you'll see the following page.
## Run Demo
1. Go to [Bytebase API Example
repo](https://github.com/bytebase/example-api) and clone it.
2. Copy `env-template.local` to `.env.local`.Update the variables.
* `NEXT_PUBLIC_BB_URL`: `http://localhost:8080`
* `NEXT_PUBLIC_BB_SERVICE_ACCOUNT`: `api-example`
* `NEXT_PUBLIC_BB_SERVICE_KEY`: service key copied in previous step
3. Go to subfolder `permission-check`, and run the following commands to start the demo application.
```bash theme={null}
pnpm i && pnpm dev
```
4. Open the demo in your browser, you'll see the following page.
 5. To enhance the demo's realism, go to Bytebase and add more users and set up user permissions:
* Add new users in **Security & Policy > Users & Groups**
* Grant roles:
* For workspace-level access: **Security & Policy > Members & Roles**
* For project-specific access: Navigate to a project and use **Manage > Members**
## Inspect Permissions
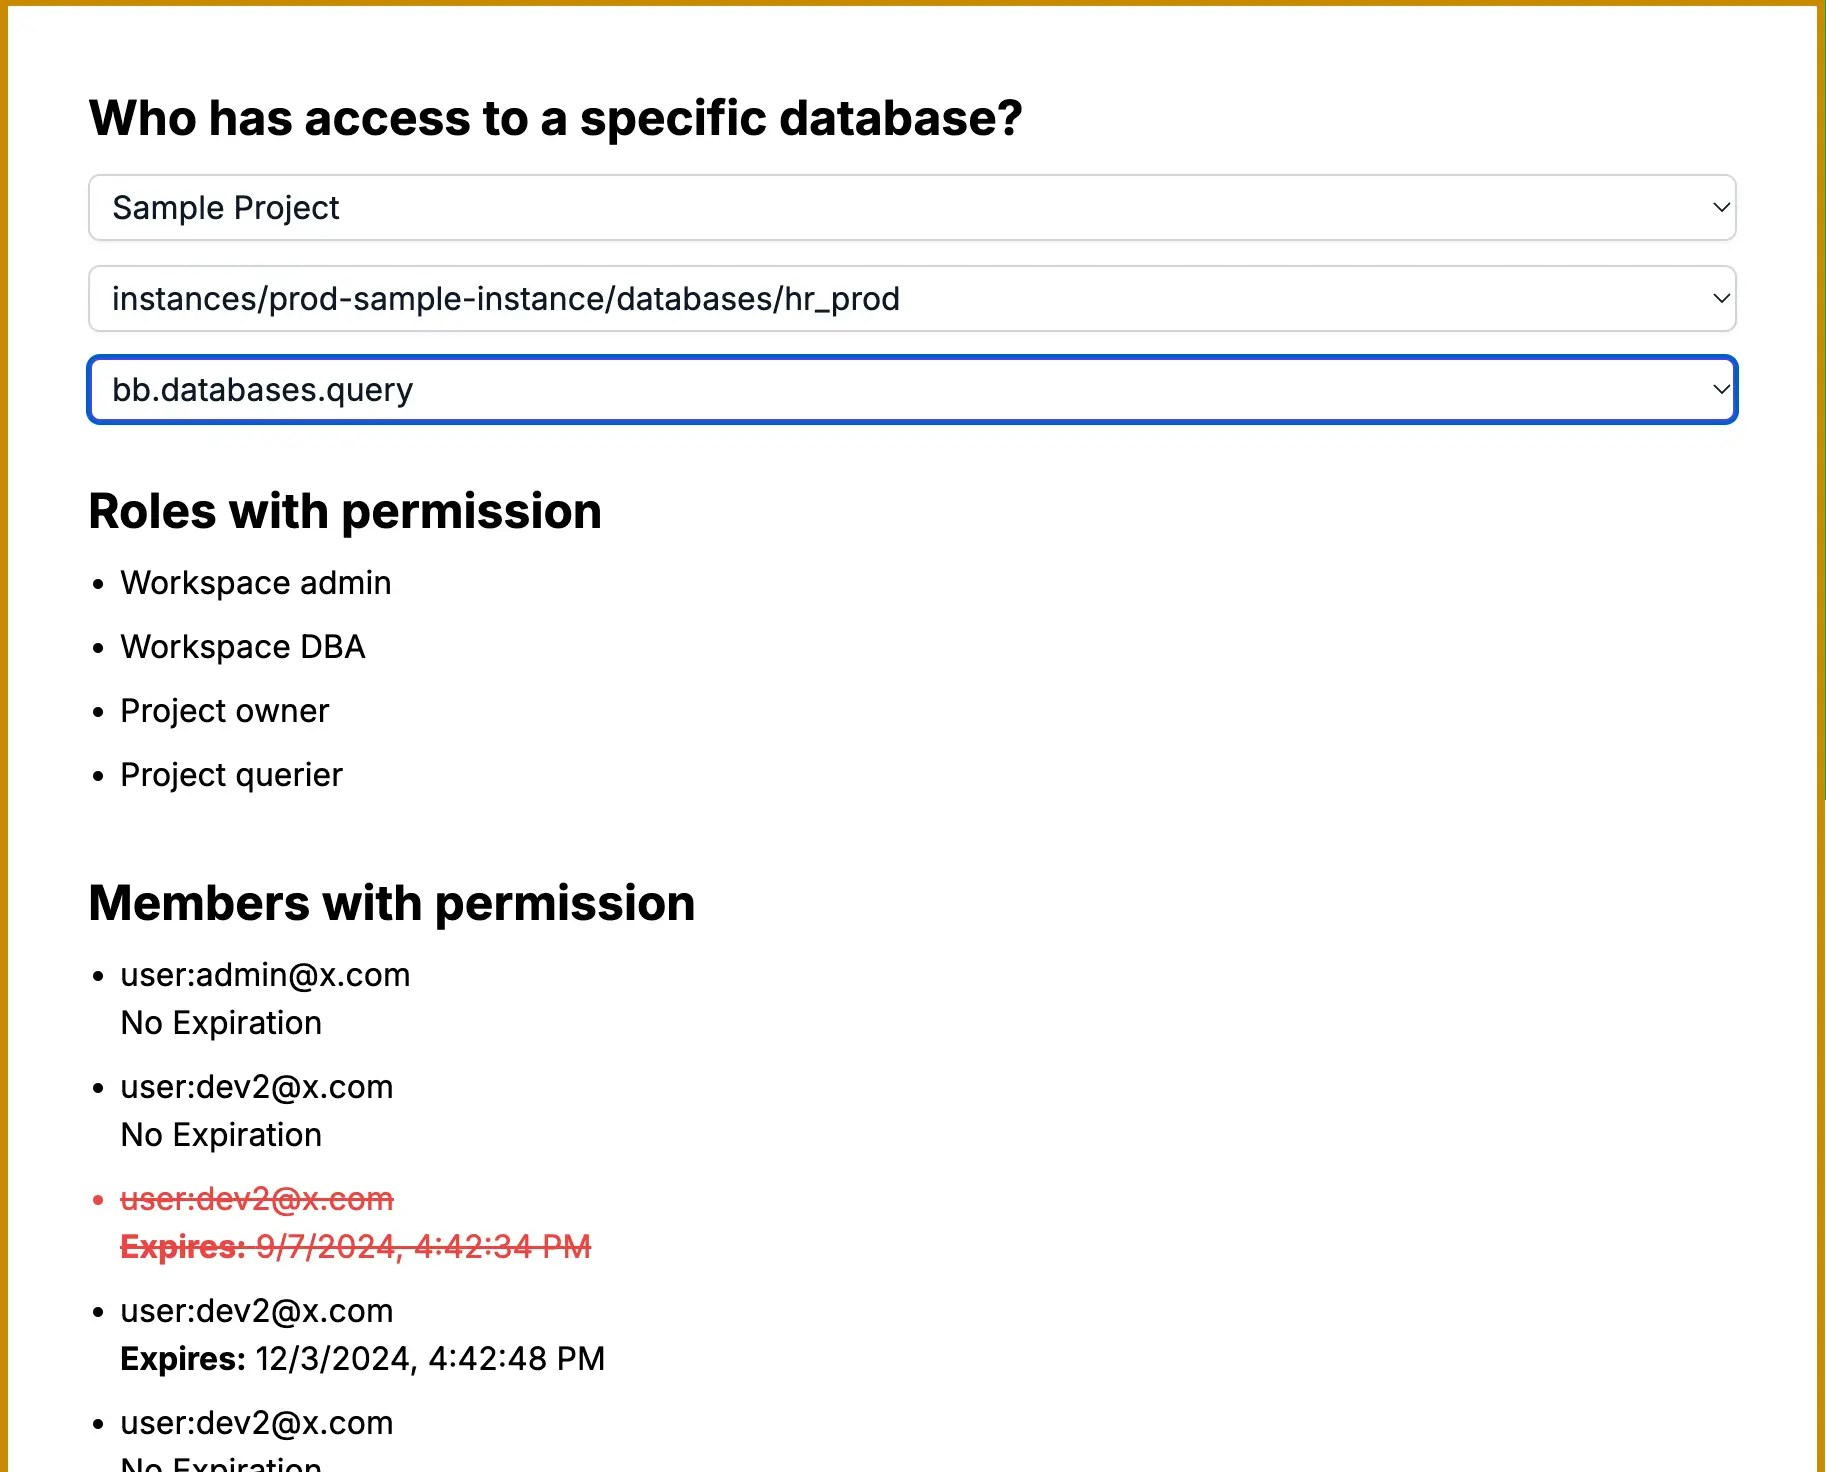
### Database + Permission => Users
The left side form demonstrates a scenario where you have a **database** and want to inspect who has access to it. This is useful for continuously tracking access to sensitive databases and ensuring only authorized users have permissions.
5. To enhance the demo's realism, go to Bytebase and add more users and set up user permissions:
* Add new users in **Security & Policy > Users & Groups**
* Grant roles:
* For workspace-level access: **Security & Policy > Members & Roles**
* For project-specific access: Navigate to a project and use **Manage > Members**
## Inspect Permissions
### Database + Permission => Users
The left side form demonstrates a scenario where you have a **database** and want to inspect who has access to it. This is useful for continuously tracking access to sensitive databases and ensuring only authorized users have permissions.
 Let's dig into the code:
1. In `page.tsx`, we fetch all roles by calling the [/v1/roles](https://api.bytebase.com/#tag/roleservice/GET/v1/roles) API before any user selection.
2. In `db-fetch-user-permission.tsx`, after the user selects a **project**, **database**, and **permission**, we filter the roles with the given permission:
```javascript theme={null}
const rolesWithPermission = allRoles.filter((role) => role.permissions.includes(permission));
```
3. Bytebase has two levels of Identity Access Management (IAM): **Workspace** and **Project**. We fetch both:
* Workspace-level IAM: [/v1/workspaces/\*:getIamPolicy](https://api.bytebase.com/#tag/workspaceservice/GET/v1/workspaces/\{workspace}:getIamPolicy) API
* Project-level IAM: [/v1/projects/PROJECT\_ID:getIamPolicy](https://api.bytebase.com/#tag/projectservice/GET/v1/projects/\{project}:getIamPolicy) API
The IAM object structure varies slightly between levels. Here's an example of a workspace-level IAM:
```json theme={null}
{
"role": "roles/workspaceDBA",
"members": [
"user:api-sample@service.bytebase.com",
"user:a@bytebase.com",
"user:admin2@x.com"
],
"condition": {
"expression": "",
"title": "",
"description": "",
"location": ""
},
"parsedExpr": null
}
```
4. We compare the roles with the given IAM to find matches:
```javascript theme={null}
rolesWithPermission.some((role) => role.name === iam.role);
```
5. Some project-level IAM objects include a `condition` field for fine-grained access control. For example:
```json theme={null}
{
"role": "roles/sqlEditorUser",
"members": ["user:dev@x.com", "user:dev2@x.com"],
"condition": {
"expression": "(resource.database in [\"instances/test-sample-instance/databases/hr_test\"])",
"title": "SQL Editor User hr_prod",
"description": "",
"location": ""
}
}
```
This grants the `SQL Editor User` role only for the `hr_test` database in `test-sample-instance`.
6. When processing IAM policies, handle [CEL (Common Expression Language)](https://cel.dev/) format conditions carefully. In this demo, we parse these conditions using a custom `parseCelExpression` function:
```javascript theme={null}
const celValue = await parseCelExpression(iam.condition.expression);
```
This function `parseCelExpression`, adapted from Bytebase's [CEL plugin](https://github.com/bytebase/bytebase/tree/main/frontend/src/plugins/cel) and [cel.ts](https://github.com/bytebase/bytebase/blob/main/frontend/src/utils/issue/cel.ts), parses the condition expression string. It is primarily based on the `convertFromCELString` function in [cel.ts](https://github.com/bytebase/bytebase/blob/main/frontend/src/utils/issue/cel.ts), though you could use `convertFromExpr` to create your own. The function returns an array of database resources with their associated expiration times. This function and related CEL parsing logic are implemented in a custom `plugins/cel` folder within the demo project.
7. We then check if the conditions are met for the specific database:
```javascript theme={null}
for (let dbrs of celValue.databaseResources) {
if (dbrs.databaseName == database) {
return iam.members.map((member) => ({ member, expiredTime }));
}
}
```
8. The `members` array may include both users and groups. To handle groups, use the [v1/groups](https://api.bytebase.com/#tag/groupservice/GET/v1/groups) API:
```json theme={null}
{
"role": "roles/projectQuerier",
"members": ["user:dev2@x.com", "group:bbbb@x.com"],
...
}
```
By following these steps, you can effectively determine which users have access to a specific database, taking into account both direct user assignments and group memberships, as well as any conditional access rules.
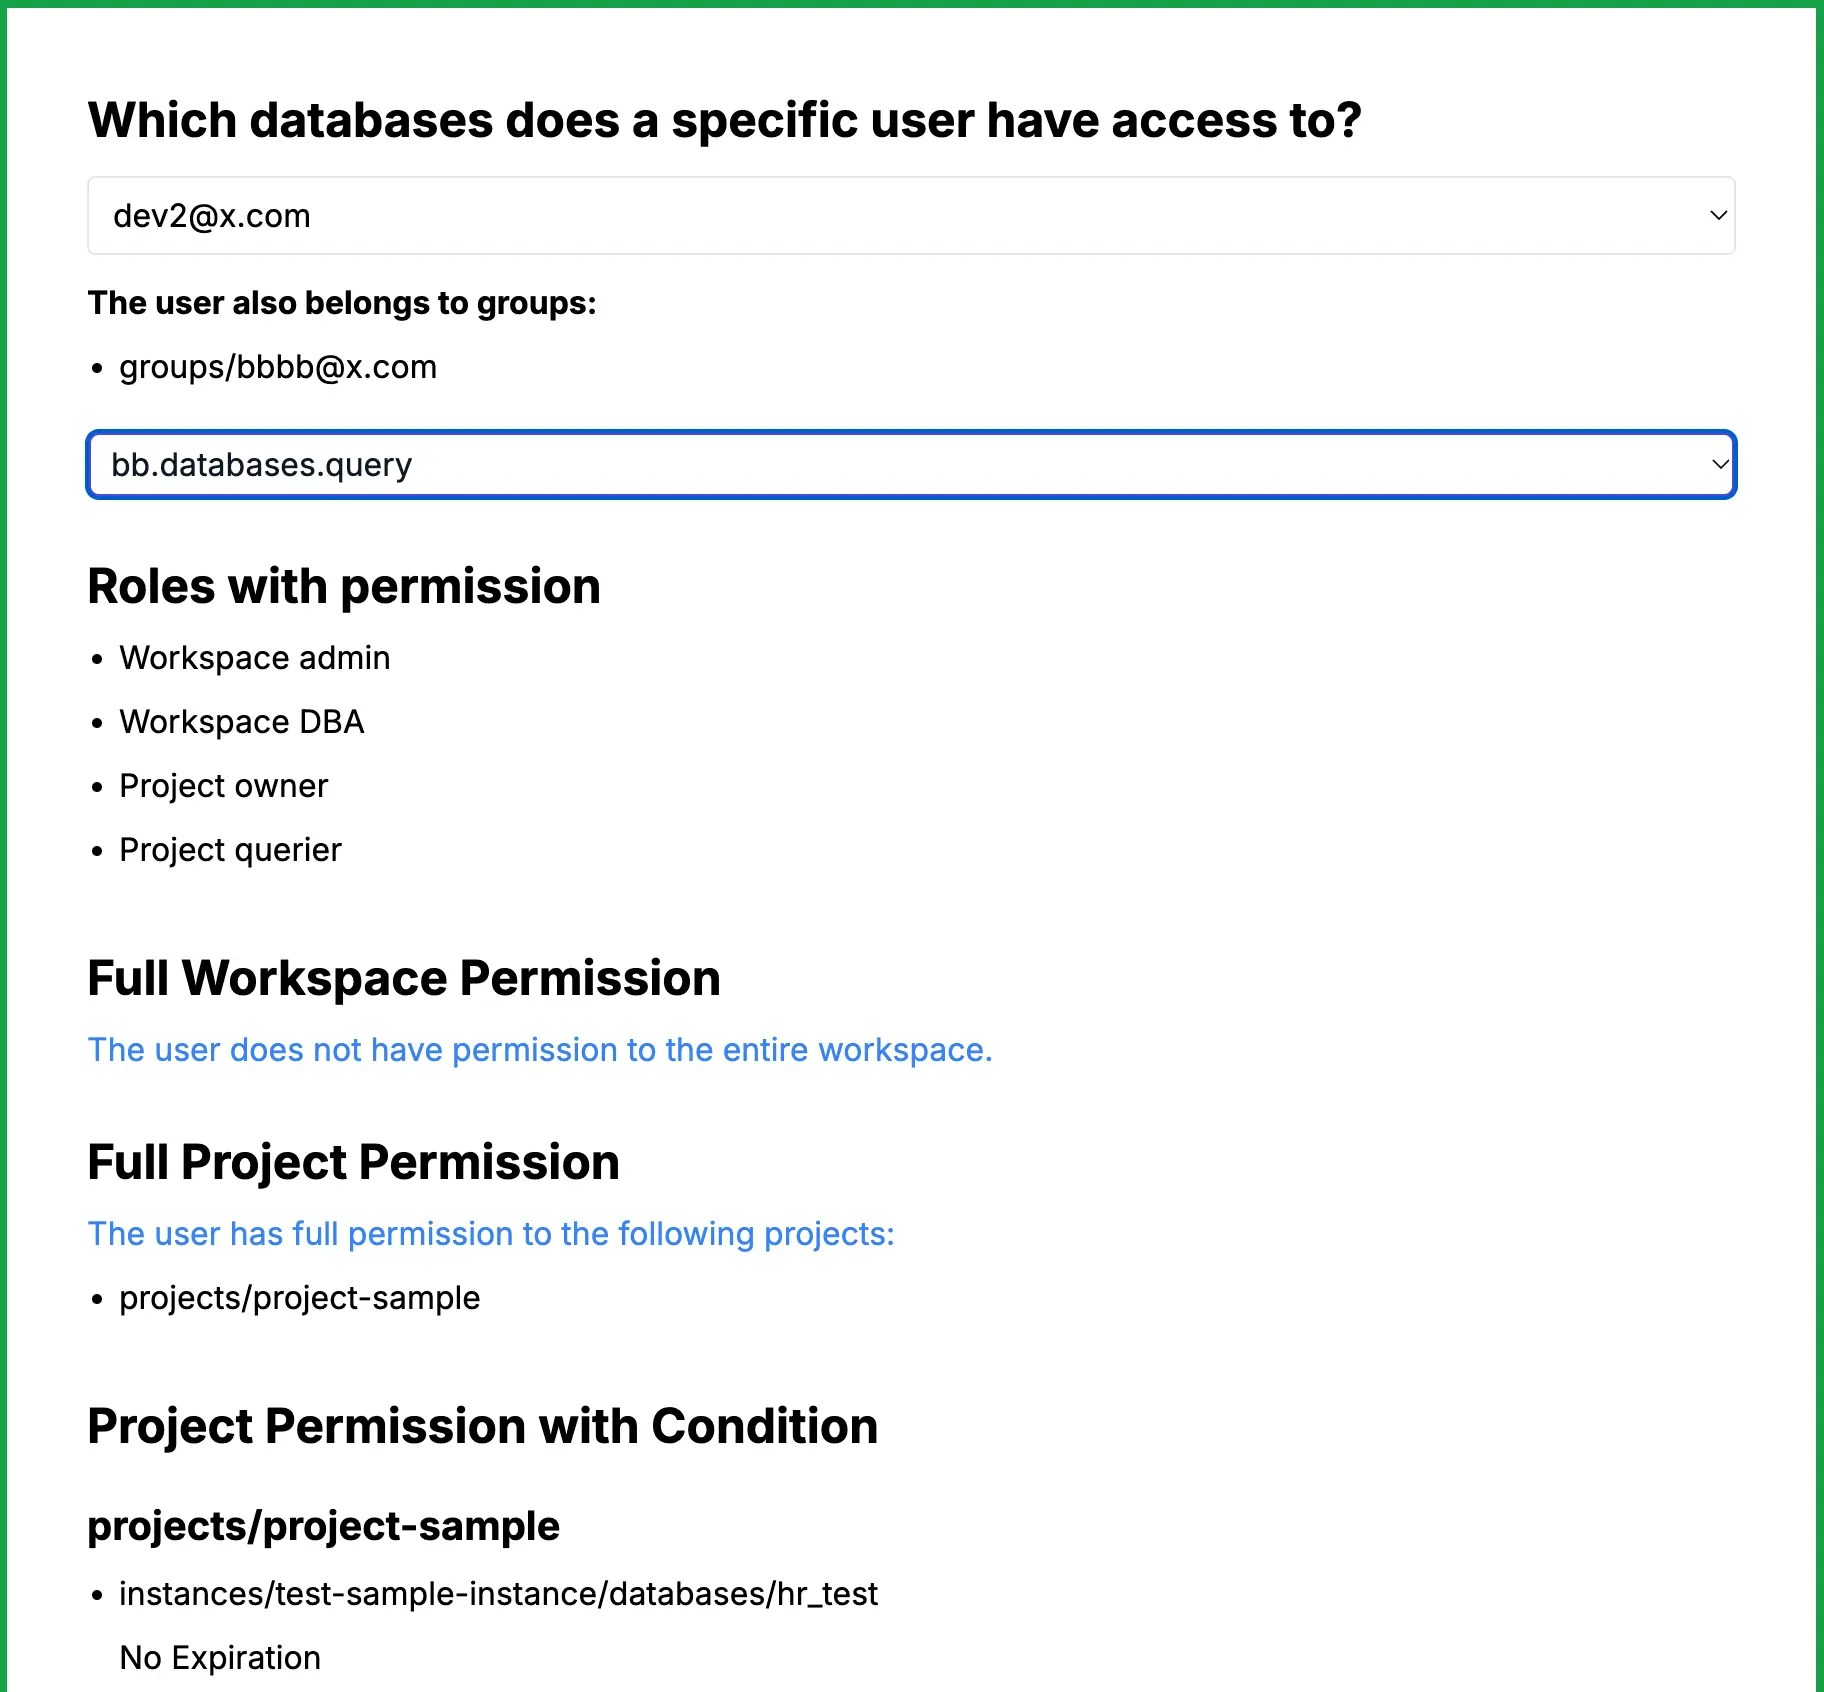
### User + Permission => Databases
The right side form demonstrates a scenario where you have a **user** and want to inspect which databases they have access to. This is useful for ongoing tracking of user permissions, especially when roles change or users leave the company.
Let's dig into the code:
1. In `page.tsx`, we fetch all roles by calling the [/v1/roles](https://api.bytebase.com/#tag/roleservice/GET/v1/roles) API before any user selection.
2. In `db-fetch-user-permission.tsx`, after the user selects a **project**, **database**, and **permission**, we filter the roles with the given permission:
```javascript theme={null}
const rolesWithPermission = allRoles.filter((role) => role.permissions.includes(permission));
```
3. Bytebase has two levels of Identity Access Management (IAM): **Workspace** and **Project**. We fetch both:
* Workspace-level IAM: [/v1/workspaces/\*:getIamPolicy](https://api.bytebase.com/#tag/workspaceservice/GET/v1/workspaces/\{workspace}:getIamPolicy) API
* Project-level IAM: [/v1/projects/PROJECT\_ID:getIamPolicy](https://api.bytebase.com/#tag/projectservice/GET/v1/projects/\{project}:getIamPolicy) API
The IAM object structure varies slightly between levels. Here's an example of a workspace-level IAM:
```json theme={null}
{
"role": "roles/workspaceDBA",
"members": [
"user:api-sample@service.bytebase.com",
"user:a@bytebase.com",
"user:admin2@x.com"
],
"condition": {
"expression": "",
"title": "",
"description": "",
"location": ""
},
"parsedExpr": null
}
```
4. We compare the roles with the given IAM to find matches:
```javascript theme={null}
rolesWithPermission.some((role) => role.name === iam.role);
```
5. Some project-level IAM objects include a `condition` field for fine-grained access control. For example:
```json theme={null}
{
"role": "roles/sqlEditorUser",
"members": ["user:dev@x.com", "user:dev2@x.com"],
"condition": {
"expression": "(resource.database in [\"instances/test-sample-instance/databases/hr_test\"])",
"title": "SQL Editor User hr_prod",
"description": "",
"location": ""
}
}
```
This grants the `SQL Editor User` role only for the `hr_test` database in `test-sample-instance`.
6. When processing IAM policies, handle [CEL (Common Expression Language)](https://cel.dev/) format conditions carefully. In this demo, we parse these conditions using a custom `parseCelExpression` function:
```javascript theme={null}
const celValue = await parseCelExpression(iam.condition.expression);
```
This function `parseCelExpression`, adapted from Bytebase's [CEL plugin](https://github.com/bytebase/bytebase/tree/main/frontend/src/plugins/cel) and [cel.ts](https://github.com/bytebase/bytebase/blob/main/frontend/src/utils/issue/cel.ts), parses the condition expression string. It is primarily based on the `convertFromCELString` function in [cel.ts](https://github.com/bytebase/bytebase/blob/main/frontend/src/utils/issue/cel.ts), though you could use `convertFromExpr` to create your own. The function returns an array of database resources with their associated expiration times. This function and related CEL parsing logic are implemented in a custom `plugins/cel` folder within the demo project.
7. We then check if the conditions are met for the specific database:
```javascript theme={null}
for (let dbrs of celValue.databaseResources) {
if (dbrs.databaseName == database) {
return iam.members.map((member) => ({ member, expiredTime }));
}
}
```
8. The `members` array may include both users and groups. To handle groups, use the [v1/groups](https://api.bytebase.com/#tag/groupservice/GET/v1/groups) API:
```json theme={null}
{
"role": "roles/projectQuerier",
"members": ["user:dev2@x.com", "group:bbbb@x.com"],
...
}
```
By following these steps, you can effectively determine which users have access to a specific database, taking into account both direct user assignments and group memberships, as well as any conditional access rules.
### User + Permission => Databases
The right side form demonstrates a scenario where you have a **user** and want to inspect which databases they have access to. This is useful for ongoing tracking of user permissions, especially when roles change or users leave the company.
 1. Fetch all roles using the [/v1/roles](https://api.bytebase.com/#tag/roleservice/GET/v1/roles) API in `page.tsx`.
2. In `user-fetch-db-permission.tsx`, filter roles based on the selected permission:
```javascript theme={null}
const rolesWithPermission = allRoles.filter((role) => role.permissions.includes(permission));
```
3. Fetch and compare workspace-level and project-level IAM policies:
* Workspace-level check:
```javascript theme={null}
const hasUserWorkspacePermission = (rolesWithPermission, rolesToBeMatched) => {
if (rolesToBeMatched.length === 0) return false;
return rolesToBeMatched.some((roleToBeMatched) =>
rolesWithPermission.some(
(roleWithPermission) =>
roleWithPermission.name === roleToBeMatched.role &&
roleToBeMatched.members.includes(`user:${user}`),
),
);
};
```
* Project-level check:
```javascript theme={null}
for (const project of allProjects) {
const projectIamData = await fetchData(
`/api/projectiam/${encodeURIComponent(project.name.split('/')[1])}`,
);
const userHasMatchedRoles = getUserProjectPermissionRoles(
rolesWithPermission,
projectIamData.bindings,
userGroups.length > 0,
project.name,
);
// ... process matched roles
}
```
4. Handle CEL conditions:
```javascript theme={null}
if (role.condition && role.condition.expression === '') {
userHasFullProjectPermission = true;
} else {
const celValue = await parseCelExpression(role.condition.expression);
celsConverted.push(celValue);
}
```
5. Group should be taken into consideration too.
```javascript theme={null}
return refinedRolesToBeMatched.filter((roleToBeMatched) => {
const memberMatch = roleToBeMatched.members.includes(`user:${user}`);
const groupMatch =
hasGroups &&
userGroups.some((group) =>
roleToBeMatched.members.includes(group.replace('groups/', 'group:')),
);
return memberMatch || groupMatch;
});
```
By following these steps, you can effectively identify all databases a specific user has access to, taking into account various permission levels and conditions.
## Summary
Congratulations! You've successfully created a user and database permission inspection tool using the Bytebase API. This allows you to:
1. Inspect which users have access to specific databases.
2. Inspect which databases a particular user can access.
By leveraging these API calls within existing DevOps platforms, organizations can improve their database access governance and security posture.
1. Fetch all roles using the [/v1/roles](https://api.bytebase.com/#tag/roleservice/GET/v1/roles) API in `page.tsx`.
2. In `user-fetch-db-permission.tsx`, filter roles based on the selected permission:
```javascript theme={null}
const rolesWithPermission = allRoles.filter((role) => role.permissions.includes(permission));
```
3. Fetch and compare workspace-level and project-level IAM policies:
* Workspace-level check:
```javascript theme={null}
const hasUserWorkspacePermission = (rolesWithPermission, rolesToBeMatched) => {
if (rolesToBeMatched.length === 0) return false;
return rolesToBeMatched.some((roleToBeMatched) =>
rolesWithPermission.some(
(roleWithPermission) =>
roleWithPermission.name === roleToBeMatched.role &&
roleToBeMatched.members.includes(`user:${user}`),
),
);
};
```
* Project-level check:
```javascript theme={null}
for (const project of allProjects) {
const projectIamData = await fetchData(
`/api/projectiam/${encodeURIComponent(project.name.split('/')[1])}`,
);
const userHasMatchedRoles = getUserProjectPermissionRoles(
rolesWithPermission,
projectIamData.bindings,
userGroups.length > 0,
project.name,
);
// ... process matched roles
}
```
4. Handle CEL conditions:
```javascript theme={null}
if (role.condition && role.condition.expression === '') {
userHasFullProjectPermission = true;
} else {
const celValue = await parseCelExpression(role.condition.expression);
celsConverted.push(celValue);
}
```
5. Group should be taken into consideration too.
```javascript theme={null}
return refinedRolesToBeMatched.filter((roleToBeMatched) => {
const memberMatch = roleToBeMatched.members.includes(`user:${user}`);
const groupMatch =
hasGroups &&
userGroups.some((group) =>
roleToBeMatched.members.includes(group.replace('groups/', 'group:')),
);
return memberMatch || groupMatch;
});
```
By following these steps, you can effectively identify all databases a specific user has access to, taking into account various permission levels and conditions.
## Summary
Congratulations! You've successfully created a user and database permission inspection tool using the Bytebase API. This allows you to:
1. Inspect which users have access to specific databases.
2. Inspect which databases a particular user can access.
By leveraging these API calls within existing DevOps platforms, organizations can improve their database access governance and security posture.