> ## Documentation Index
> Fetch the complete documentation index at: https://docs.bytebase.com/llms.txt
> Use this file to discover all available pages before exploring further.
# Automate Database Change with Jira
> Automate database changes using Jira and Bytebase.
In the [previous tutorial](/tutorials/database-change-management-with-jira-manual), we have set up a manual database change workflow with Jira and Bytebase. In this tutorial, we will show you how to automate the process by leveraging Jira and Bytebase Webhook and API. You need to finish the previous tutorial first.
Bytebase is an open-source database DevSecOps solution for Developer, Security, DBA, and Platform Engineering teams. The GitLab for database DevSecOps.
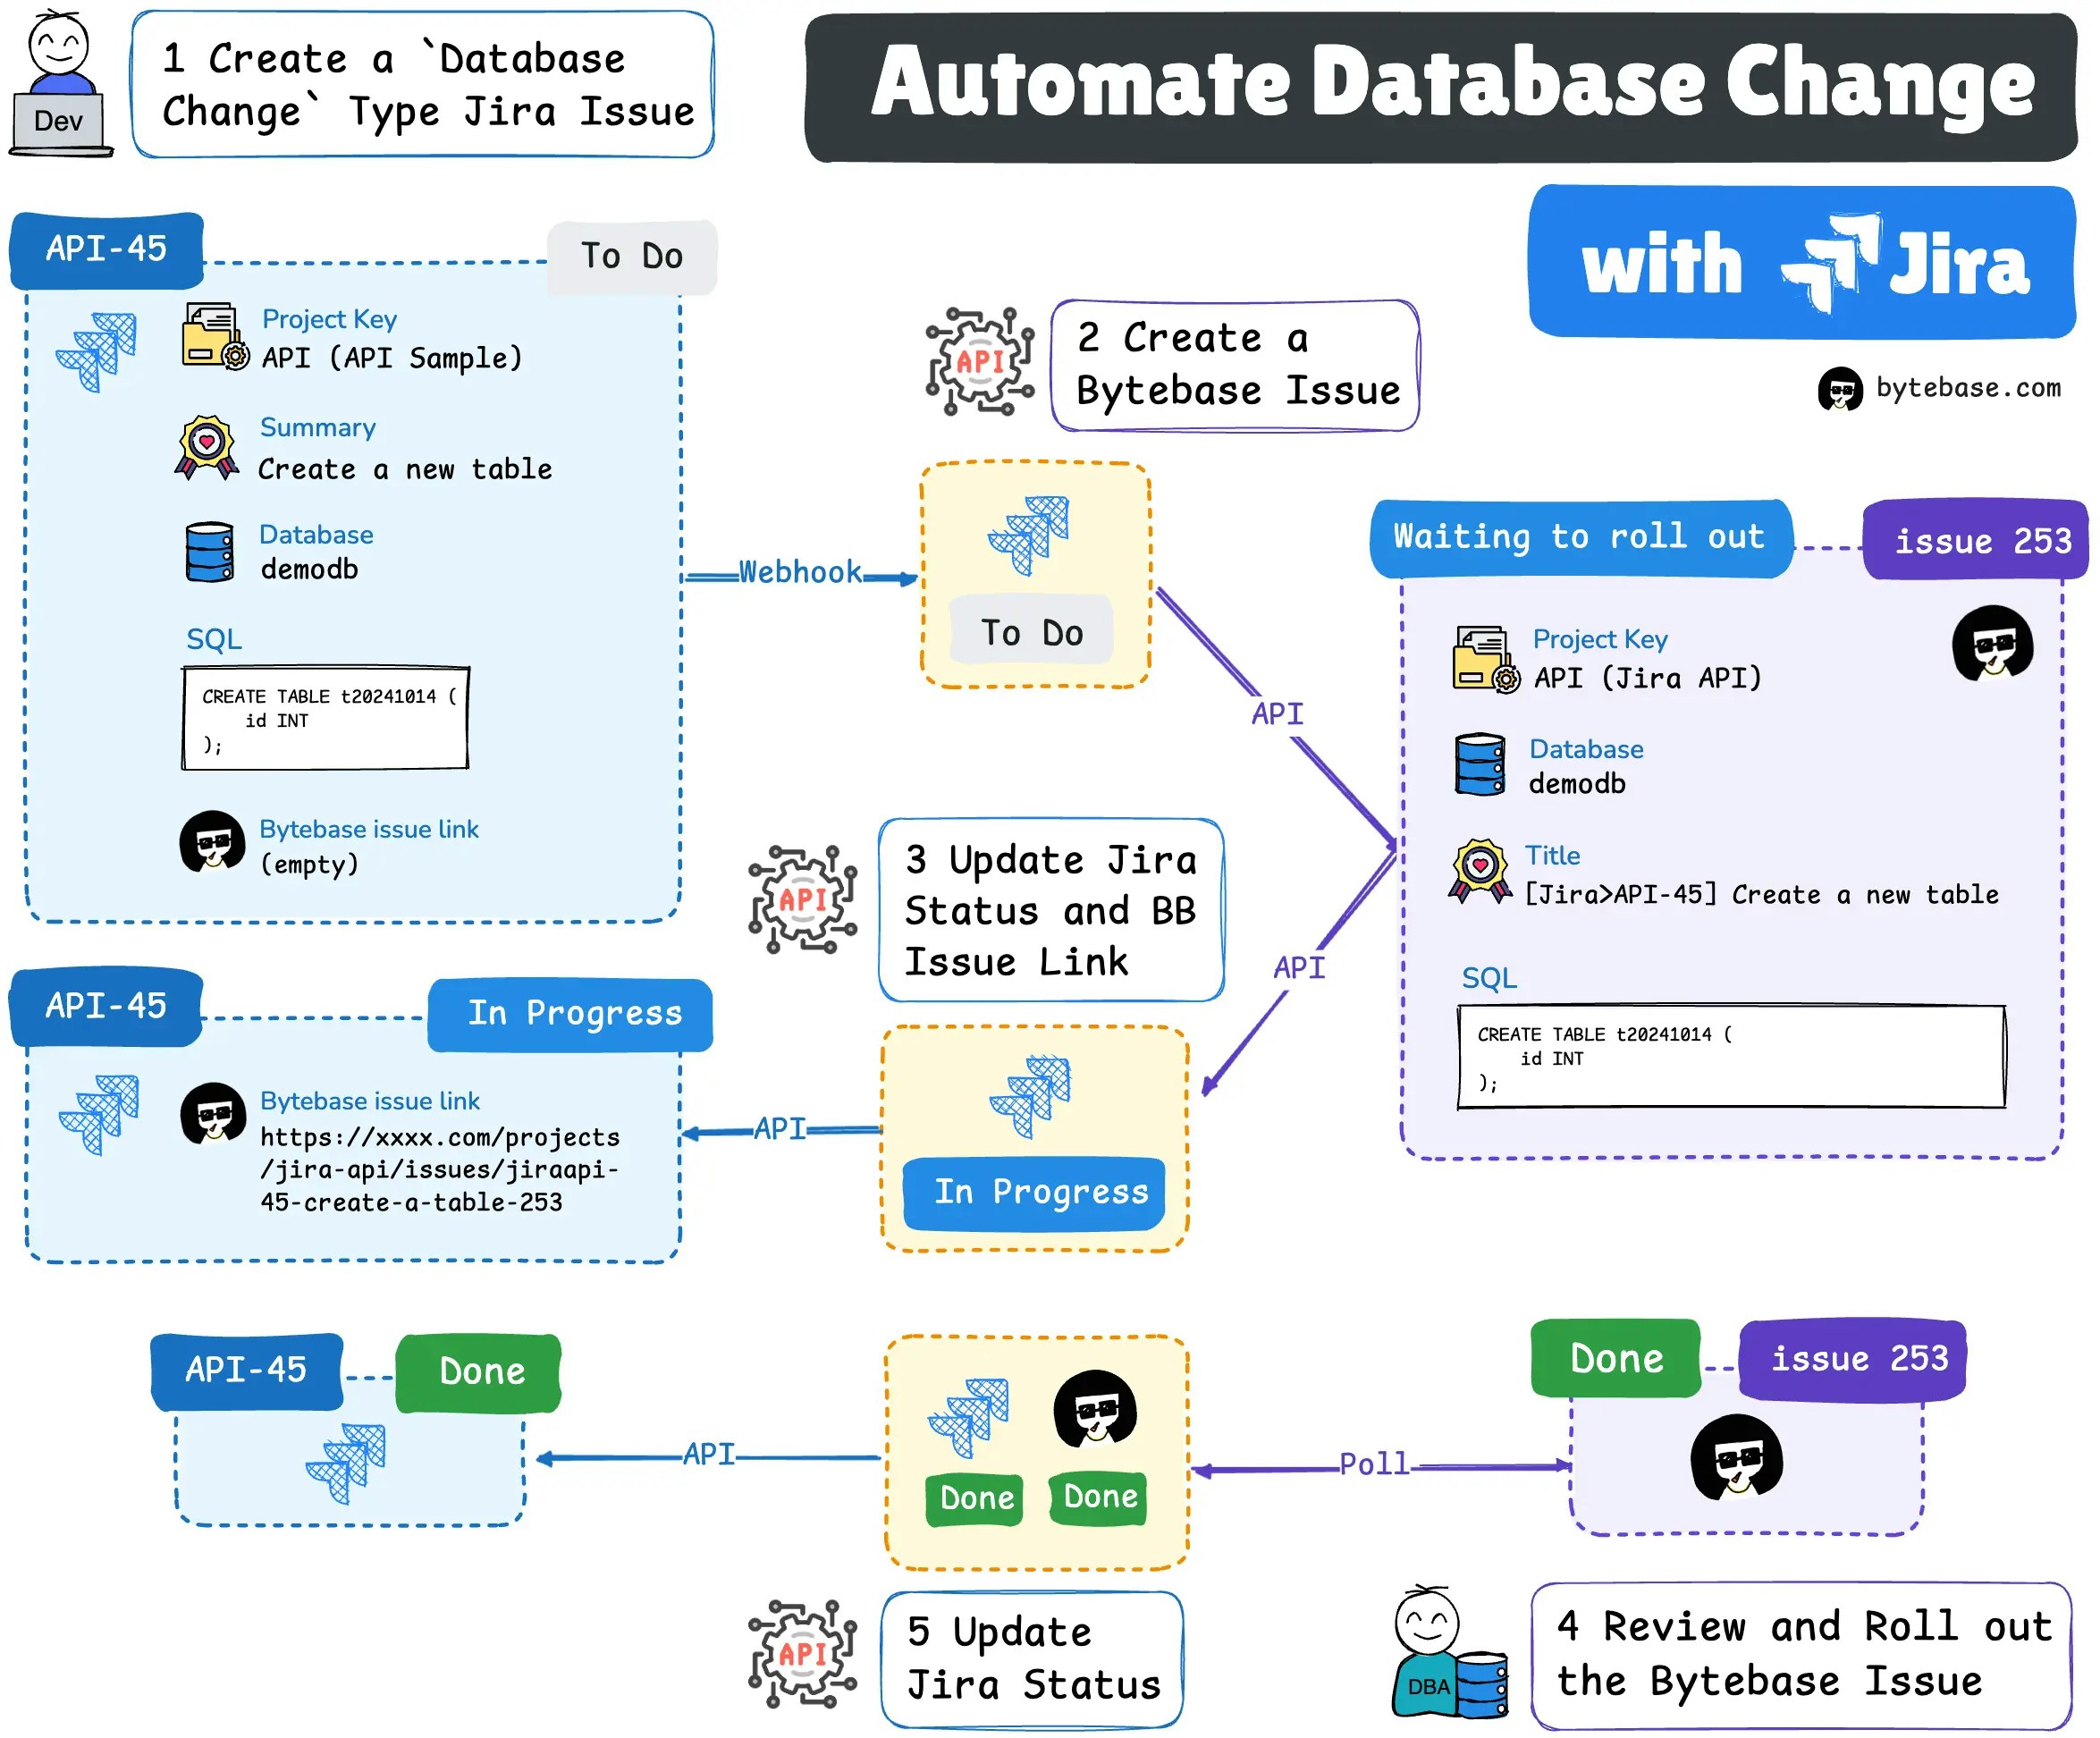
Here is what you will achieve by the end of this tutorial:
## Prerequisites
* A Jira workspace
* A Bytebase workspace
* [Manual Database Change with Jira](/tutorials/database-change-management-with-jira-manual) completed
* Download the [api-example repository](https://github.com/bytebase/example-api), you'll only need `jira` folder for this tutorial
## Workflow Overview
### Setup
1. Configure the environment variables and run the `jira` demo app
2. Setup Jira Webhook and API
### Change process
1. (Jira) Developer creates a Jira `Database Change` issue filling the **summary**, **SQL**, **database**, and **description** fields, the status is `Todo`.
2. (Jira Webhook -> Bytebase API) Once the Jira issue is created, Jira webhook will trigger Bytebase API to create a corresponding issue.
3. (Bytebase API -> Jira API) Once the Bytebase issue is created, the success response will trigger Jira API to set Jira issue with the Bytebase issue link and change the status to `In Progress`.
4. (Bytebase) DBA goes to Bytebase to deploy the database change.
5. (Bytebase Poll Comparison -> Jira API) Once the Bytebase issue rolls out and becomes `Done`, Jira issue status will be set to `Done`.
## Setup
### Configure the environment variables and run the `jira` demo app.
1. Go to the `jira` folder of the `api-example` repository, and copy `env-template.local` file as `.env.local`. Replace the placeholders with yours.
```javascript theme={null}
NEXT_PUBLIC_JIRA_BASE_URL=https://xxxxxx.atlassian.net
NEXT_PUBLIC_JIRA_EMAIL=xxx@xxxx.com
NEXT_PUBLIC_JIRA_API_TOKEN=xxxxxxx
NEXT_PUBLIC_JIRA_PROJECT_KEY=KEY
NEXT_PUBLIC_BB_PROJECT_NAME=projects/jira-api
NEXT_PUBLIC_BB_HOST=https://xxxxxxx
NEXT_PUBLIC_BB_SERVICE_ACCOUNT=xxxx@service.bytebase.com
NEXT_PUBLIC_BB_SERVICE_KEY=bbs_xxxxxx
```
2. Run `pnpm i` and `pnpm run dev`, you can run the demo app locally with `localhost:xxxx`. However, the app need to listen to webhook from Jira and Bytebase, so you need to make the app network accessible from both. By using [ngrok](https://ngrok.com/) or [vscode ports](https://code.visualstudio.com/docs/editor/port-forwarding), you can achieve this.
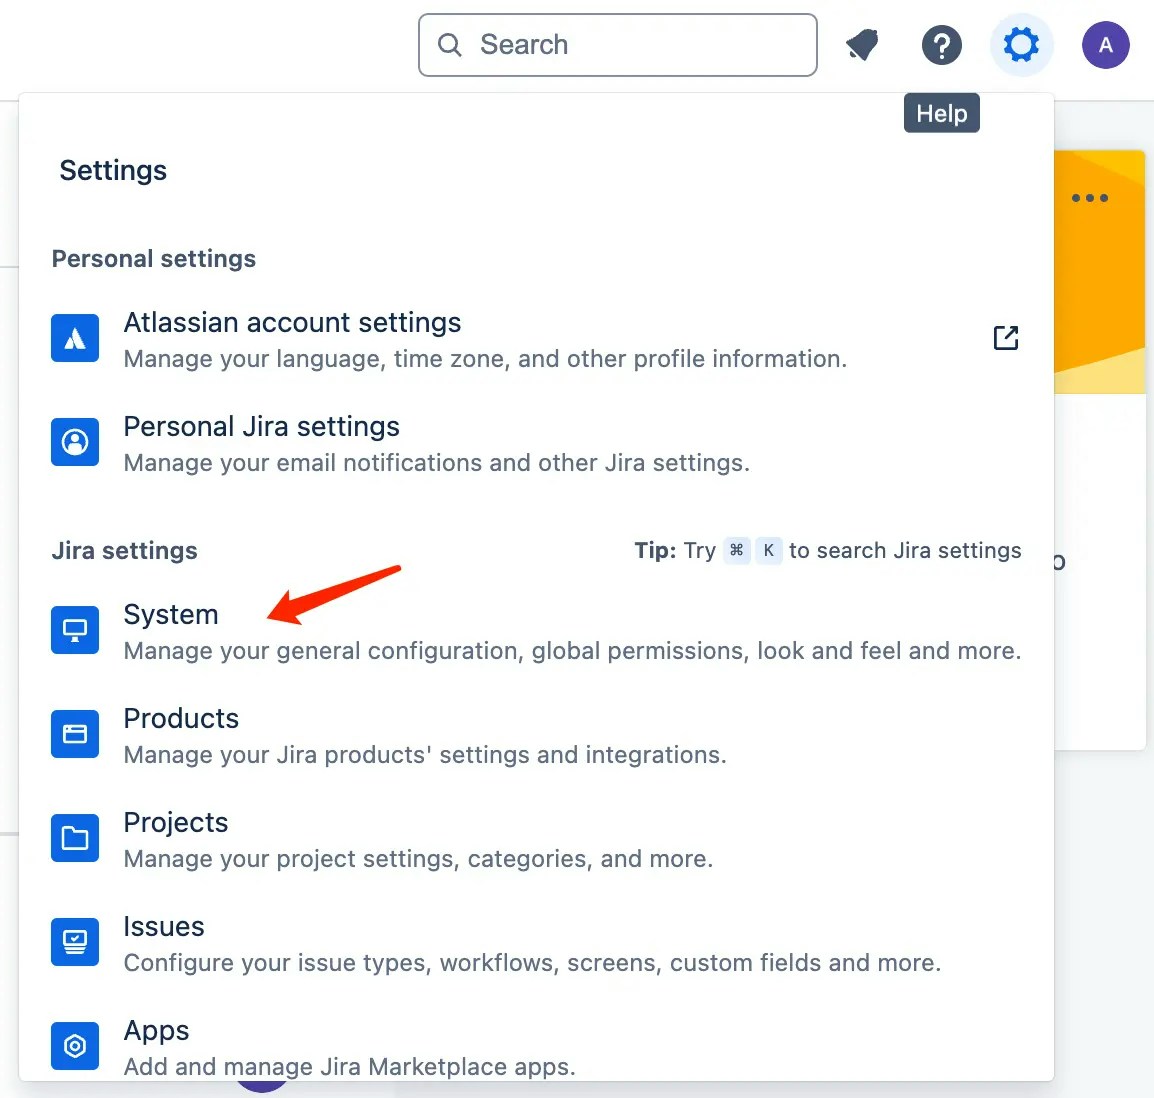
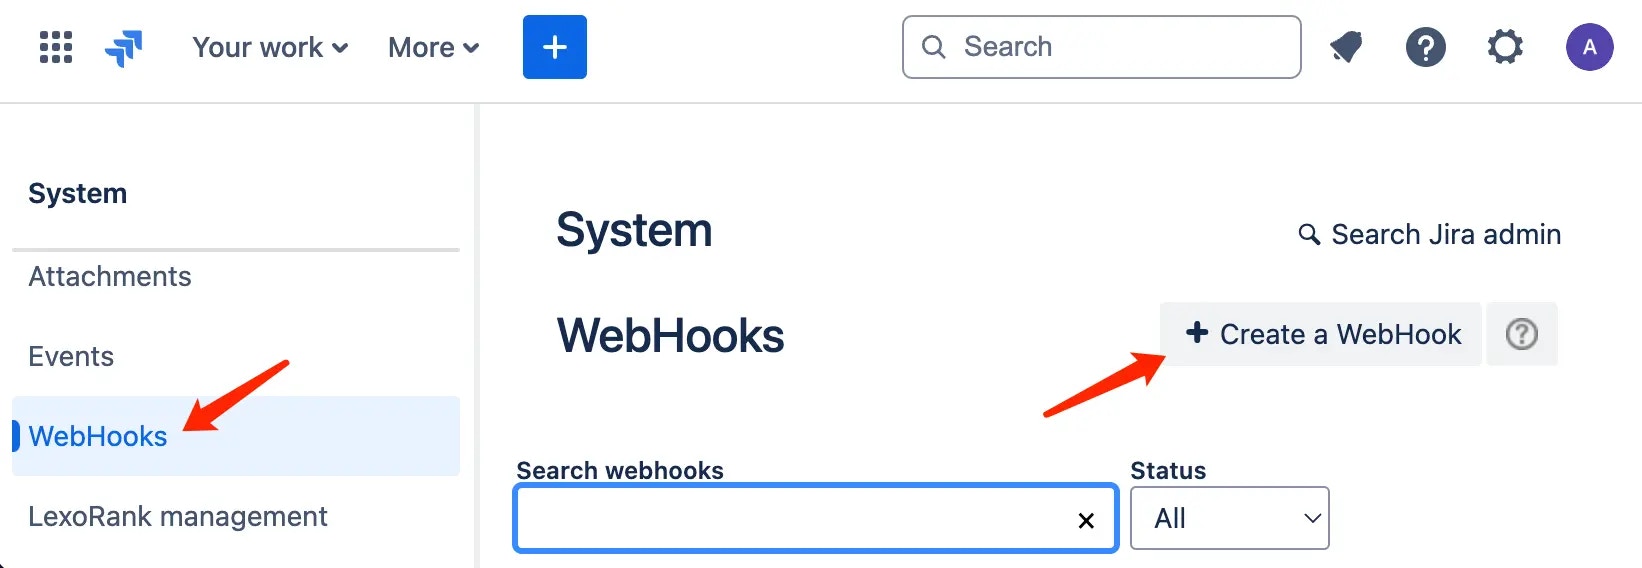
### Jira webhook: To trigger when Jira issue is created or updated
1. Go to Jira, click **Settings** and then **System settings** in the dropdown menu.
2. Click **WebHooks** on the left sidebar, and then click **+ Create a WebHook**.
3. Fill in the **URL**, remember to append `/api/receive-jira-issue-webhook` to your base URL for the demo jira app, select `Issue created and updated`, and click **Create**.
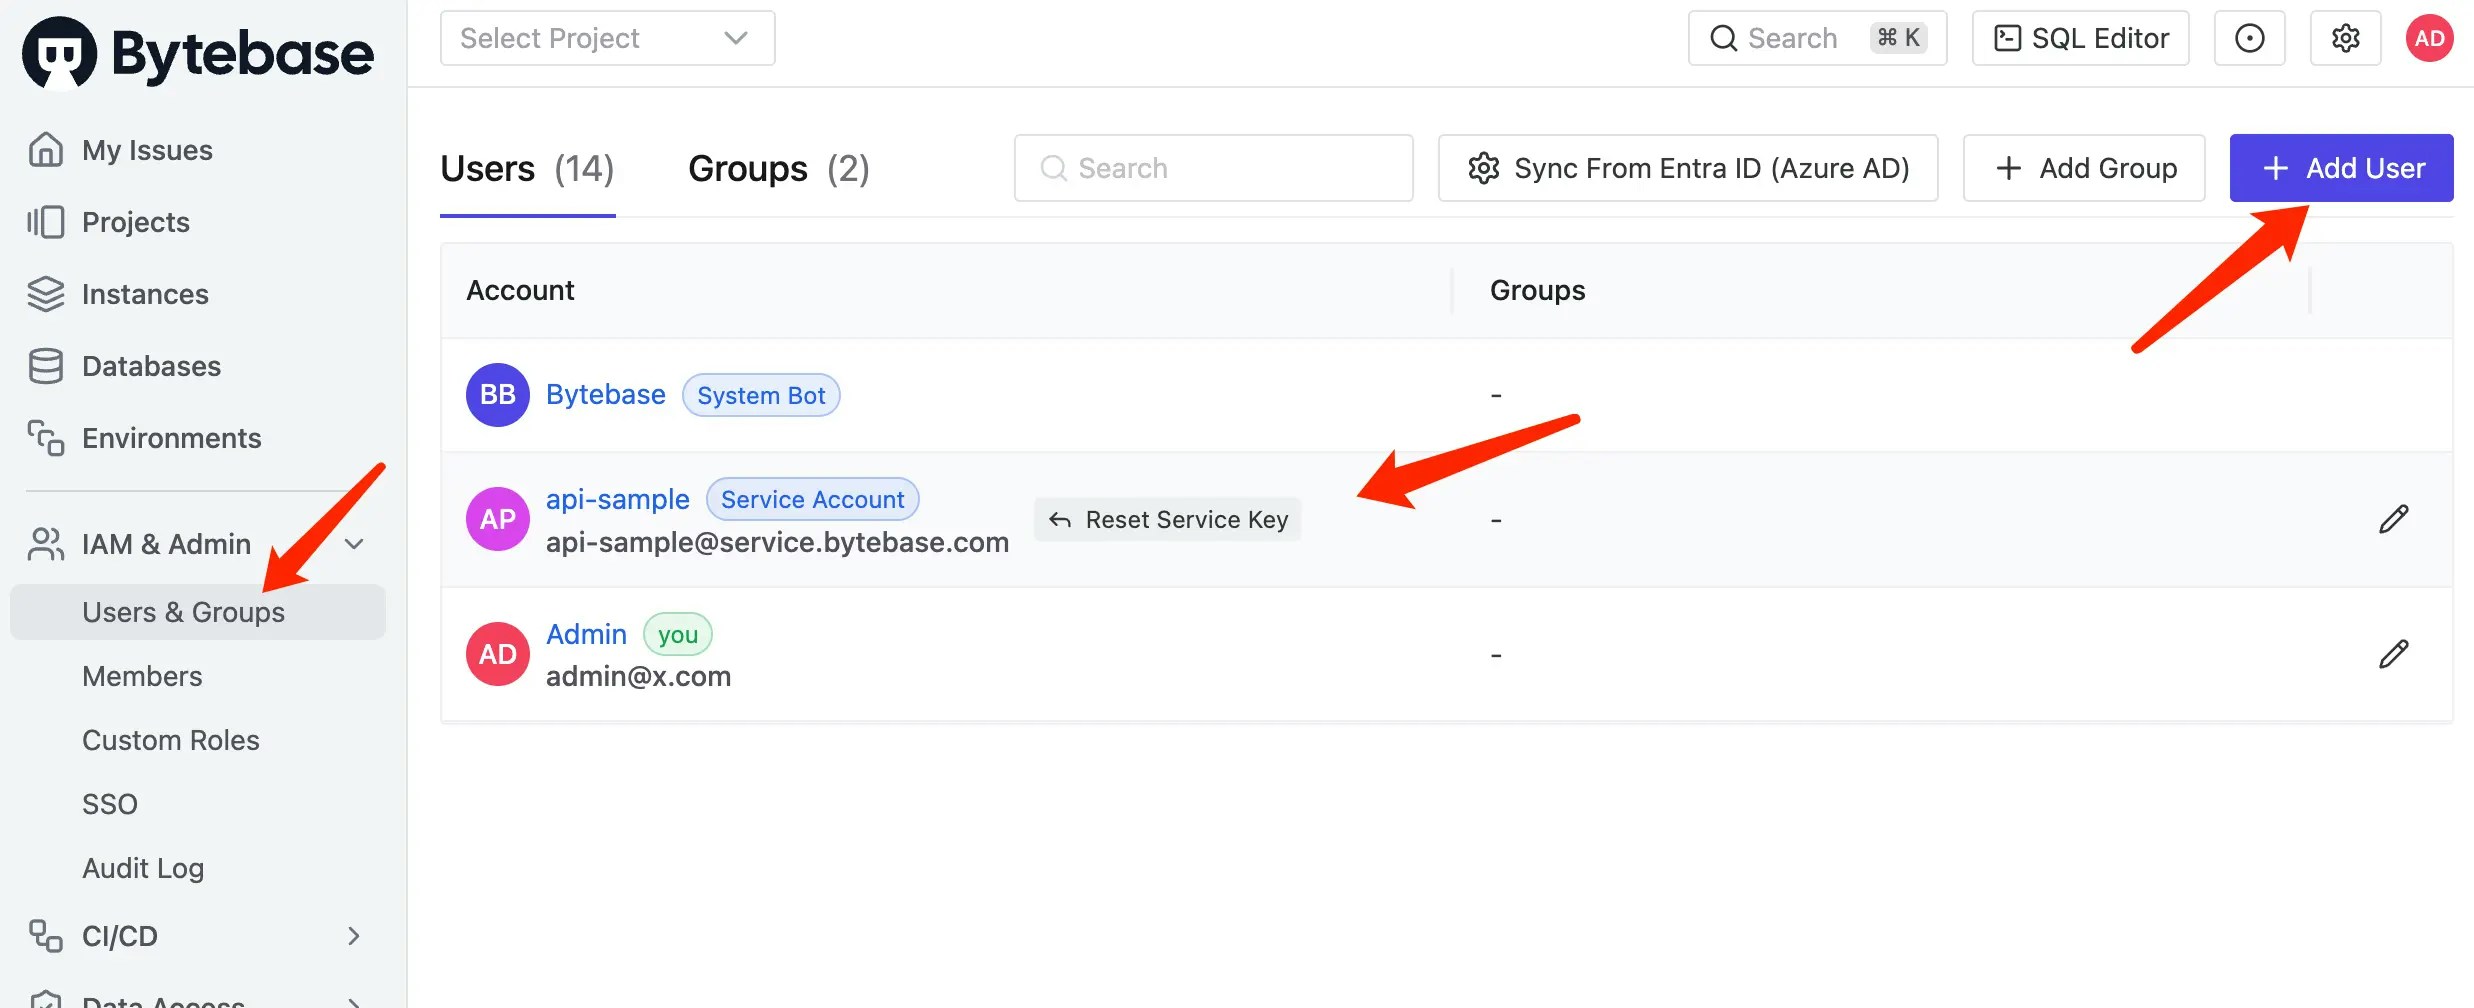
### Bytebase API: To create a Bytebase issue
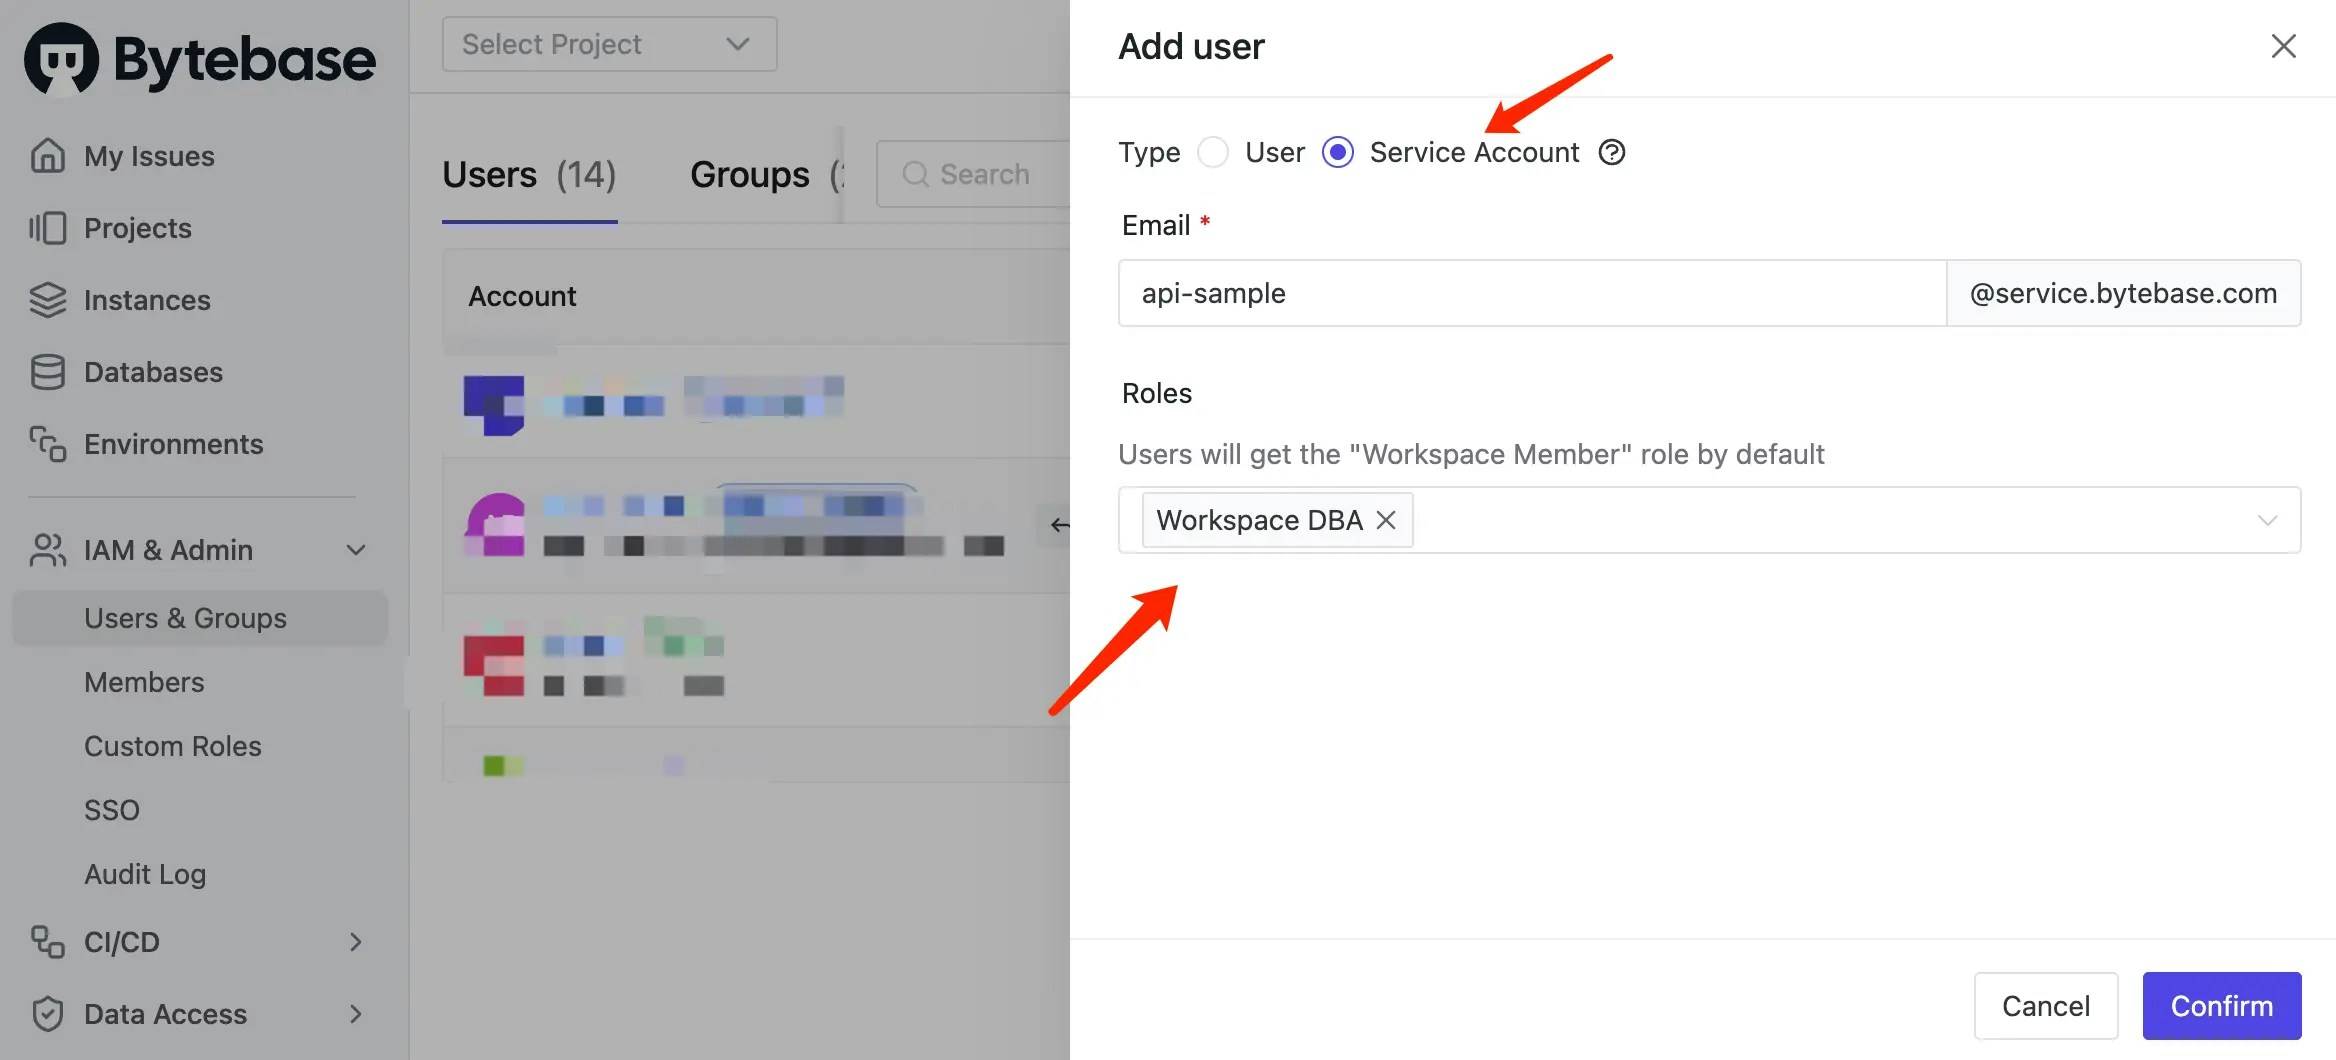
1. Go to Bytebase, click **IAM & Admin > Users & Groups** on the left sidebar, and then click **+Add User**.
2. Choose `Service Account` as **User Type**, fill in the **Email**, give it `Workspace DBA` role, and then click **Create**. Copy the **API Token** to the `.env.local` file.
### Jira API: To update Jira issue status to `In Progress`/ `Done` and set its Bytebase issue link
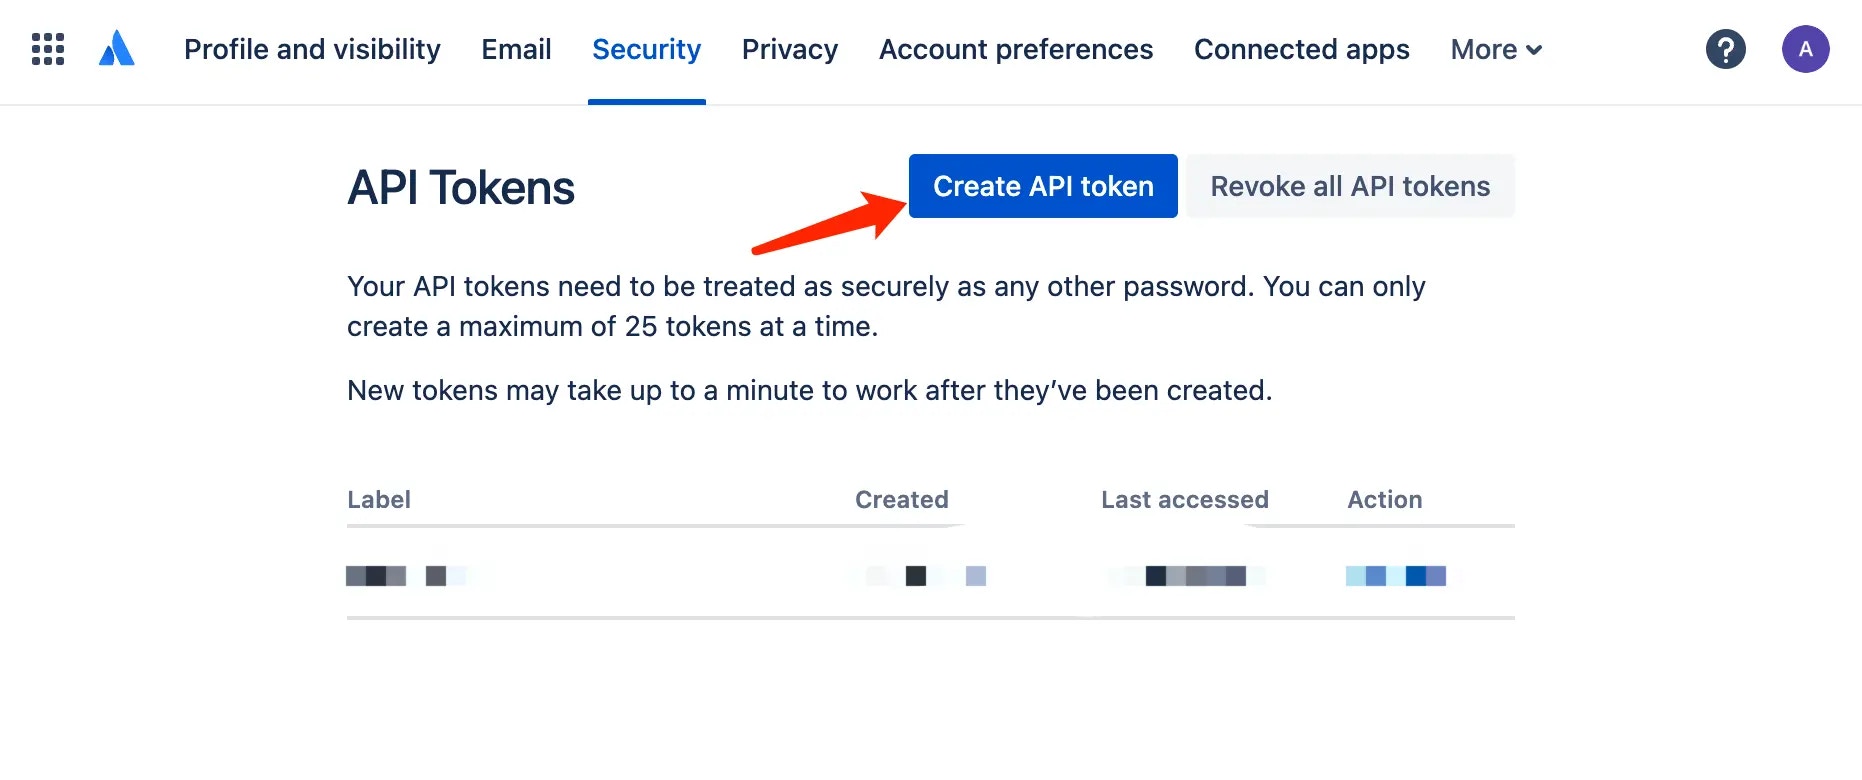
1. Go to [Atlassian Account >Security > API tokens](https://id.atlassian.com/manage-profile/security/api-tokens) to generate an API token. Copy the **API Token** to the `.env.local` file.
## Change process
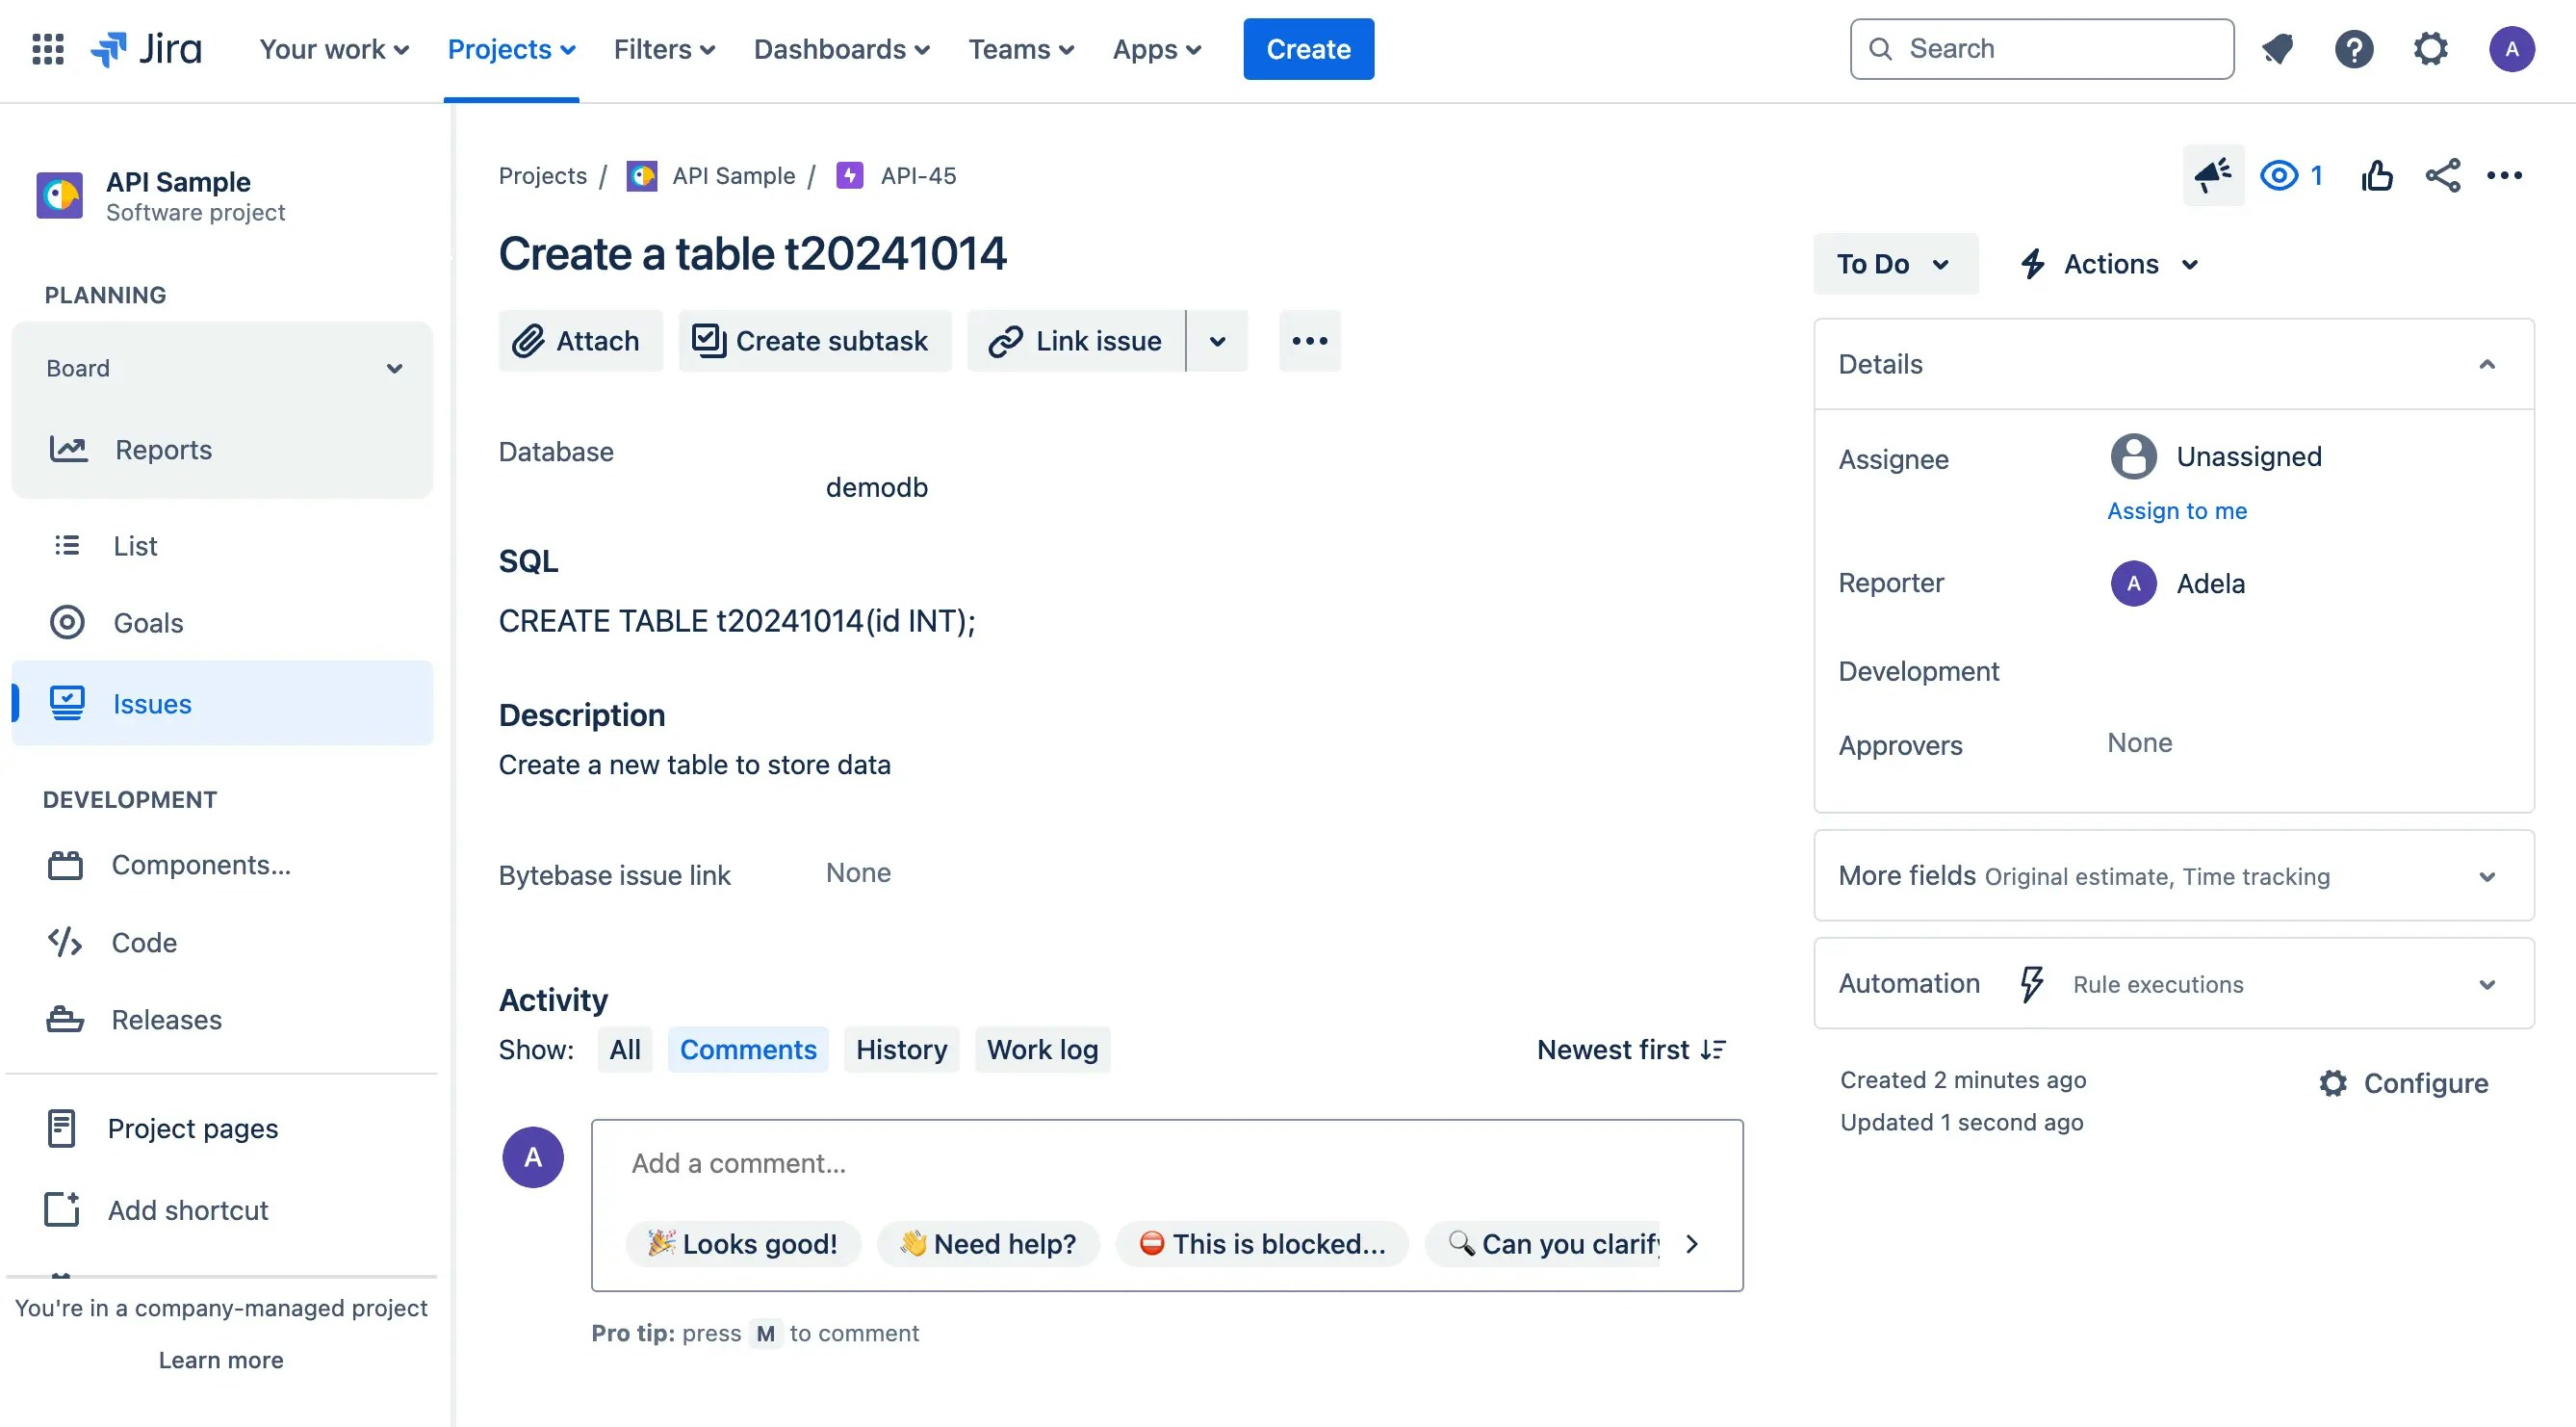
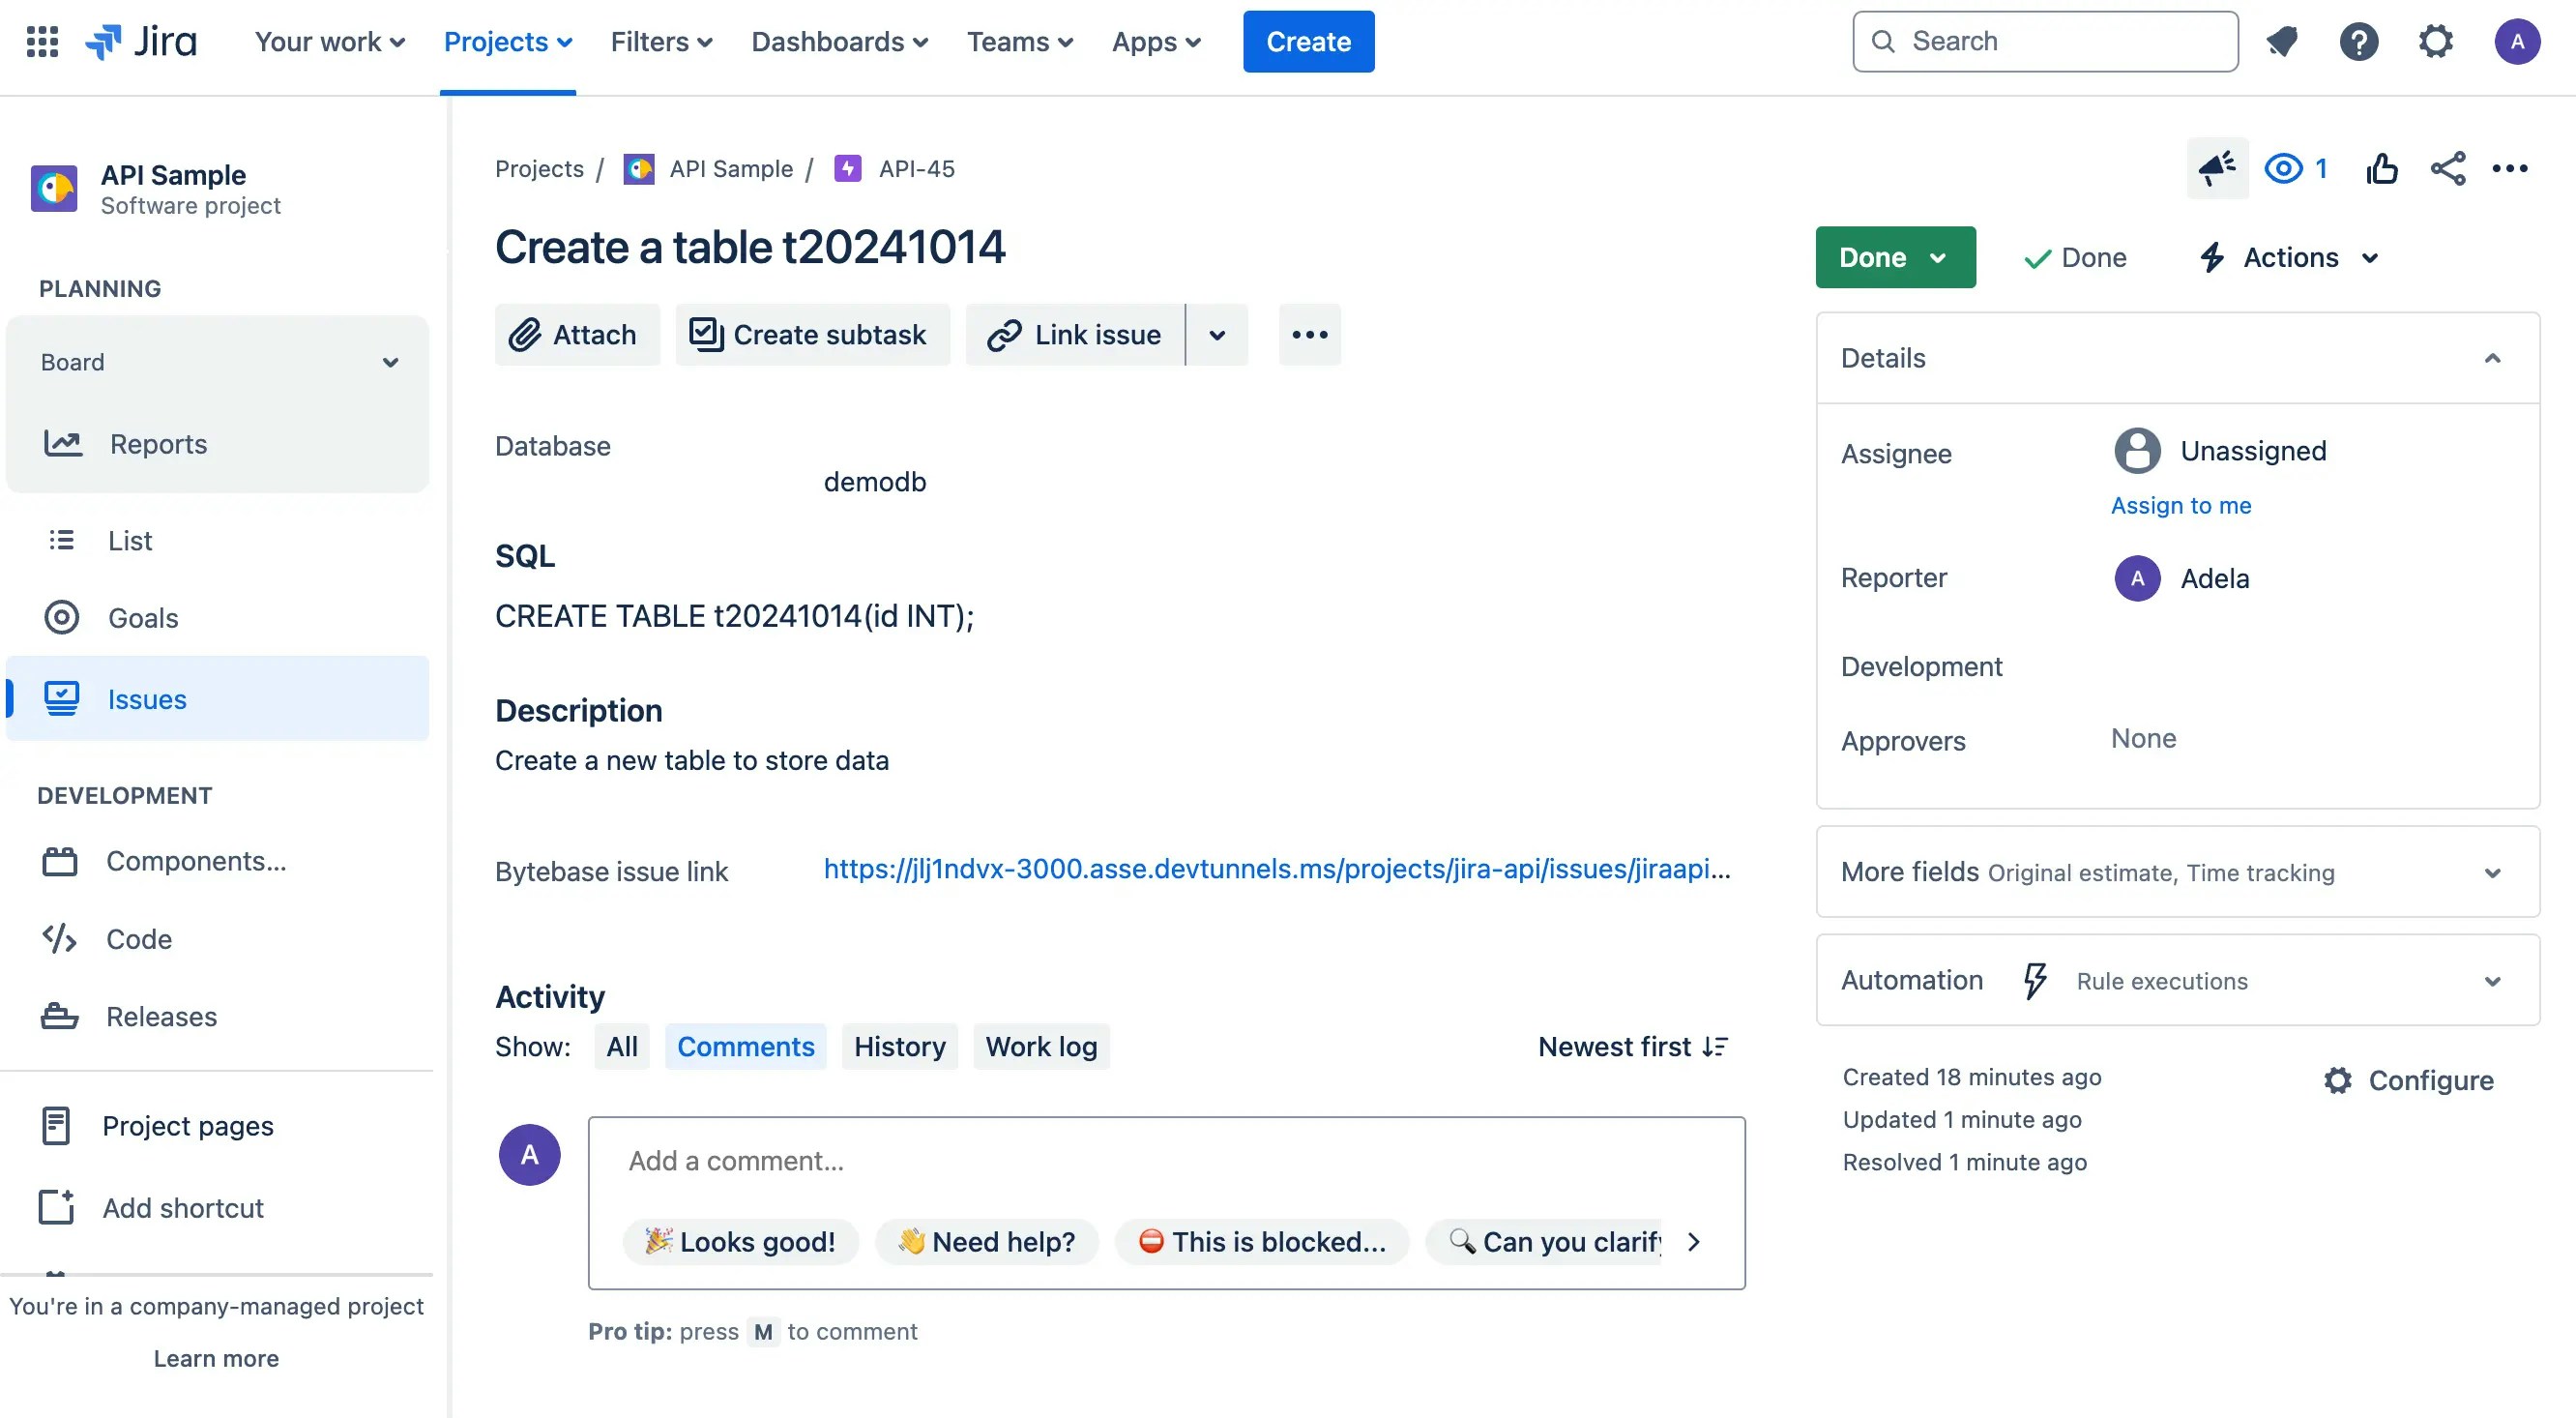
### Step 1 (Jira): Create a database change issue
1. You act as a developer, now go to the Jira project to create a `Database Change` issue, fill in the fields **summary**, **SQL**, **database**, and **description**, and click **Create**. Here's the screenshot of the issue.
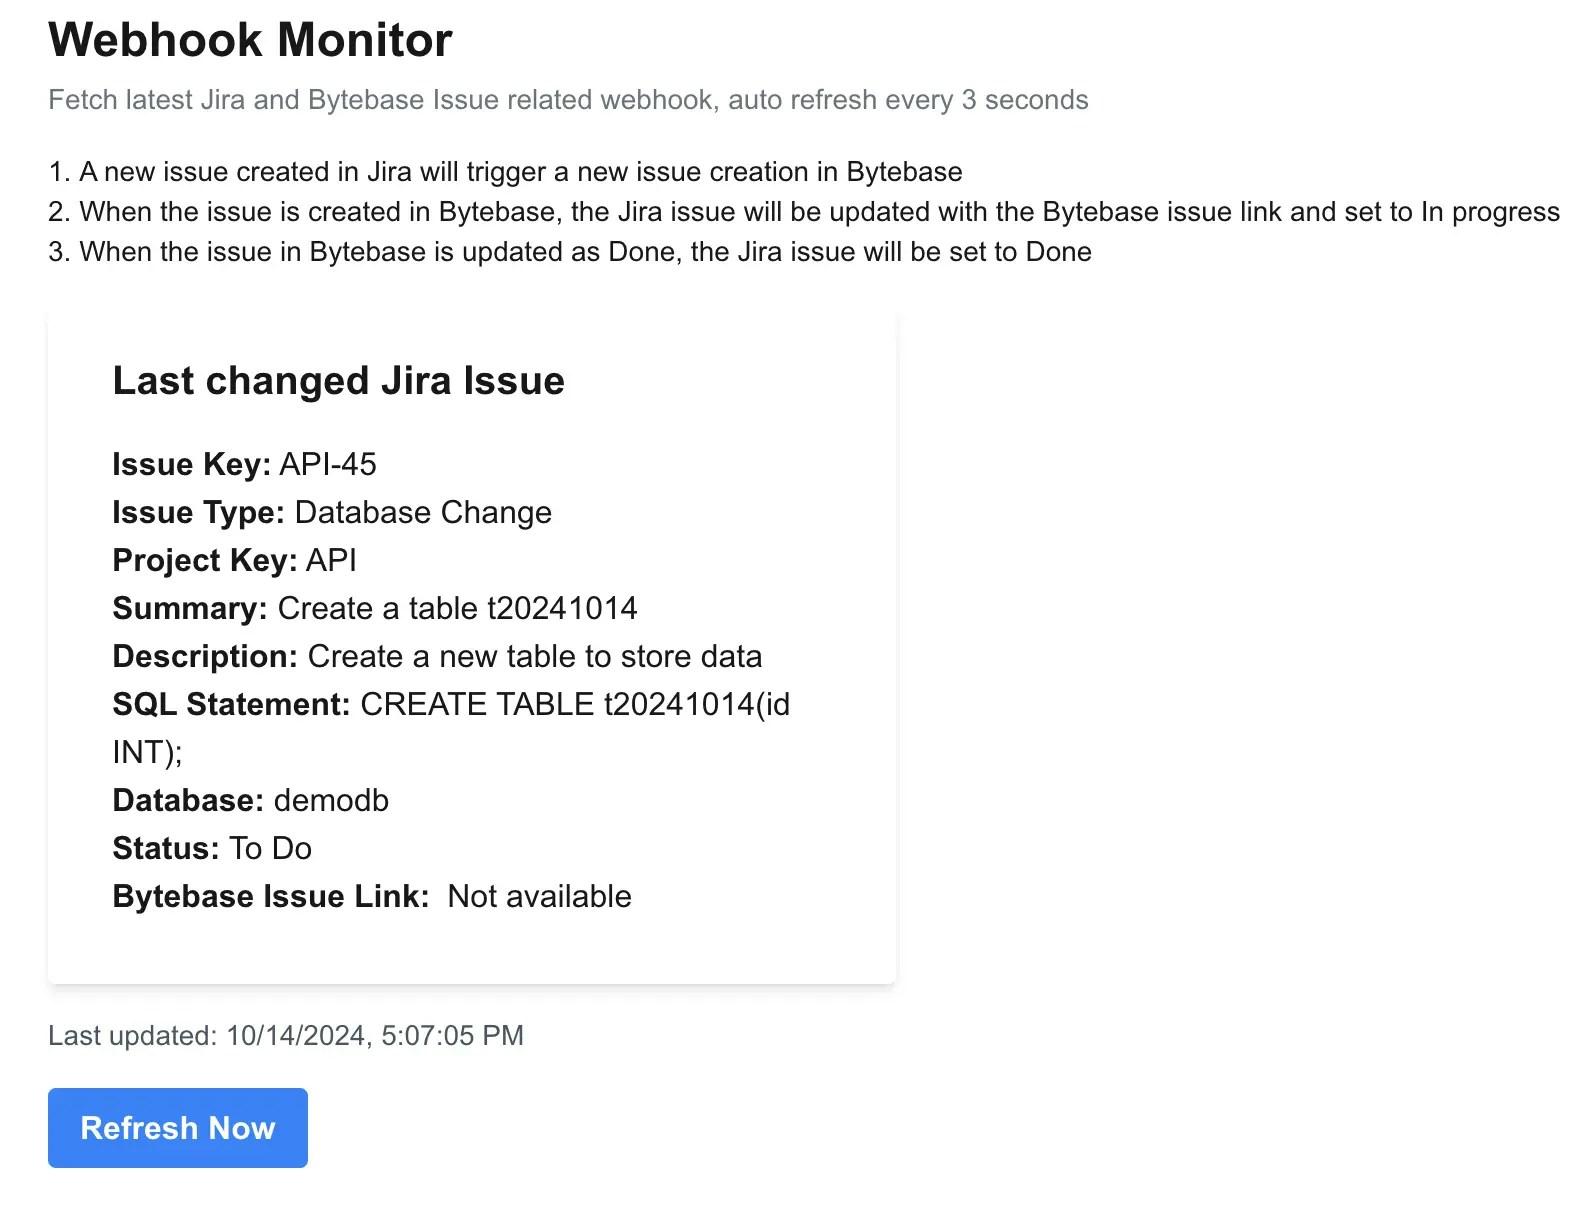
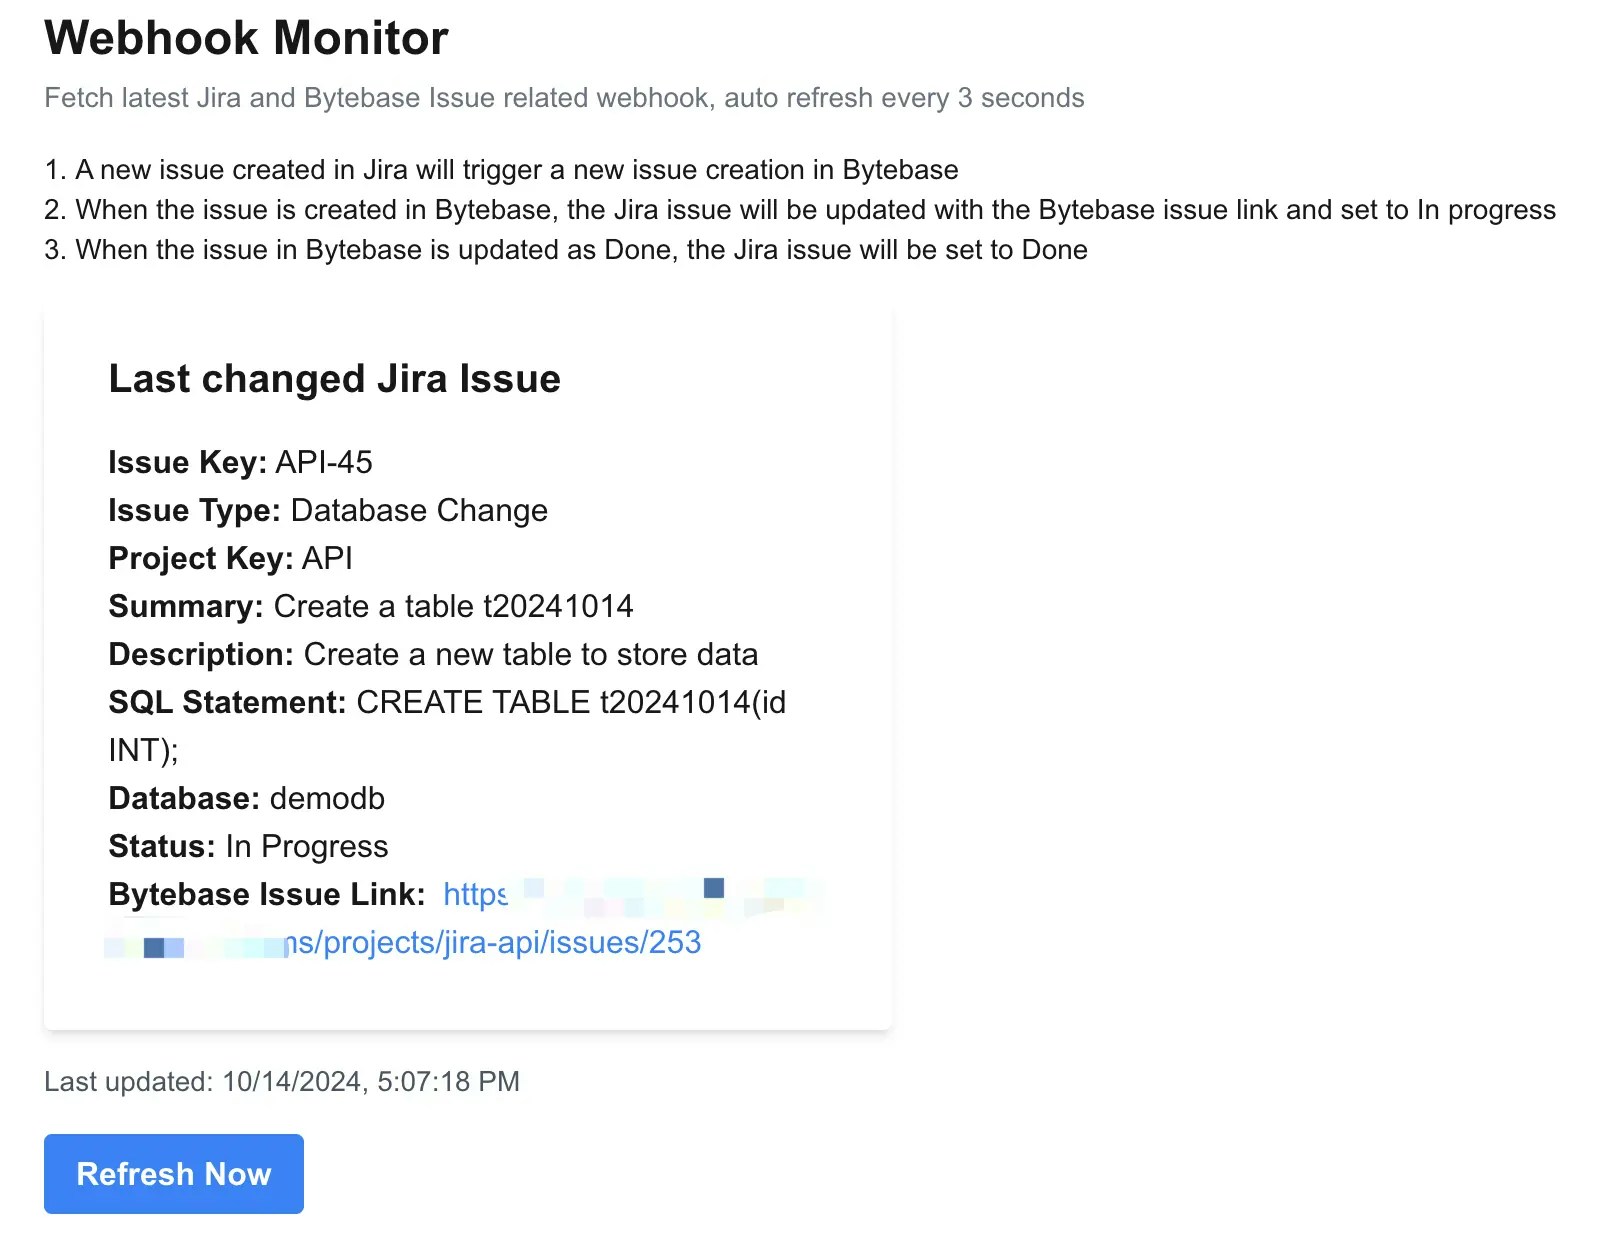
2. View the `jira` app demo, you will see there's a jira webhook received with `Todo` status.
### Step 2 (Jira Webhook -> Bytebase API) Once the Jira issue is created, Jira Webhook will trigger Bytebase API to create a corresponding issue
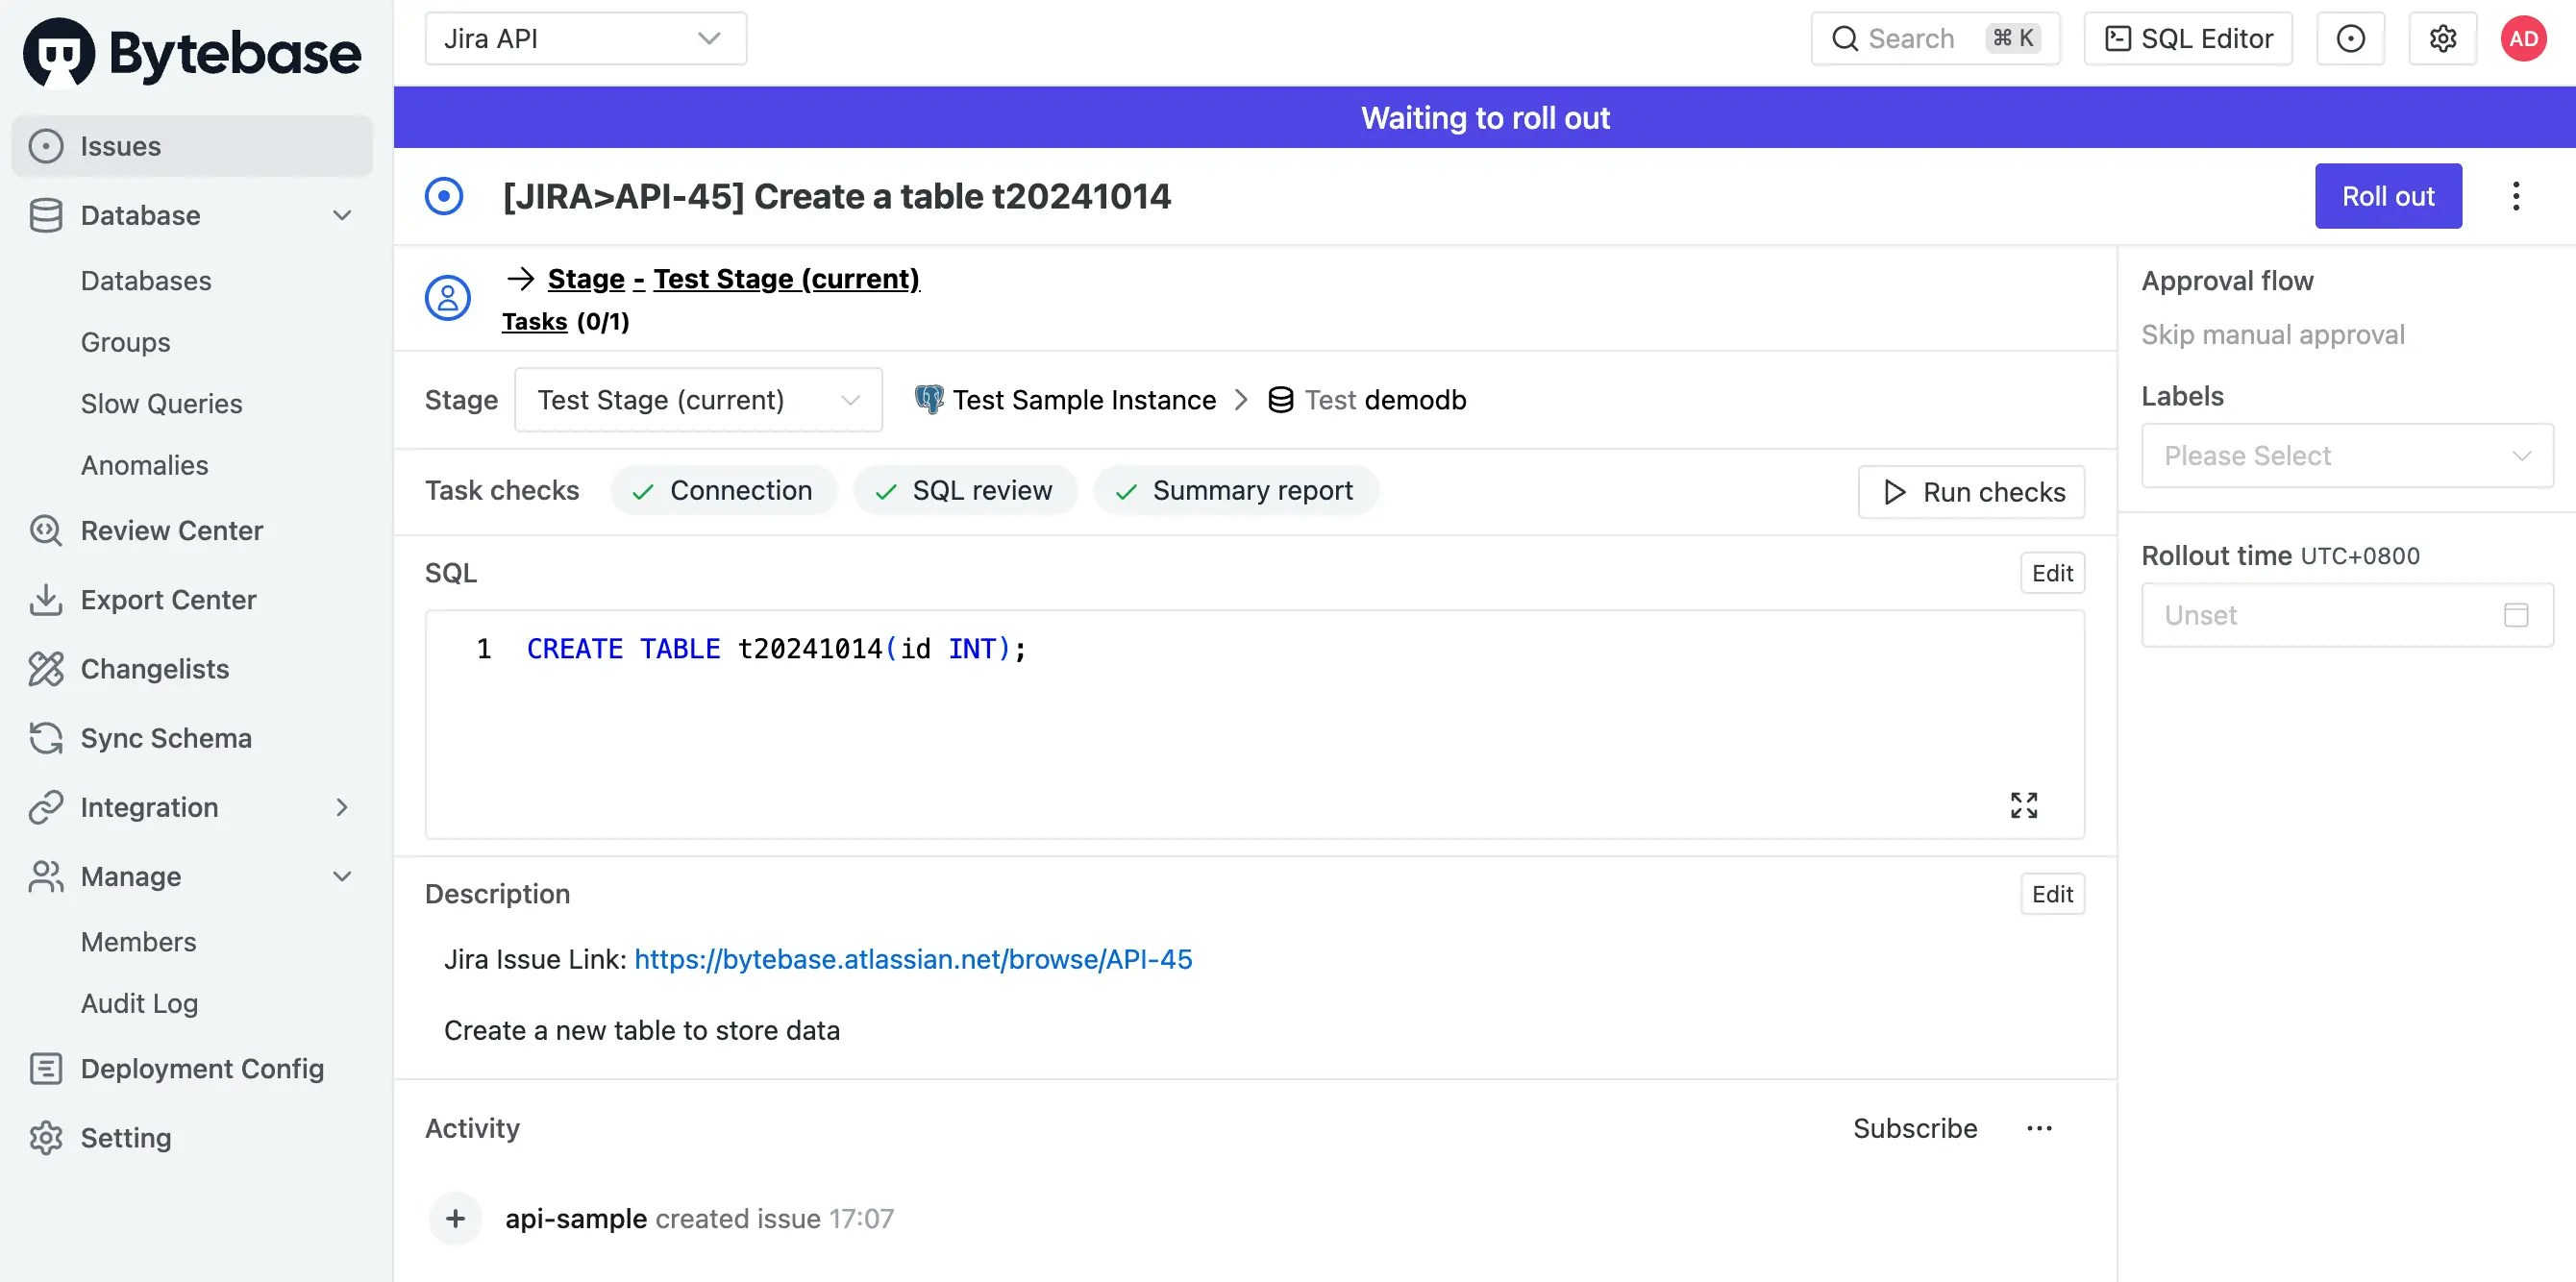
Go to the Bytebase project and find the issue which is waiting to rollout.
It's because the jira webhook trigger Bytebase API to create an issue there. The logic is in `src/api/receive-jira-issue-webhook/route.ts`.
1. When it receive the trigger, it checks if the issue type is `Database Change`. and then if the webhook event is `issue_created`.
```javascript theme={null}
const body: JiraWebhookPayload = await request.json();
const issueType = body.issue.fields.issuetype.name;
if (issueType !== 'Database Change') {
return Response.json({ error: 'Not a Database Change issue' }, { status: 400 });
}
const issueKey = body.issue.key;
...
let bytebaseIssueLink = body.issue.fields.customfield_10039;
f (body.webhookEvent === "jira:issue_created" && body.issue_event_type_name === "issue_created") {
...
```
2. If both are true, via Bytebase API, it will try to match the Jira's `project key` and Bytebase's `project name` with the ones you configured in the `.env.local`. then it will try to match the Jira's `database` with the database belonging to that Bytebase project.
```javascript theme={null}
...
// Fetch databases for the matching project
const databasesData = await fetchData(`${process.env.NEXT_PUBLIC_BB_HOST}/v1/${process.env.NEXT_PUBLIC_BB_PROJECT_NAME}/databases`, token);
// Find matching database
const matchingDatabase = databasesData.databases.find((db: BytebaseDatabase) => db.name.split('/').pop() === database);
if (!matchingDatabase) {
return Response.json({ error: 'No matching Bytebase database found' }, { status: 400 });
}
// Create Bytebase issue
const result = await createBBIssueWorkflow(matchingProject.name, matchingDatabase, sqlStatement, summary, description, issueKey);
```
3. Once matched, it will create a Bytebase issue.
```javascript theme={null}
// Create Bytebase issue
const result = await createBBIssueWorkflow(
matchingProject.name,
matchingDatabase,
sqlStatement,
summary,
description,
issueKey,
);
```
which internally involves four steps:
```javascript theme={null}
const sheetData = await createSheet(project, SQL);
const planData = await createPlan(project, database, sheetData.name);
const issueData = await createIssue(
project,
database,
planData.name,
summary,
description,
jiraIssueKey,
);
const rolloutData = await createRollout(project, planData.name);
```
### Step 3 (Bytebase API -> Jira API) Once the Bytebase issue is created, the Jira API will set Bytebase issue link in Jira issue, and set status as `In Progress`
1. If you go back to Jira, you'll see the Jira issue status becomes `In Progress` with **Bytebase url link** filled.
2. View the `jira` app demo, it's updated, too.
The logic is still in `src/api/receive-jira-issue-webhook/route.ts`.
1. Once the Bytebase issue is created via API, the demo app will parse the **Bytebase issue link**.
```javascript theme={null}
if (result.success && result.issueLink) {
bytebaseIssueLink = result.issueLink;
parsedData.bytebaseIssueLink = bytebaseIssueLink;
try {
// Update Jira issue with Bytebase link and set status to "In Progress"
await updateJiraIssueAfterBBIssueCreated(issueKey, bytebaseIssueLink);
} catch (error) {
return Response.json(
{
error: 'Failed to update Jira issue',
details: error instanceof Error ? error.message : String(error),
},
{ status: 500 },
);
}
}
```
2. Then call the Jira API to update **Bytebase issue link** field and change the status from `Todo` to `In Progress`.
```javascript theme={null}
...
await updateJiraIssueAfterBBIssueCreated(issueKey, bytebaseIssueLink);
```
Here we need to call two Jira APIs:
* `/rest/api/3/issue/${issueKey}` to update Bytebase Link
* `/rest/api/3/issue/${issueKey}/transitions` to change the status
### Step 4 (Bytebase) DBA goes to Bytebase to deploy the database change.
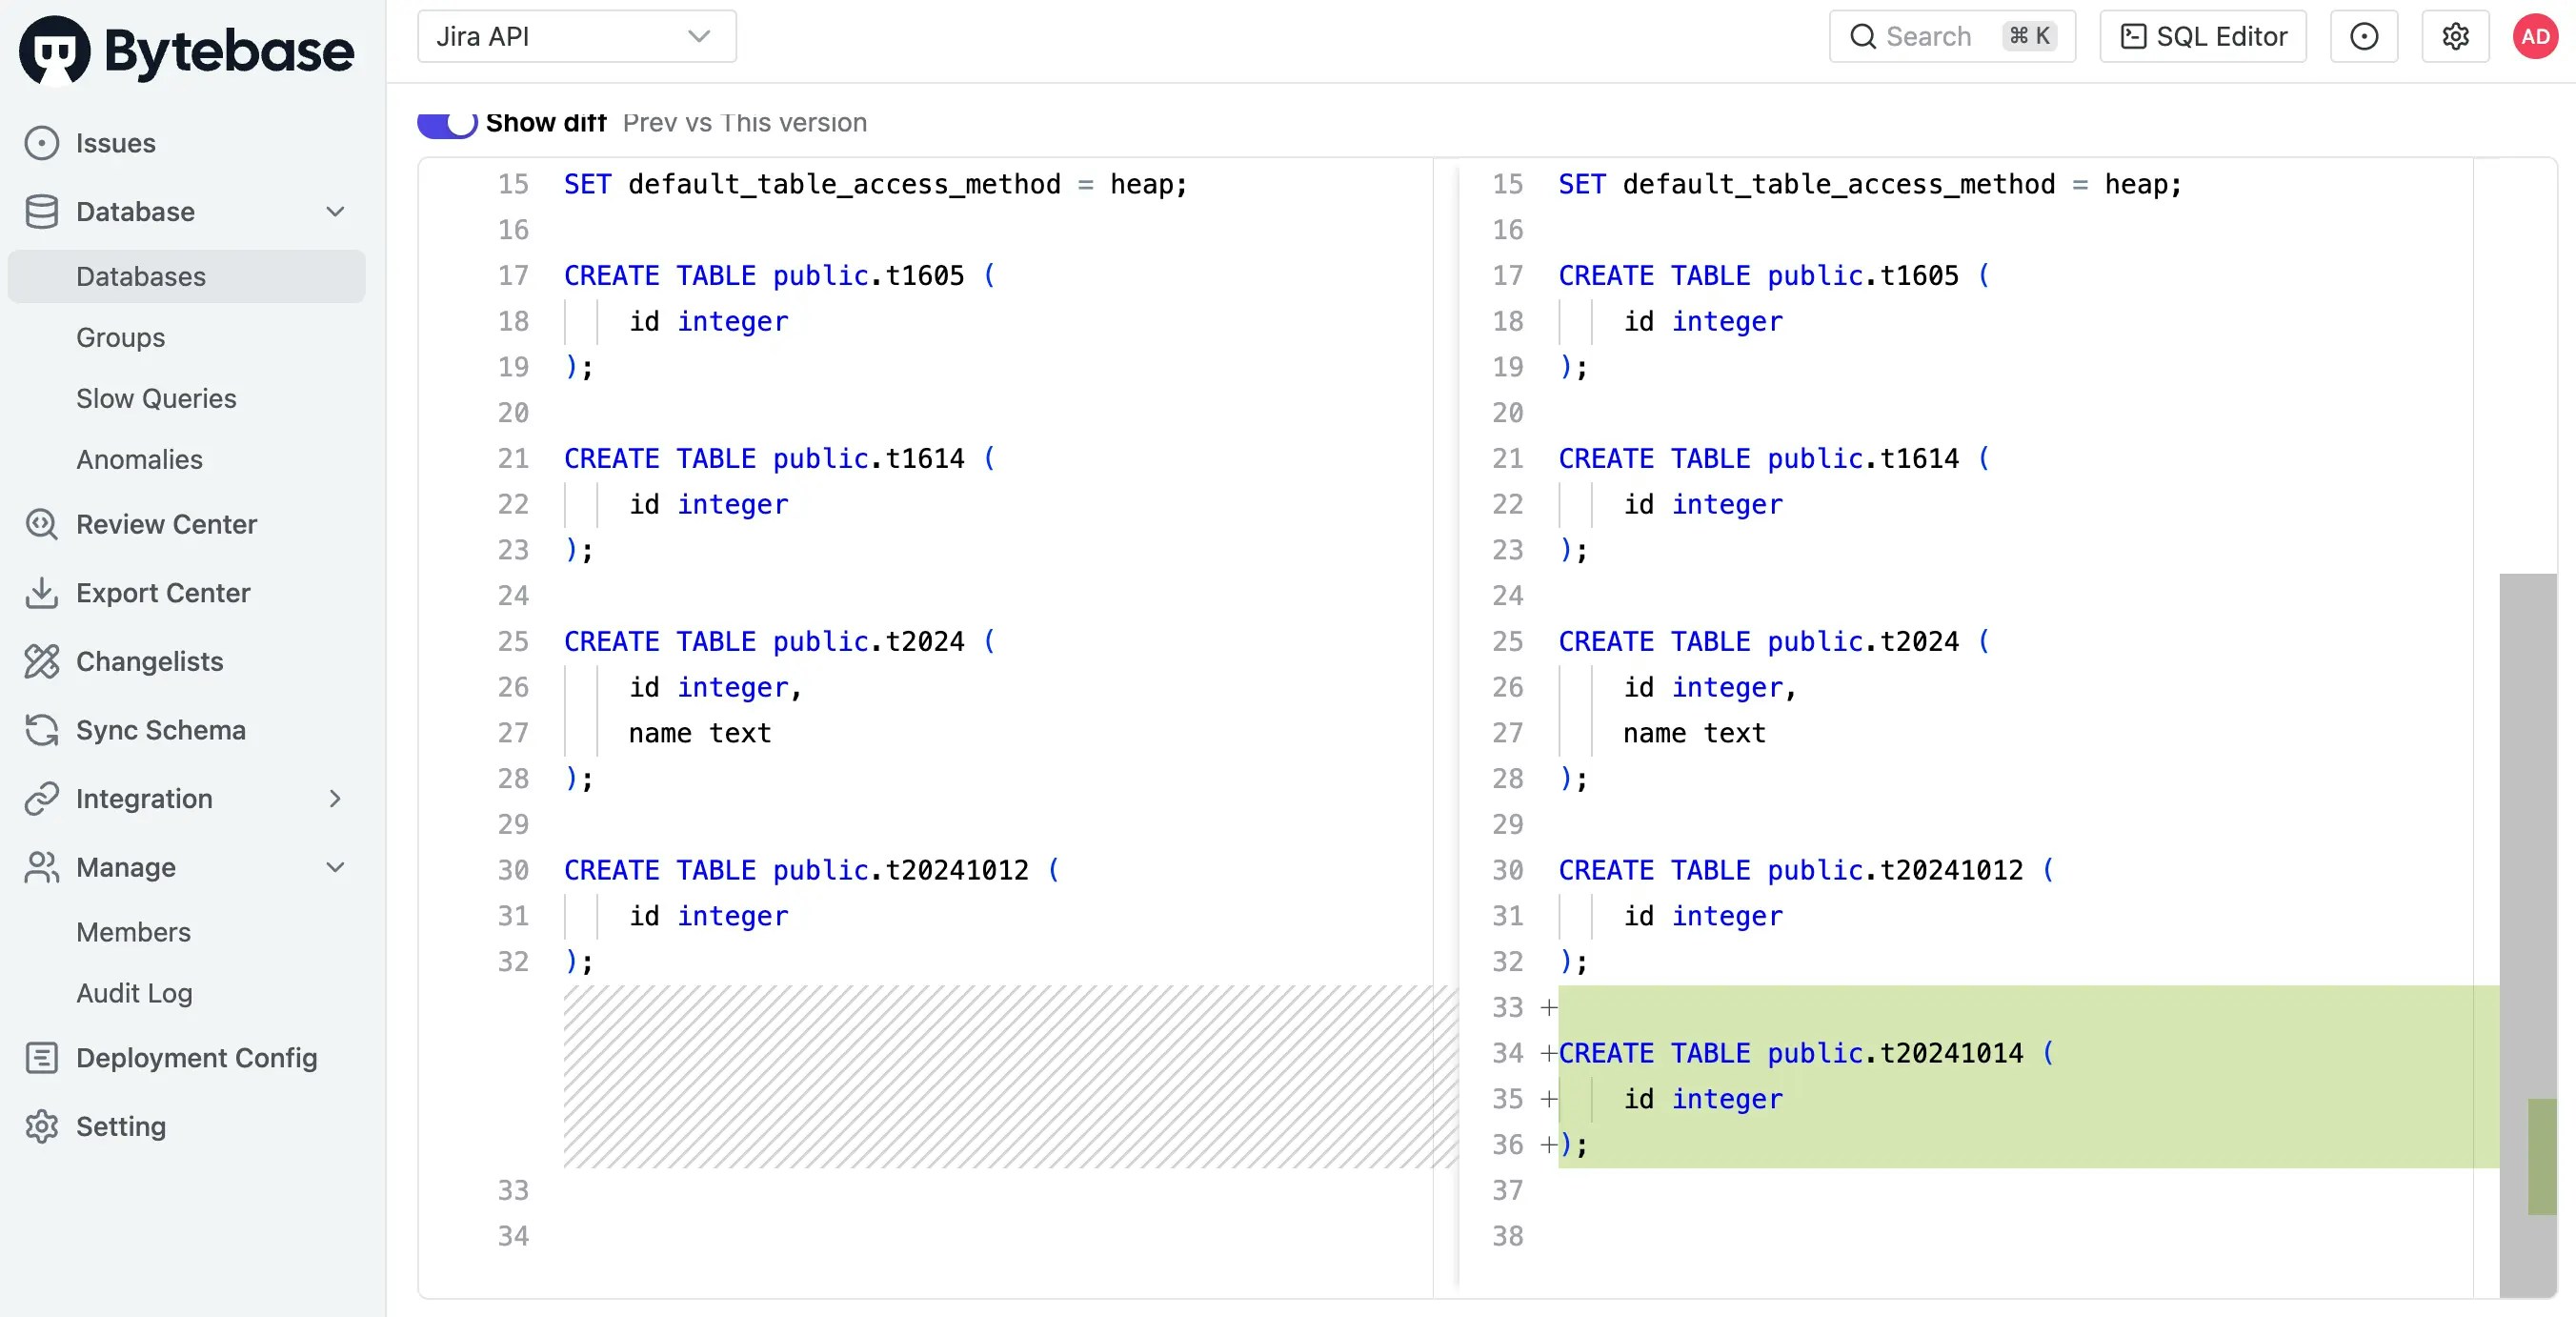
1. You now act as DBA, go to Bytebase to deploy the database change.
2. Once change is rolled out, Bytebase will record the change in the database **Change History**.
3. You can also click **View change** to view the change diff.
### Step 5 (Bytebase Poll Comparison -> Jira API) Once the Bytebase issue rolls out and becomes `Done`, Jira API will set Jira issue status as `Done`.
1. Once the issue has rolled out in Bytebase, the Bytebase poll comparison will run, and if there's any change, it will trigger `jira` app demo.
2. Go to Jira, you'll see the Jira issue status becomes `Done`.
The logic is in `src/app/api/poll-bytebase-issue/route.ts`. Bytebase will poll the issue status every 3 seconds, if it's a issue update, it will parse the Jira issue key from the Bytebase issue name, and then call the Jira API to update the issue status to `Done`.
```javascript theme={null}
for (const issue of issues) {
const jiraIssueKeyMatch = issue.title.match(/\[JIRA>([^\]]+)\]/);
const jiraIssueKey = jiraIssueKeyMatch ? jiraIssueKeyMatch[1] : null;
// Skip if no Jira issue is linked
if (!jiraIssueKey) continue;
// Skip if we've already processed this issue with the same status
const lastStatus = processedIssues.get(issue.name);
if (lastStatus === issue.status) continue;
// Update the processed issues map
processedIssues.set(issue.name, issue.status);
let jiraStatus;
if (issue.status === "DONE") {
jiraStatus = "Done";
} else if (issue.status === "OPEN") {
jiraStatus = "In Progress";
}
if (jiraStatus) {
try {
await updateJiraIssueStatus(jiraIssueKey, jiraStatus);
...
```
## Summary
In this tutorial, you have successfully set up a automatic database change workflow with Jira and Bytebase.
We eliminate most of the manual process in the last tutorial.
1. Bytebase issue is automatically created. And the created issue link is set automatically in the Jira issue.
2. Once Bytebase rolls out the SQL, the Jira issue status is updated automatically.
If you want to automate further, you can also call Bytebase API to approve and deploy the SQL.
 ## Prerequisites
* A Jira workspace
* A Bytebase workspace
* [Manual Database Change with Jira](/tutorials/database-change-management-with-jira-manual) completed
* Download the [api-example repository](https://github.com/bytebase/example-api), you'll only need `jira` folder for this tutorial
## Workflow Overview
### Setup
1. Configure the environment variables and run the `jira` demo app
2. Setup Jira Webhook and API
### Change process
1. (Jira) Developer creates a Jira `Database Change` issue filling the **summary**, **SQL**, **database**, and **description** fields, the status is `Todo`.
2. (Jira Webhook -> Bytebase API) Once the Jira issue is created, Jira webhook will trigger Bytebase API to create a corresponding issue.
3. (Bytebase API -> Jira API) Once the Bytebase issue is created, the success response will trigger Jira API to set Jira issue with the Bytebase issue link and change the status to `In Progress`.
4. (Bytebase) DBA goes to Bytebase to deploy the database change.
5. (Bytebase Poll Comparison -> Jira API) Once the Bytebase issue rolls out and becomes `Done`, Jira issue status will be set to `Done`.
## Prerequisites
* A Jira workspace
* A Bytebase workspace
* [Manual Database Change with Jira](/tutorials/database-change-management-with-jira-manual) completed
* Download the [api-example repository](https://github.com/bytebase/example-api), you'll only need `jira` folder for this tutorial
## Workflow Overview
### Setup
1. Configure the environment variables and run the `jira` demo app
2. Setup Jira Webhook and API
### Change process
1. (Jira) Developer creates a Jira `Database Change` issue filling the **summary**, **SQL**, **database**, and **description** fields, the status is `Todo`.
2. (Jira Webhook -> Bytebase API) Once the Jira issue is created, Jira webhook will trigger Bytebase API to create a corresponding issue.
3. (Bytebase API -> Jira API) Once the Bytebase issue is created, the success response will trigger Jira API to set Jira issue with the Bytebase issue link and change the status to `In Progress`.
4. (Bytebase) DBA goes to Bytebase to deploy the database change.
5. (Bytebase Poll Comparison -> Jira API) Once the Bytebase issue rolls out and becomes `Done`, Jira issue status will be set to `Done`.
 2. Click **WebHooks** on the left sidebar, and then click **+ Create a WebHook**.
 3. Fill in the **URL**, remember to append `/api/receive-jira-issue-webhook` to your base URL for the demo jira app, select `Issue created and updated`, and click **Create**.
 ### Bytebase API: To create a Bytebase issue
1. Go to Bytebase, click **IAM & Admin > Users & Groups** on the left sidebar, and then click **+Add User**.
### Bytebase API: To create a Bytebase issue
1. Go to Bytebase, click **IAM & Admin > Users & Groups** on the left sidebar, and then click **+Add User**.
 2. Choose `Service Account` as **User Type**, fill in the **Email**, give it `Workspace DBA` role, and then click **Create**. Copy the **API Token** to the `.env.local` file.
 ### Jira API: To update Jira issue status to `In Progress`/ `Done` and set its Bytebase issue link
1. Go to [Atlassian Account >Security > API tokens](https://id.atlassian.com/manage-profile/security/api-tokens) to generate an API token. Copy the **API Token** to the `.env.local` file.
### Jira API: To update Jira issue status to `In Progress`/ `Done` and set its Bytebase issue link
1. Go to [Atlassian Account >Security > API tokens](https://id.atlassian.com/manage-profile/security/api-tokens) to generate an API token. Copy the **API Token** to the `.env.local` file.
 ## Change process
### Step 1 (Jira): Create a database change issue
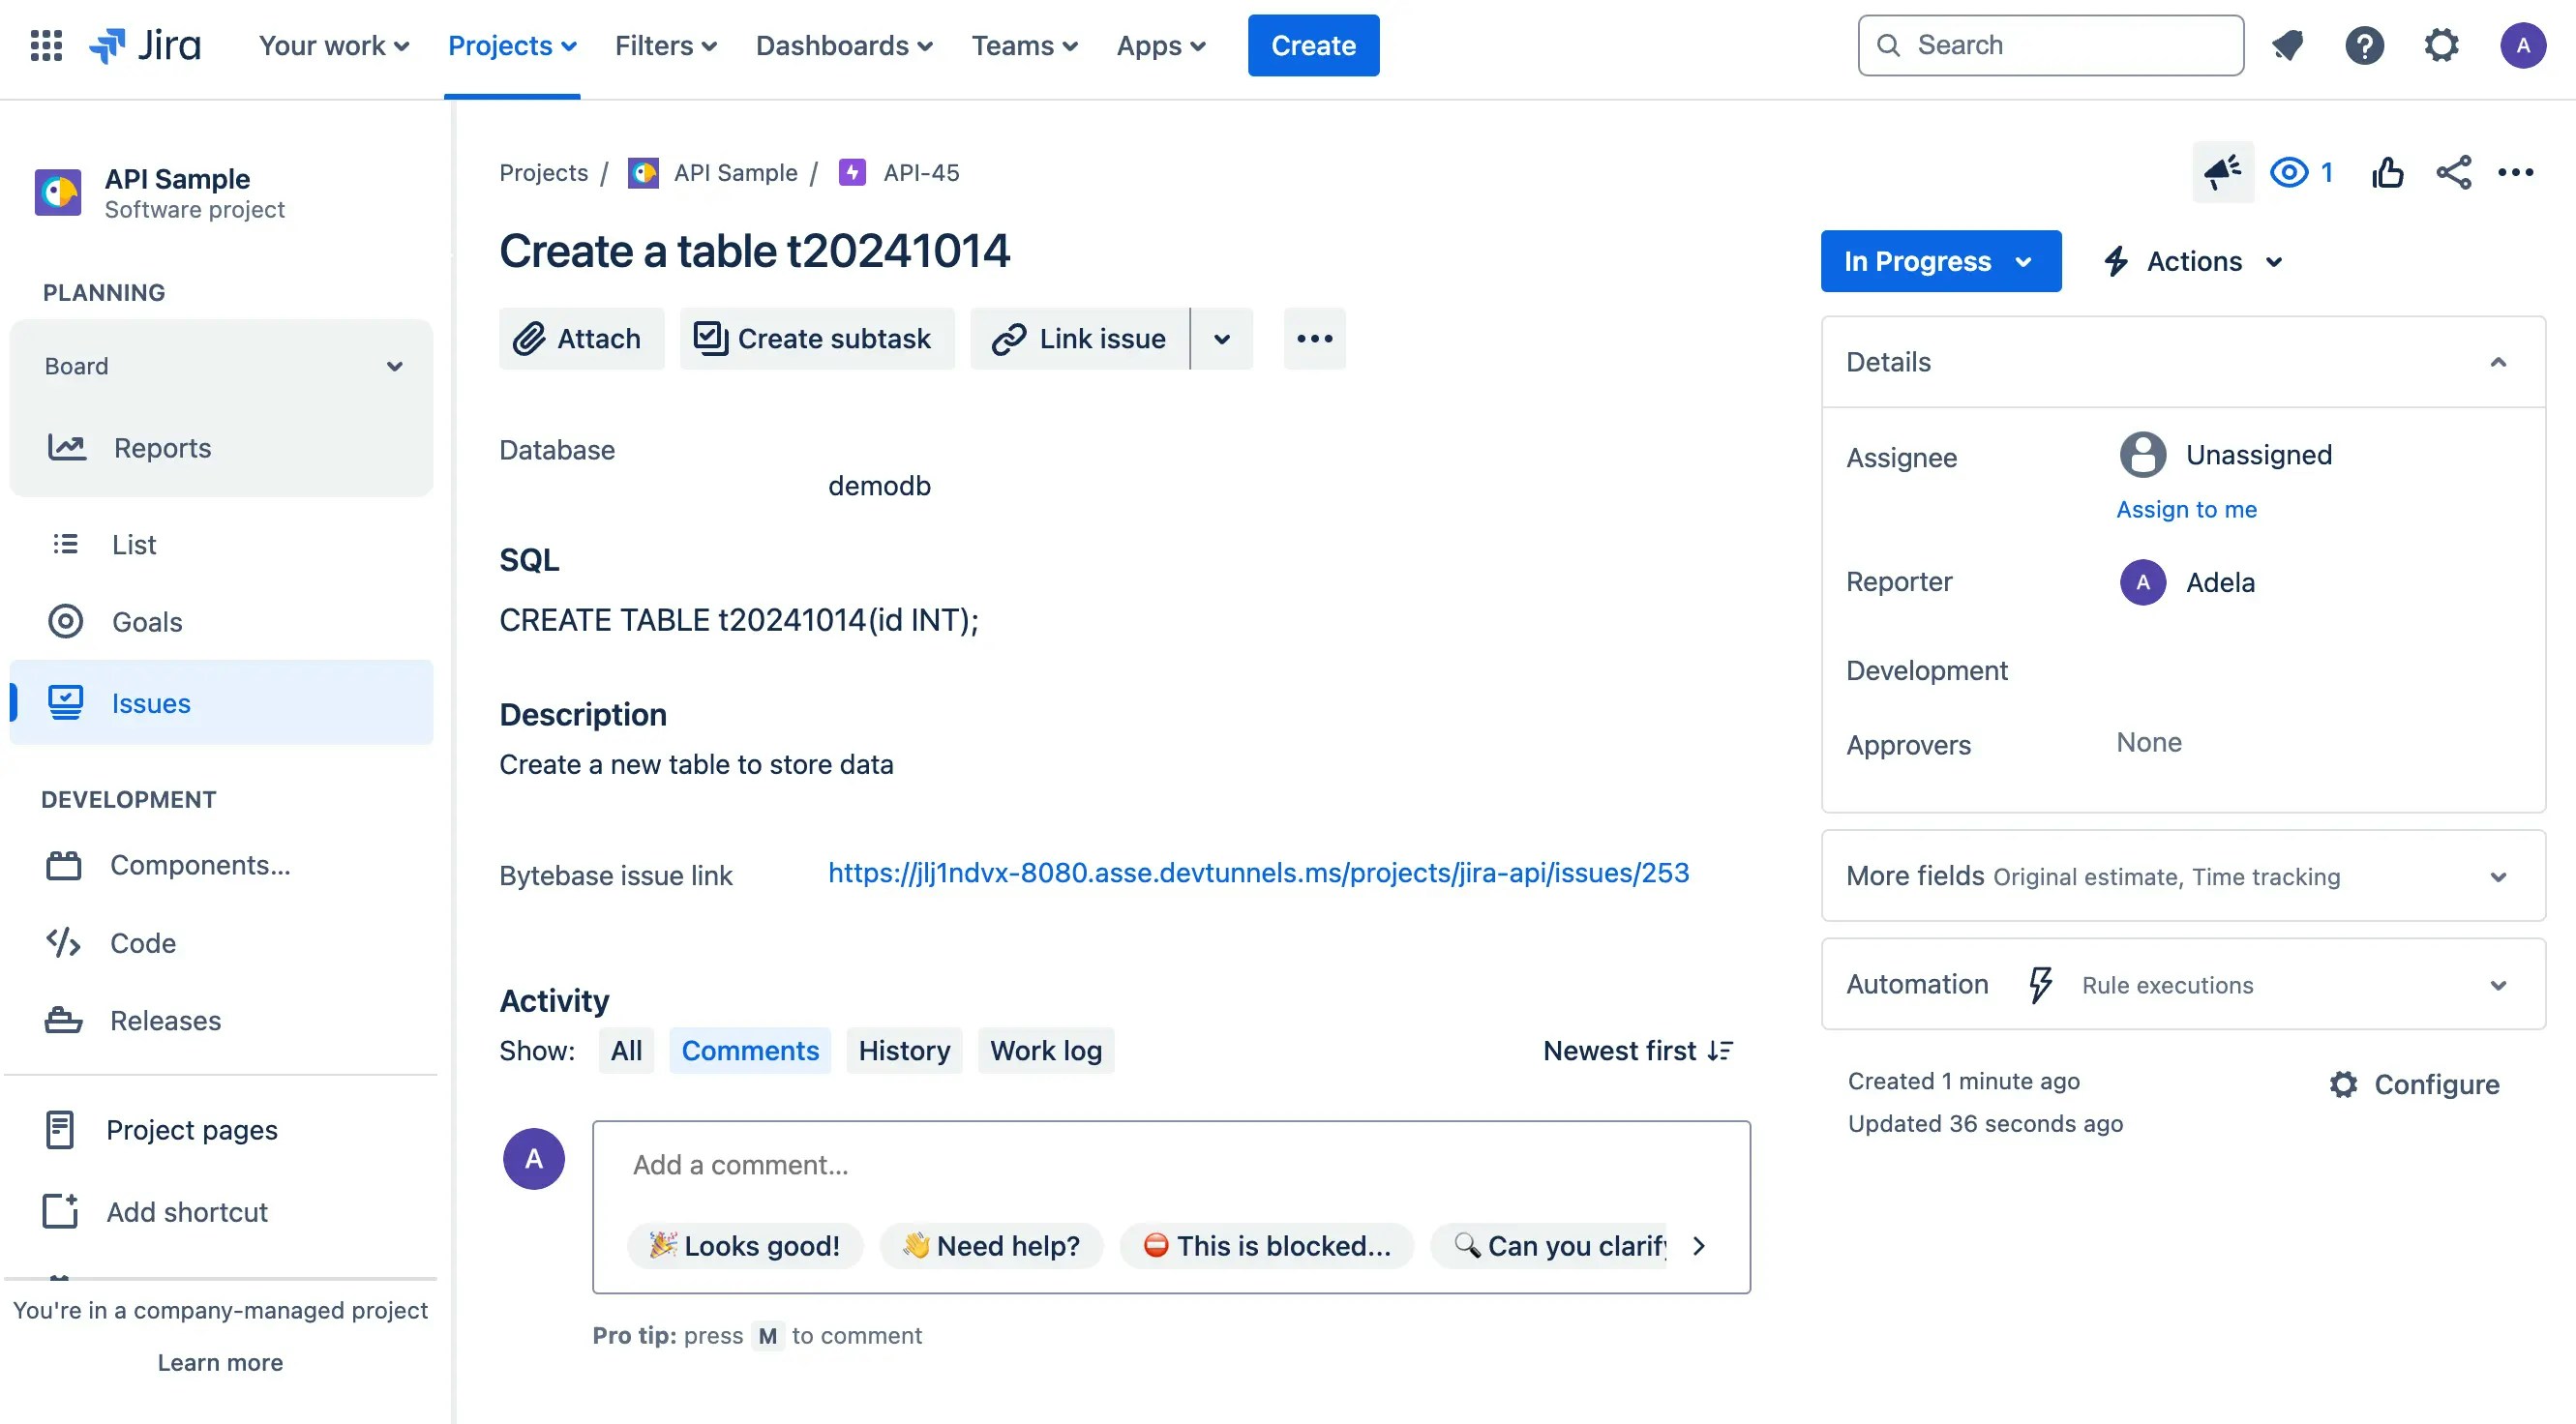
1. You act as a developer, now go to the Jira project to create a `Database Change` issue, fill in the fields **summary**, **SQL**, **database**, and **description**, and click **Create**. Here's the screenshot of the issue.
## Change process
### Step 1 (Jira): Create a database change issue
1. You act as a developer, now go to the Jira project to create a `Database Change` issue, fill in the fields **summary**, **SQL**, **database**, and **description**, and click **Create**. Here's the screenshot of the issue.
 2. View the `jira` app demo, you will see there's a jira webhook received with `Todo` status.
 ### Step 2 (Jira Webhook -> Bytebase API) Once the Jira issue is created, Jira Webhook will trigger Bytebase API to create a corresponding issue
Go to the Bytebase project and find the issue which is waiting to rollout.
### Step 2 (Jira Webhook -> Bytebase API) Once the Jira issue is created, Jira Webhook will trigger Bytebase API to create a corresponding issue
Go to the Bytebase project and find the issue which is waiting to rollout.
 It's because the jira webhook trigger Bytebase API to create an issue there. The logic is in `src/api/receive-jira-issue-webhook/route.ts`.
1. When it receive the trigger, it checks if the issue type is `Database Change`. and then if the webhook event is `issue_created`.
```javascript theme={null}
const body: JiraWebhookPayload = await request.json();
const issueType = body.issue.fields.issuetype.name;
if (issueType !== 'Database Change') {
return Response.json({ error: 'Not a Database Change issue' }, { status: 400 });
}
const issueKey = body.issue.key;
...
let bytebaseIssueLink = body.issue.fields.customfield_10039;
f (body.webhookEvent === "jira:issue_created" && body.issue_event_type_name === "issue_created") {
...
```
2. If both are true, via Bytebase API, it will try to match the Jira's `project key` and Bytebase's `project name` with the ones you configured in the `.env.local`. then it will try to match the Jira's `database` with the database belonging to that Bytebase project.
```javascript theme={null}
...
// Fetch databases for the matching project
const databasesData = await fetchData(`${process.env.NEXT_PUBLIC_BB_HOST}/v1/${process.env.NEXT_PUBLIC_BB_PROJECT_NAME}/databases`, token);
// Find matching database
const matchingDatabase = databasesData.databases.find((db: BytebaseDatabase) => db.name.split('/').pop() === database);
if (!matchingDatabase) {
return Response.json({ error: 'No matching Bytebase database found' }, { status: 400 });
}
// Create Bytebase issue
const result = await createBBIssueWorkflow(matchingProject.name, matchingDatabase, sqlStatement, summary, description, issueKey);
```
3. Once matched, it will create a Bytebase issue.
```javascript theme={null}
// Create Bytebase issue
const result = await createBBIssueWorkflow(
matchingProject.name,
matchingDatabase,
sqlStatement,
summary,
description,
issueKey,
);
```
which internally involves four steps:
```javascript theme={null}
const sheetData = await createSheet(project, SQL);
const planData = await createPlan(project, database, sheetData.name);
const issueData = await createIssue(
project,
database,
planData.name,
summary,
description,
jiraIssueKey,
);
const rolloutData = await createRollout(project, planData.name);
```
### Step 3 (Bytebase API -> Jira API) Once the Bytebase issue is created, the Jira API will set Bytebase issue link in Jira issue, and set status as `In Progress`
1. If you go back to Jira, you'll see the Jira issue status becomes `In Progress` with **Bytebase url link** filled.
It's because the jira webhook trigger Bytebase API to create an issue there. The logic is in `src/api/receive-jira-issue-webhook/route.ts`.
1. When it receive the trigger, it checks if the issue type is `Database Change`. and then if the webhook event is `issue_created`.
```javascript theme={null}
const body: JiraWebhookPayload = await request.json();
const issueType = body.issue.fields.issuetype.name;
if (issueType !== 'Database Change') {
return Response.json({ error: 'Not a Database Change issue' }, { status: 400 });
}
const issueKey = body.issue.key;
...
let bytebaseIssueLink = body.issue.fields.customfield_10039;
f (body.webhookEvent === "jira:issue_created" && body.issue_event_type_name === "issue_created") {
...
```
2. If both are true, via Bytebase API, it will try to match the Jira's `project key` and Bytebase's `project name` with the ones you configured in the `.env.local`. then it will try to match the Jira's `database` with the database belonging to that Bytebase project.
```javascript theme={null}
...
// Fetch databases for the matching project
const databasesData = await fetchData(`${process.env.NEXT_PUBLIC_BB_HOST}/v1/${process.env.NEXT_PUBLIC_BB_PROJECT_NAME}/databases`, token);
// Find matching database
const matchingDatabase = databasesData.databases.find((db: BytebaseDatabase) => db.name.split('/').pop() === database);
if (!matchingDatabase) {
return Response.json({ error: 'No matching Bytebase database found' }, { status: 400 });
}
// Create Bytebase issue
const result = await createBBIssueWorkflow(matchingProject.name, matchingDatabase, sqlStatement, summary, description, issueKey);
```
3. Once matched, it will create a Bytebase issue.
```javascript theme={null}
// Create Bytebase issue
const result = await createBBIssueWorkflow(
matchingProject.name,
matchingDatabase,
sqlStatement,
summary,
description,
issueKey,
);
```
which internally involves four steps:
```javascript theme={null}
const sheetData = await createSheet(project, SQL);
const planData = await createPlan(project, database, sheetData.name);
const issueData = await createIssue(
project,
database,
planData.name,
summary,
description,
jiraIssueKey,
);
const rolloutData = await createRollout(project, planData.name);
```
### Step 3 (Bytebase API -> Jira API) Once the Bytebase issue is created, the Jira API will set Bytebase issue link in Jira issue, and set status as `In Progress`
1. If you go back to Jira, you'll see the Jira issue status becomes `In Progress` with **Bytebase url link** filled.
 2. View the `jira` app demo, it's updated, too.
 The logic is still in `src/api/receive-jira-issue-webhook/route.ts`.
1. Once the Bytebase issue is created via API, the demo app will parse the **Bytebase issue link**.
```javascript theme={null}
if (result.success && result.issueLink) {
bytebaseIssueLink = result.issueLink;
parsedData.bytebaseIssueLink = bytebaseIssueLink;
try {
// Update Jira issue with Bytebase link and set status to "In Progress"
await updateJiraIssueAfterBBIssueCreated(issueKey, bytebaseIssueLink);
} catch (error) {
return Response.json(
{
error: 'Failed to update Jira issue',
details: error instanceof Error ? error.message : String(error),
},
{ status: 500 },
);
}
}
```
2. Then call the Jira API to update **Bytebase issue link** field and change the status from `Todo` to `In Progress`.
```javascript theme={null}
...
await updateJiraIssueAfterBBIssueCreated(issueKey, bytebaseIssueLink);
```
Here we need to call two Jira APIs:
* `/rest/api/3/issue/${issueKey}` to update Bytebase Link
* `/rest/api/3/issue/${issueKey}/transitions` to change the status
### Step 4 (Bytebase) DBA goes to Bytebase to deploy the database change.
1. You now act as DBA, go to Bytebase to deploy the database change.
The logic is still in `src/api/receive-jira-issue-webhook/route.ts`.
1. Once the Bytebase issue is created via API, the demo app will parse the **Bytebase issue link**.
```javascript theme={null}
if (result.success && result.issueLink) {
bytebaseIssueLink = result.issueLink;
parsedData.bytebaseIssueLink = bytebaseIssueLink;
try {
// Update Jira issue with Bytebase link and set status to "In Progress"
await updateJiraIssueAfterBBIssueCreated(issueKey, bytebaseIssueLink);
} catch (error) {
return Response.json(
{
error: 'Failed to update Jira issue',
details: error instanceof Error ? error.message : String(error),
},
{ status: 500 },
);
}
}
```
2. Then call the Jira API to update **Bytebase issue link** field and change the status from `Todo` to `In Progress`.
```javascript theme={null}
...
await updateJiraIssueAfterBBIssueCreated(issueKey, bytebaseIssueLink);
```
Here we need to call two Jira APIs:
* `/rest/api/3/issue/${issueKey}` to update Bytebase Link
* `/rest/api/3/issue/${issueKey}/transitions` to change the status
### Step 4 (Bytebase) DBA goes to Bytebase to deploy the database change.
1. You now act as DBA, go to Bytebase to deploy the database change.
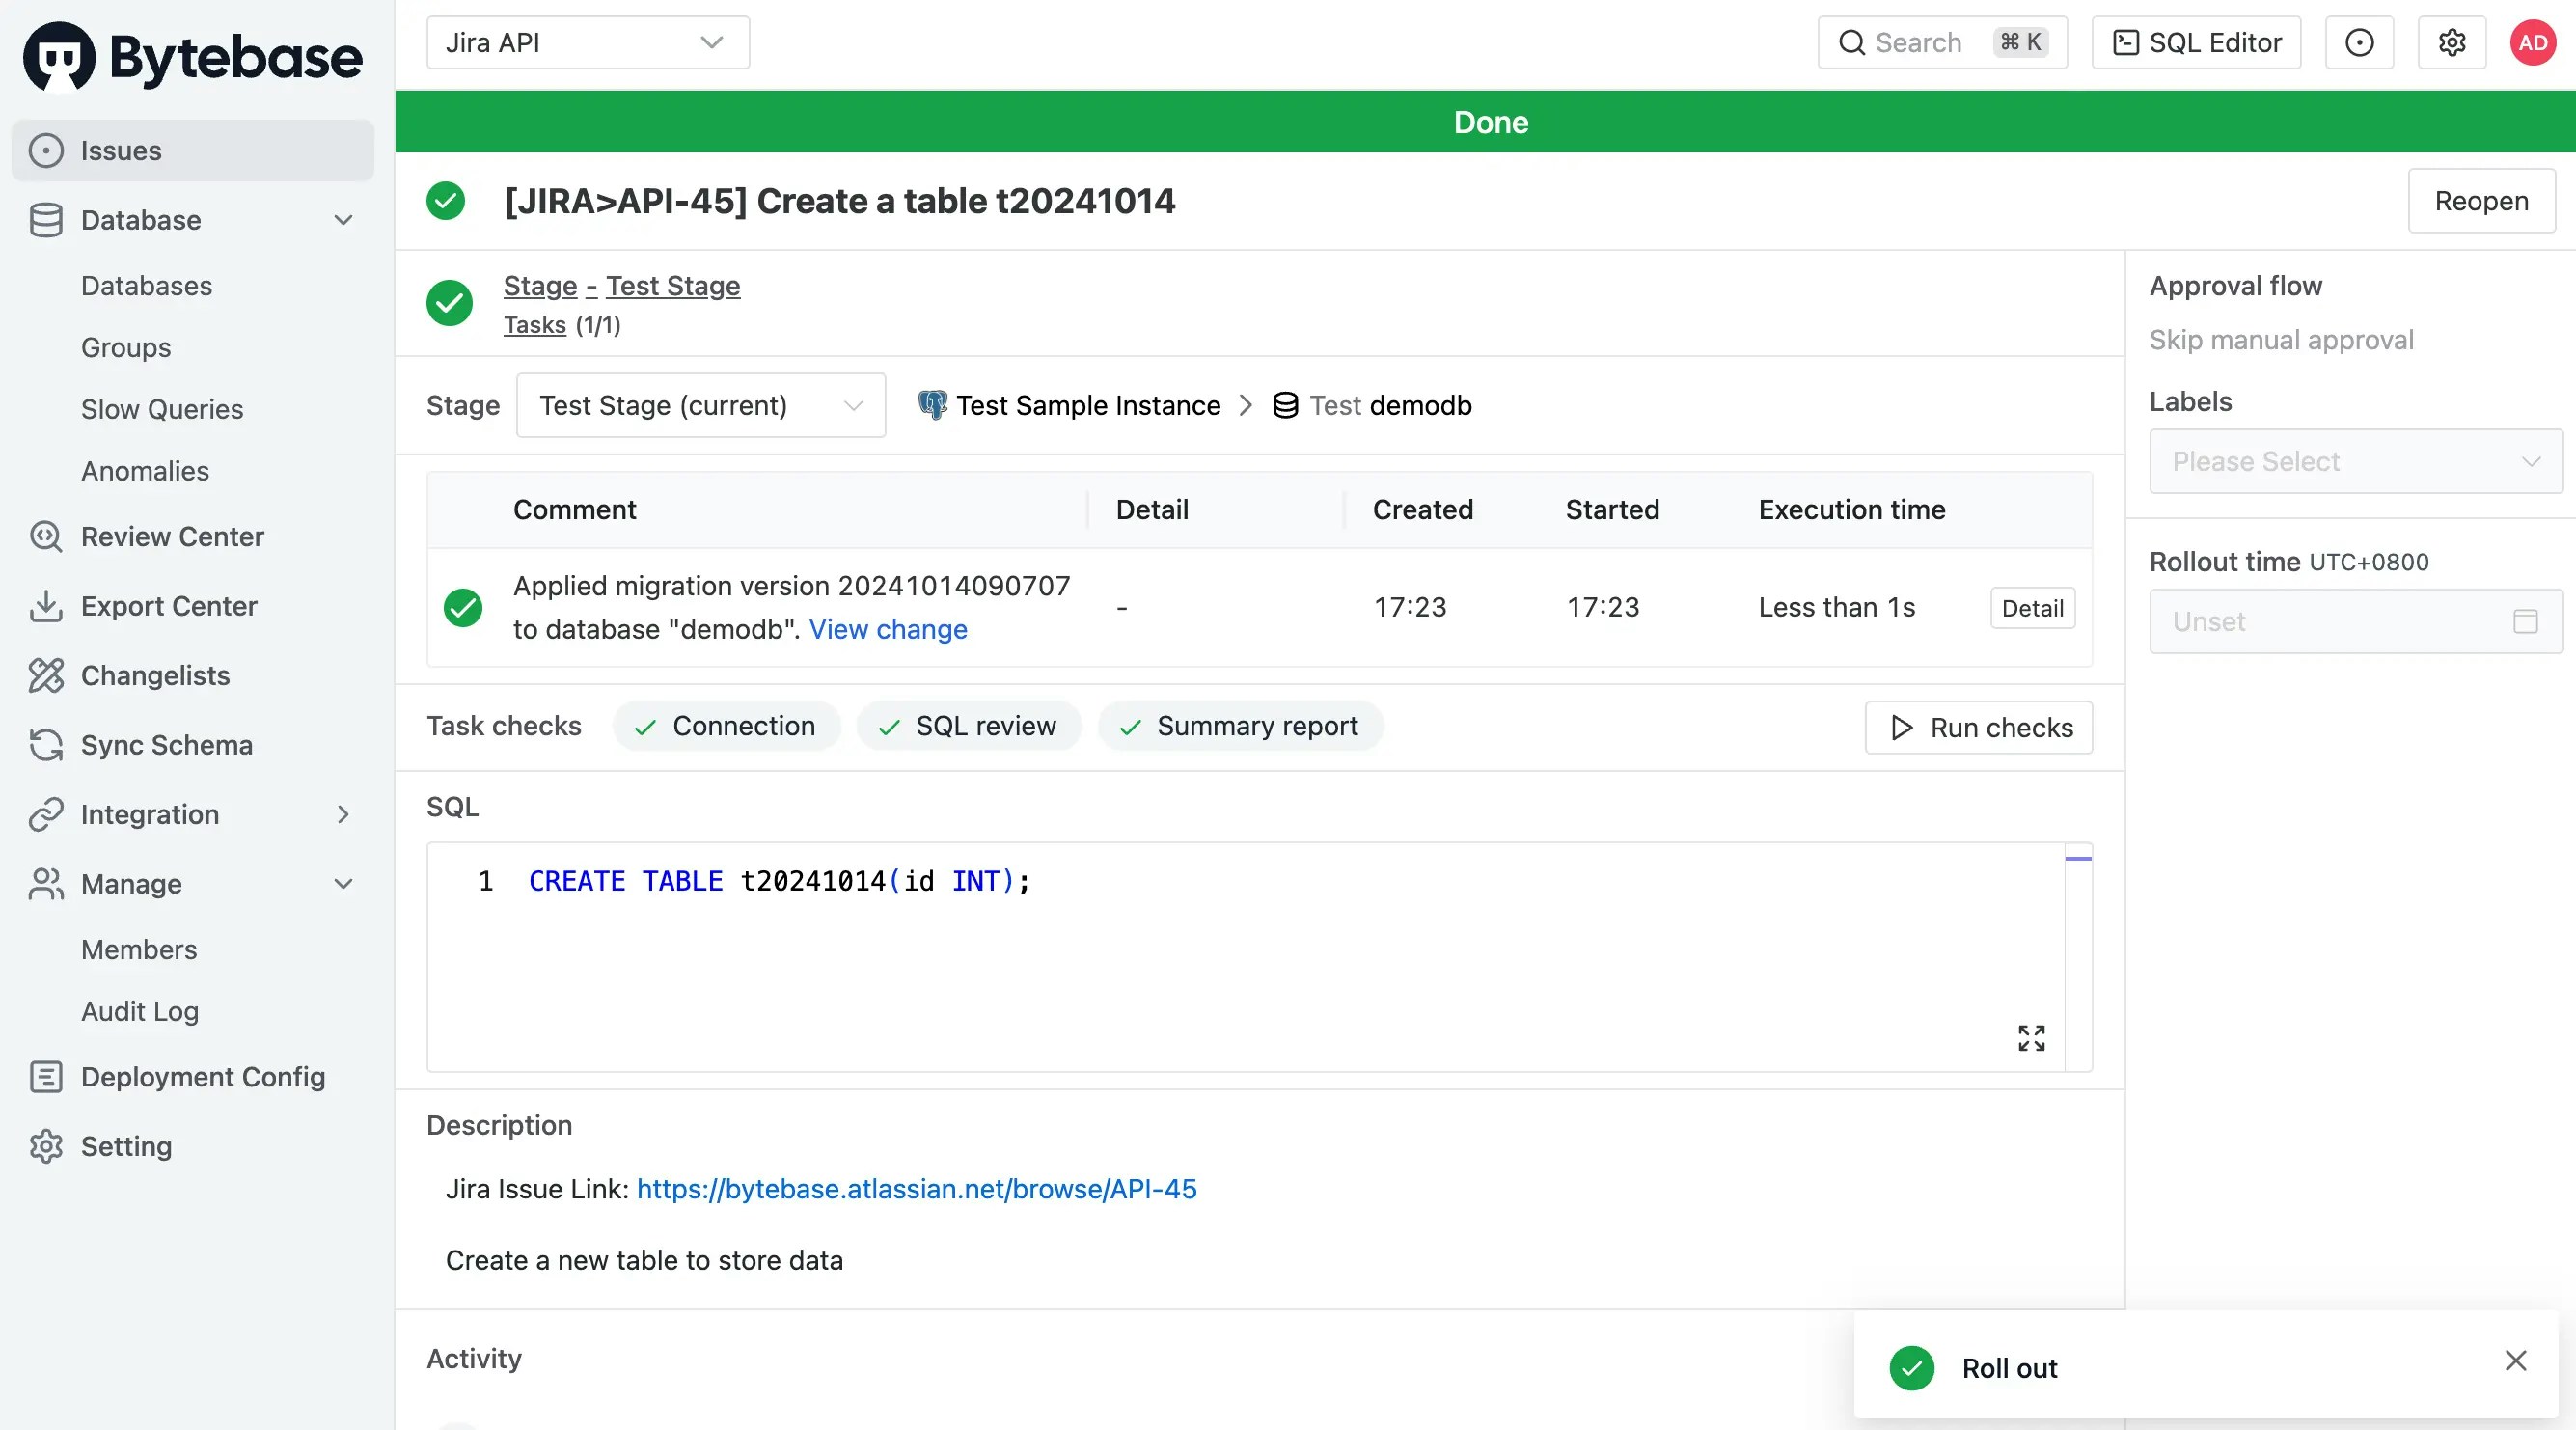 2. Once change is rolled out, Bytebase will record the change in the database **Change History**.
 3. You can also click **View change** to view the change diff.
 ### Step 5 (Bytebase Poll Comparison -> Jira API) Once the Bytebase issue rolls out and becomes `Done`, Jira API will set Jira issue status as `Done`.
1. Once the issue has rolled out in Bytebase, the Bytebase poll comparison will run, and if there's any change, it will trigger `jira` app demo.
### Step 5 (Bytebase Poll Comparison -> Jira API) Once the Bytebase issue rolls out and becomes `Done`, Jira API will set Jira issue status as `Done`.
1. Once the issue has rolled out in Bytebase, the Bytebase poll comparison will run, and if there's any change, it will trigger `jira` app demo.
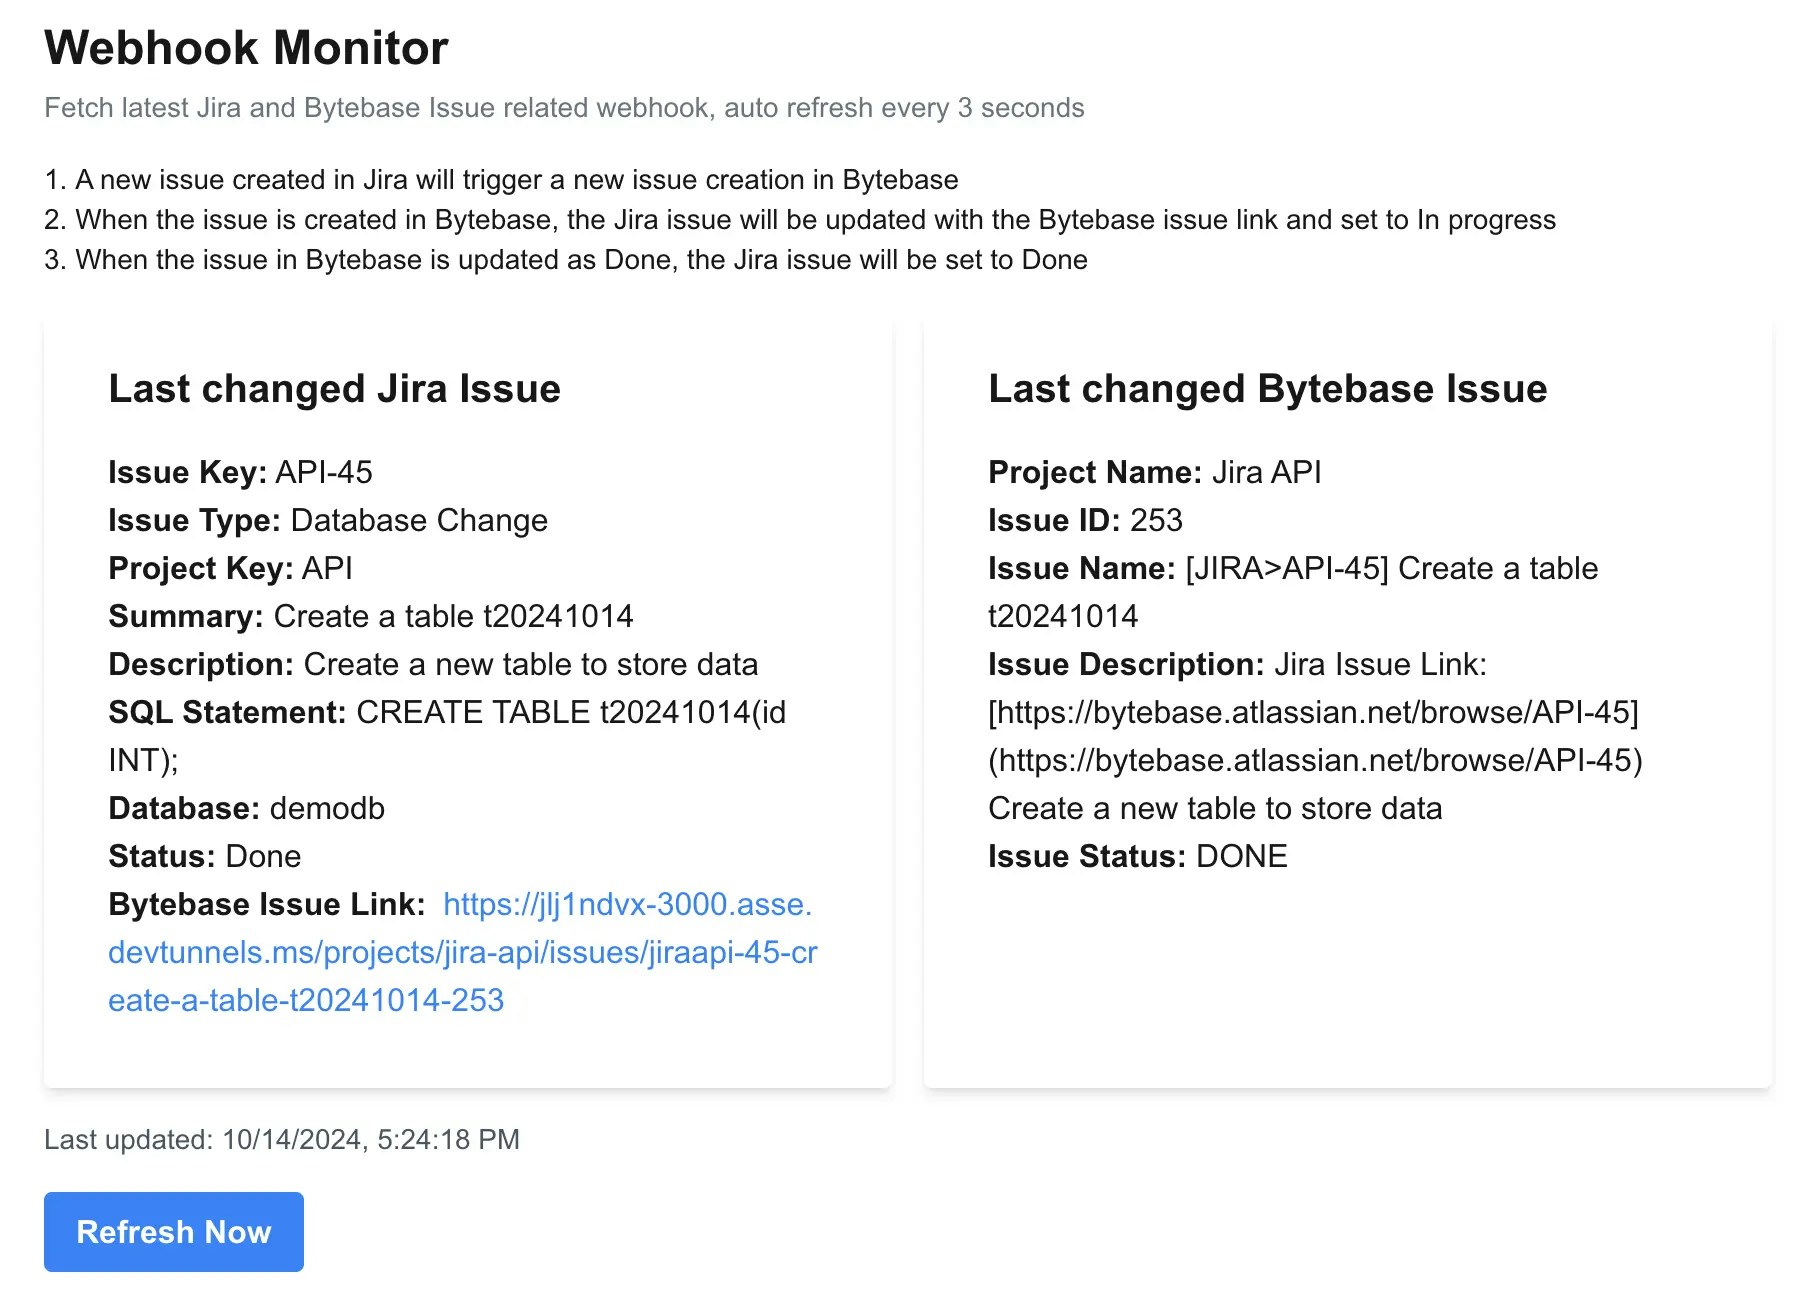 2. Go to Jira, you'll see the Jira issue status becomes `Done`.
 The logic is in `src/app/api/poll-bytebase-issue/route.ts`. Bytebase will poll the issue status every 3 seconds, if it's a issue update, it will parse the Jira issue key from the Bytebase issue name, and then call the Jira API to update the issue status to `Done`.
```javascript theme={null}
for (const issue of issues) {
const jiraIssueKeyMatch = issue.title.match(/\[JIRA>([^\]]+)\]/);
const jiraIssueKey = jiraIssueKeyMatch ? jiraIssueKeyMatch[1] : null;
// Skip if no Jira issue is linked
if (!jiraIssueKey) continue;
// Skip if we've already processed this issue with the same status
const lastStatus = processedIssues.get(issue.name);
if (lastStatus === issue.status) continue;
// Update the processed issues map
processedIssues.set(issue.name, issue.status);
let jiraStatus;
if (issue.status === "DONE") {
jiraStatus = "Done";
} else if (issue.status === "OPEN") {
jiraStatus = "In Progress";
}
if (jiraStatus) {
try {
await updateJiraIssueStatus(jiraIssueKey, jiraStatus);
...
```
## Summary
In this tutorial, you have successfully set up a automatic database change workflow with Jira and Bytebase.
We eliminate most of the manual process in the last tutorial.
1. Bytebase issue is automatically created. And the created issue link is set automatically in the Jira issue.
2. Once Bytebase rolls out the SQL, the Jira issue status is updated automatically.
If you want to automate further, you can also call Bytebase API to approve and deploy the SQL.
The logic is in `src/app/api/poll-bytebase-issue/route.ts`. Bytebase will poll the issue status every 3 seconds, if it's a issue update, it will parse the Jira issue key from the Bytebase issue name, and then call the Jira API to update the issue status to `Done`.
```javascript theme={null}
for (const issue of issues) {
const jiraIssueKeyMatch = issue.title.match(/\[JIRA>([^\]]+)\]/);
const jiraIssueKey = jiraIssueKeyMatch ? jiraIssueKeyMatch[1] : null;
// Skip if no Jira issue is linked
if (!jiraIssueKey) continue;
// Skip if we've already processed this issue with the same status
const lastStatus = processedIssues.get(issue.name);
if (lastStatus === issue.status) continue;
// Update the processed issues map
processedIssues.set(issue.name, issue.status);
let jiraStatus;
if (issue.status === "DONE") {
jiraStatus = "Done";
} else if (issue.status === "OPEN") {
jiraStatus = "In Progress";
}
if (jiraStatus) {
try {
await updateJiraIssueStatus(jiraIssueKey, jiraStatus);
...
```
## Summary
In this tutorial, you have successfully set up a automatic database change workflow with Jira and Bytebase.
We eliminate most of the manual process in the last tutorial.
1. Bytebase issue is automatically created. And the created issue link is set automatically in the Jira issue.
2. Once Bytebase rolls out the SQL, the Jira issue status is updated automatically.
If you want to automate further, you can also call Bytebase API to approve and deploy the SQL.