> ## Documentation Index
> Fetch the complete documentation index at: https://docs.bytebase.com/llms.txt
> Use this file to discover all available pages before exploring further.
# Manual Database Change with Jira
Jira is a leading issue tracking product for software development teams, aiding in planning, tracking, and releasing great software. Teams may also want to adopt Jira for the database change management process.
However, a database change workflow also involves deploying and tracking those changes, and Jira doesn't
have such capability. By integrating Bytebase, you can achieve this goal.
Bytebase is an open-source database DevSecOps solution for Developer, Security, DBA, and Platform Engineering teams. The GitLab for database DevSecOps.
 This is a 2-series tutorials:
* Manual Database Change with Jira (this one)
* [Automate Database Change with Jira](/tutorials/database-change-management-with-jira-automated/)
## Prerequisites
* A Jira workspace
* A Bytebase workspace
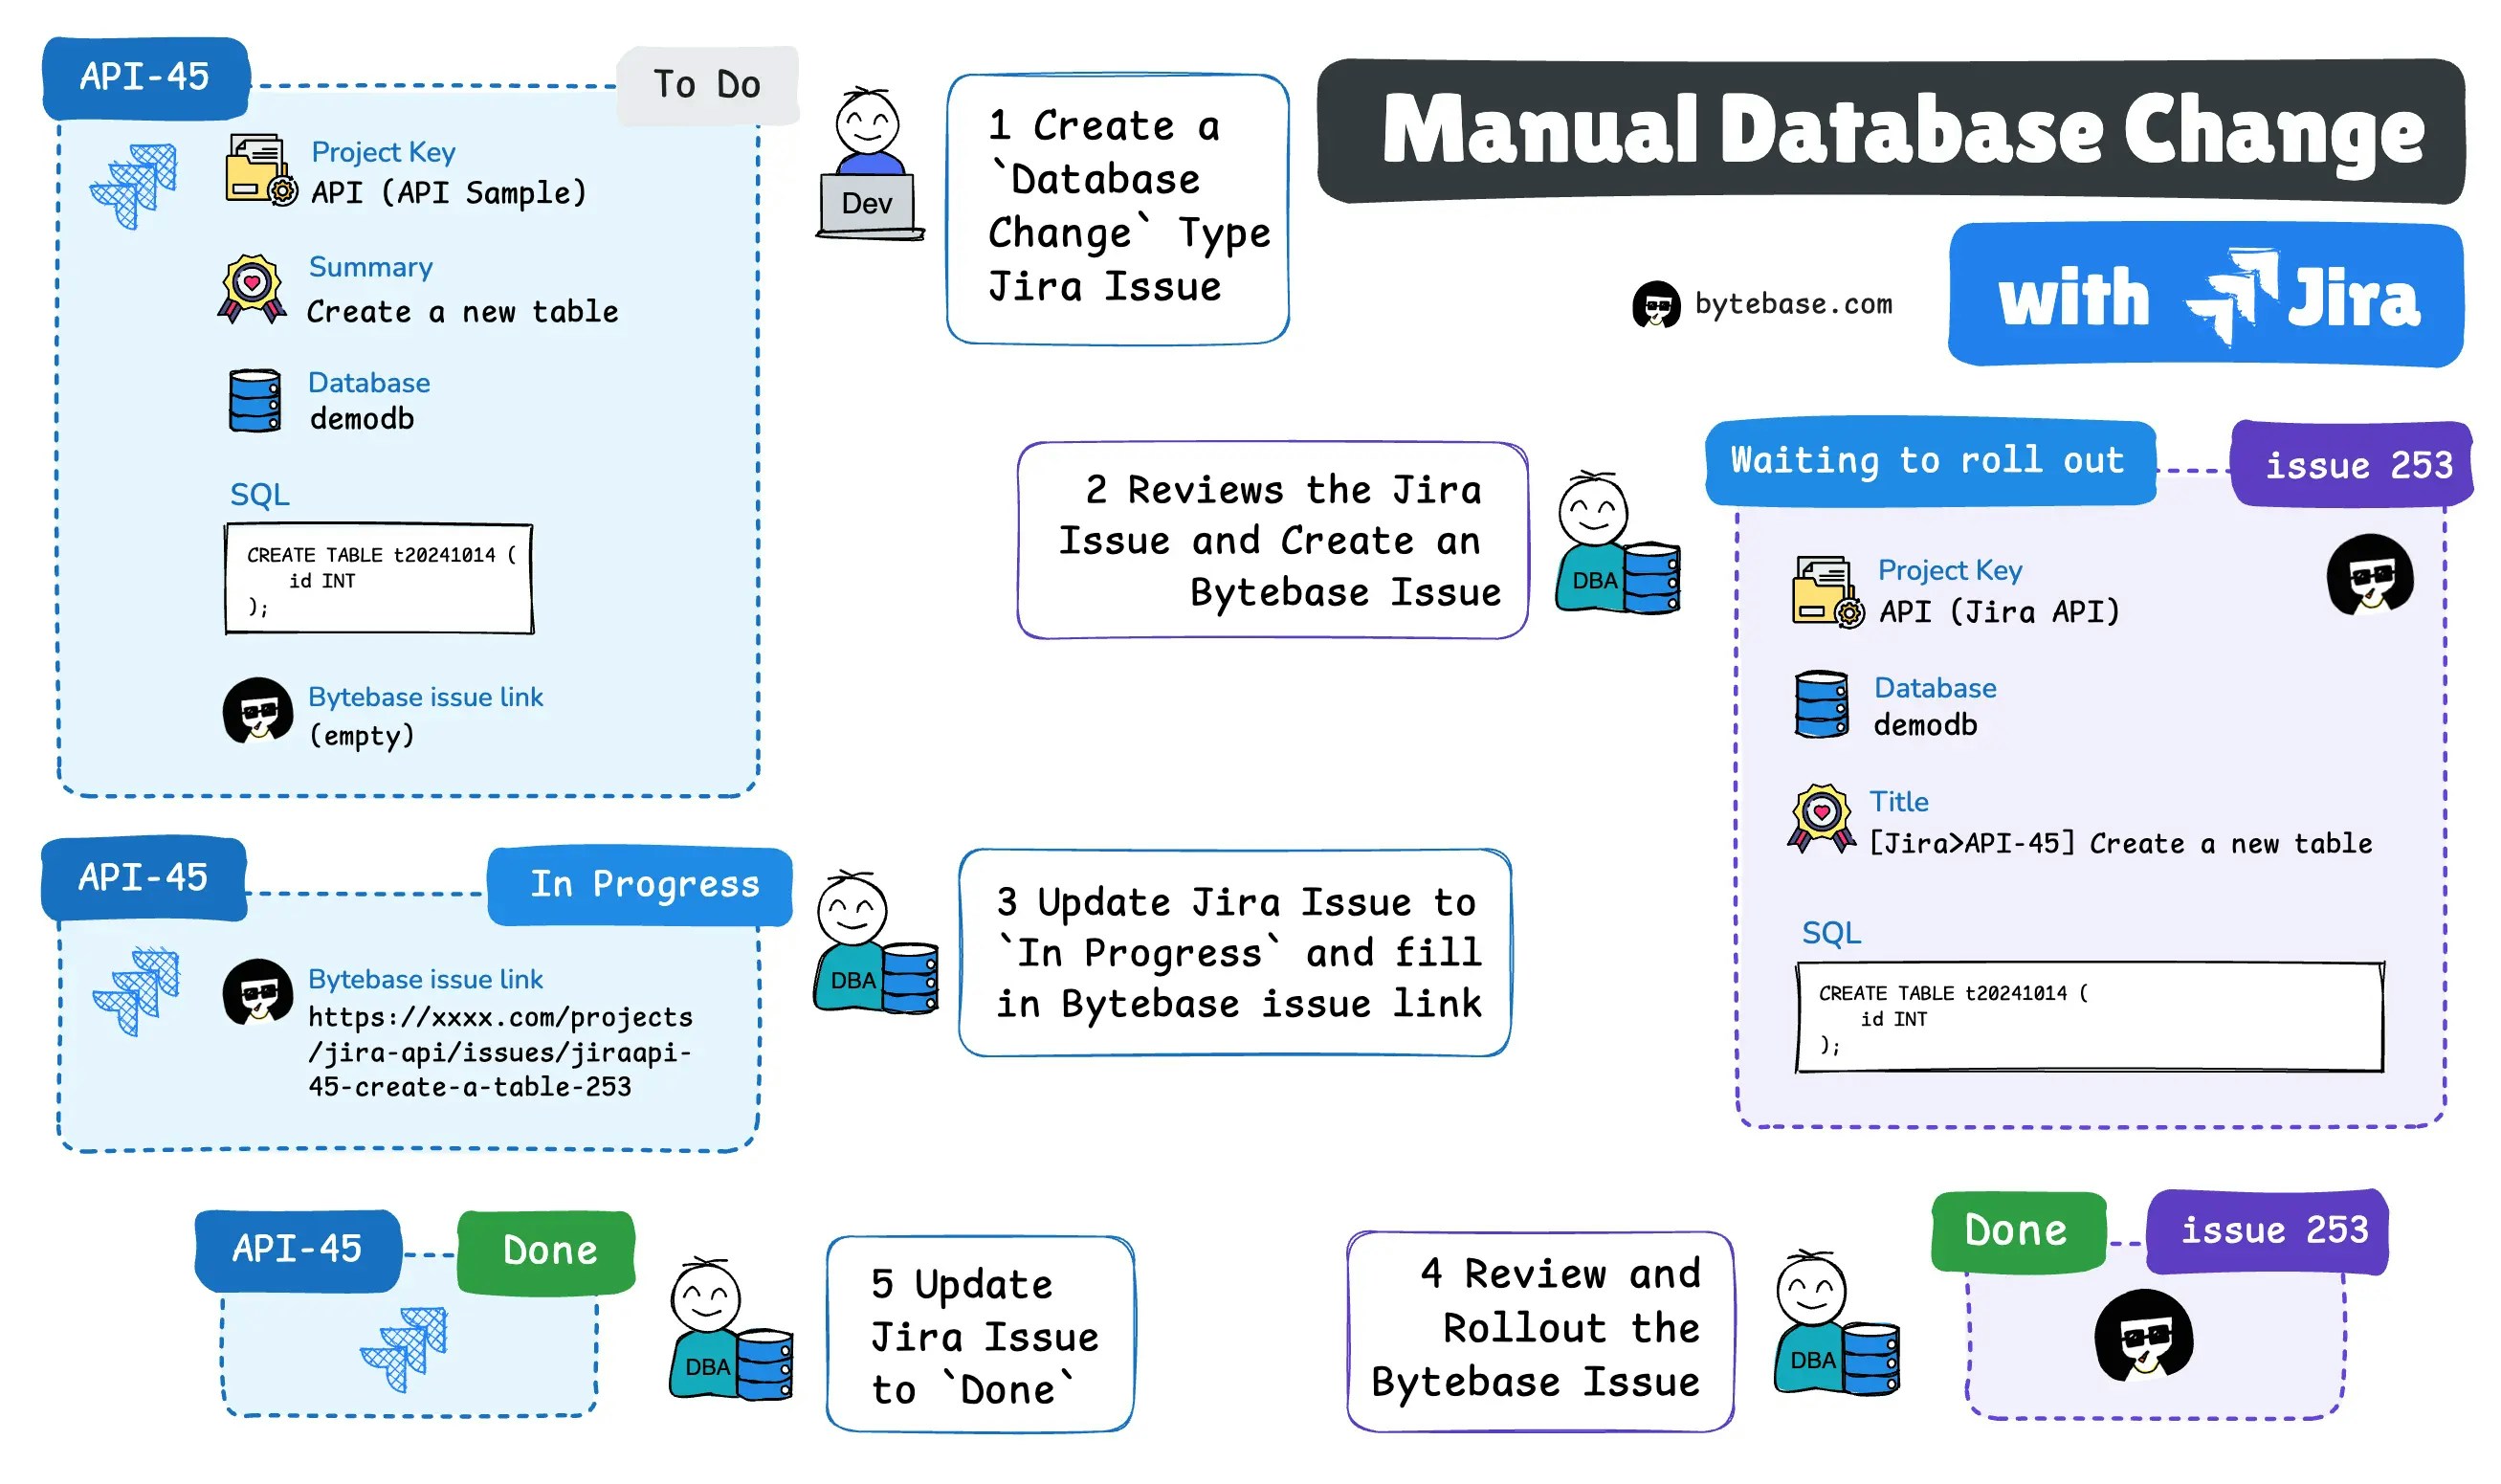
## Workflow Overview
### Setup
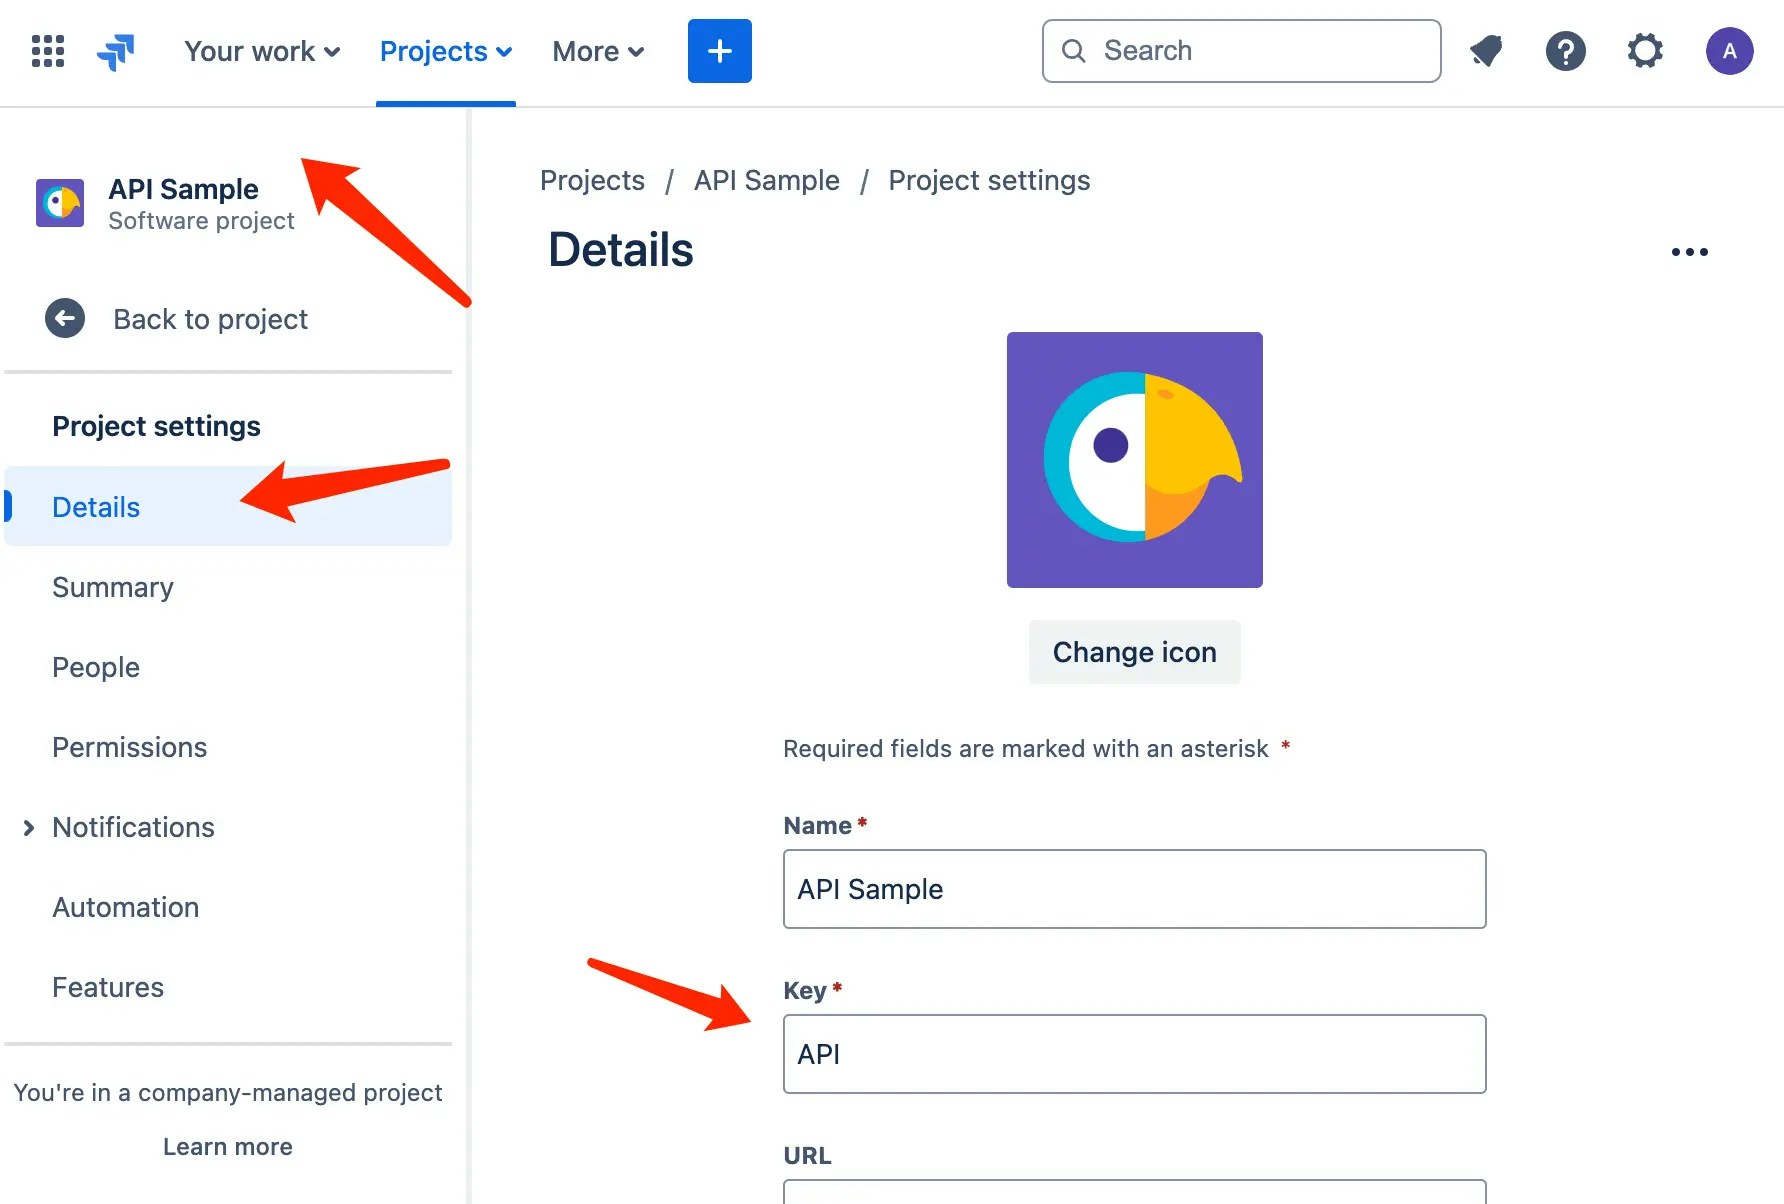
1. Prepare a Jira project: Create a `Database Change` issue type with custom fields **SQL**, **database**.
2. Prepare a corresponding Bytebase project and database.
### Change process
1. (Jira) Developer creates a Jira `Database Change` issue filling the **SQL**, **database**, and **description** fields.
2. (Jira -> Bytebase) DBA reviews the Jira issue and goes to Bytebase to create an issue with the developer supplied **SQL**, **database**, and **description**.
3. (Jira) DBA updates the Jira issue status to indicate the change is in progress.
4. (Bytbease) DBA goes to Bytebase to deploy the database change.
5. (Jira) DBA updates the Jira issue status to indicate the change has completed.
## Setup
### Step 1 (Jira): Configure database change issue and custom fields
1. Create a Jira project.
This is a 2-series tutorials:
* Manual Database Change with Jira (this one)
* [Automate Database Change with Jira](/tutorials/database-change-management-with-jira-automated/)
## Prerequisites
* A Jira workspace
* A Bytebase workspace
## Workflow Overview
### Setup
1. Prepare a Jira project: Create a `Database Change` issue type with custom fields **SQL**, **database**.
2. Prepare a corresponding Bytebase project and database.
### Change process
1. (Jira) Developer creates a Jira `Database Change` issue filling the **SQL**, **database**, and **description** fields.
2. (Jira -> Bytebase) DBA reviews the Jira issue and goes to Bytebase to create an issue with the developer supplied **SQL**, **database**, and **description**.
3. (Jira) DBA updates the Jira issue status to indicate the change is in progress.
4. (Bytbease) DBA goes to Bytebase to deploy the database change.
5. (Jira) DBA updates the Jira issue status to indicate the change has completed.
## Setup
### Step 1 (Jira): Configure database change issue and custom fields
1. Create a Jira project.
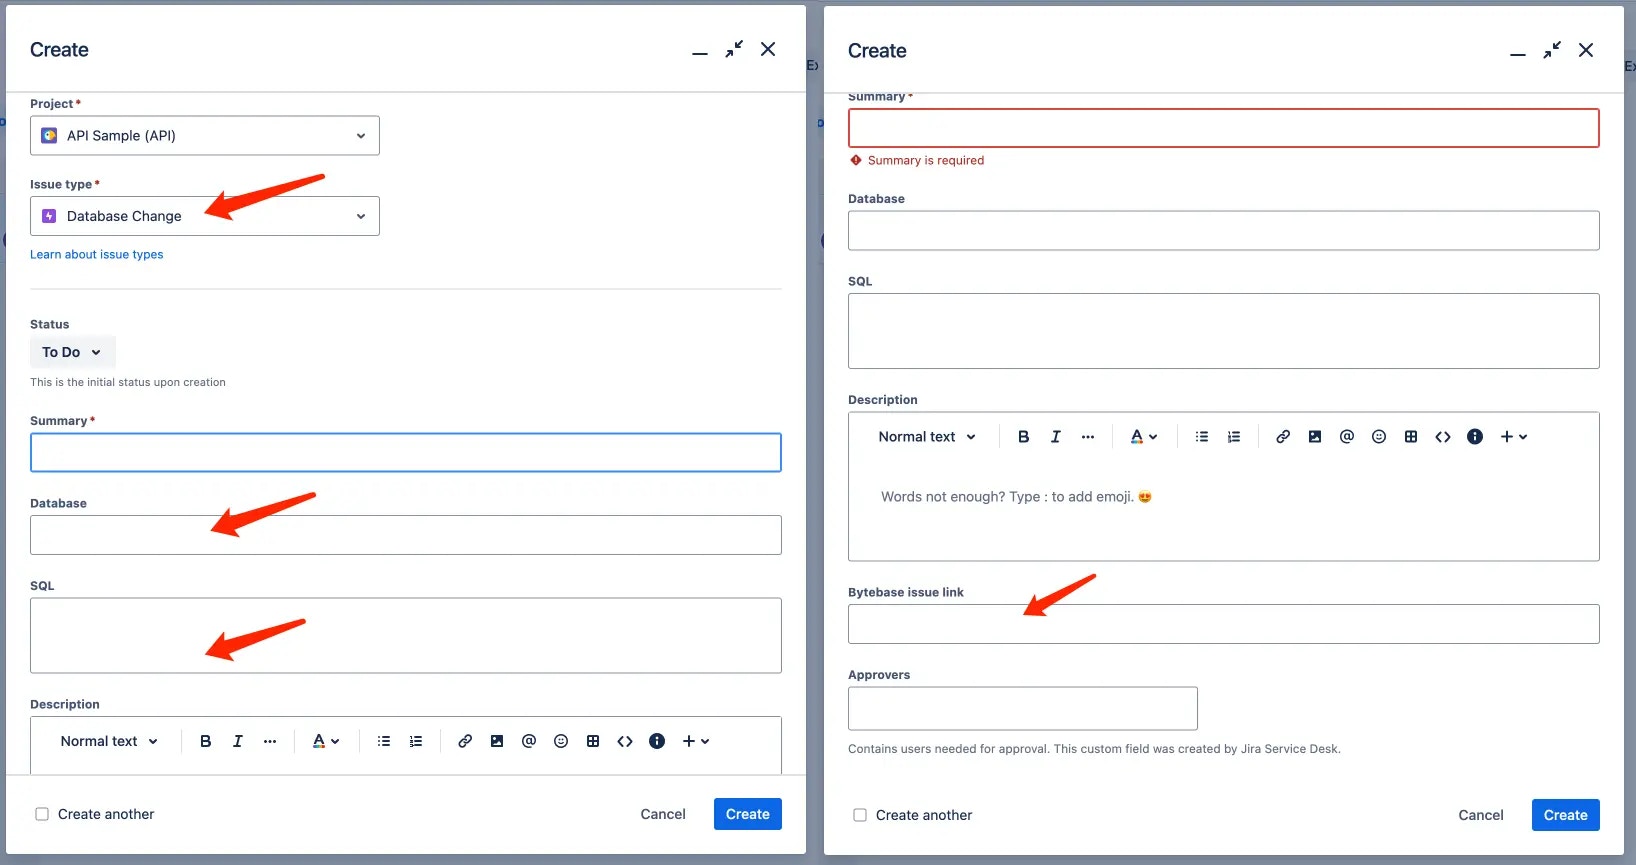
 2. The default issue fields `Summary`,`Description` are not enough for us to track the database changes, so we need to have a new issue type `Database Change` and customize the fields accordingly.
3. Here's the screenshot of the customized type `Database Change`. We added three additional fields:
* Database
* SQL
* Bytebase issue link
2. The default issue fields `Summary`,`Description` are not enough for us to track the database changes, so we need to have a new issue type `Database Change` and customize the fields accordingly.
3. Here's the screenshot of the customized type `Database Change`. We added three additional fields:
* Database
* SQL
* Bytebase issue link
 ### Step 2 (Bytebase): Create a project and database in Bytebase
1. Start Bytebase via Docker and register an account which will be granted `Workspace Admin` role.
```bash theme={null} theme={null} theme={null} theme={null} theme={null} theme={null} theme={null} theme={null} theme={null} theme={null} theme={null} theme={null}
docker run --rm --init \
--name bytebase \
--publish 8080:8080 --pull always \
--volume ~/.bytebase/data:/var/opt/bytebase \
bytebase/bytebase:latest
```
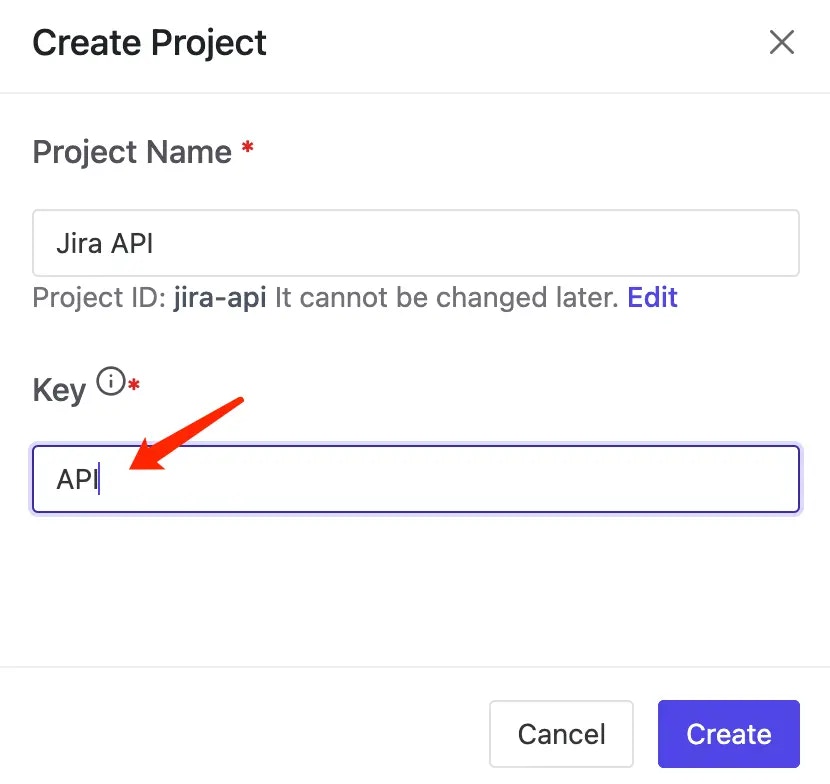
2. Click **Projects** on the sidebar, and then click **New Project**.
### Step 2 (Bytebase): Create a project and database in Bytebase
1. Start Bytebase via Docker and register an account which will be granted `Workspace Admin` role.
```bash theme={null} theme={null} theme={null} theme={null} theme={null} theme={null} theme={null} theme={null} theme={null} theme={null} theme={null} theme={null}
docker run --rm --init \
--name bytebase \
--publish 8080:8080 --pull always \
--volume ~/.bytebase/data:/var/opt/bytebase \
bytebase/bytebase:latest
```
2. Click **Projects** on the sidebar, and then click **New Project**.
 3. Bytebase has embedded sample database instances `Prod Sample Instance` and `Test Sample Instance` for you to explore the product.
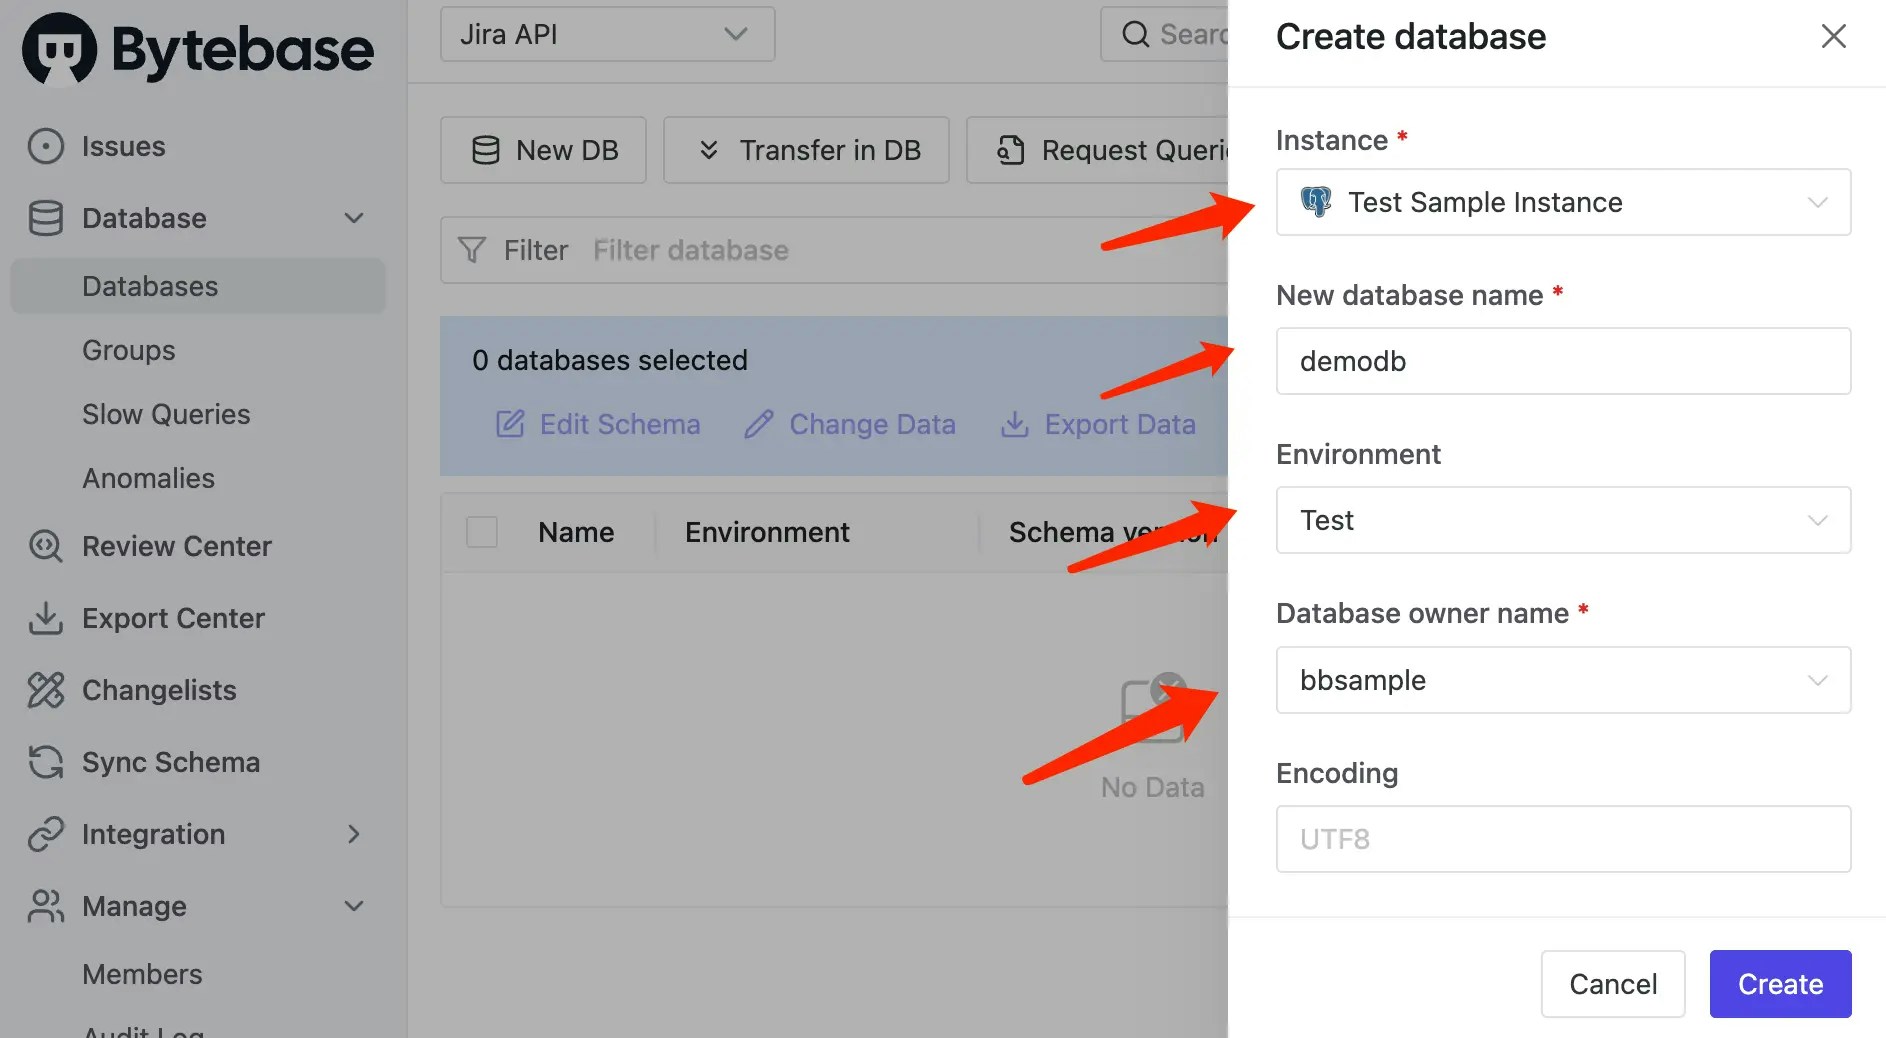
4. Go to the project, and then click **New DB**. Select `Test Sample Instance`, fill in the database name `demodb`, and click **Create**.
3. Bytebase has embedded sample database instances `Prod Sample Instance` and `Test Sample Instance` for you to explore the product.
4. Go to the project, and then click **New DB**. Select `Test Sample Instance`, fill in the database name `demodb`, and click **Create**.
 ## Change process
### Step 1 (Jira): Create a database change issue
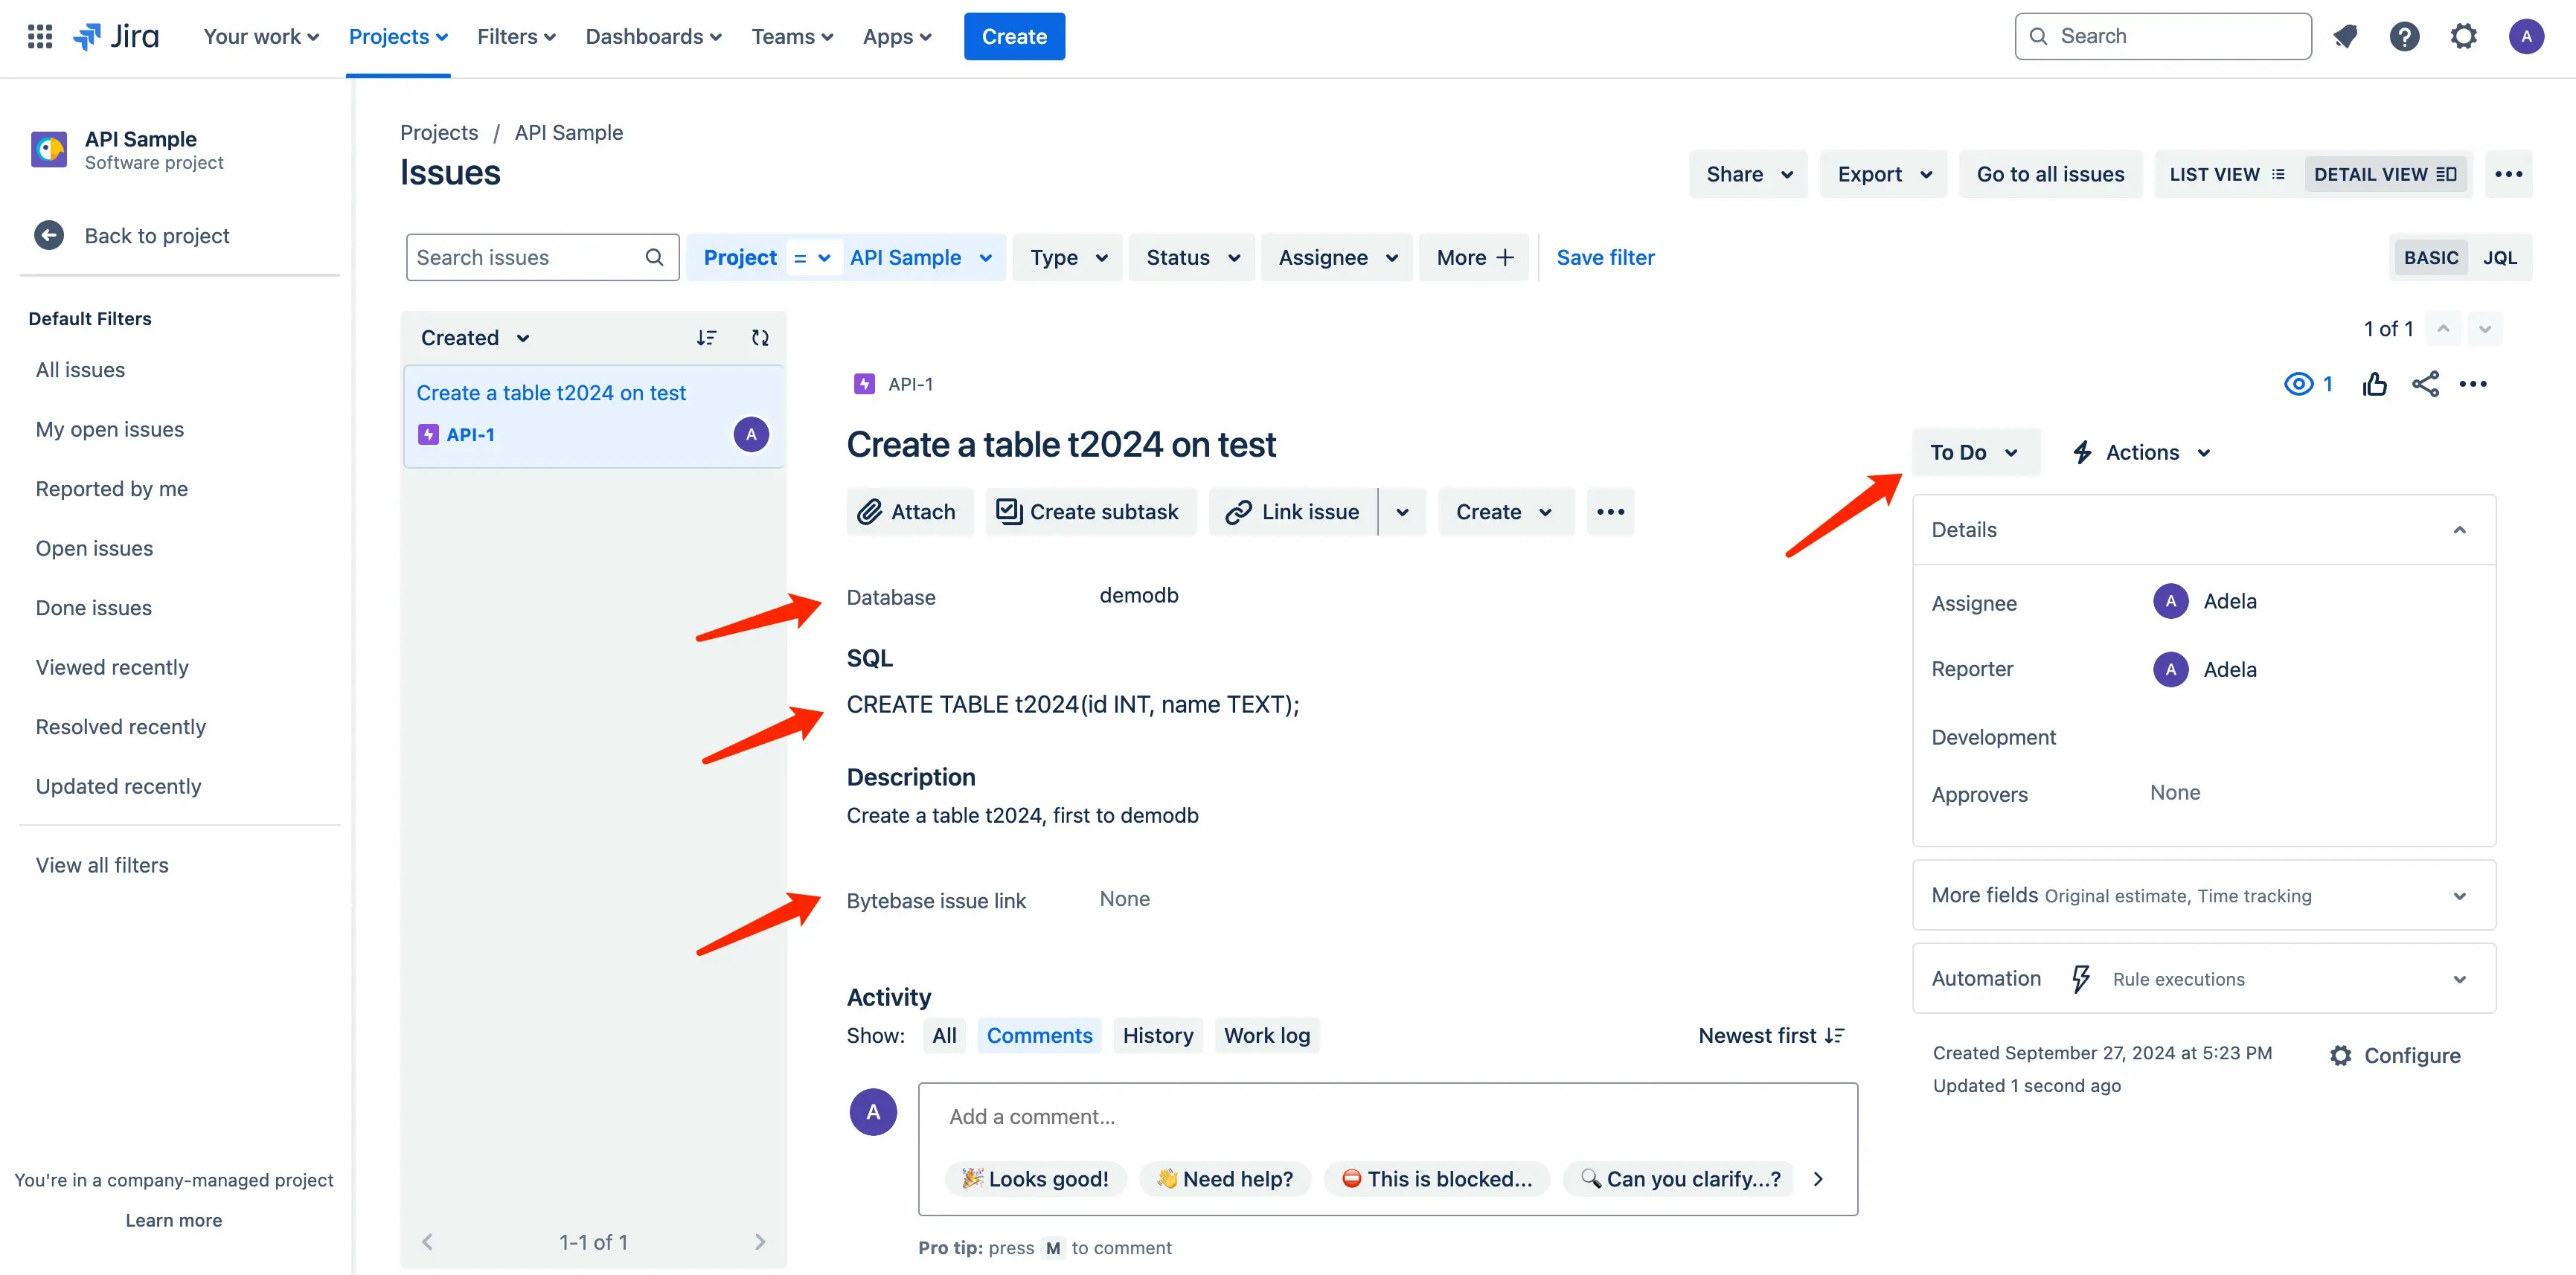
You act as a developer, now go to the Jira project to create a `Database Change` issue, fill in the fields and click **Create**. Here's the screenshot of the issue.
## Change process
### Step 1 (Jira): Create a database change issue
You act as a developer, now go to the Jira project to create a `Database Change` issue, fill in the fields and click **Create**. Here's the screenshot of the issue.
 ### Step 2 (Jira -> Bytebase): Review the Jira issue and create a corresponding Bytebase issue
1. You act as a DBA, now visit the Jira project, and open the `Database Change` issue just created.
The Jira issue contains the following info:
1. **Database**: `demodb`
2. **SQL**: `CREATE TABLE t2024 (id INT, name TEXT);`
3. **Description**: `Create a table t2024, first to demodb`
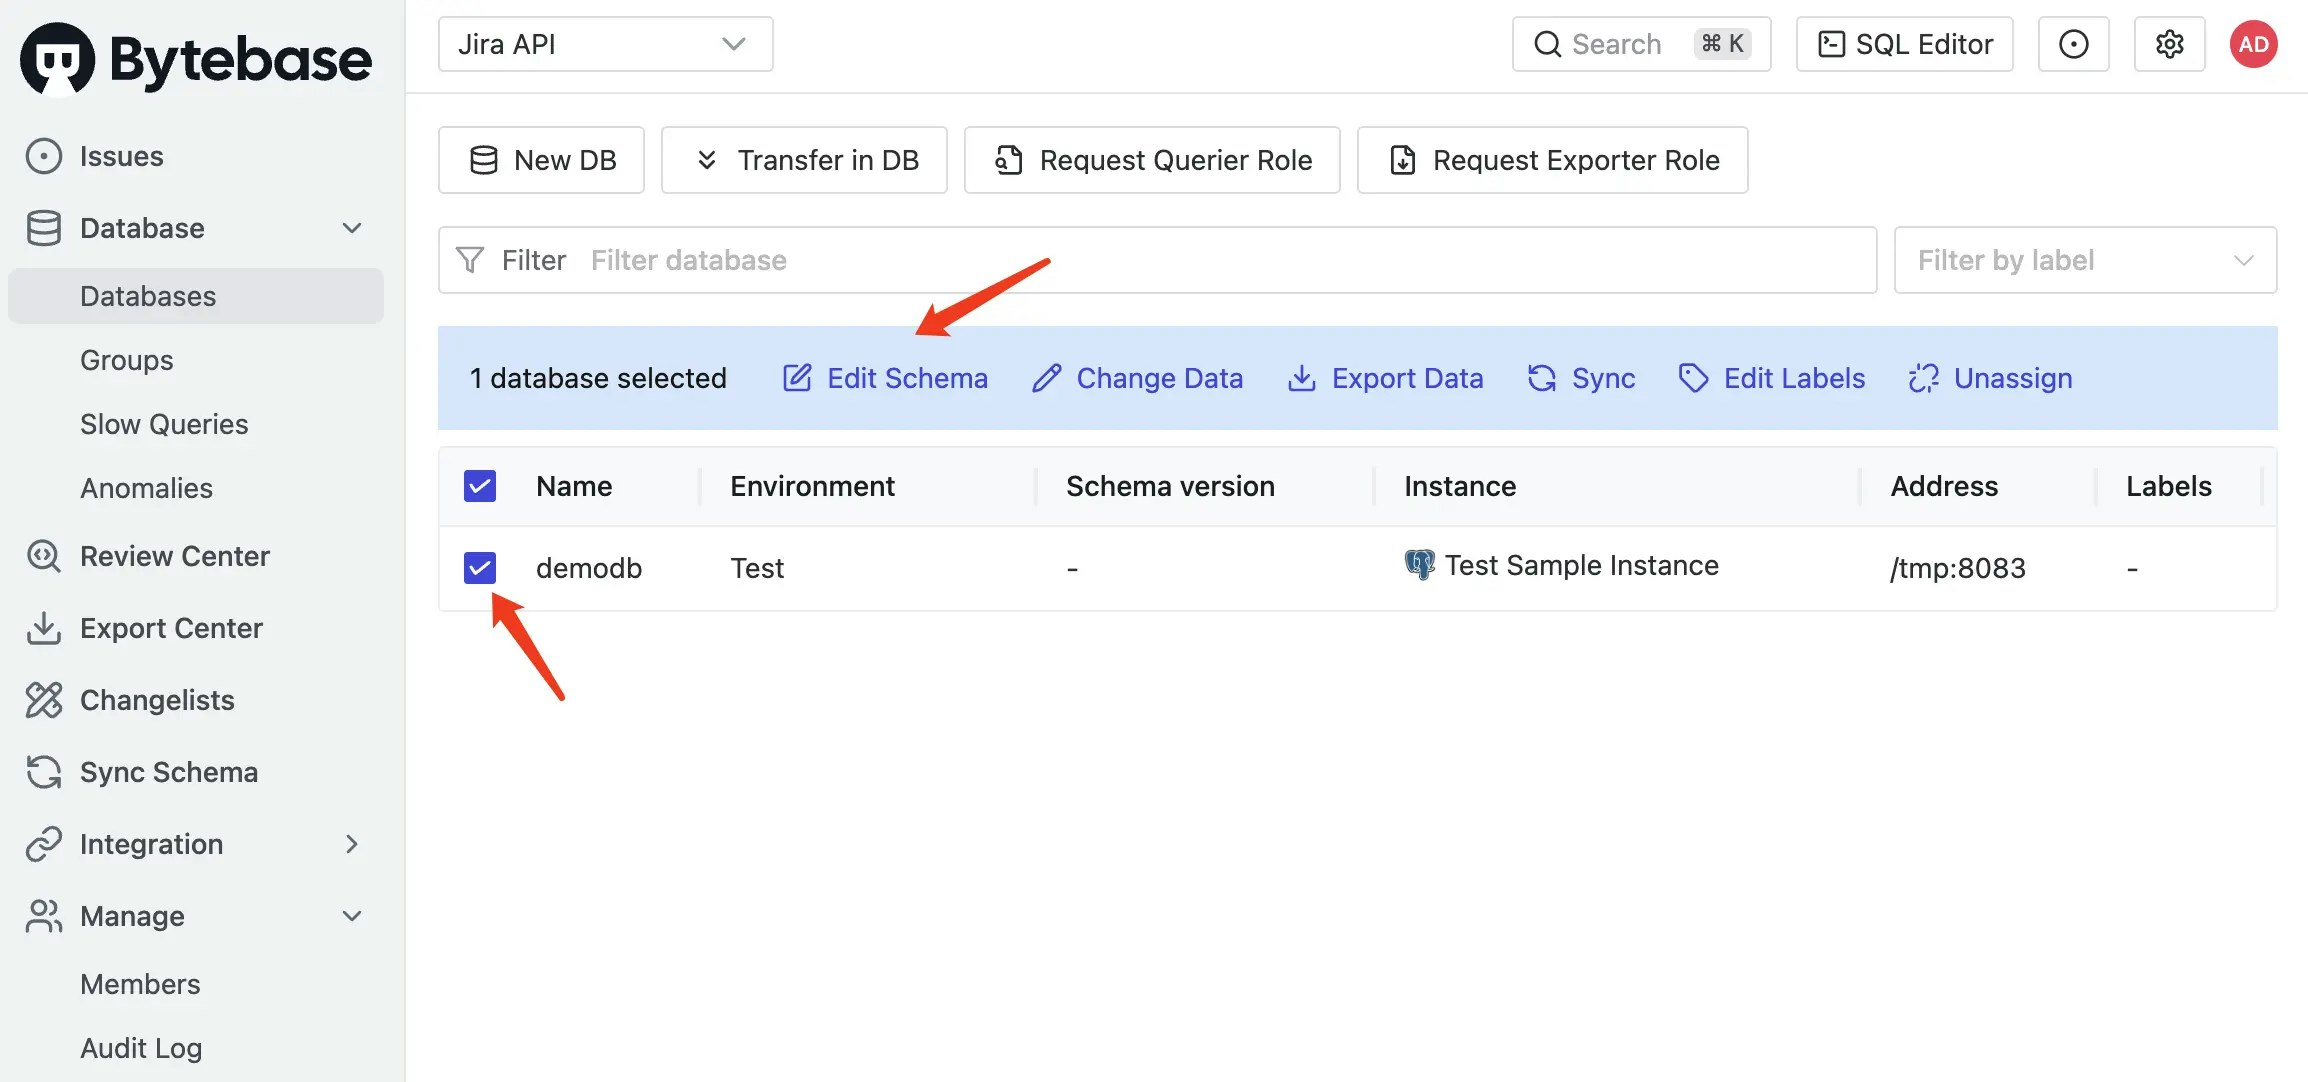
2. Visit Bytebase, and go to the Bytebase project, click **Database** on the sidebar, you'll see the database `demodb` just created. Select the database, and click **Edit Schema**.
### Step 2 (Jira -> Bytebase): Review the Jira issue and create a corresponding Bytebase issue
1. You act as a DBA, now visit the Jira project, and open the `Database Change` issue just created.
The Jira issue contains the following info:
1. **Database**: `demodb`
2. **SQL**: `CREATE TABLE t2024 (id INT, name TEXT);`
3. **Description**: `Create a table t2024, first to demodb`
2. Visit Bytebase, and go to the Bytebase project, click **Database** on the sidebar, you'll see the database `demodb` just created. Select the database, and click **Edit Schema**.
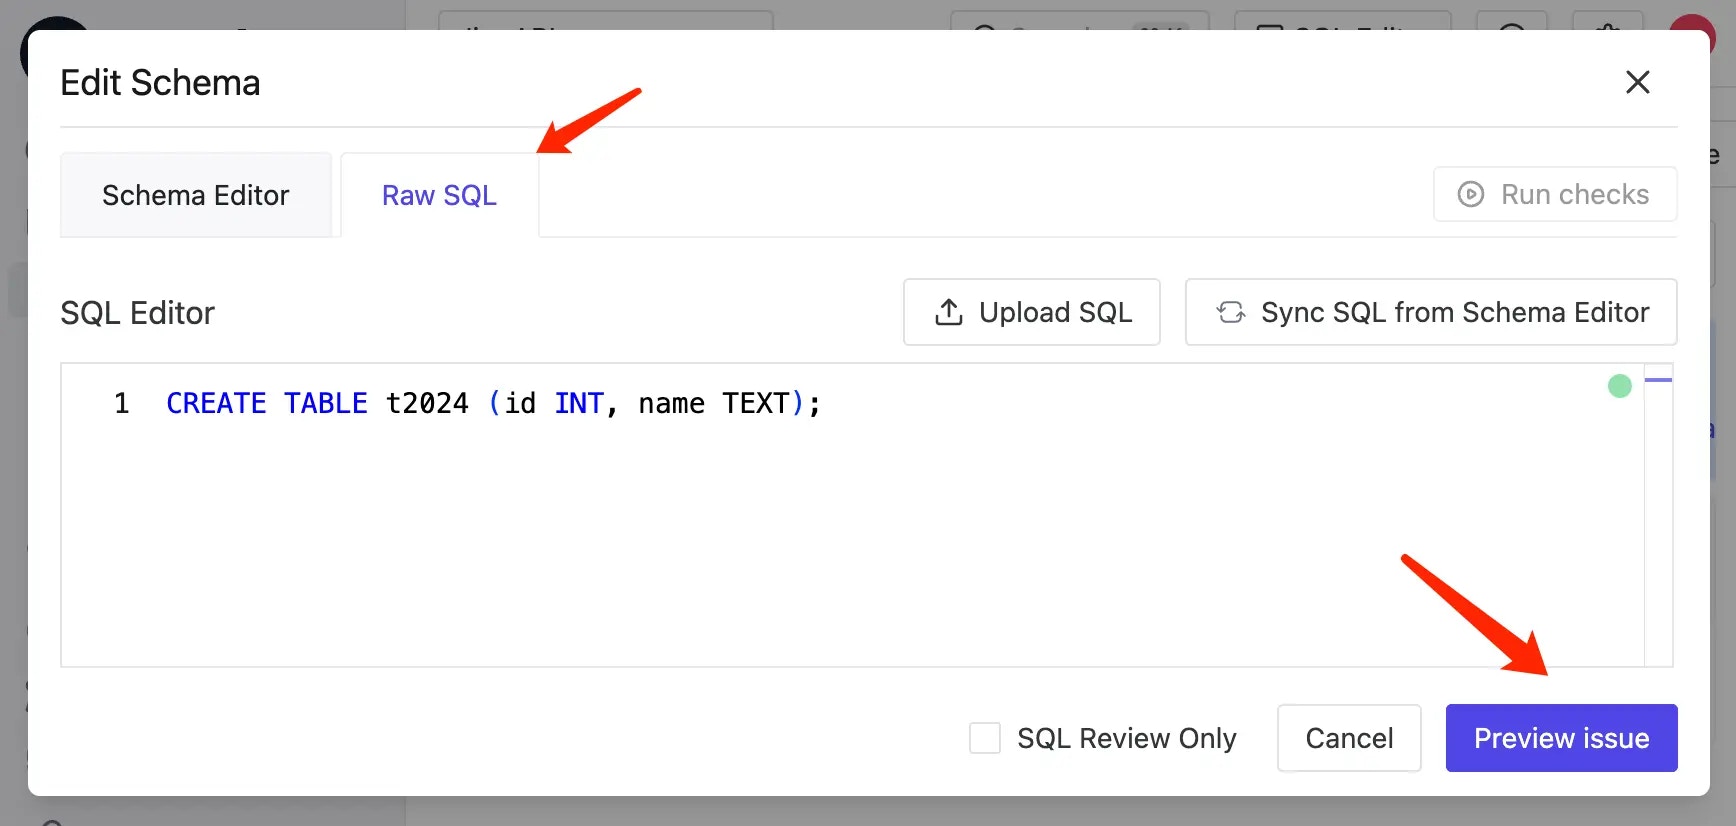
 3. You'll be redirected to **Schema Editor**. Click **Raw SQL** tab, paste the **SQL** content in Jira issue to the text area, and then click **Preview issue**. An issue will be previewed with SQL filled in. Fill in the issue **Description**, and then click **Create**.
 ### Step 3 (Jira): Paste the Bytebase issue URL and update the Jira issue status
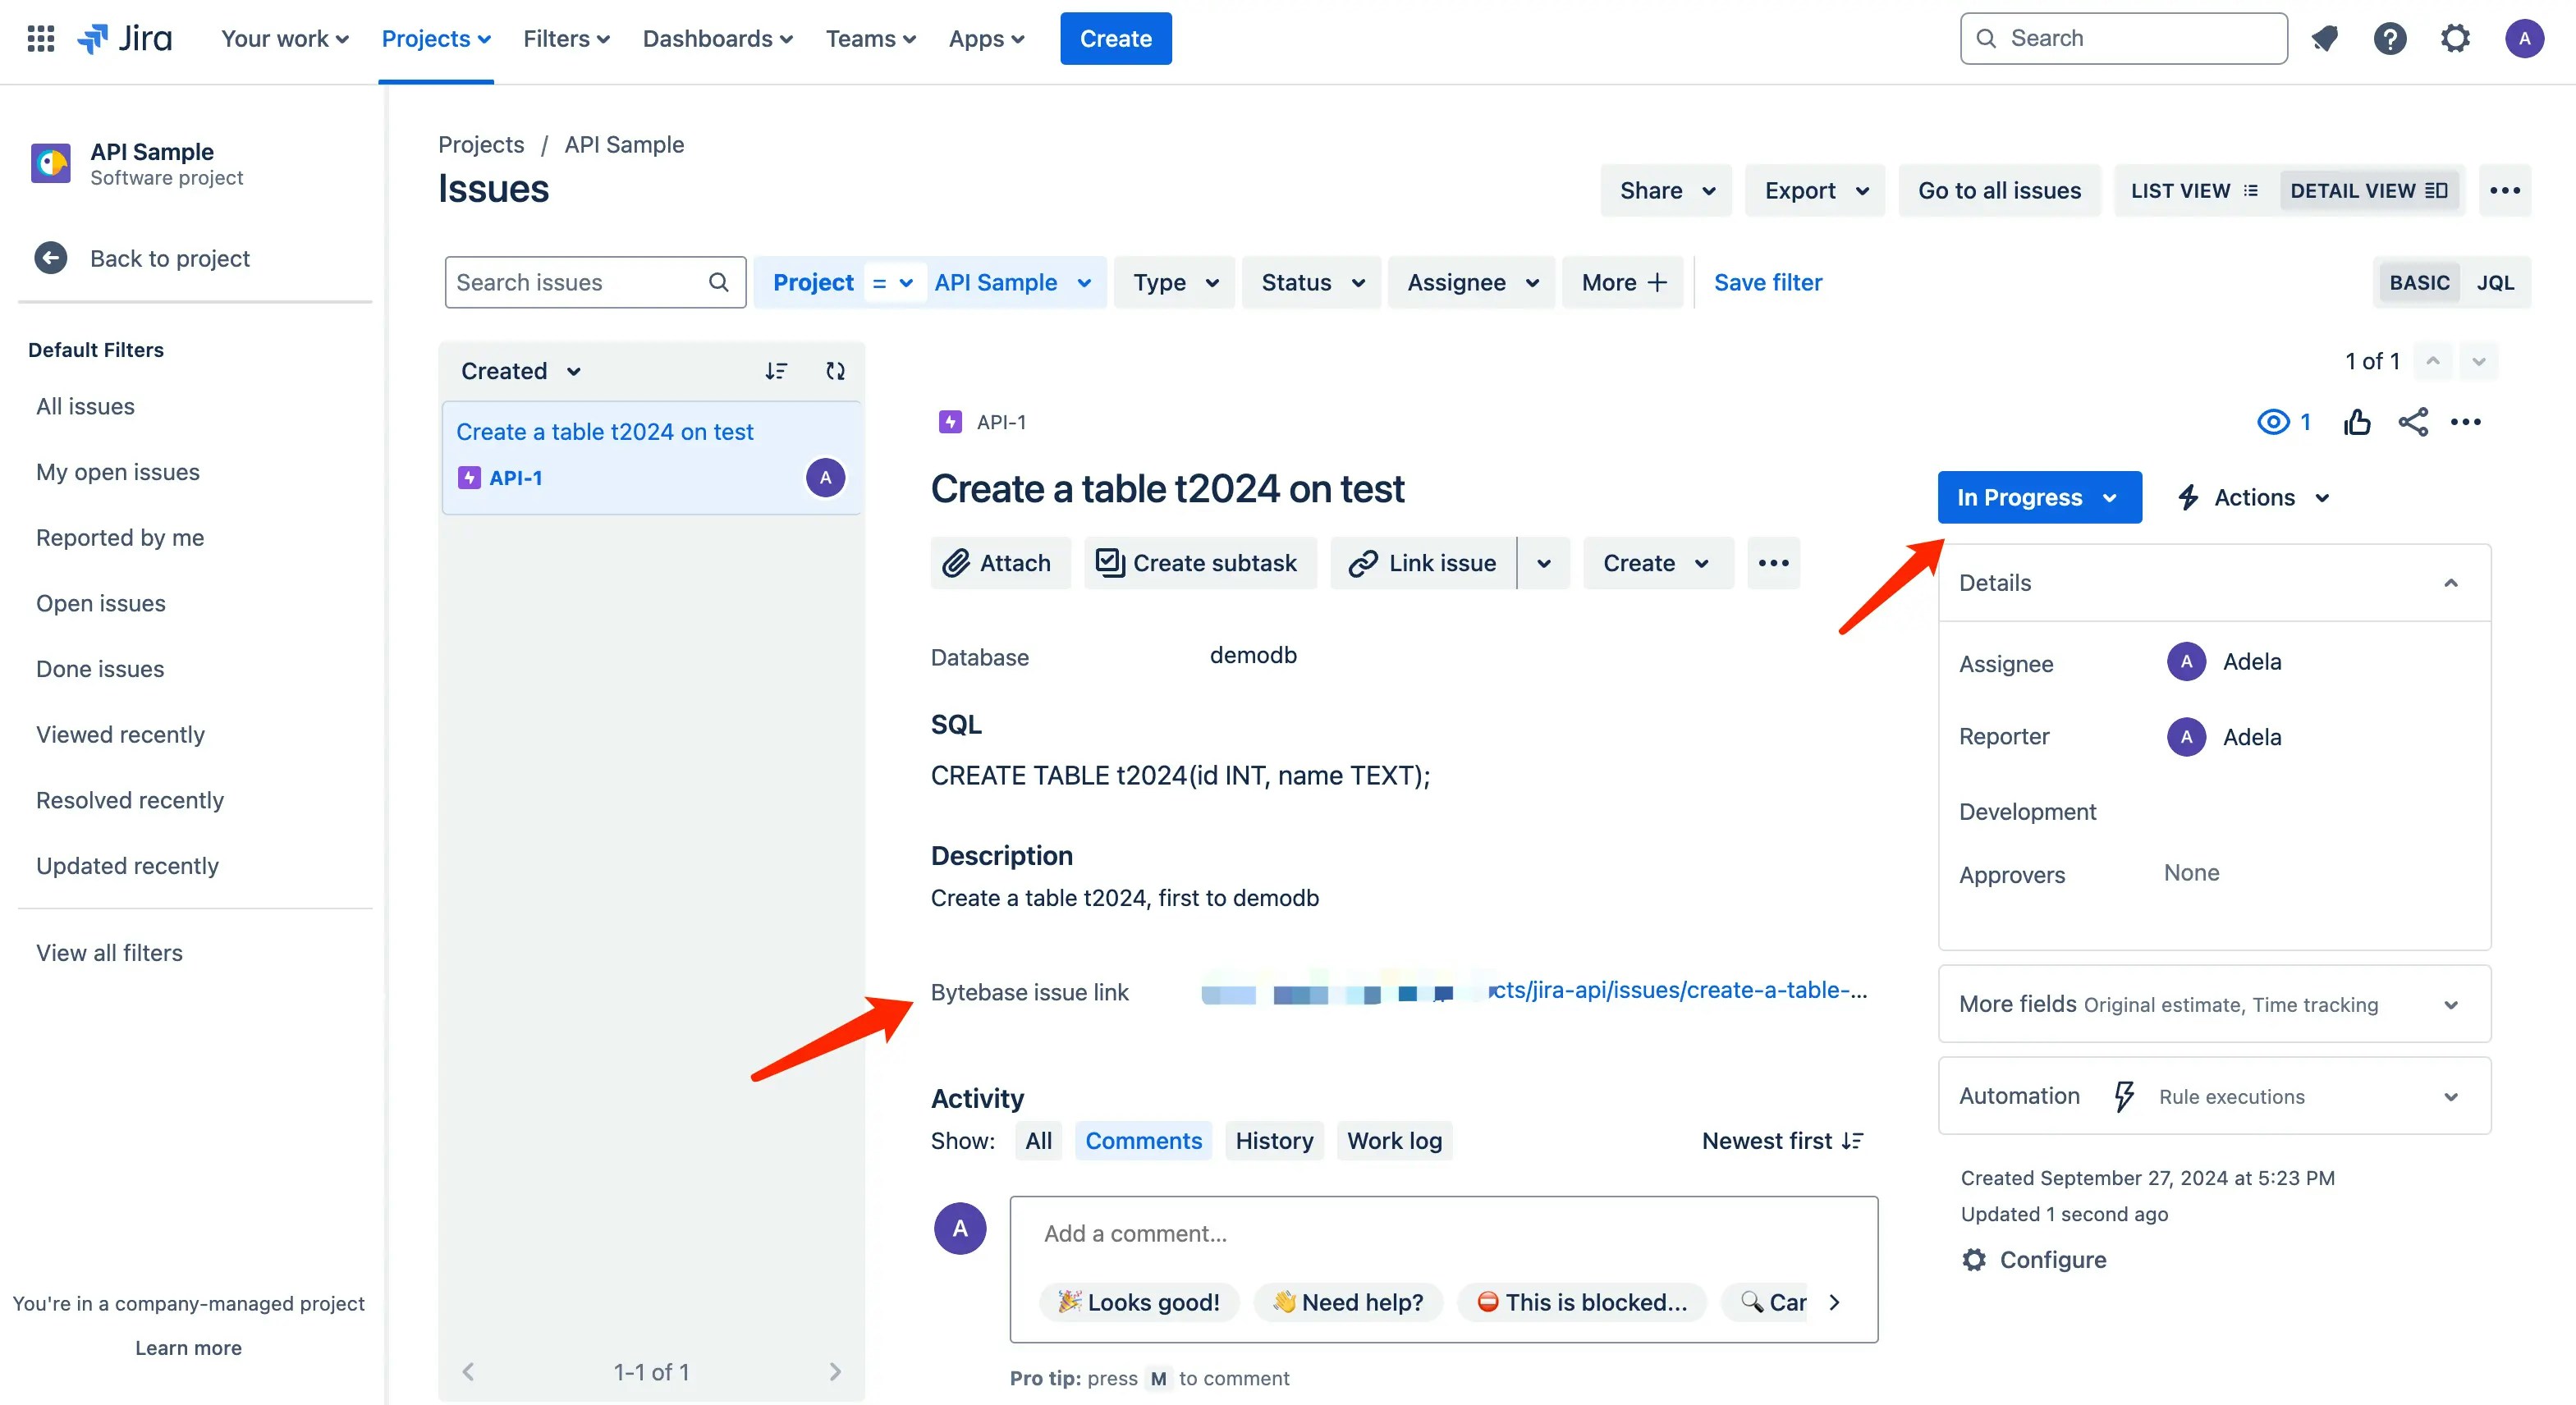
Copy the Bytebase issue URL, and paste it to the **Bytebase issue link** field in Jira issue. Then update the Jira issue status to `In Progress`.
### Step 3 (Jira): Paste the Bytebase issue URL and update the Jira issue status
Copy the Bytebase issue URL, and paste it to the **Bytebase issue link** field in Jira issue. Then update the Jira issue status to `In Progress`.
 ### Step 4 (Bytebase): Deploy the database change in Bytebase
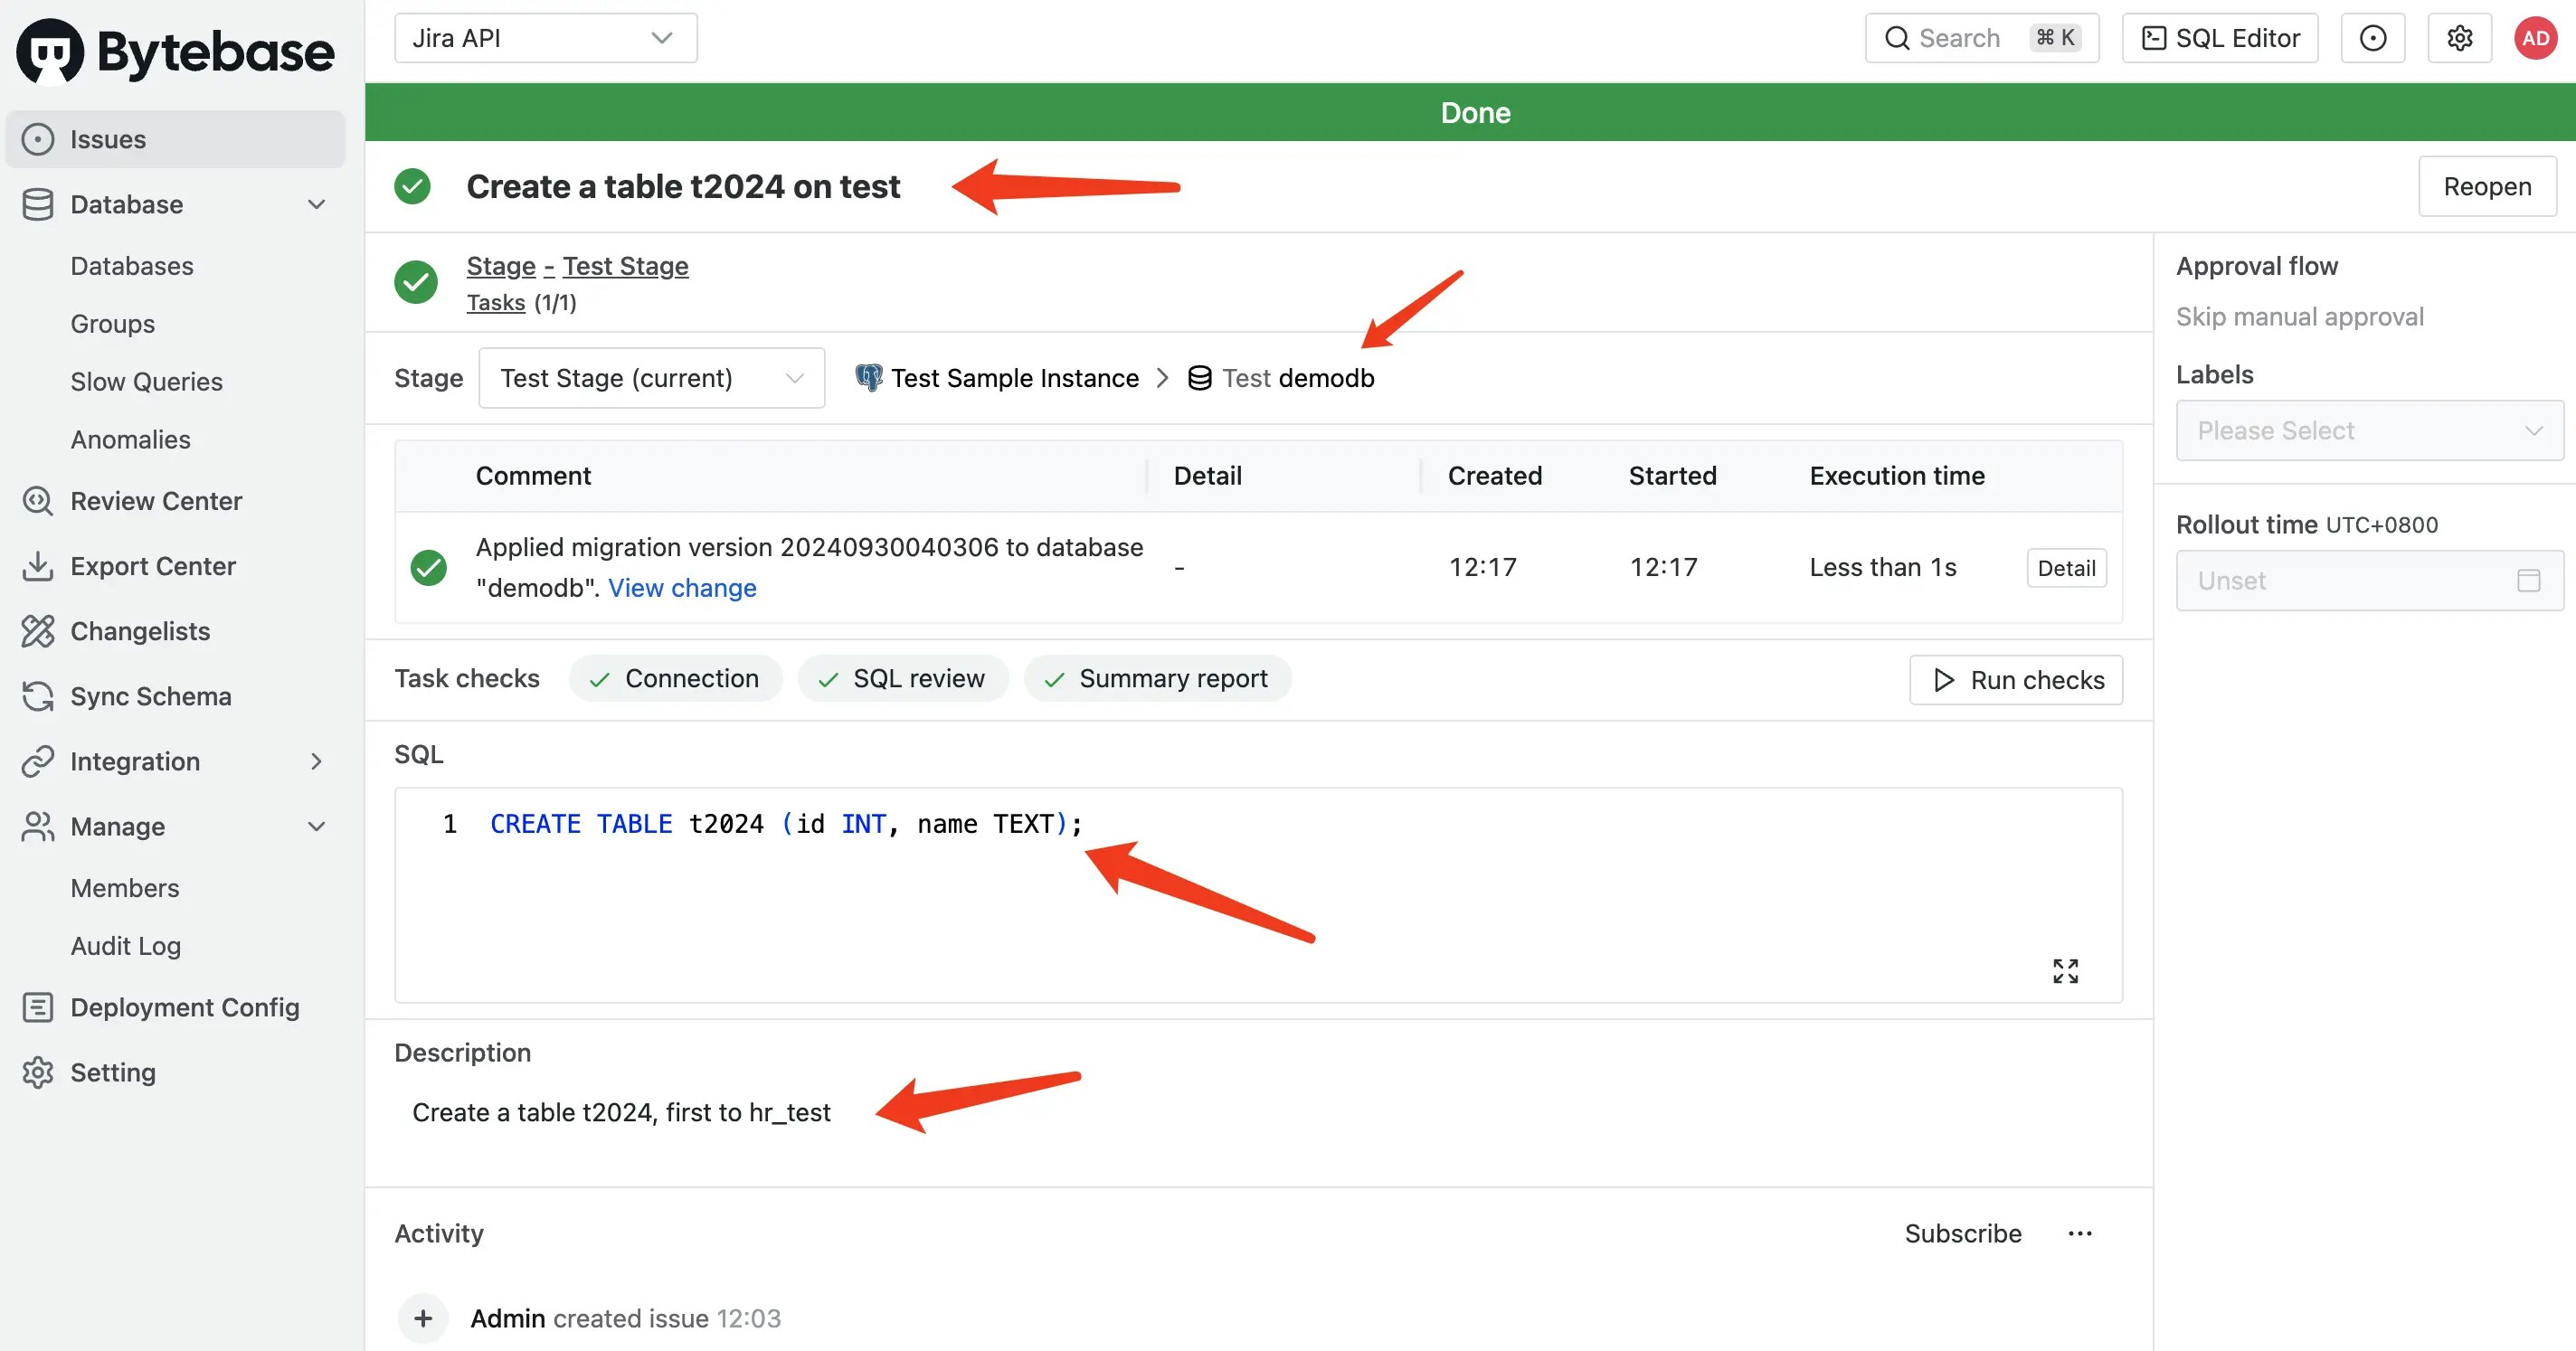
1. Go to Bytebase to deploy the database change.
### Step 4 (Bytebase): Deploy the database change in Bytebase
1. Go to Bytebase to deploy the database change.
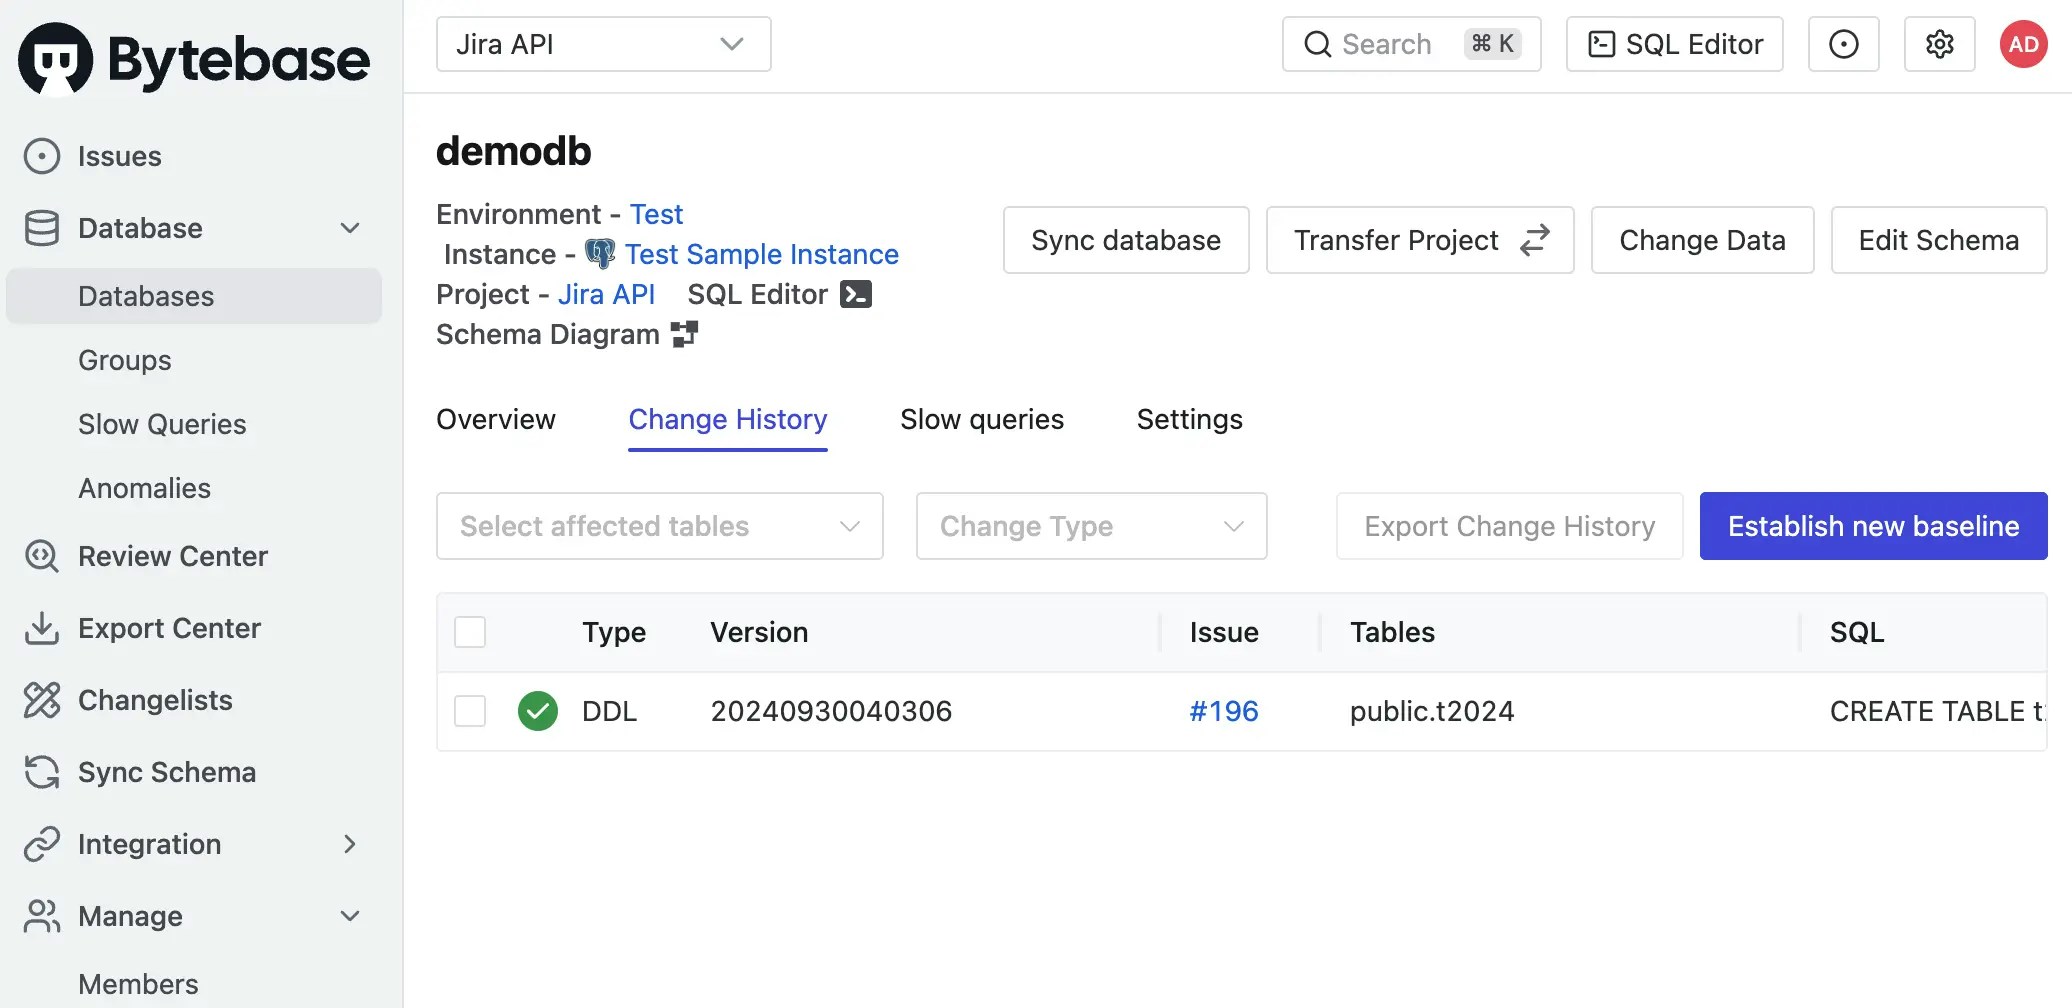
 2. Once change is rolled out, Bytebase will record the change in the database **Changelog**.
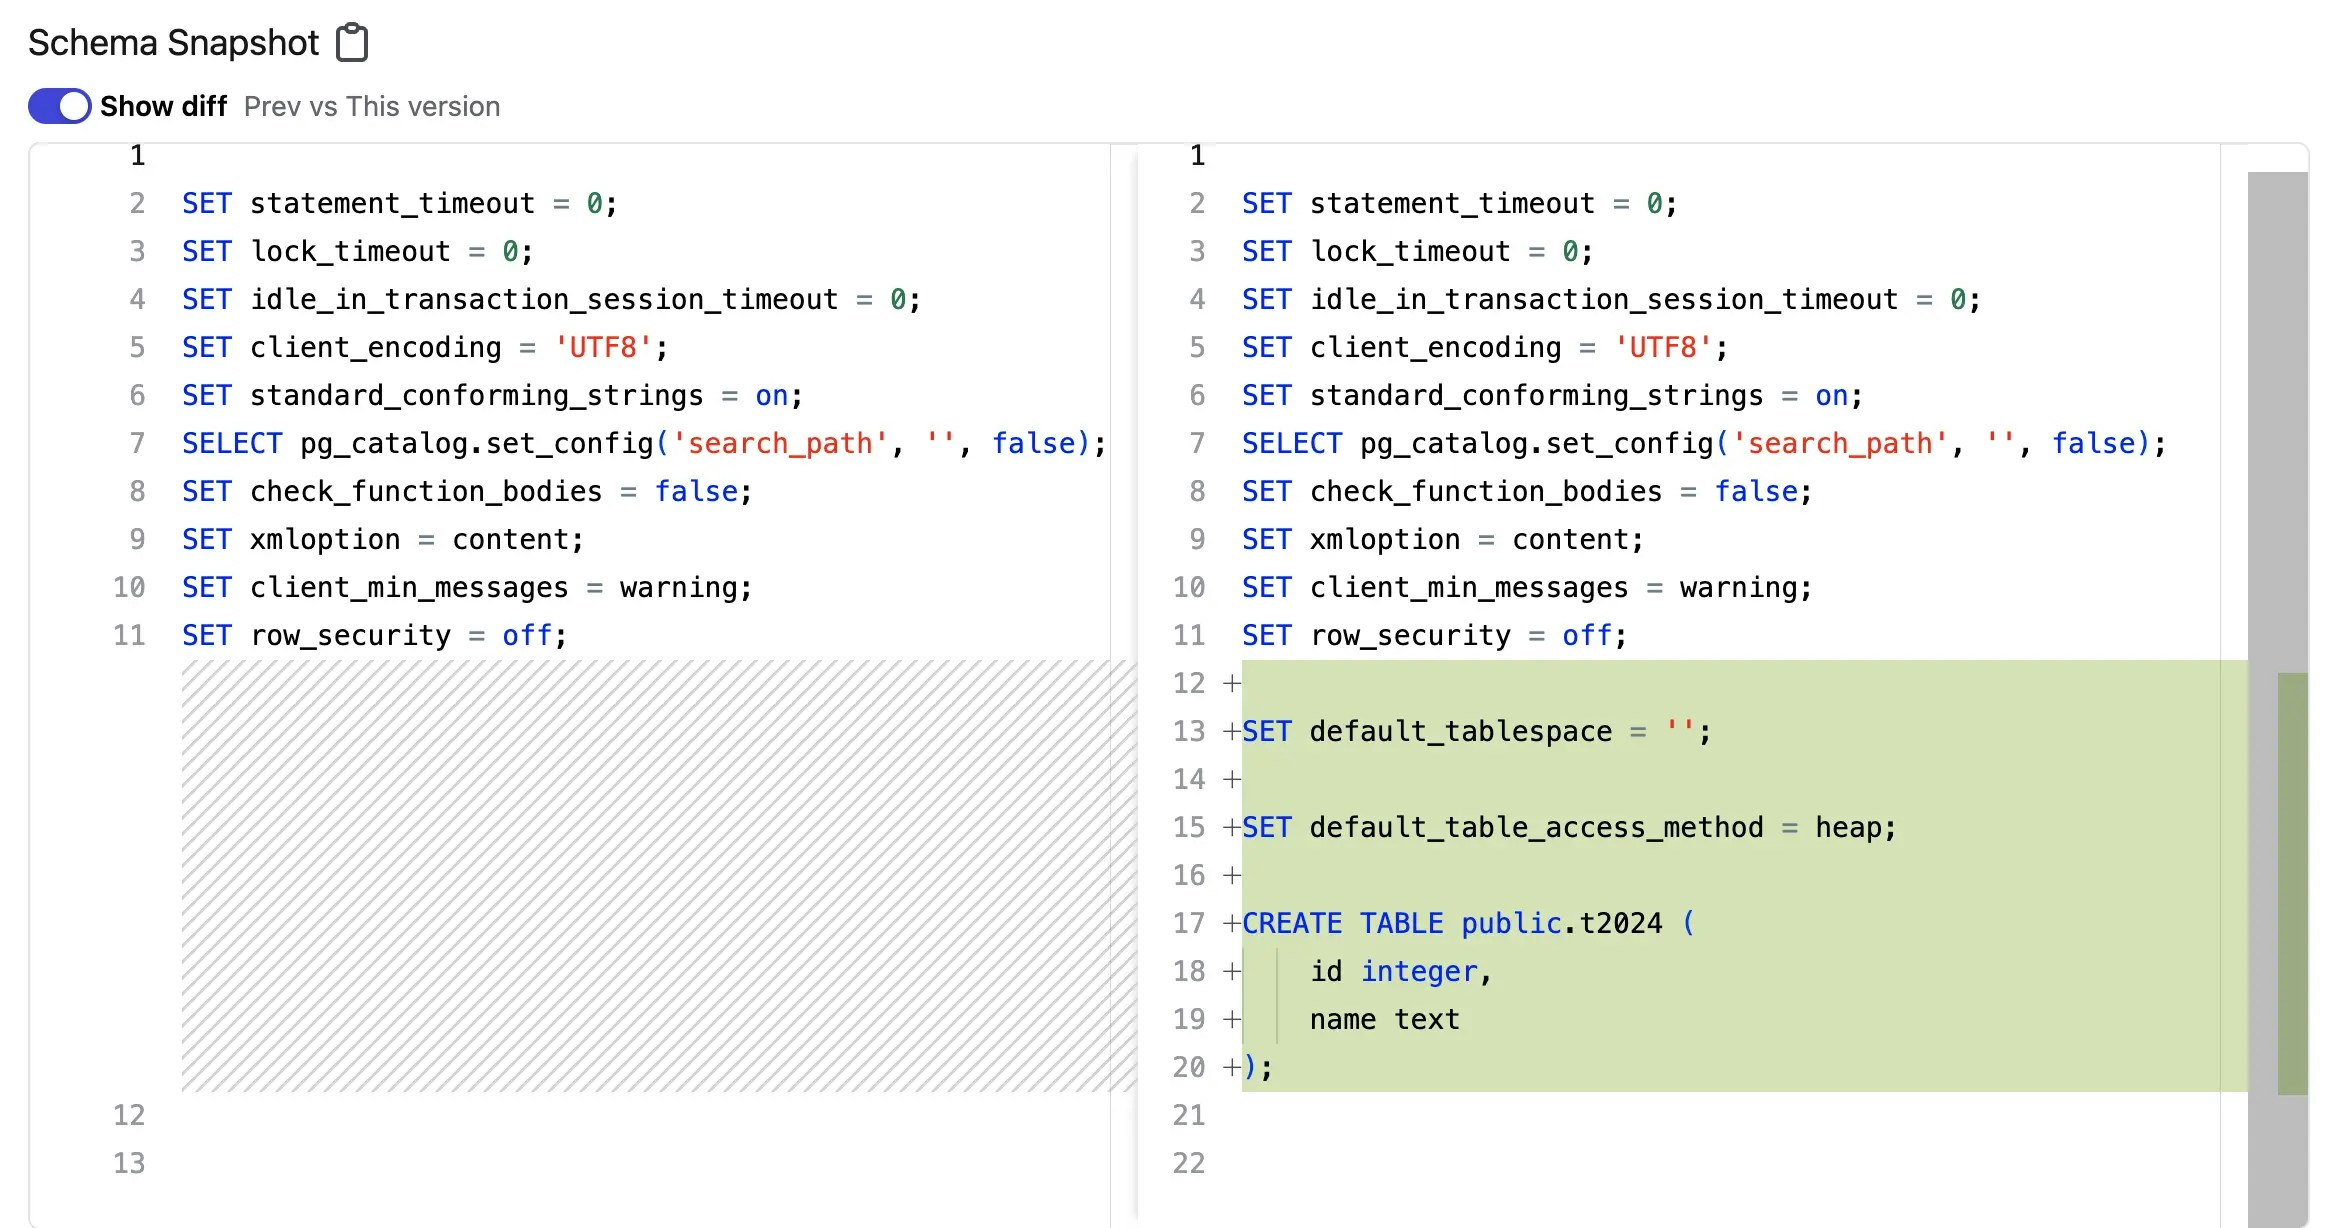
 3. You can also click **View change** to view the change diff.
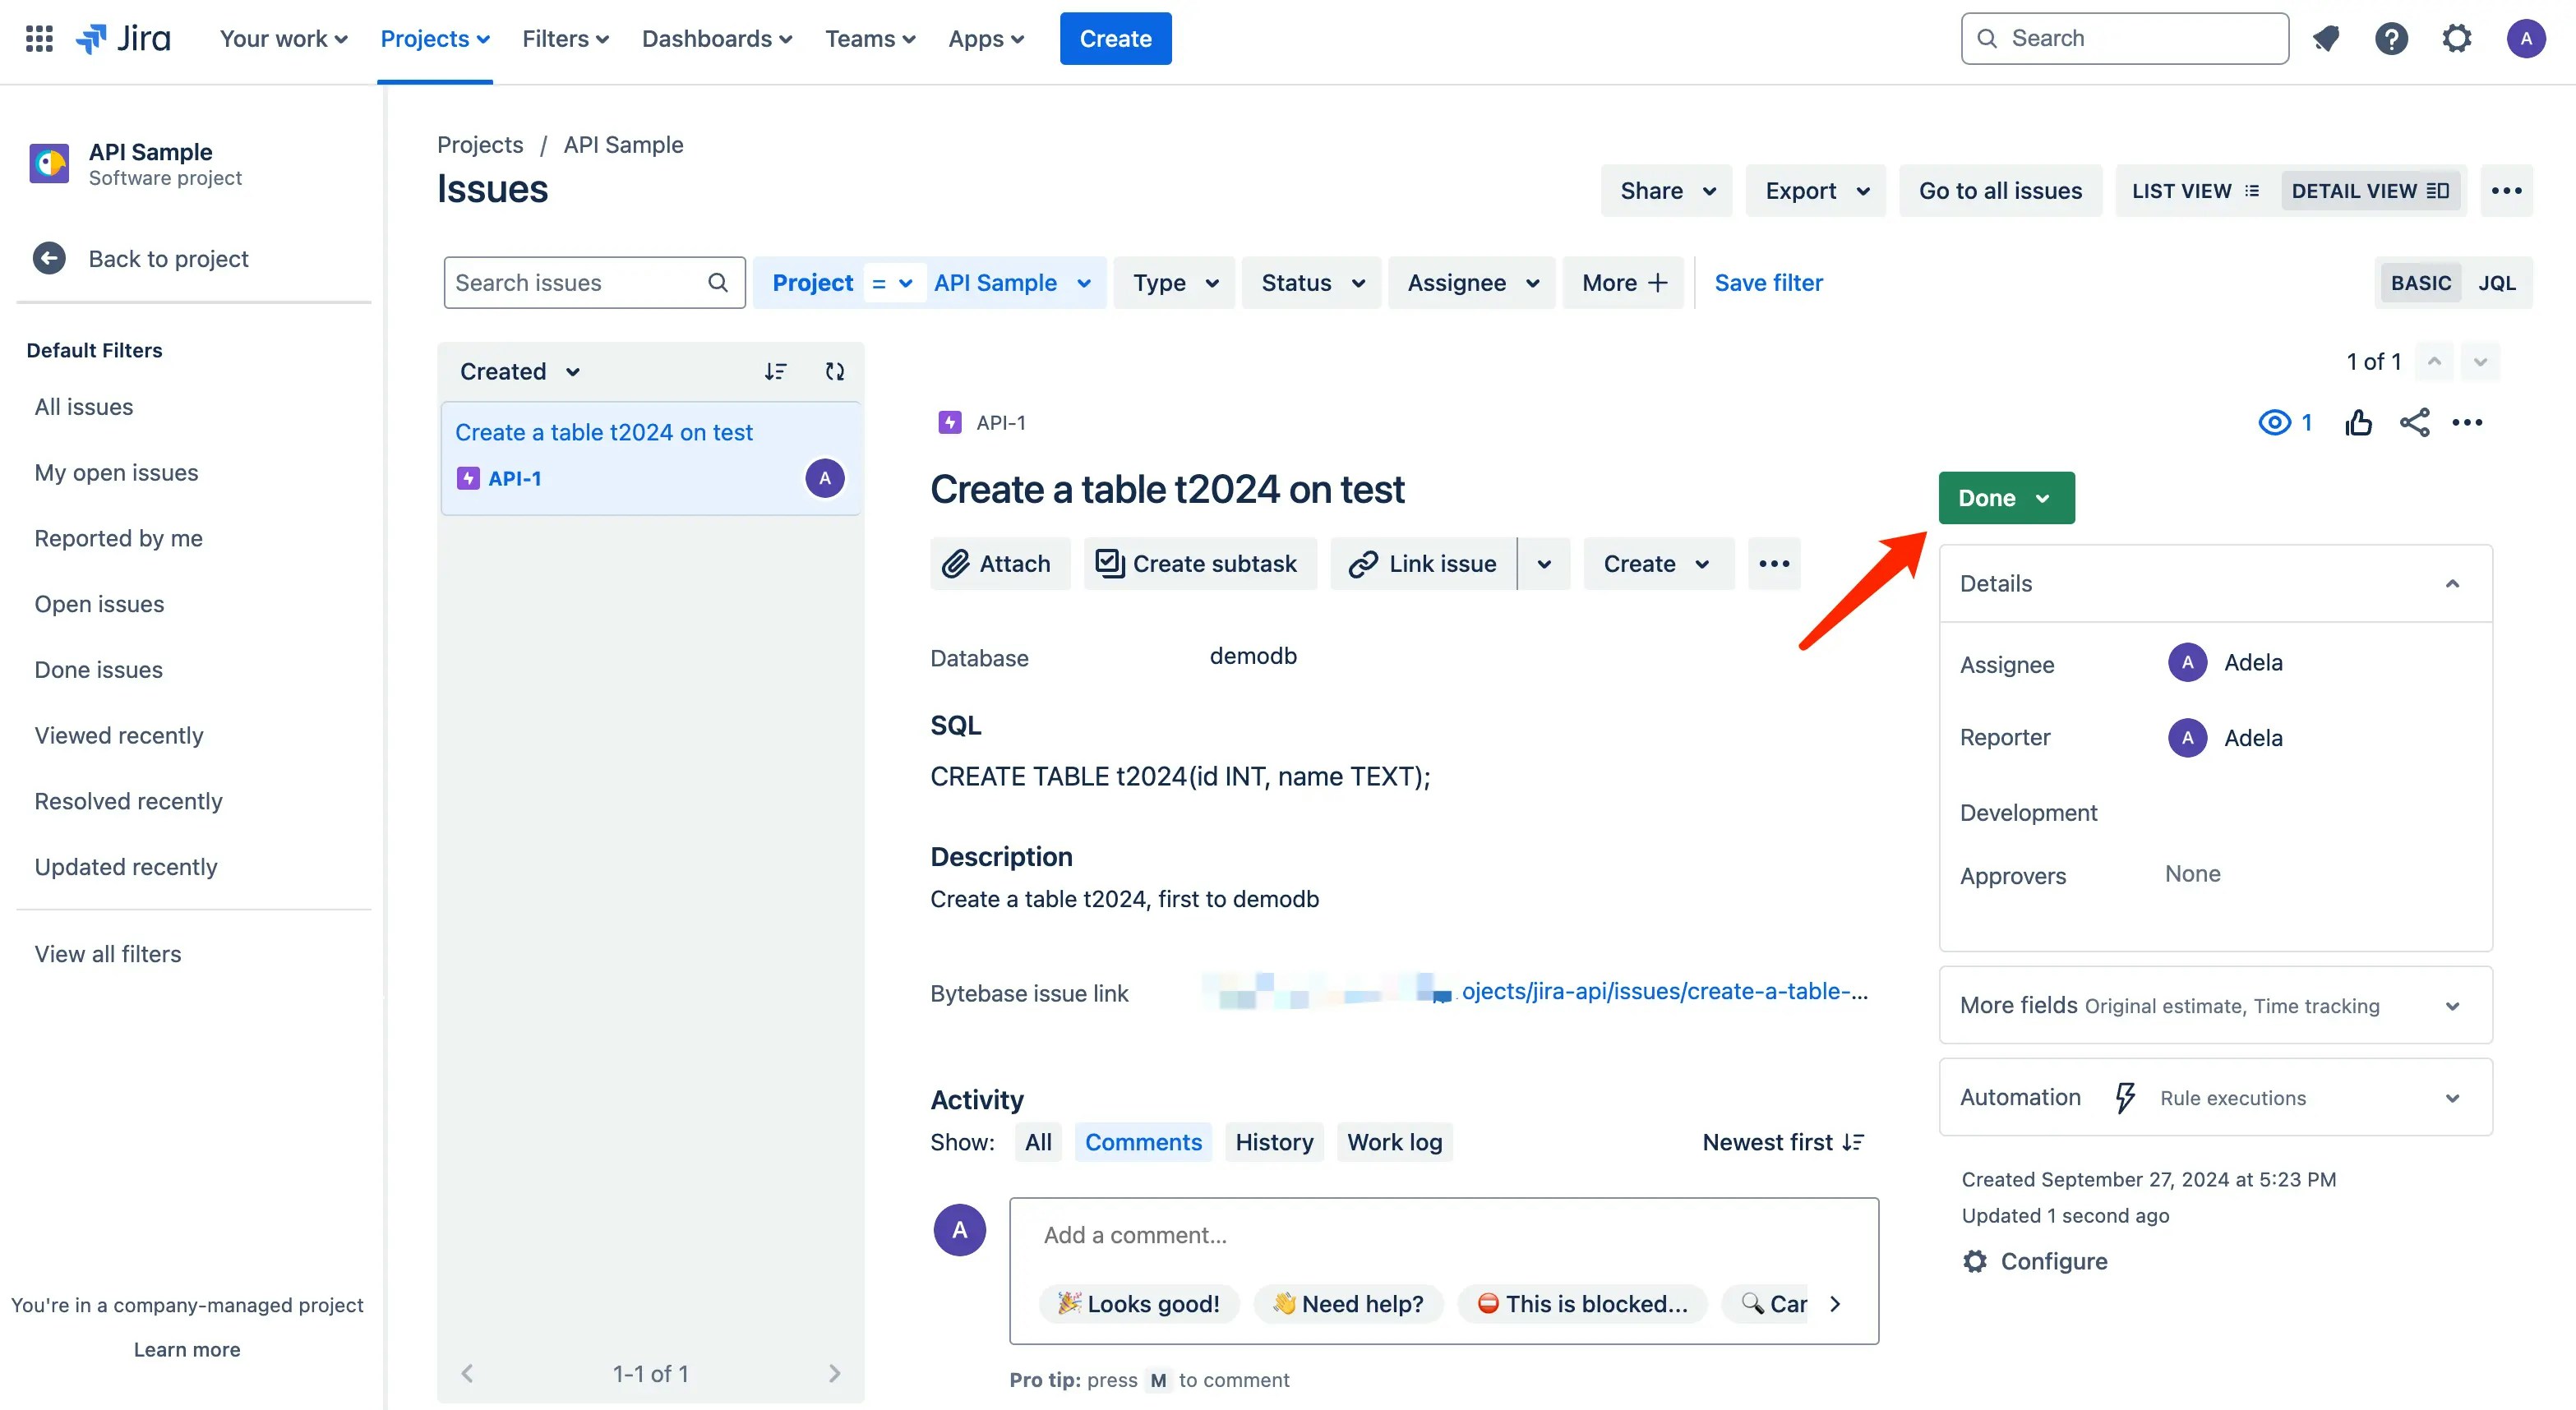
 ### Step 5 (Jira): Update Jira status to Done
Visit Jira issue and set the status to `Done`. The whole process is completed.
### Step 5 (Jira): Update Jira status to Done
Visit Jira issue and set the status to `Done`. The whole process is completed.
 ## Summary and next
In this tutorial, you have successfully set up a database change workflow with Jira and Bytebase.
* Jira takes care of the review process and the overall progress tracking.
* Bytebase takes care of the database change rollout and history tracking.
On the other hand, there are still manual steps to move the fields' information and update the status
in Jira and Bytebase. In the [next tutorial](/tutorials/database-change-management-with-jira-automated/), we will show you how to automate those by leveraging Jira/Bytebase webhook and API.
## Summary and next
In this tutorial, you have successfully set up a database change workflow with Jira and Bytebase.
* Jira takes care of the review process and the overall progress tracking.
* Bytebase takes care of the database change rollout and history tracking.
On the other hand, there are still manual steps to move the fields' information and update the status
in Jira and Bytebase. In the [next tutorial](/tutorials/database-change-management-with-jira-automated/), we will show you how to automate those by leveraging Jira/Bytebase webhook and API.