> ## Documentation Index
> Fetch the complete documentation index at: https://docs.bytebase.com/llms.txt
> Use this file to discover all available pages before exploring further.
# Data Masking with GitHub Actions Part 1 - Semantic Type and Global Masking Rule
> Learn how to automate semantic type and global masking rule using GitHub Actions and Bytebase API
Bytebase is a database DevSecOps platform designed for developers, security, DBA, and platform engineering teams. While it offers an intuitive GUI for managing database schema changes and access control, some teams may want to integrate Bytebase into their existing DevOps platforms using the [Bytebase API](/integrations/api/overview/).
Bytebase provides database [dynamic data masking](/security/data-masking/overview/) in the **Enterprise Plan**, which can mask sensitive data in the SQL Editor query result based on the context on the fly. It helps organizations to protect sensitive data from being exposed to unauthorized users.
By using GitHub Actions with Bytebase API, you can implement policy-as-code to apply database masking policies via the GitOps workflow. This tutorial will guide you through the process.
***
This is Part 1 of our tutorial series on implementing automated database masking using GitHub Actions:
* Part 1: [Semantic Type and Global Masking Rule](/tutorials/github-action-data-masking-part1)
* Part 2: [Column Masking and Masking Exemption](/tutorials/github-action-data-masking-part2)
* Part 3: [Data Classification](/tutorials/github-action-data-masking-part3)
## Overview
In this tutorial, you'll learn how to automate database masking policies using GitHub Actions and the Bytebase API. This integration allows you to:
* Manage data masking rules as code
* Automatically apply masking policies when PRs are merged
Here is [a merged pull request](https://github.com/bytebase/example-database-security/pull/81) as an example, for this tutorial, only "Semantic Type and Global Masking Rule" is covered.
The complete code for this tutorial is available at: [example-database-security](https://github.com/bytebase/example-database-security)
## Prerequisites
* A Bytebase instance (Bytebase Cloud or self-hosted) with Enterprise Plan
* For self-hosted version, you need [Docker](https://www.docker.com/) to run Bytebase
* A [GitHub](https://github.com/) account
## Setup Instructions
### Step 1 - Set up Bytebase
Use [Bytebase Cloud](https://cloud.bytebase.com/) for instant setup without infrastructure management. CI/CD services can connect immediately.
**Best for:** Quick testing, evaluation, and small teams
Run Bytebase in Docker within your infrastructure:
```bash theme={null}
docker run --rm --init \
--name bytebase \
--publish 8080:8080 --pull always \
--volume ~/.bytebase/data:/var/opt/bytebase \
bytebase/bytebase:latest
```
**Network Access Options:**
* **For testing:** Use tools such as [ngrok](https://ngrok.com/) or [VS Code port forwarding](https://code.visualstudio.com/docs/editor/port-forwarding) to temporarily expose your local Bytebase to cloud CI/CD services. After exposing, configure the **External URL** in Bytebase **Settings > General**.
* **For production:** Use self-hosted CI/CD runners within your private network. Never expose production Bytebase to the internet.
**Best for:** Organizations with security requirements or existing infrastructure
See [Network Architecture guide](/get-started/self-host/network-architecture#2-self-hosted-bytebase-production).
### Step 2 - Create Service Account
1. Log in as `Workspace Admin`, and go to **IAM & Admin** > **Users & Groups**. Click **+ Add User**, fill in with `api-sample`, choose the `Workspace DBA` role sufficient for this tutorial and click **Confirm**.
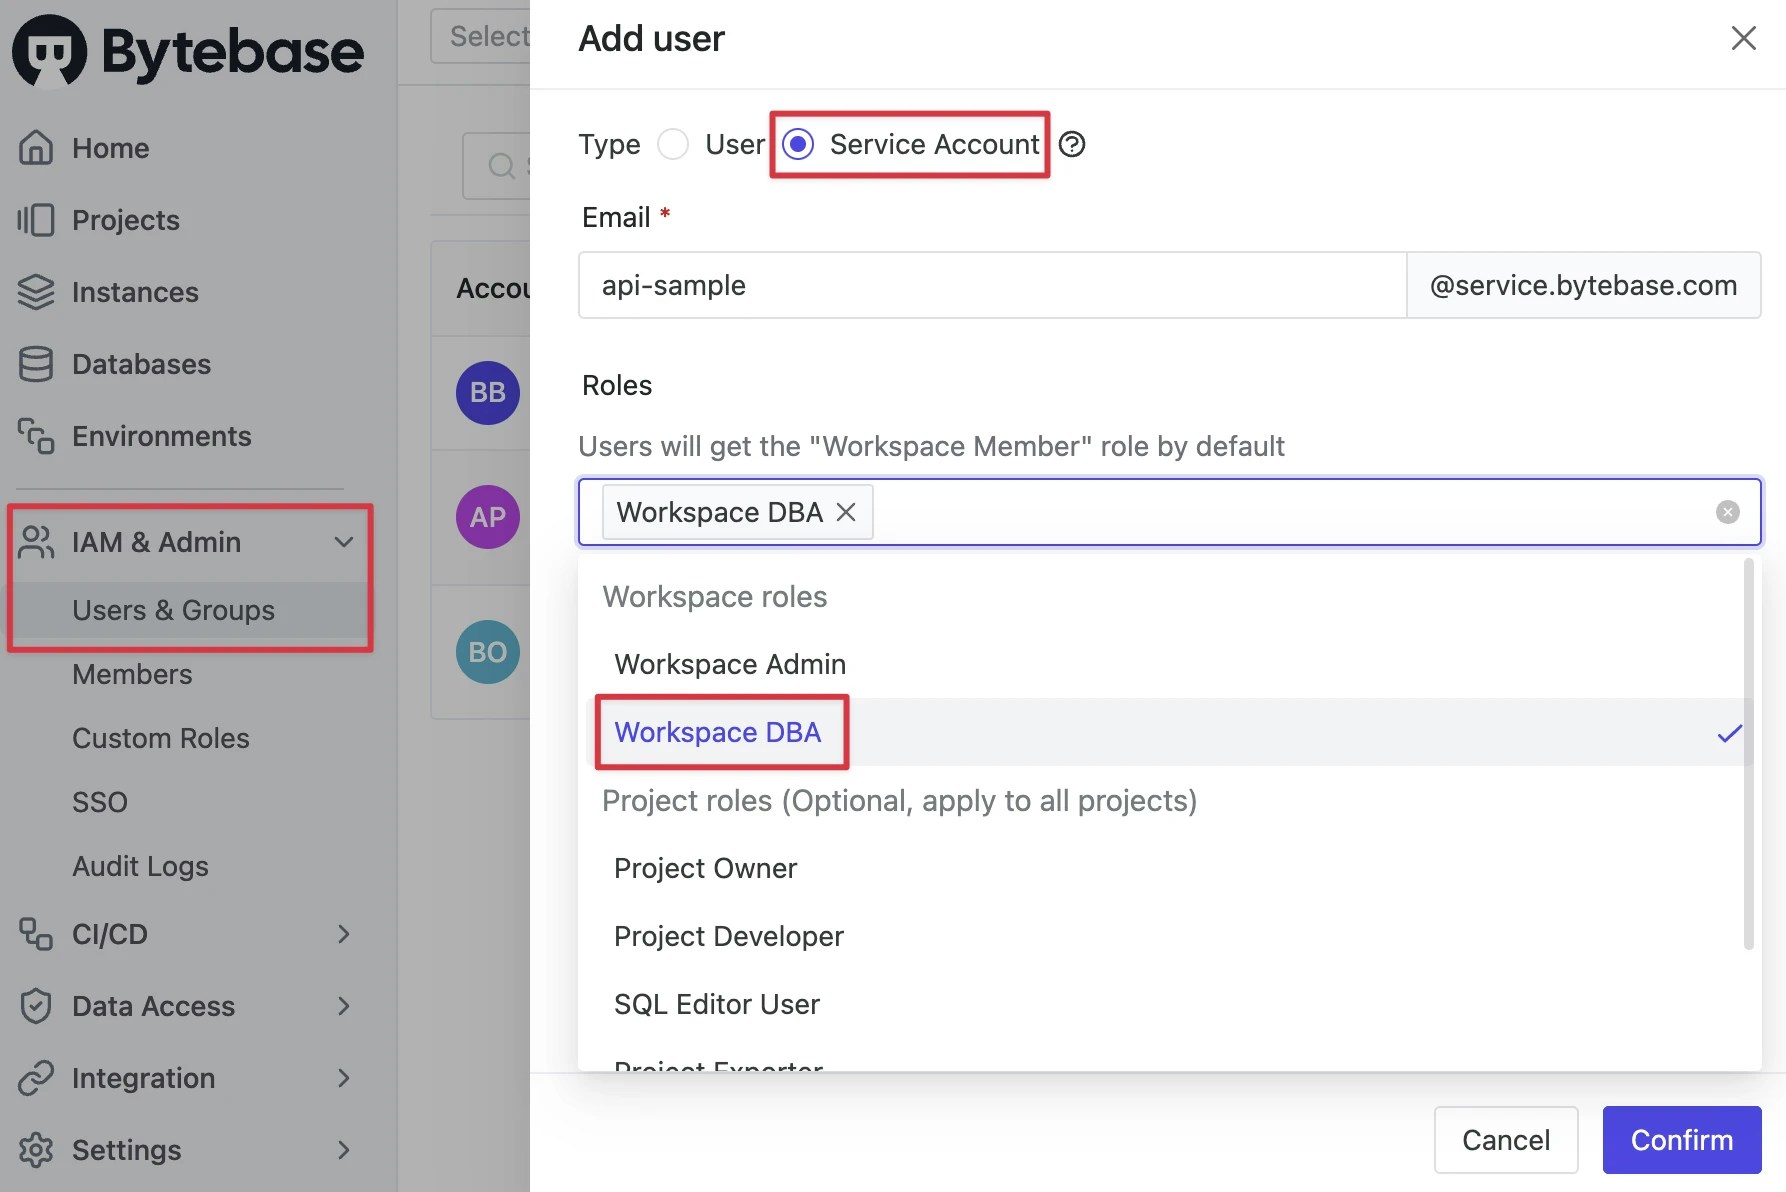 2. Find the newly created service account and **Copy Service Key**. We will use this token to authenticate the API calls.
 ### Step 3 - Prepare Test Data
1. Bytebase by default provides a project `Sample Project` with two database `hr_test` and `hr_prod`.
2. Click **IAM & Admin > Users & Groups** on the left sidebar. Add users: `dev@example.com`, `dev2@example.com` and `dev3@example.com` with no roles.
3. Add a group `contractor@example.com` with `dev3@example.com` as a member.
4. Go to project `Sample Project`, click **Manage > Members** on the left sidebar.
5. Click **Grant Access** and select users `dev@example.com` and `dev2@example.com` with `Developer` role and group `contractor@example.com` with `Querier` role.
### Step 4 - Configure GitHub Actions
1. Fork [Database Security GitHub Actions Example](https://github.com/bytebase/example-database-security).
2. Click **Settings** and then click **Secrets and variables > Actions**. Add the following secrets:
* `BYTEBASE_URL`: Your Bytebase instance URL (e.g., `https://bytebase.your-company.com` or your Bytebase Cloud URL)
* `BYTEBASE_SERVICE_KEY`: `api-example@service.bytebase.com`
* `BYTEBASE_SERVICE_SECRET`: service key copied in the previous step
### Step 5 - Understanding the GitHub Workflow
Let's dig into the GitHub Actions workflow [code](https://github.com/bytebase/example-database-security/blob/main/.github/workflows/1-bb-masking-semantic-type-global.yml):
1. **Trigger**: Workflow runs when PRs are merged to `main`.
2. **Authentication**: The step `Login Bytebase` will log in Bytebase using the official [bytebase-login](https://github.com/marketplace/actions/bytebase-login) action. The variables you configured in the GitHub **Secrets and variables** are mapped to the variables in the action.
3. **File Detection**: The step `Get changed files` will monitor the changed files in the pull request. For this workflow, we only care about semantic type and global masking rule. So `masking/semantic-type.json` and `masking/global-masking-rule.json` are filtered out.
4. **PR Feedback**: The step `Comment on PR` will comment on the merged pull to notify the result.
## Semantic Type
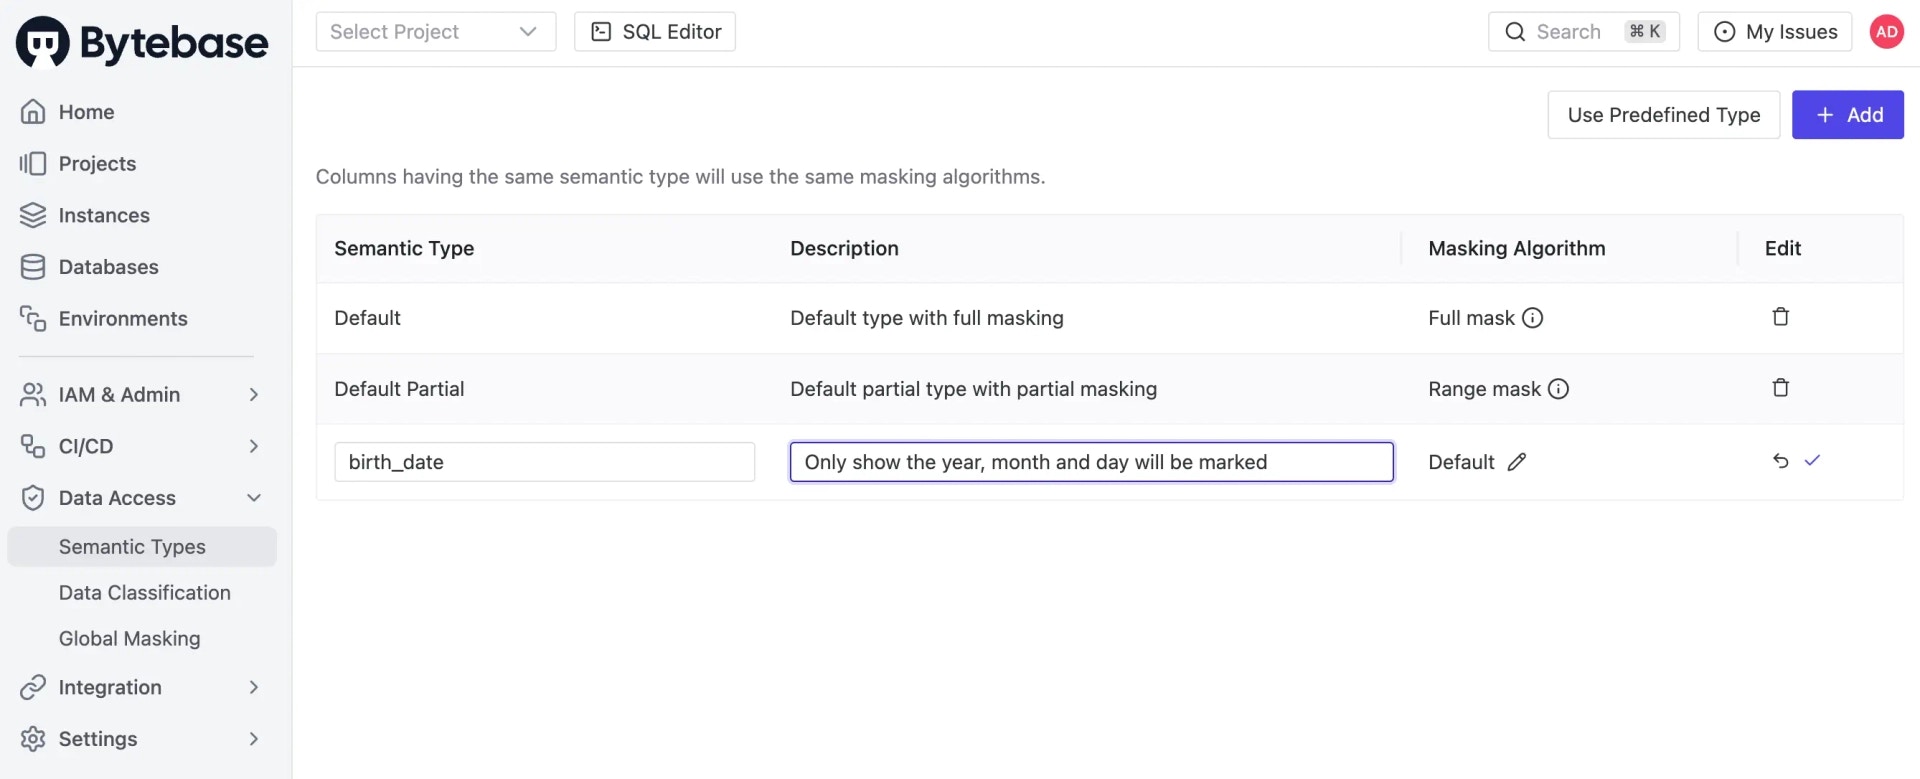
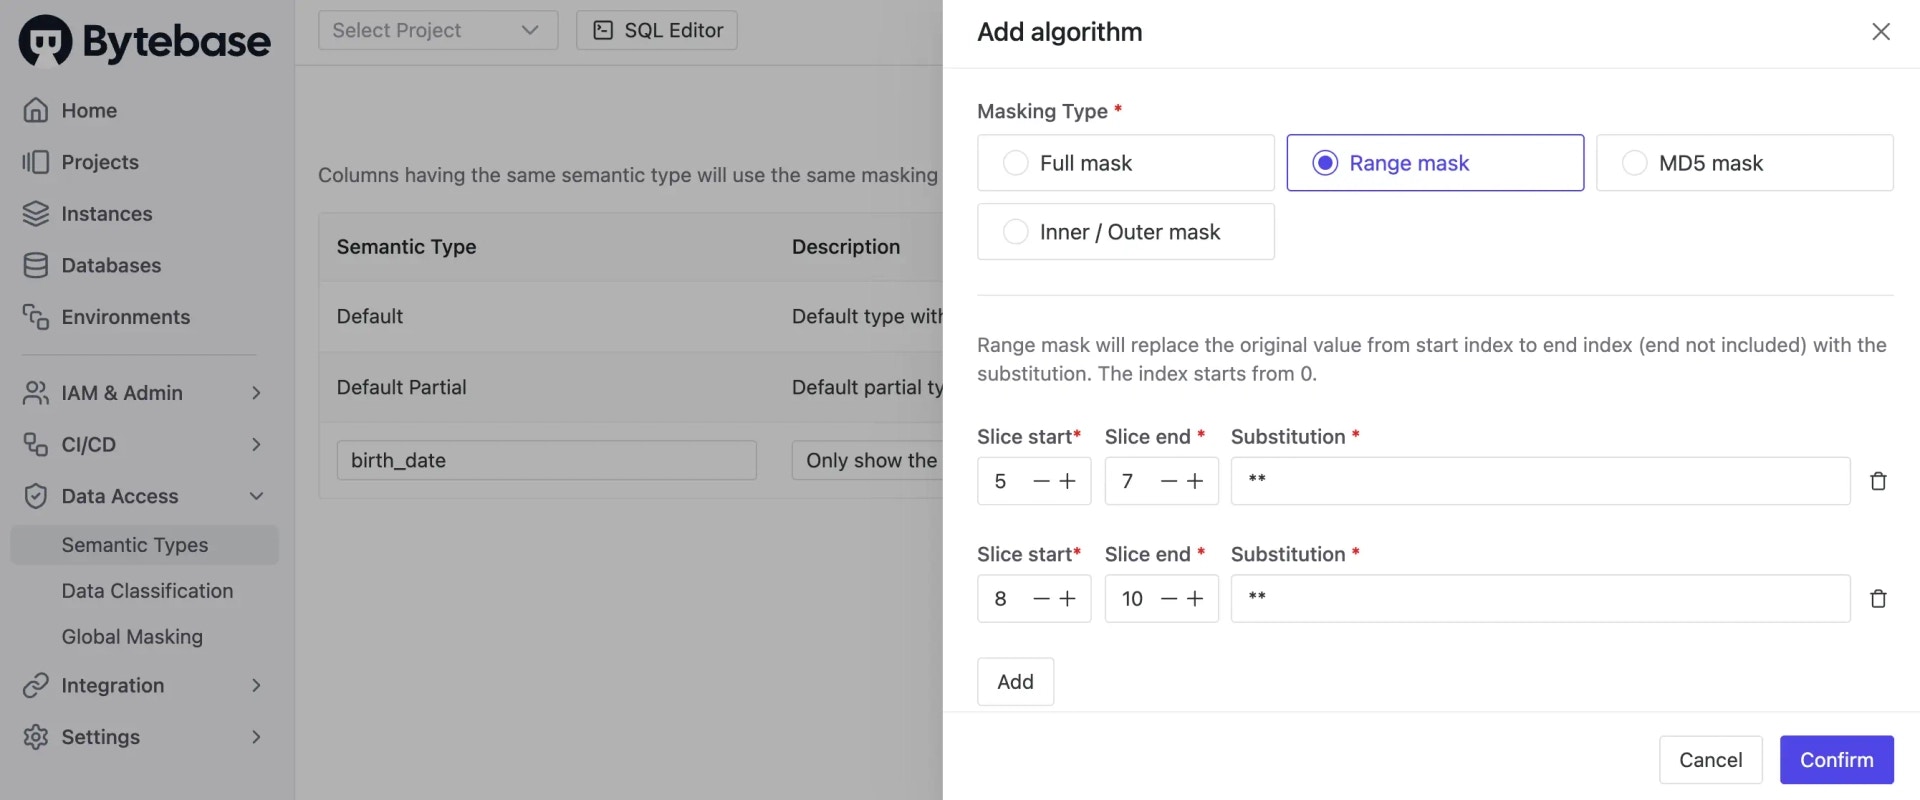
Masking algorithm is associated with [Semantic Type](/security/data-masking/semantic-types/). You define semantic types and apply them to global masking rule or table columns. For example, you may define a semantic type `birth_date` with a masking algorithm to mask month and day.
### In Bytebase Console
Go to **Data Access > Semantic Types** and click **Add**. You can create a new semantic type with a name and description, and customize the masking algorithm.
### Step 3 - Prepare Test Data
1. Bytebase by default provides a project `Sample Project` with two database `hr_test` and `hr_prod`.
2. Click **IAM & Admin > Users & Groups** on the left sidebar. Add users: `dev@example.com`, `dev2@example.com` and `dev3@example.com` with no roles.
3. Add a group `contractor@example.com` with `dev3@example.com` as a member.
4. Go to project `Sample Project`, click **Manage > Members** on the left sidebar.
5. Click **Grant Access** and select users `dev@example.com` and `dev2@example.com` with `Developer` role and group `contractor@example.com` with `Querier` role.
### Step 4 - Configure GitHub Actions
1. Fork [Database Security GitHub Actions Example](https://github.com/bytebase/example-database-security).
2. Click **Settings** and then click **Secrets and variables > Actions**. Add the following secrets:
* `BYTEBASE_URL`: Your Bytebase instance URL (e.g., `https://bytebase.your-company.com` or your Bytebase Cloud URL)
* `BYTEBASE_SERVICE_KEY`: `api-example@service.bytebase.com`
* `BYTEBASE_SERVICE_SECRET`: service key copied in the previous step
### Step 5 - Understanding the GitHub Workflow
Let's dig into the GitHub Actions workflow [code](https://github.com/bytebase/example-database-security/blob/main/.github/workflows/1-bb-masking-semantic-type-global.yml):
1. **Trigger**: Workflow runs when PRs are merged to `main`.
2. **Authentication**: The step `Login Bytebase` will log in Bytebase using the official [bytebase-login](https://github.com/marketplace/actions/bytebase-login) action. The variables you configured in the GitHub **Secrets and variables** are mapped to the variables in the action.
3. **File Detection**: The step `Get changed files` will monitor the changed files in the pull request. For this workflow, we only care about semantic type and global masking rule. So `masking/semantic-type.json` and `masking/global-masking-rule.json` are filtered out.
4. **PR Feedback**: The step `Comment on PR` will comment on the merged pull to notify the result.
## Semantic Type
Masking algorithm is associated with [Semantic Type](/security/data-masking/semantic-types/). You define semantic types and apply them to global masking rule or table columns. For example, you may define a semantic type `birth_date` with a masking algorithm to mask month and day.
### In Bytebase Console
Go to **Data Access > Semantic Types** and click **Add**. You can create a new semantic type with a name and description, and customize the masking algorithm.
 ### In GitHub Workflow
Find the step `Apply semantic type`, which will apply the semantic type to the database via API. All the masking algorithms should be defined in one file in the root directory as `masking/semantic-type.json`.
```bash theme={null}
response=$(curl -s -w "\n%{http_code}" --request PATCH "${BYTEBASE_API_URL}/settings/SEMANTIC_TYPES" \
--header "Authorization: Bearer ${BYTEBASE_TOKEN}" \
--header "Content-Type: application/json" \
--data @"$CHANGED_FILE")
```
By changing file `masking/semantic-type.json`, creating a PR and merging, the semantic types will be applied. Go to Bytebase console, click **Data Access > Semantic Types**, you can see the applied semantic types.
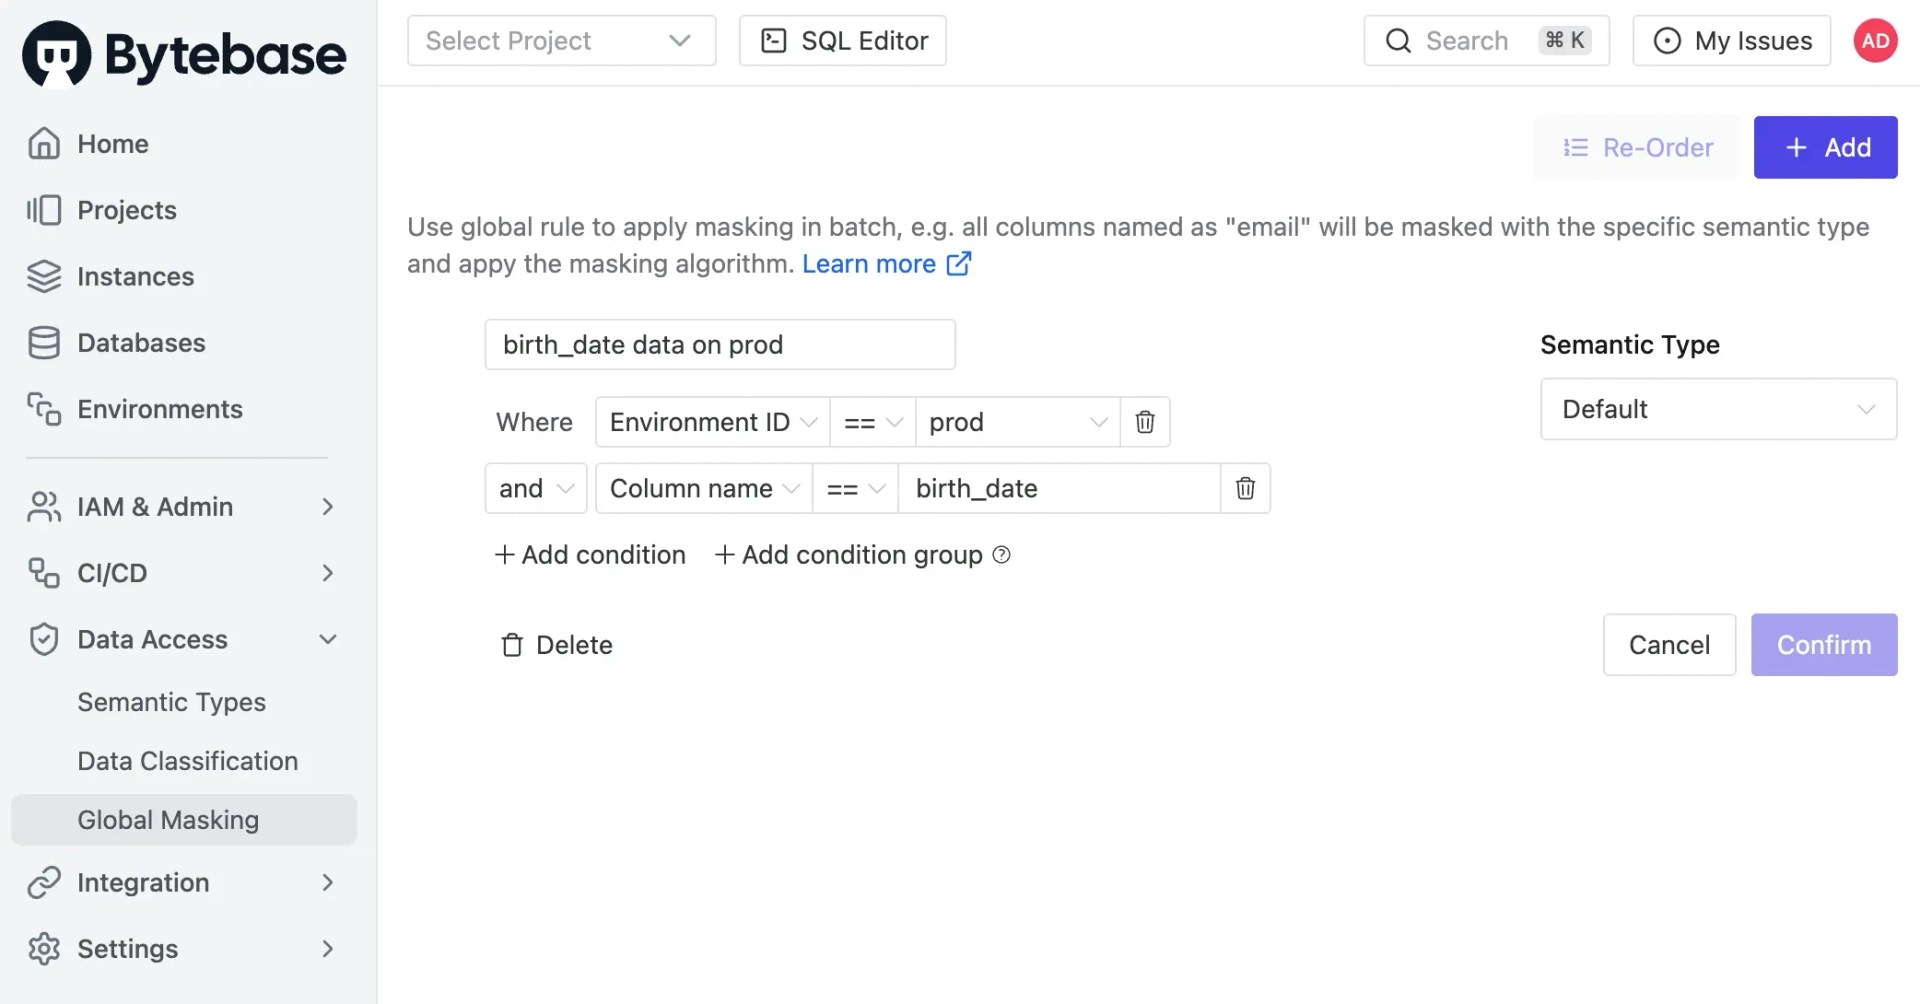
## Global Masking Rule
[Global Masking Rule](/security/data-masking/global-masking-rule/) is configured by the admin.
### In Bytebase Console
Go to **Data Access > Global Masking** and click **Add**. You can create a new global masking rule mapping condition to a semantic type.
### In GitHub Workflow
Find the step `Apply semantic type`, which will apply the semantic type to the database via API. All the masking algorithms should be defined in one file in the root directory as `masking/semantic-type.json`.
```bash theme={null}
response=$(curl -s -w "\n%{http_code}" --request PATCH "${BYTEBASE_API_URL}/settings/SEMANTIC_TYPES" \
--header "Authorization: Bearer ${BYTEBASE_TOKEN}" \
--header "Content-Type: application/json" \
--data @"$CHANGED_FILE")
```
By changing file `masking/semantic-type.json`, creating a PR and merging, the semantic types will be applied. Go to Bytebase console, click **Data Access > Semantic Types**, you can see the applied semantic types.
## Global Masking Rule
[Global Masking Rule](/security/data-masking/global-masking-rule/) is configured by the admin.
### In Bytebase Console
Go to **Data Access > Global Masking** and click **Add**. You can create a new global masking rule mapping condition to a semantic type.
 ### In GitHub Workflow
Find the step `Apply global masking rule`, which will apply the global masking rule to the database via API. All the global masking rules should be defined in one file in the root directory as `masking/global-masking-rule.json`. The code it calls Bytebase API is as follows:
```bash theme={null}
# Resolve the current workspace resource name (e.g. "workspaces/abcd1234").
# Policy URLs require the real workspace ID — the "workspaces/-" wildcard only
# works for the GetWorkspace RPC, not for policy endpoints.
WORKSPACE_NAME=$(curl -s \
--header "Authorization: Bearer ${BYTEBASE_TOKEN}" \
"${BYTEBASE_API_URL}/workspaces/-" | jq -r '.name')
response=$(curl -s -w "\n%{http_code}" --request PATCH "${BYTEBASE_API_URL}/${WORKSPACE_NAME}/policies/masking_rule?allowMissing=true&updateMask=payload" \
--header "Authorization: Bearer ${BYTEBASE_TOKEN}" \
--header "Content-Type: application/json" \
--data @"$CHANGED_FILE")
```
By changing file `masking/global-masking-rule.json`, creating a PR and merge, you can apply the global masking rules.
### In GitHub Workflow
Find the step `Apply global masking rule`, which will apply the global masking rule to the database via API. All the global masking rules should be defined in one file in the root directory as `masking/global-masking-rule.json`. The code it calls Bytebase API is as follows:
```bash theme={null}
# Resolve the current workspace resource name (e.g. "workspaces/abcd1234").
# Policy URLs require the real workspace ID — the "workspaces/-" wildcard only
# works for the GetWorkspace RPC, not for policy endpoints.
WORKSPACE_NAME=$(curl -s \
--header "Authorization: Bearer ${BYTEBASE_TOKEN}" \
"${BYTEBASE_API_URL}/workspaces/-" | jq -r '.name')
response=$(curl -s -w "\n%{http_code}" --request PATCH "${BYTEBASE_API_URL}/${WORKSPACE_NAME}/policies/masking_rule?allowMissing=true&updateMask=payload" \
--header "Authorization: Bearer ${BYTEBASE_TOKEN}" \
--header "Content-Type: application/json" \
--data @"$CHANGED_FILE")
```
By changing file `masking/global-masking-rule.json`, creating a PR and merge, you can apply the global masking rules.