> ## Documentation Index
> Fetch the complete documentation index at: https://docs.bytebase.com/llms.txt
> Use this file to discover all available pages before exploring further.
# Database GitOps with Bitbucket Pipelines
This is part of our database GitOps series with Bytebase:
* [Database GitOps with GitHub Actions](/tutorials/gitops-github-workflow)
* [Database GitOps with Azure DevOps Pipeline](/tutorials/gitops-azure-devops-workflow)
* [Database GitOps with GitLab CI](/tutorials/gitops-gitlab-workflow)
* Database GitOps with Bitbucket Pipelines (this one)
***
This tutorial shows you how to build an database GitOps workflow using Bitbucket Pipelines and Bytebase API. You'll learn to create a streamlined database release workflow where you can:
* Submit schema migrations through Bitbucket
* Automatically run SQL reviews on pull requests
* Auto-create and deploy Bytebase releases when merging to `main`
While we use Bitbucket Pipelines in this guide, you can apply these concepts to other CI platforms like GitHub Actions, GitLab CI, or Azure DevOps using the Bytebase API.
While we use PostgreSQL with Bitbucket Pipelines in this guide, you can apply these concepts to other SQL or NoSQL databases with any CI platforms like GitHub Actions, GitLab CI, or Azure DevOps using the Bytebase API.
## Repository
[https://bitbucket.org/p0nyyy/cicd/](https://bitbucket.org/p0nyyy/cicd/)
## Prerequisites
* A Bytebase instance (Bytebase Cloud or self-hosted)
* For self-hosted version, you need [Docker](https://www.docker.com/) to run Bytebase
## Automatic Rollout across environments
### Step 1 - Set up Bytebase
Use [Bytebase Cloud](https://cloud.bytebase.com/) for instant setup without infrastructure management. CI/CD services can connect immediately.
**Best for:** Quick testing, evaluation, and small teams
Run Bytebase in Docker within your infrastructure:
```bash theme={null}
docker run --rm --init \
--name bytebase \
--publish 8080:8080 --pull always \
--volume ~/.bytebase/data:/var/opt/bytebase \
bytebase/bytebase:latest
```
**Network Access Options:**
* **For testing:** Use tools such as [ngrok](https://ngrok.com/) or [VS Code port forwarding](https://code.visualstudio.com/docs/editor/port-forwarding) to temporarily expose your local Bytebase to cloud CI/CD services. After exposing, configure the **External URL** in Bytebase **Settings > General**.
* **For production:** Use self-hosted CI/CD runners within your private network. Never expose production Bytebase to the internet.
**Best for:** Organizations with security requirements or existing infrastructure
See [Network Architecture guide](/get-started/self-host/network-architecture#2-self-hosted-bytebase-production).
### Step 2 - Create Service Account
1. Log in as `Workspace Admin`, and go to **IAM & Admin** > **Users & Groups**. Click **+ Add User**, fill in with `api-sample`, and assign the `Workspace Member` and `GitOps Service Agent` roles, which are sufficient for this tutorial, then click **Confirm**.
2. Find the newly created service account and **Copy Service Key**. We will use this token to authenticate the API calls.
 ### Step 3 - Configure SQL Review in Bytebase
Since you will need to run SQL review on your PRs, you need to configure the SQL review in Bytebase.
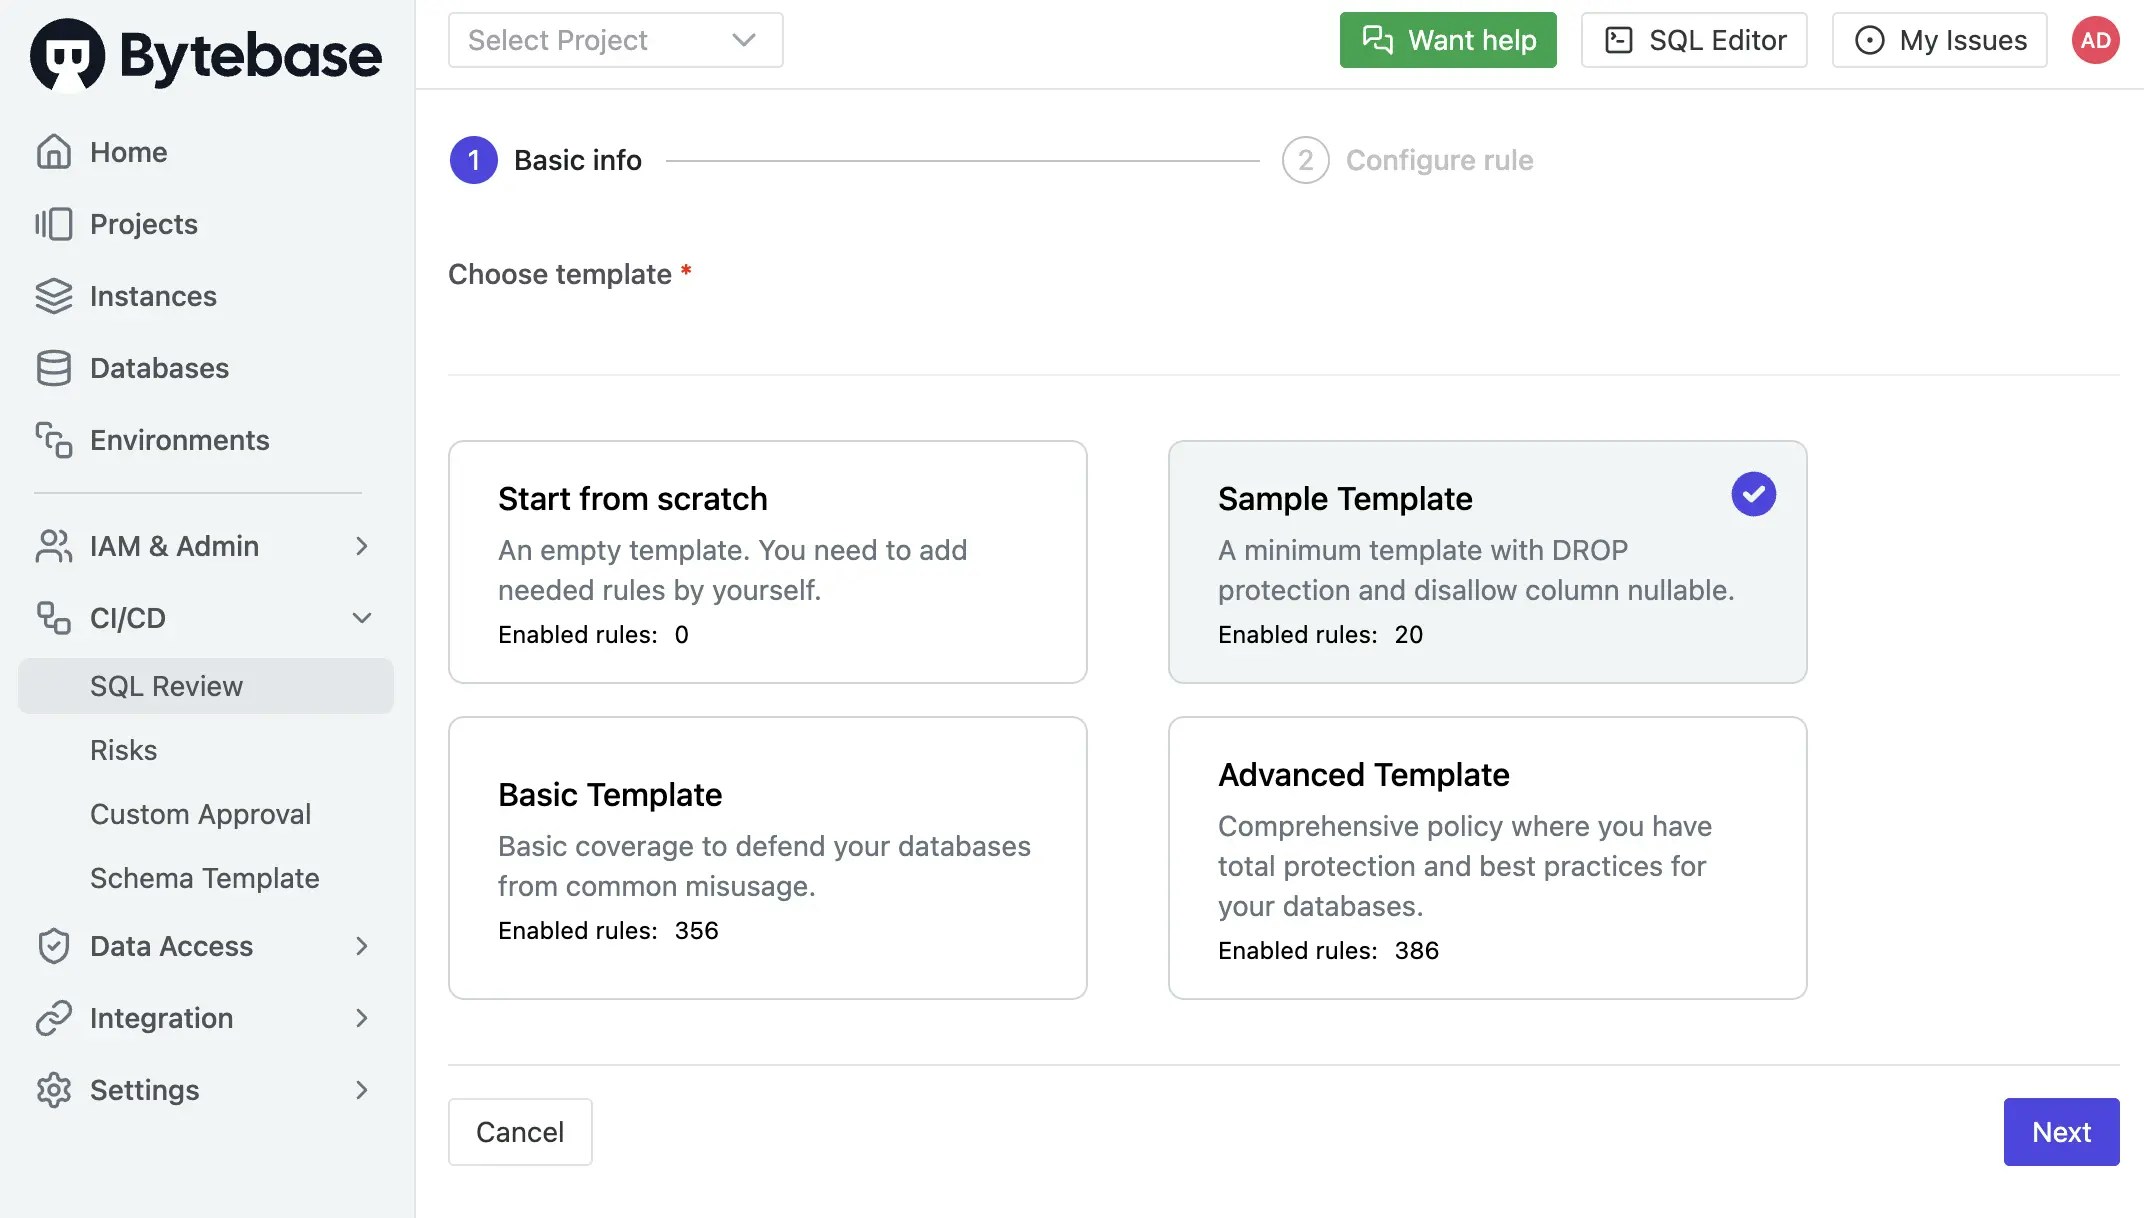
1. Go to **CI/CD** > **SQL Review**, click **Create SQL Review**.
2. Select the `Sample Template` and click **Next**.
### Step 3 - Configure SQL Review in Bytebase
Since you will need to run SQL review on your PRs, you need to configure the SQL review in Bytebase.
1. Go to **CI/CD** > **SQL Review**, click **Create SQL Review**.
2. Select the `Sample Template` and click **Next**.
 3. Select `Prod` environment as the attached resources and click **Confirm**. Now the SQL review is enabled for the `Prod` environment.
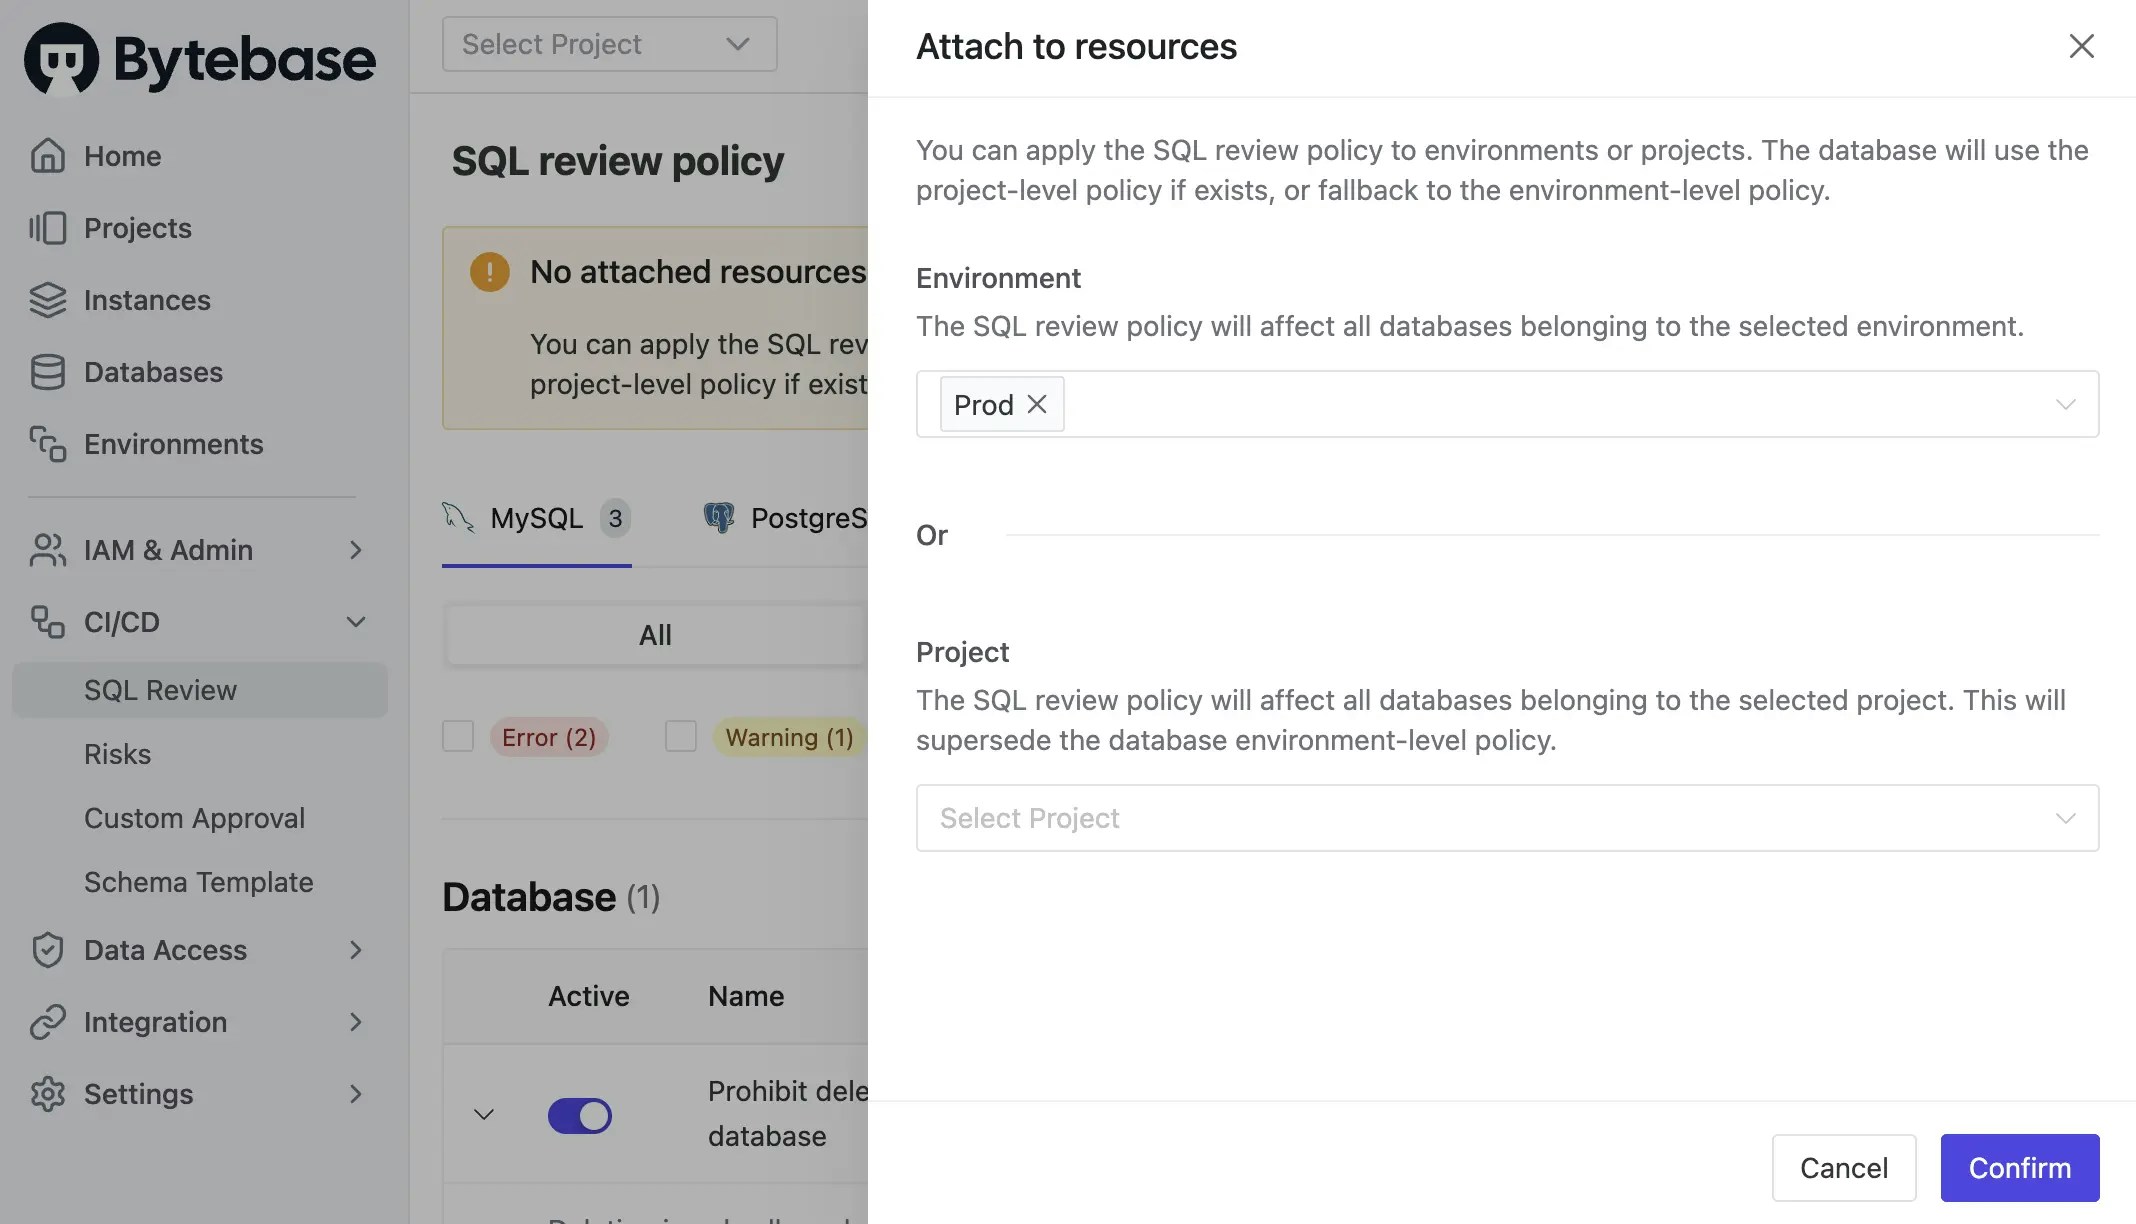 *Note: Usually we enable SQL review for `Prod` environment as above. In this demo, we would switch to enable it for `Test` to fit the following GitLab CI workflow.*
### Step 4 - Copy the Example Repository and Configure Variables
1. Create a new repository and copy the configuration file `bitbucket-pipelines.yml` from [https://bitbucket.org/p0nyyy/cicd/](https://bitbucket.org/p0nyyy/cicd/). It includes sql review and release creation.
2. Go into `bitbucket-pipelines.yml`, replace the variable in all 3 steps the values with your own and commit the changes.
* **BYTEBASE\_URL**: Your Bytebase instance URL (e.g., `https://bytebase.your-company.com` or your Bytebase Cloud URL)
* **BYTEBASE\_SERVICE\_ACCOUNT**: `api-example@service.bytebase.com` (the service account you created in the previous step)
* **BYTEBASE\_SERVICE\_ACCOUNT\_SECRET**: the password of the service account
The pipeline runs `bytebase-action check` and `bytebase-action rollout`, which verify
version compatibility before executing. For Bytebase Cloud, use
`bytebase/bytebase-action:cloud`; for self-hosted Bytebase, use the image tag matching
your Bytebase server version, for example `bytebase/bytebase-action:3.14.0`.
*In `bitbucket-pipelines.yml`, pay attention to `BYTEBASE_TARGETS` in `deploy-to-test` stage. You should put all the databases including both `Test` and `Prod` environments. NOT ONLY the `Test` database.*
### Step 5 - Configure in Bitbucket
Before creating the migration files, you need to configure the environment in Bitbucket to match the environment in Bytebase.
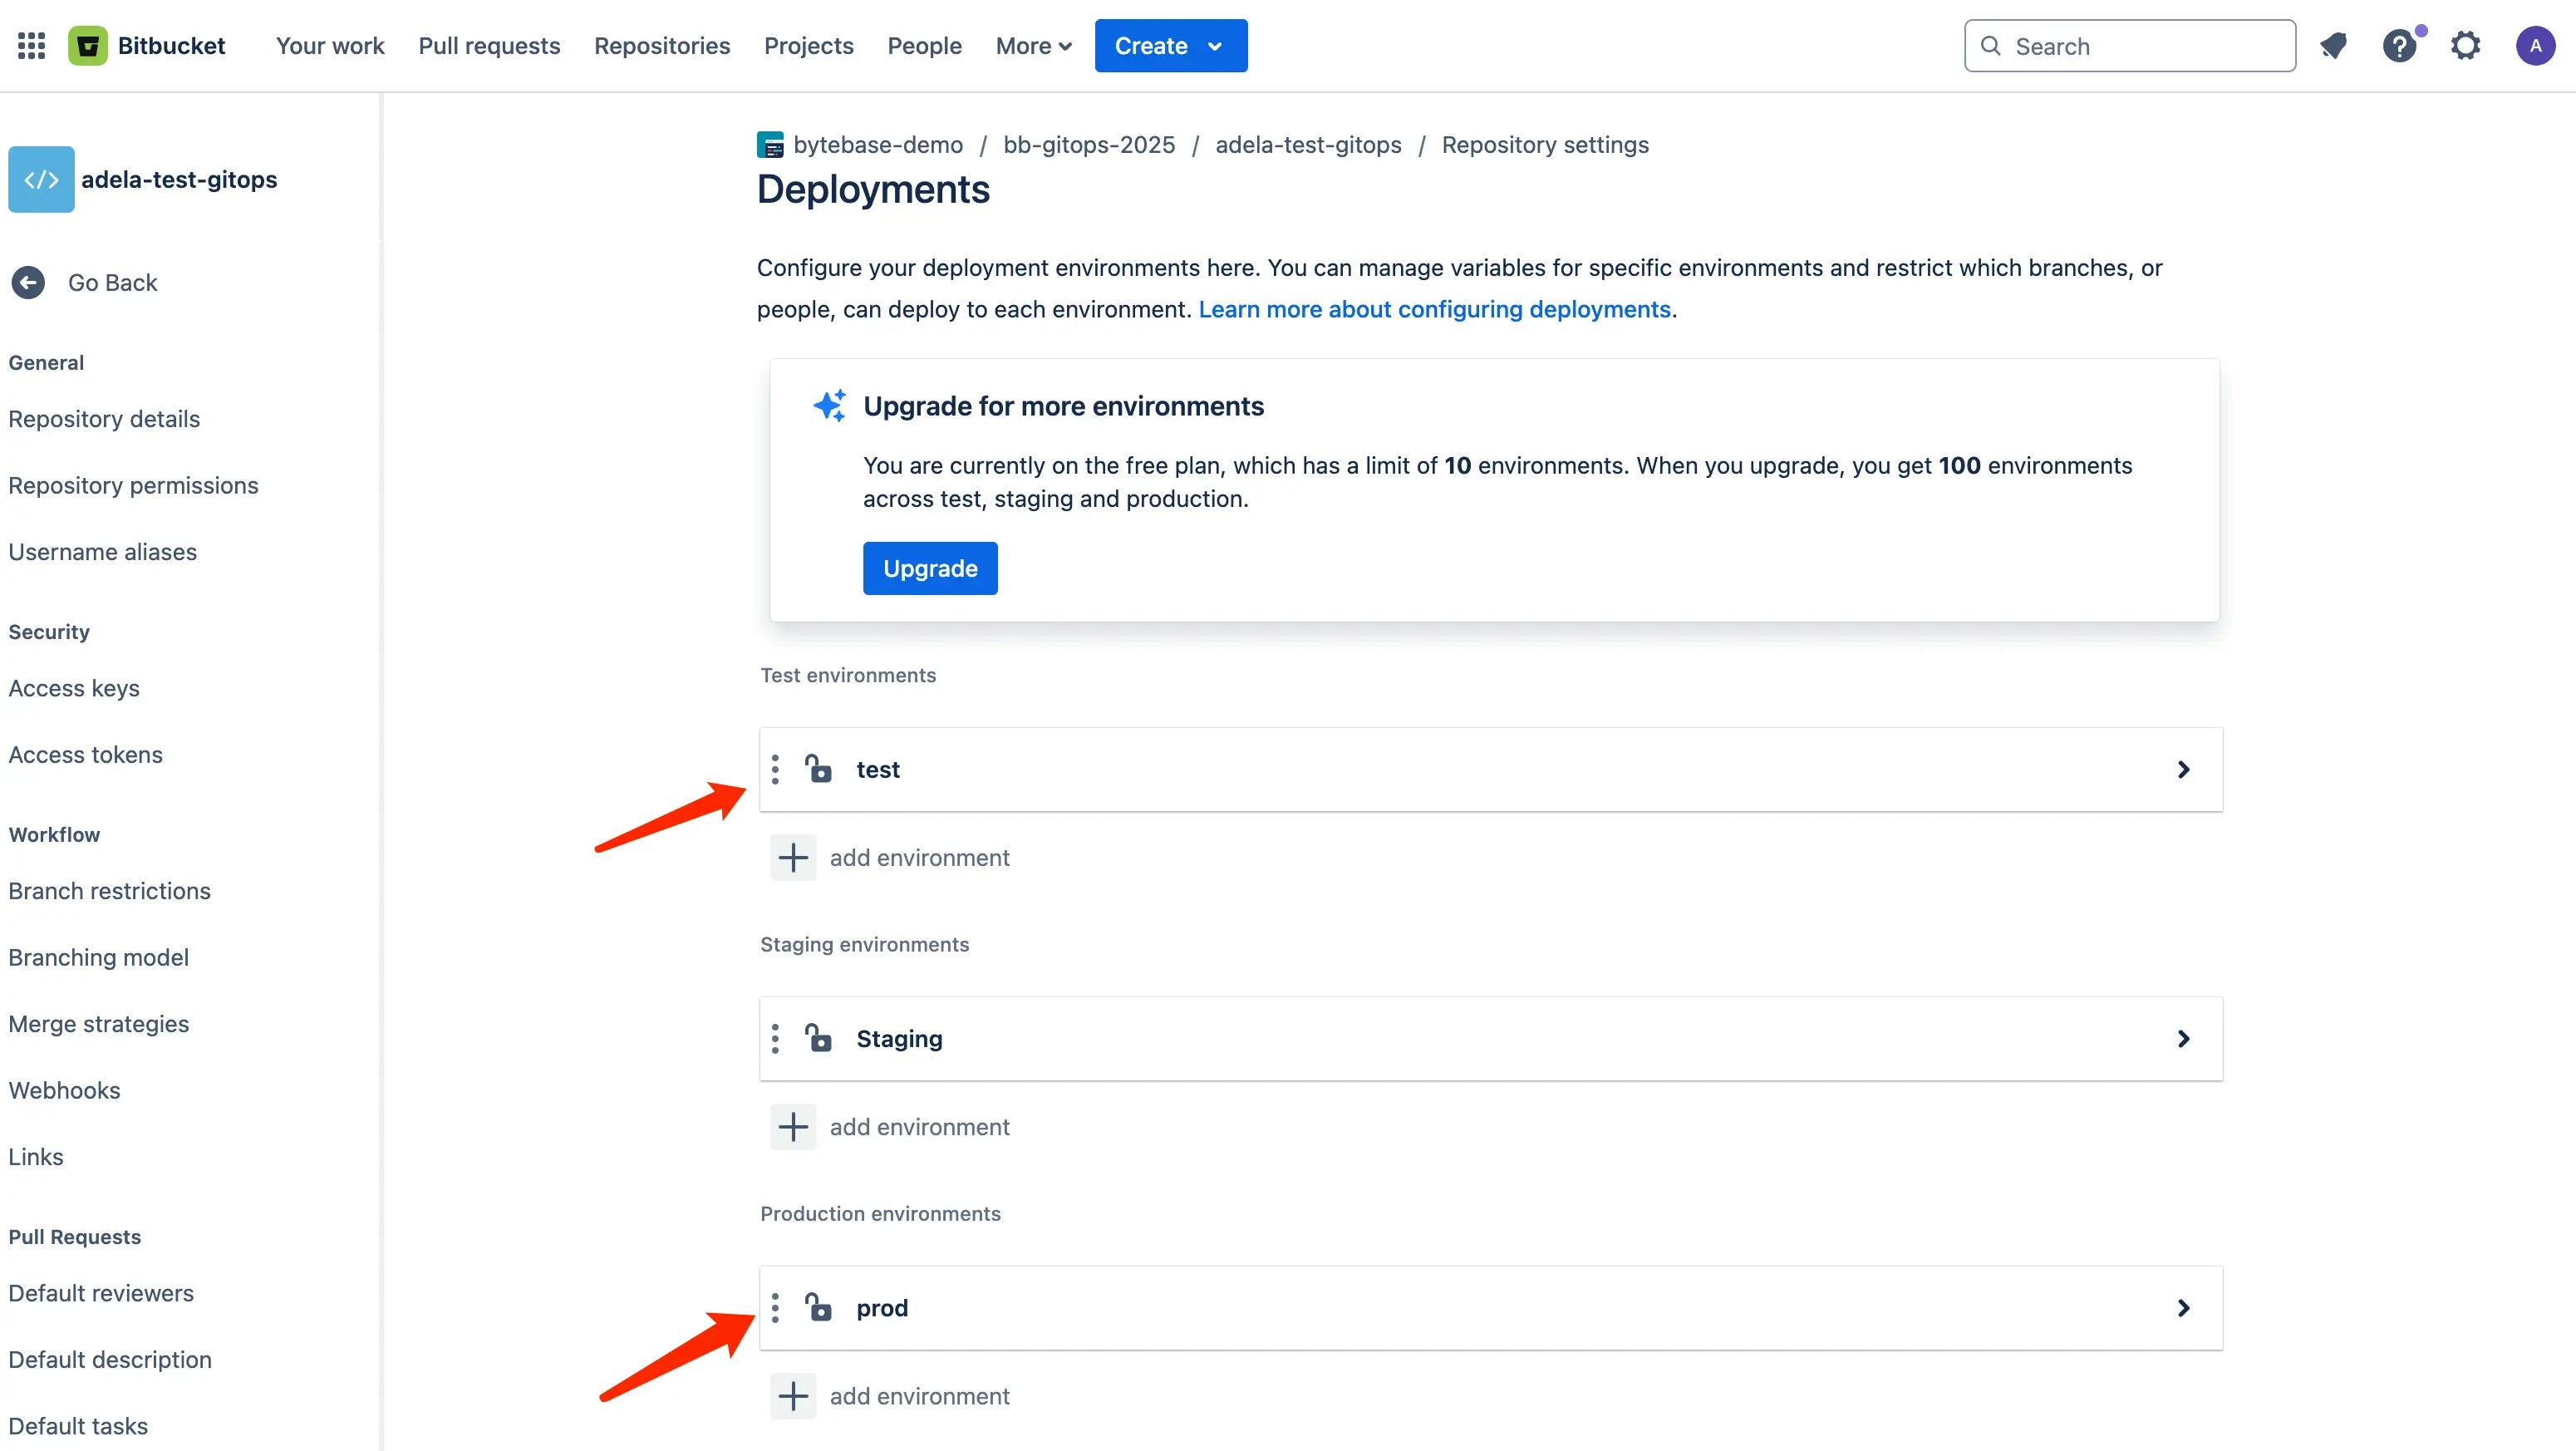
1. Go to **Repository settings > Pipelines > Deployments**. Rename the environment name to `Test`-> `test` and `Production`-> `prod`.
*Note: Usually we enable SQL review for `Prod` environment as above. In this demo, we would switch to enable it for `Test` to fit the following GitLab CI workflow.*
### Step 4 - Copy the Example Repository and Configure Variables
1. Create a new repository and copy the configuration file `bitbucket-pipelines.yml` from [https://bitbucket.org/p0nyyy/cicd/](https://bitbucket.org/p0nyyy/cicd/). It includes sql review and release creation.
2. Go into `bitbucket-pipelines.yml`, replace the variable in all 3 steps the values with your own and commit the changes.
* **BYTEBASE\_URL**: Your Bytebase instance URL (e.g., `https://bytebase.your-company.com` or your Bytebase Cloud URL)
* **BYTEBASE\_SERVICE\_ACCOUNT**: `api-example@service.bytebase.com` (the service account you created in the previous step)
* **BYTEBASE\_SERVICE\_ACCOUNT\_SECRET**: the password of the service account
The pipeline runs `bytebase-action check` and `bytebase-action rollout`, which verify
version compatibility before executing. For Bytebase Cloud, use
`bytebase/bytebase-action:cloud`; for self-hosted Bytebase, use the image tag matching
your Bytebase server version, for example `bytebase/bytebase-action:3.14.0`.
*In `bitbucket-pipelines.yml`, pay attention to `BYTEBASE_TARGETS` in `deploy-to-test` stage. You should put all the databases including both `Test` and `Prod` environments. NOT ONLY the `Test` database.*
### Step 5 - Configure in Bitbucket
Before creating the migration files, you need to configure the environment in Bitbucket to match the environment in Bytebase.
1. Go to **Repository settings > Pipelines > Deployments**. Rename the environment name to `Test`-> `test` and `Production`-> `prod`.
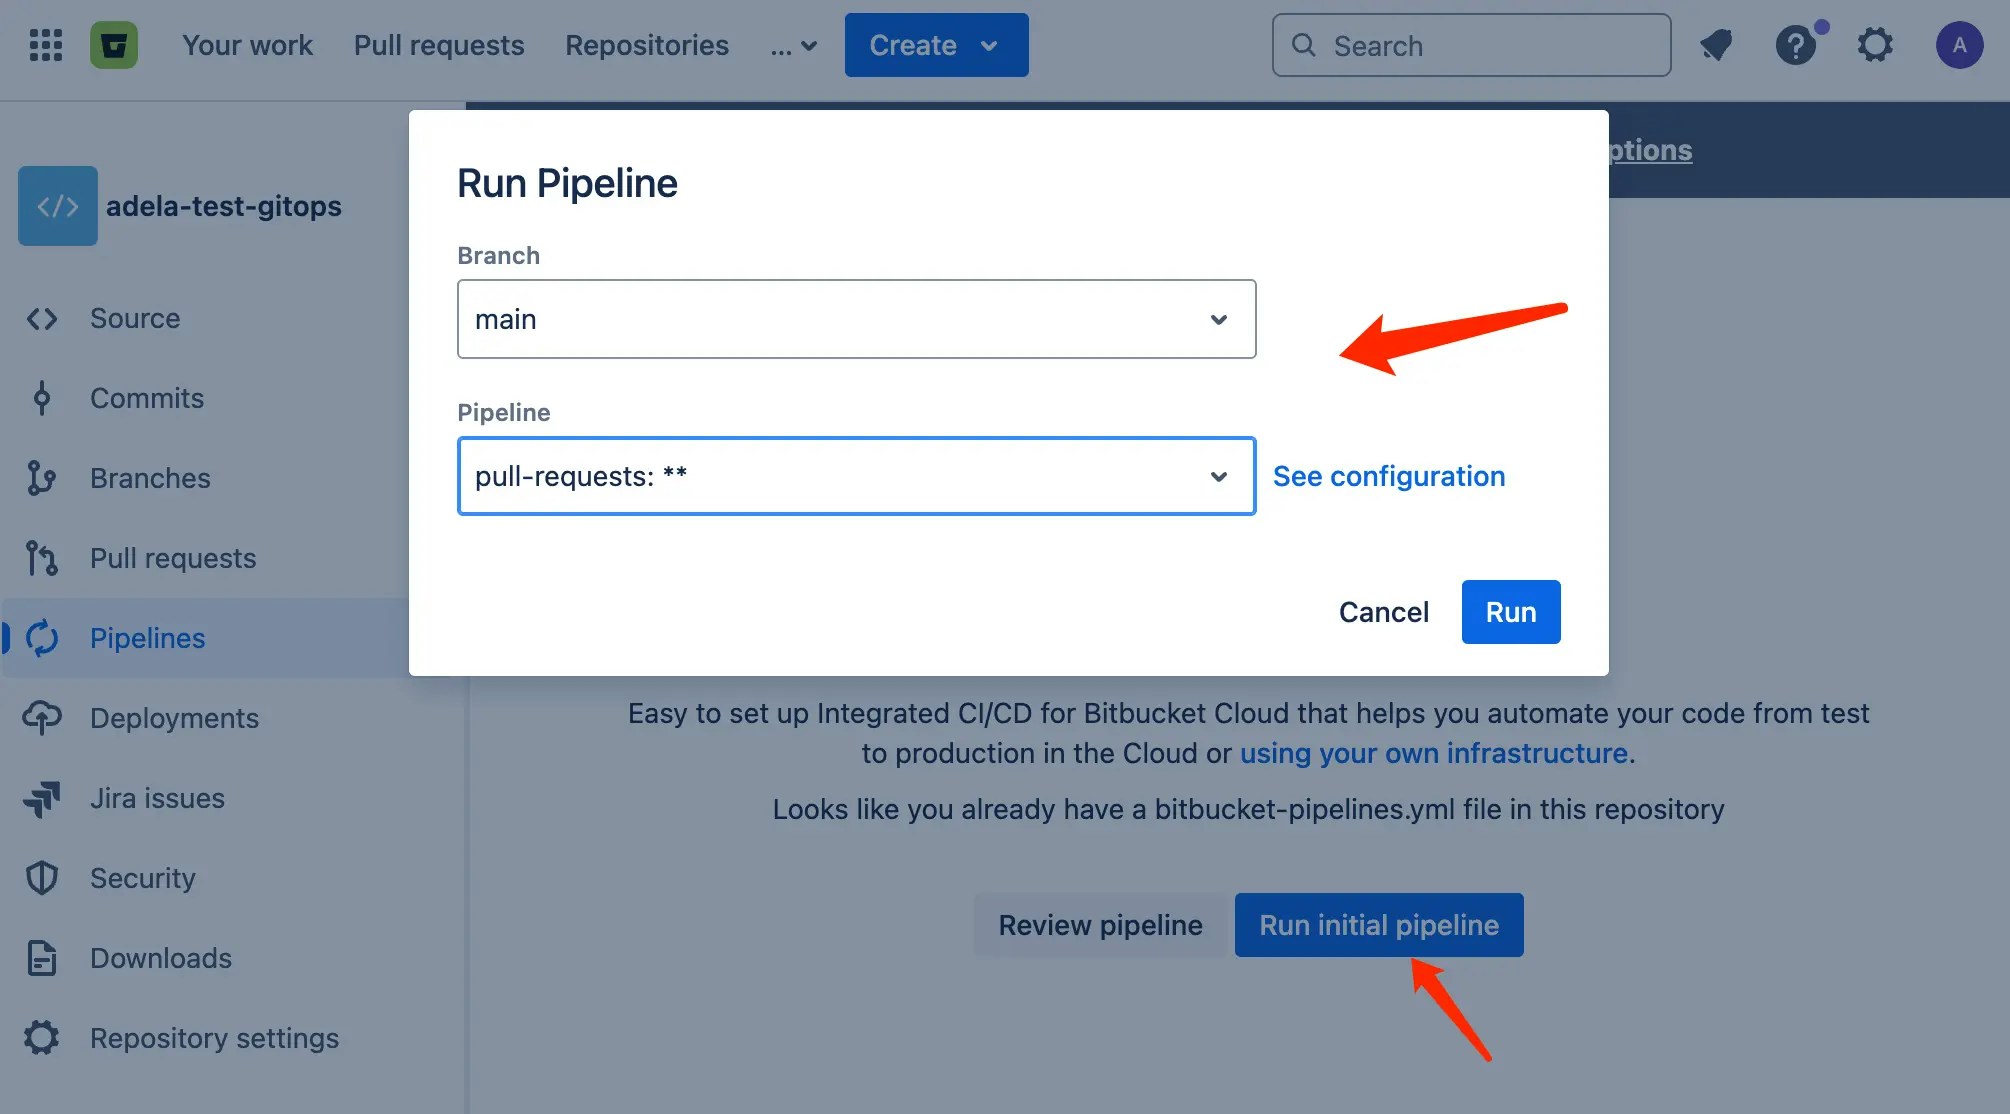
 2. Go to **Pipelines** to enable it for the pull request to the main branch. Without this the pipeline will not be triggered.
 ### Step 6 - Create the migration files
To create migration files to trigger release creation, the files have to match the following pattern:
* A migration file should start with digits, which is also its version. e.g. `202505141650_create_table_t1.sql`.
* A migration file may end with `ddl` or `dml` to indicate its change type. If it doesn't end with any of the two, its change type is DDL by default.
1. Within your repository, create the following migration files under `migration` directory:
* 202505141650\_create\_table\_t1.sql
```sql theme={null}
CREATE TABLE t1 (
id SERIAL PRIMARY KEY,
name TEXT
);
```
2. Commit to a new branch and create a pull request, the `sql-review` pipeline will be triggered. There will be a warning in the SQL review result.
### Step 6 - Create the migration files
To create migration files to trigger release creation, the files have to match the following pattern:
* A migration file should start with digits, which is also its version. e.g. `202505141650_create_table_t1.sql`.
* A migration file may end with `ddl` or `dml` to indicate its change type. If it doesn't end with any of the two, its change type is DDL by default.
1. Within your repository, create the following migration files under `migration` directory:
* 202505141650\_create\_table\_t1.sql
```sql theme={null}
CREATE TABLE t1 (
id SERIAL PRIMARY KEY,
name TEXT
);
```
2. Commit to a new branch and create a pull request, the `sql-review` pipeline will be triggered. There will be a warning in the SQL review result.
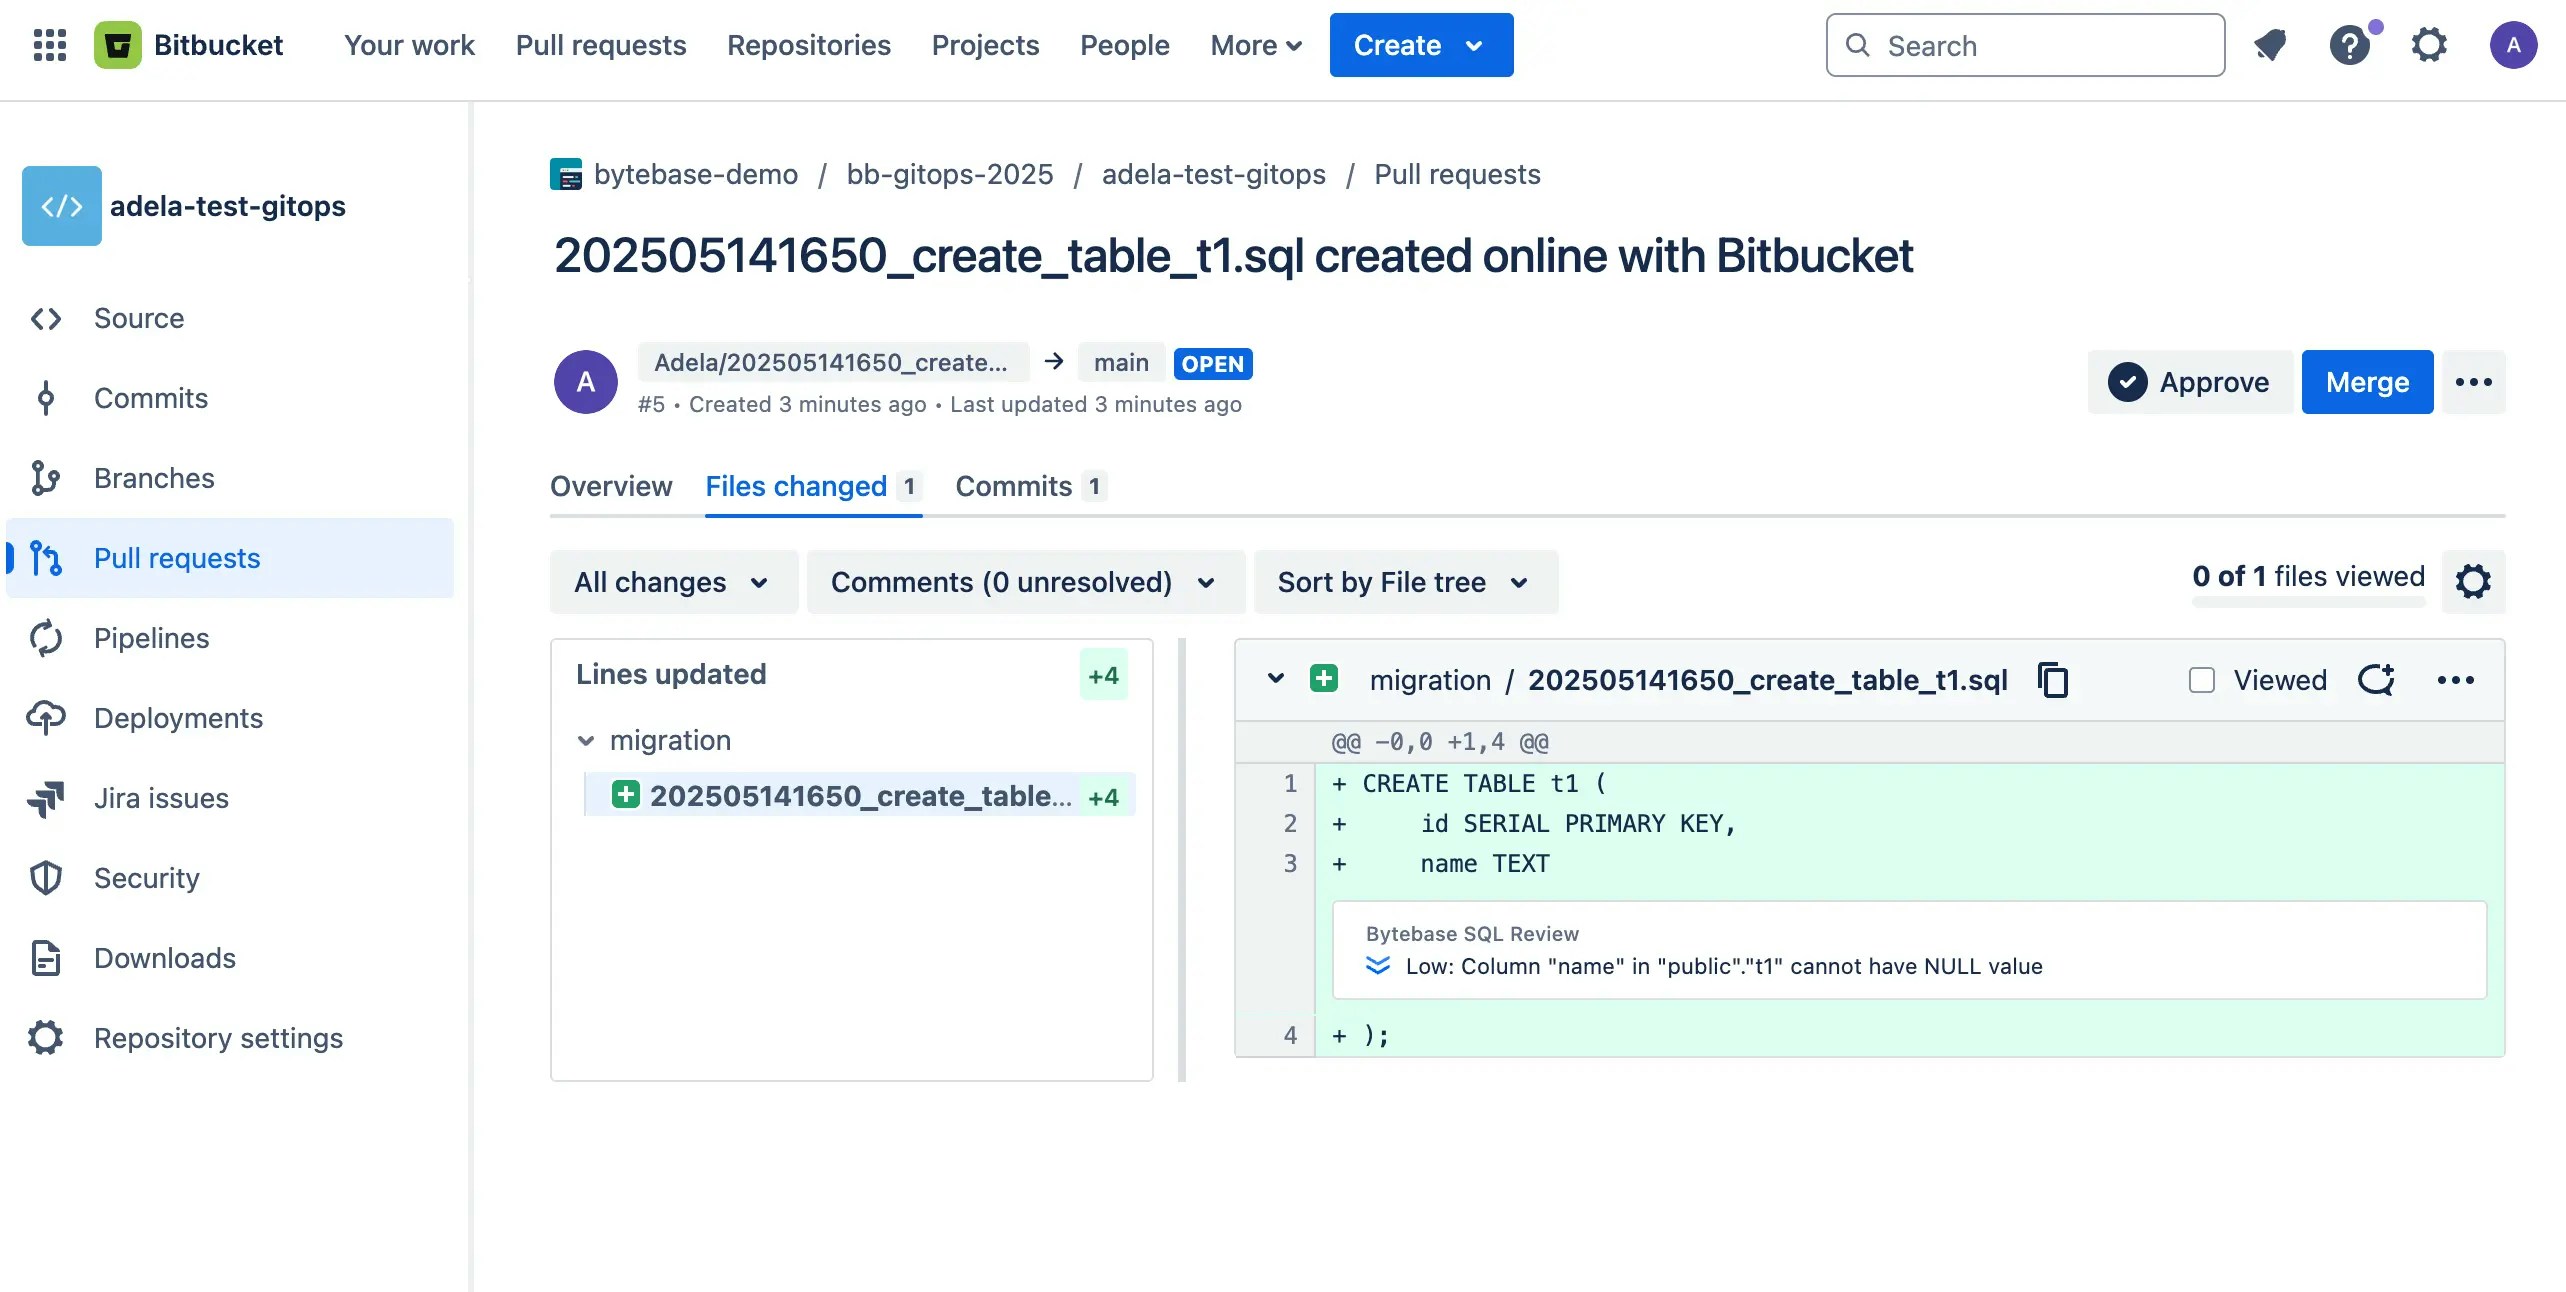 3. According to the SQL review result, you can do some changes to the SQL files and push to the branch. Then you should see the SQL review has passed. There are no warnings in the SQL review result.
```sql theme={null}
CREATE TABLE t1 (
id SERIAL PRIMARY KEY,
name TEXT NOT NULL
);
```
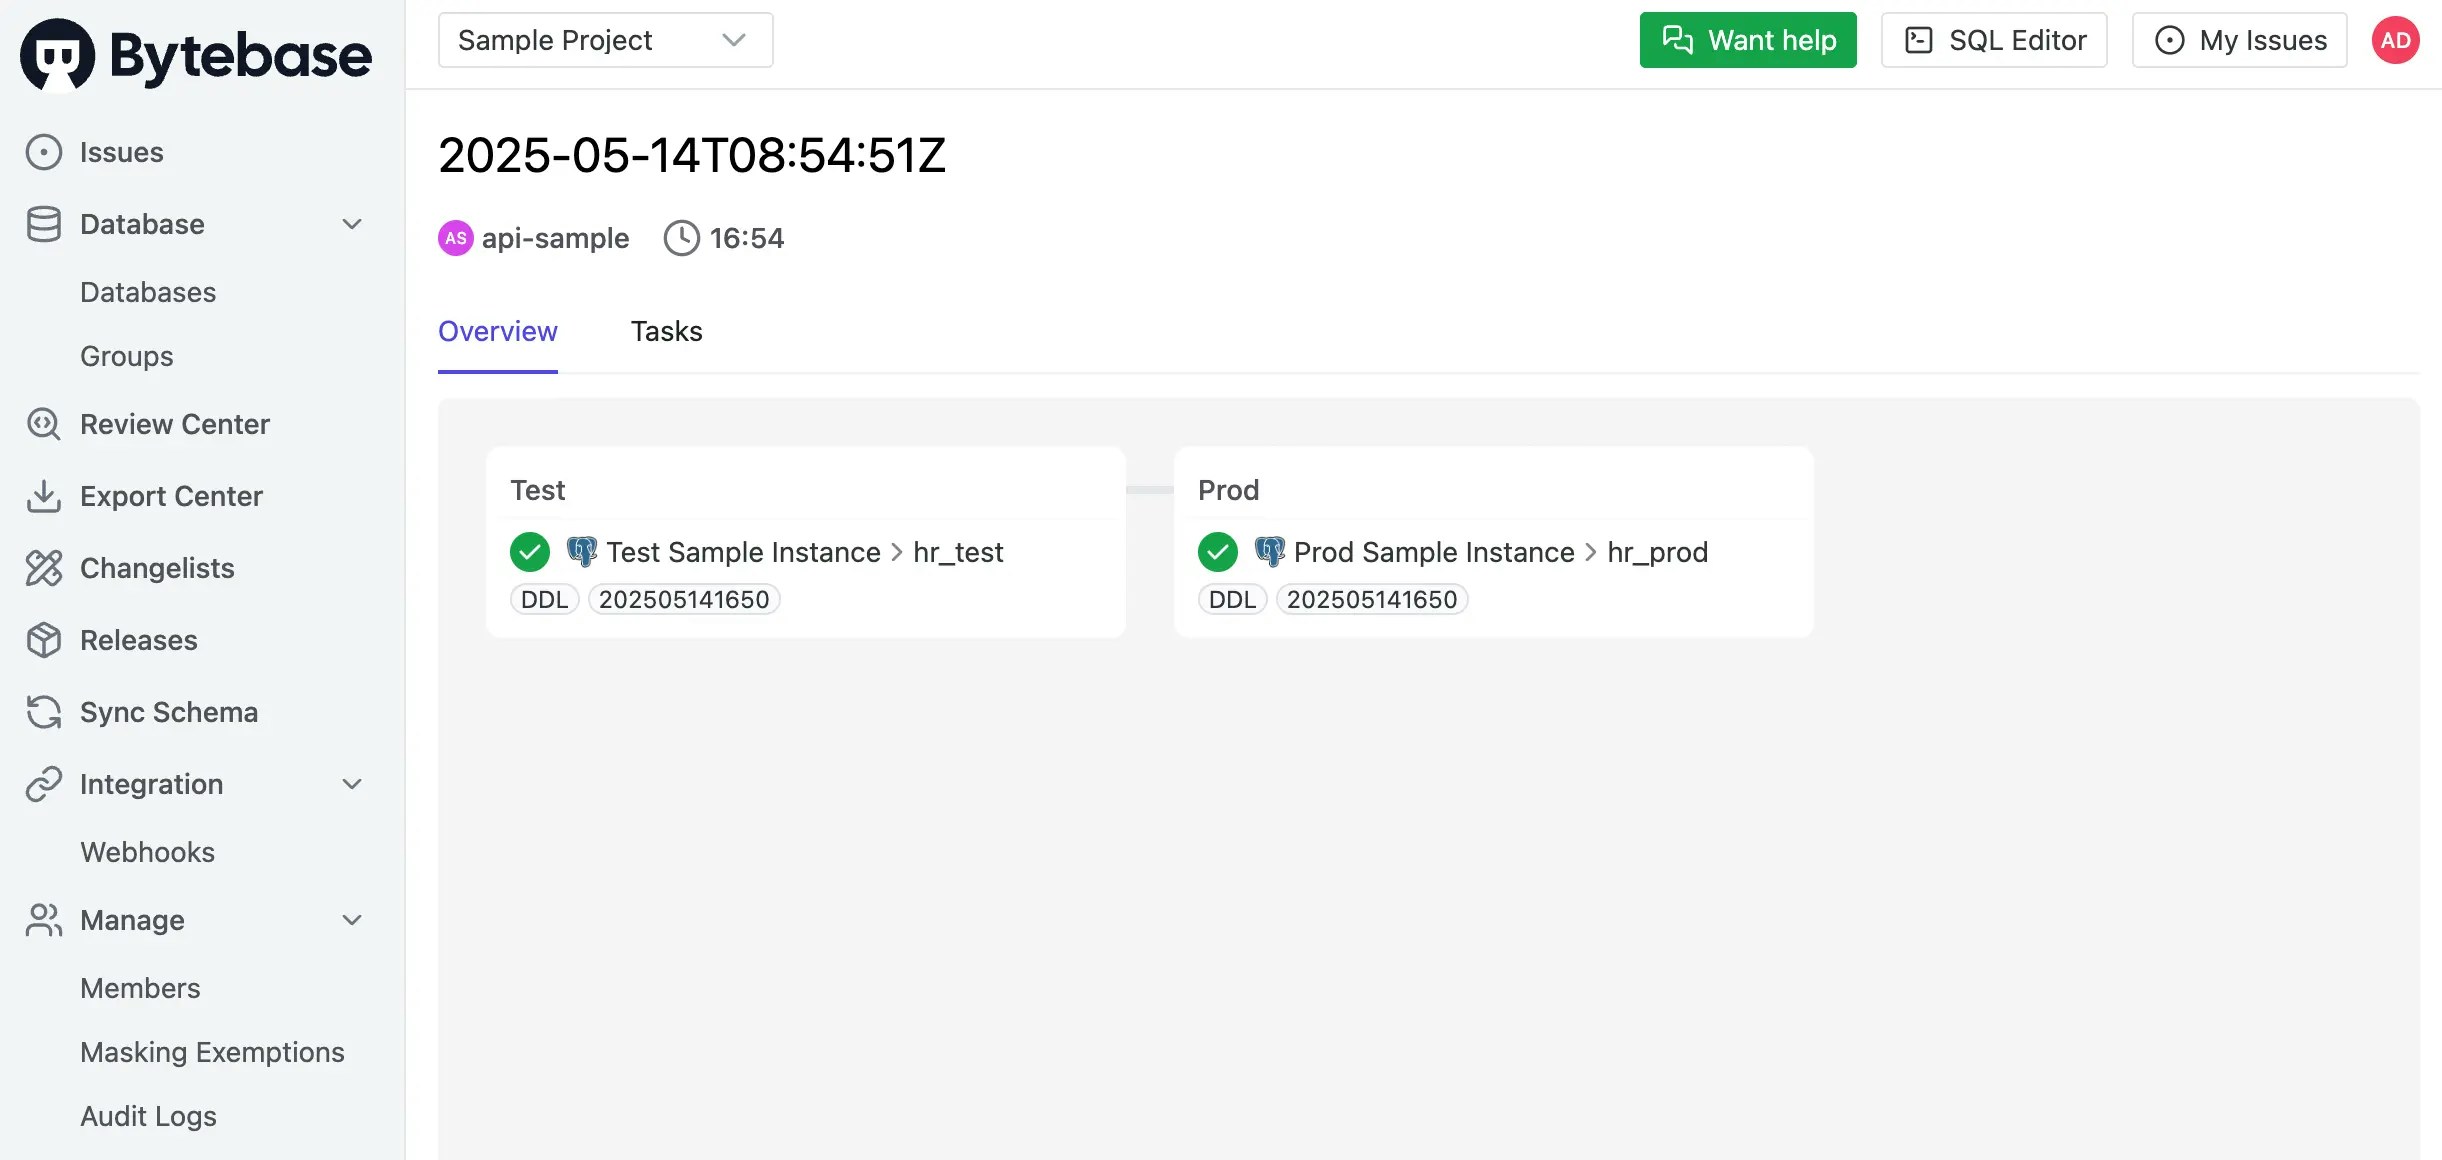
4. When the SQL review is passed, you can merge the pull request. The `release` pipeline will be triggered to create a **release** in Bytebase and then deploy automatically on test but waiting for approval on prod.
5. Click into the pipelines and choose the merge pipeline, you can see release is created in test environment but waiting for approval on prod.
3. According to the SQL review result, you can do some changes to the SQL files and push to the branch. Then you should see the SQL review has passed. There are no warnings in the SQL review result.
```sql theme={null}
CREATE TABLE t1 (
id SERIAL PRIMARY KEY,
name TEXT NOT NULL
);
```
4. When the SQL review is passed, you can merge the pull request. The `release` pipeline will be triggered to create a **release** in Bytebase and then deploy automatically on test but waiting for approval on prod.
5. Click into the pipelines and choose the merge pipeline, you can see release is created in test environment but waiting for approval on prod.
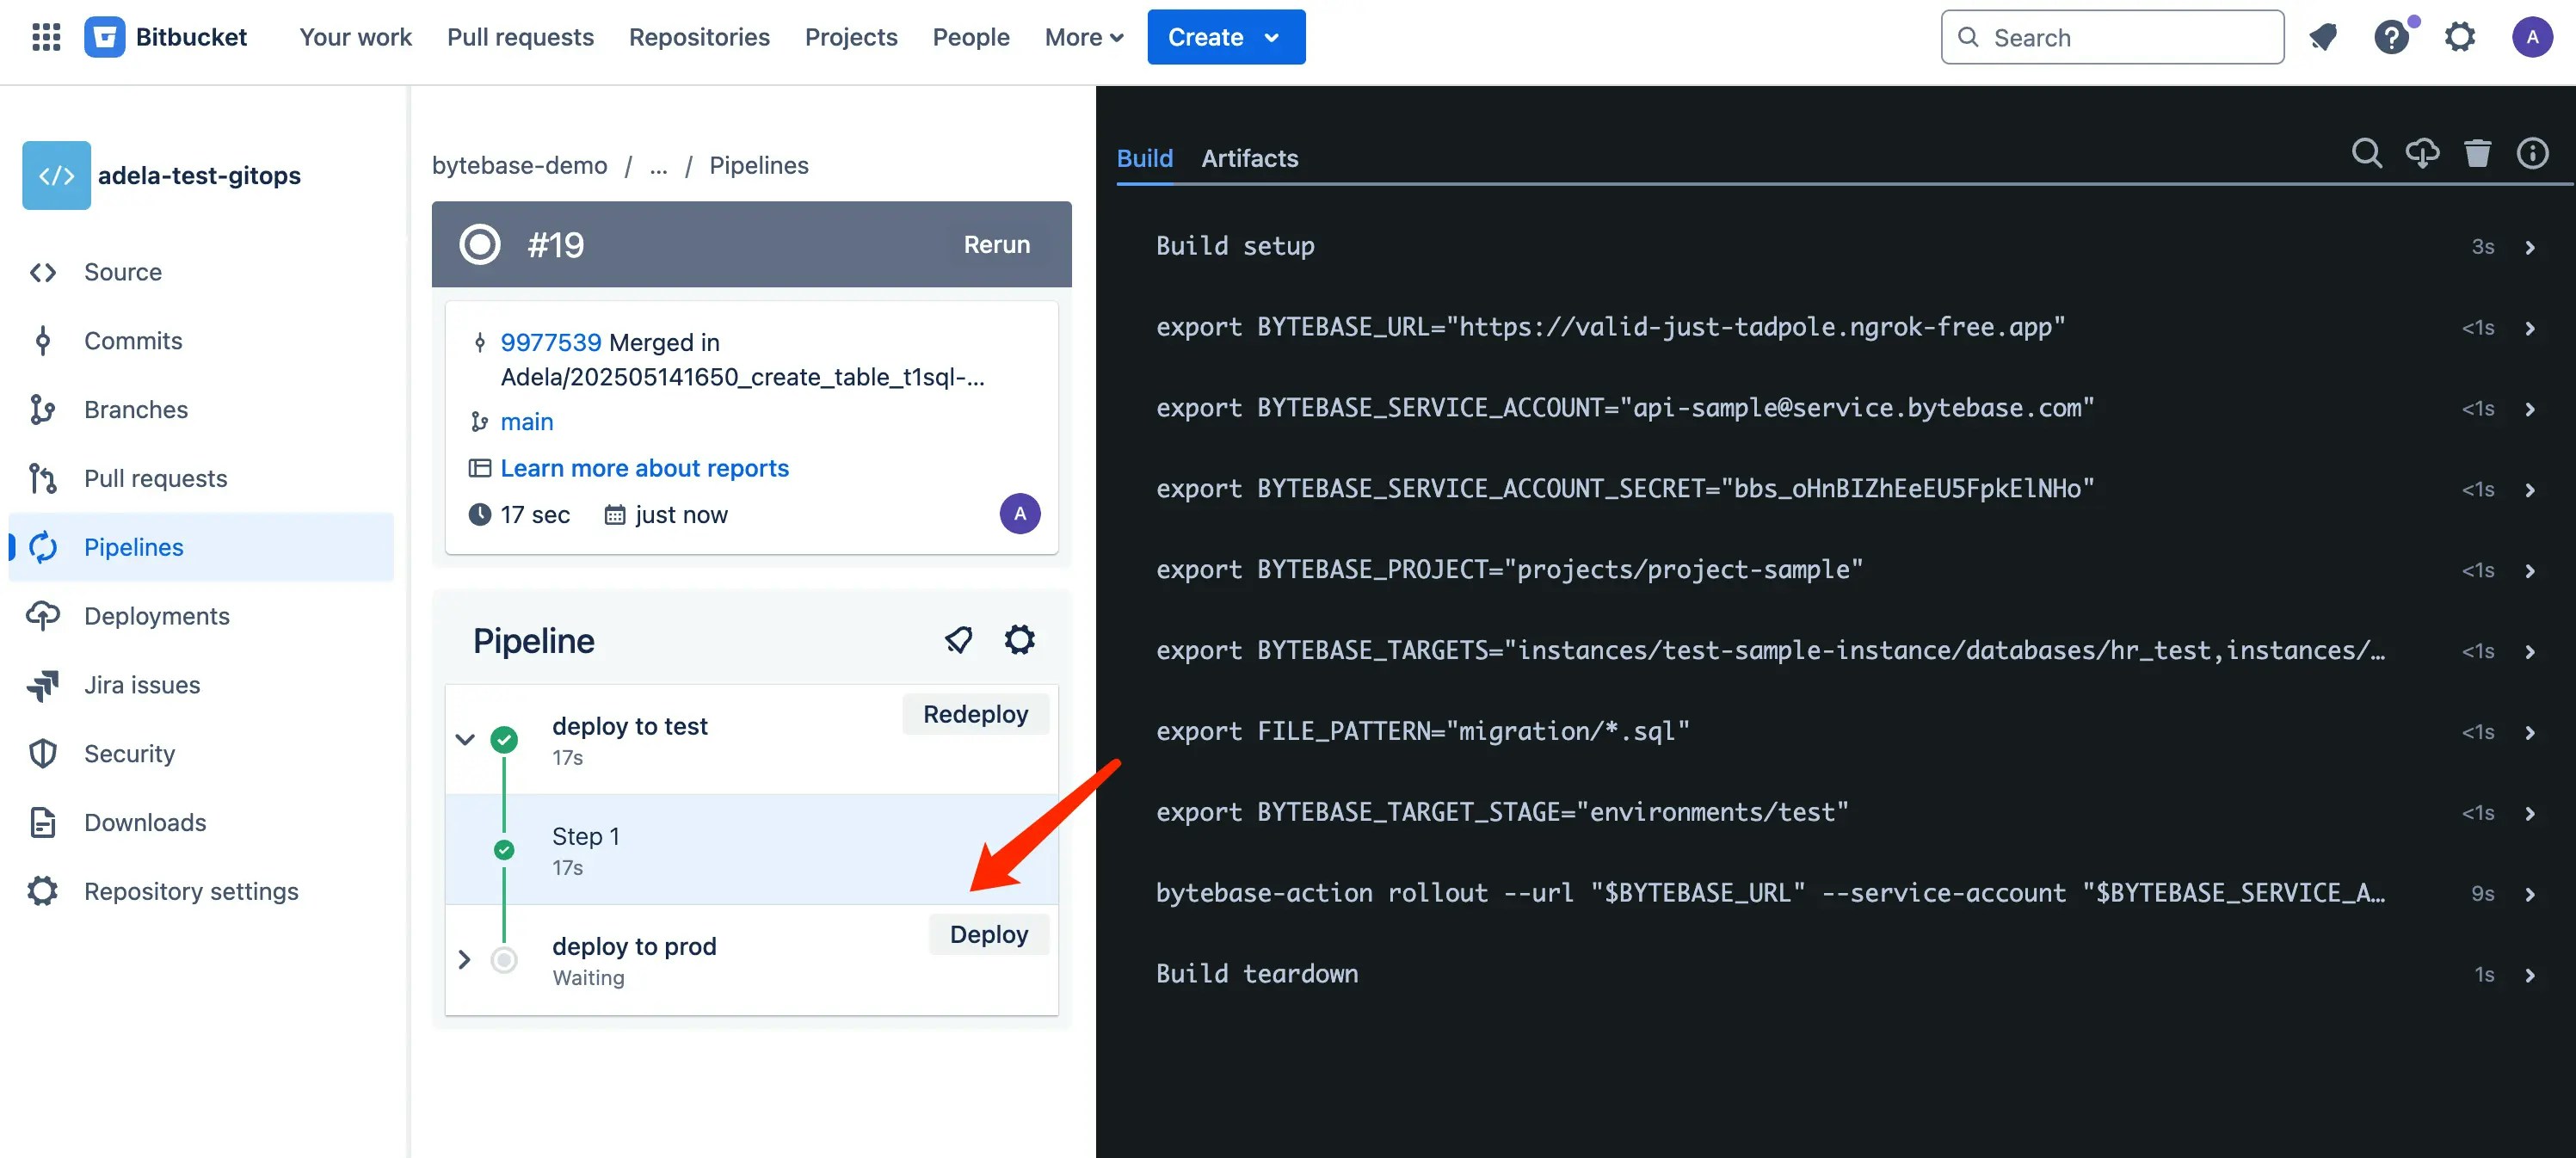 6. If you expand the log for `bytebase-action rollout ...`, you can follow the rollout link to Bytebase.
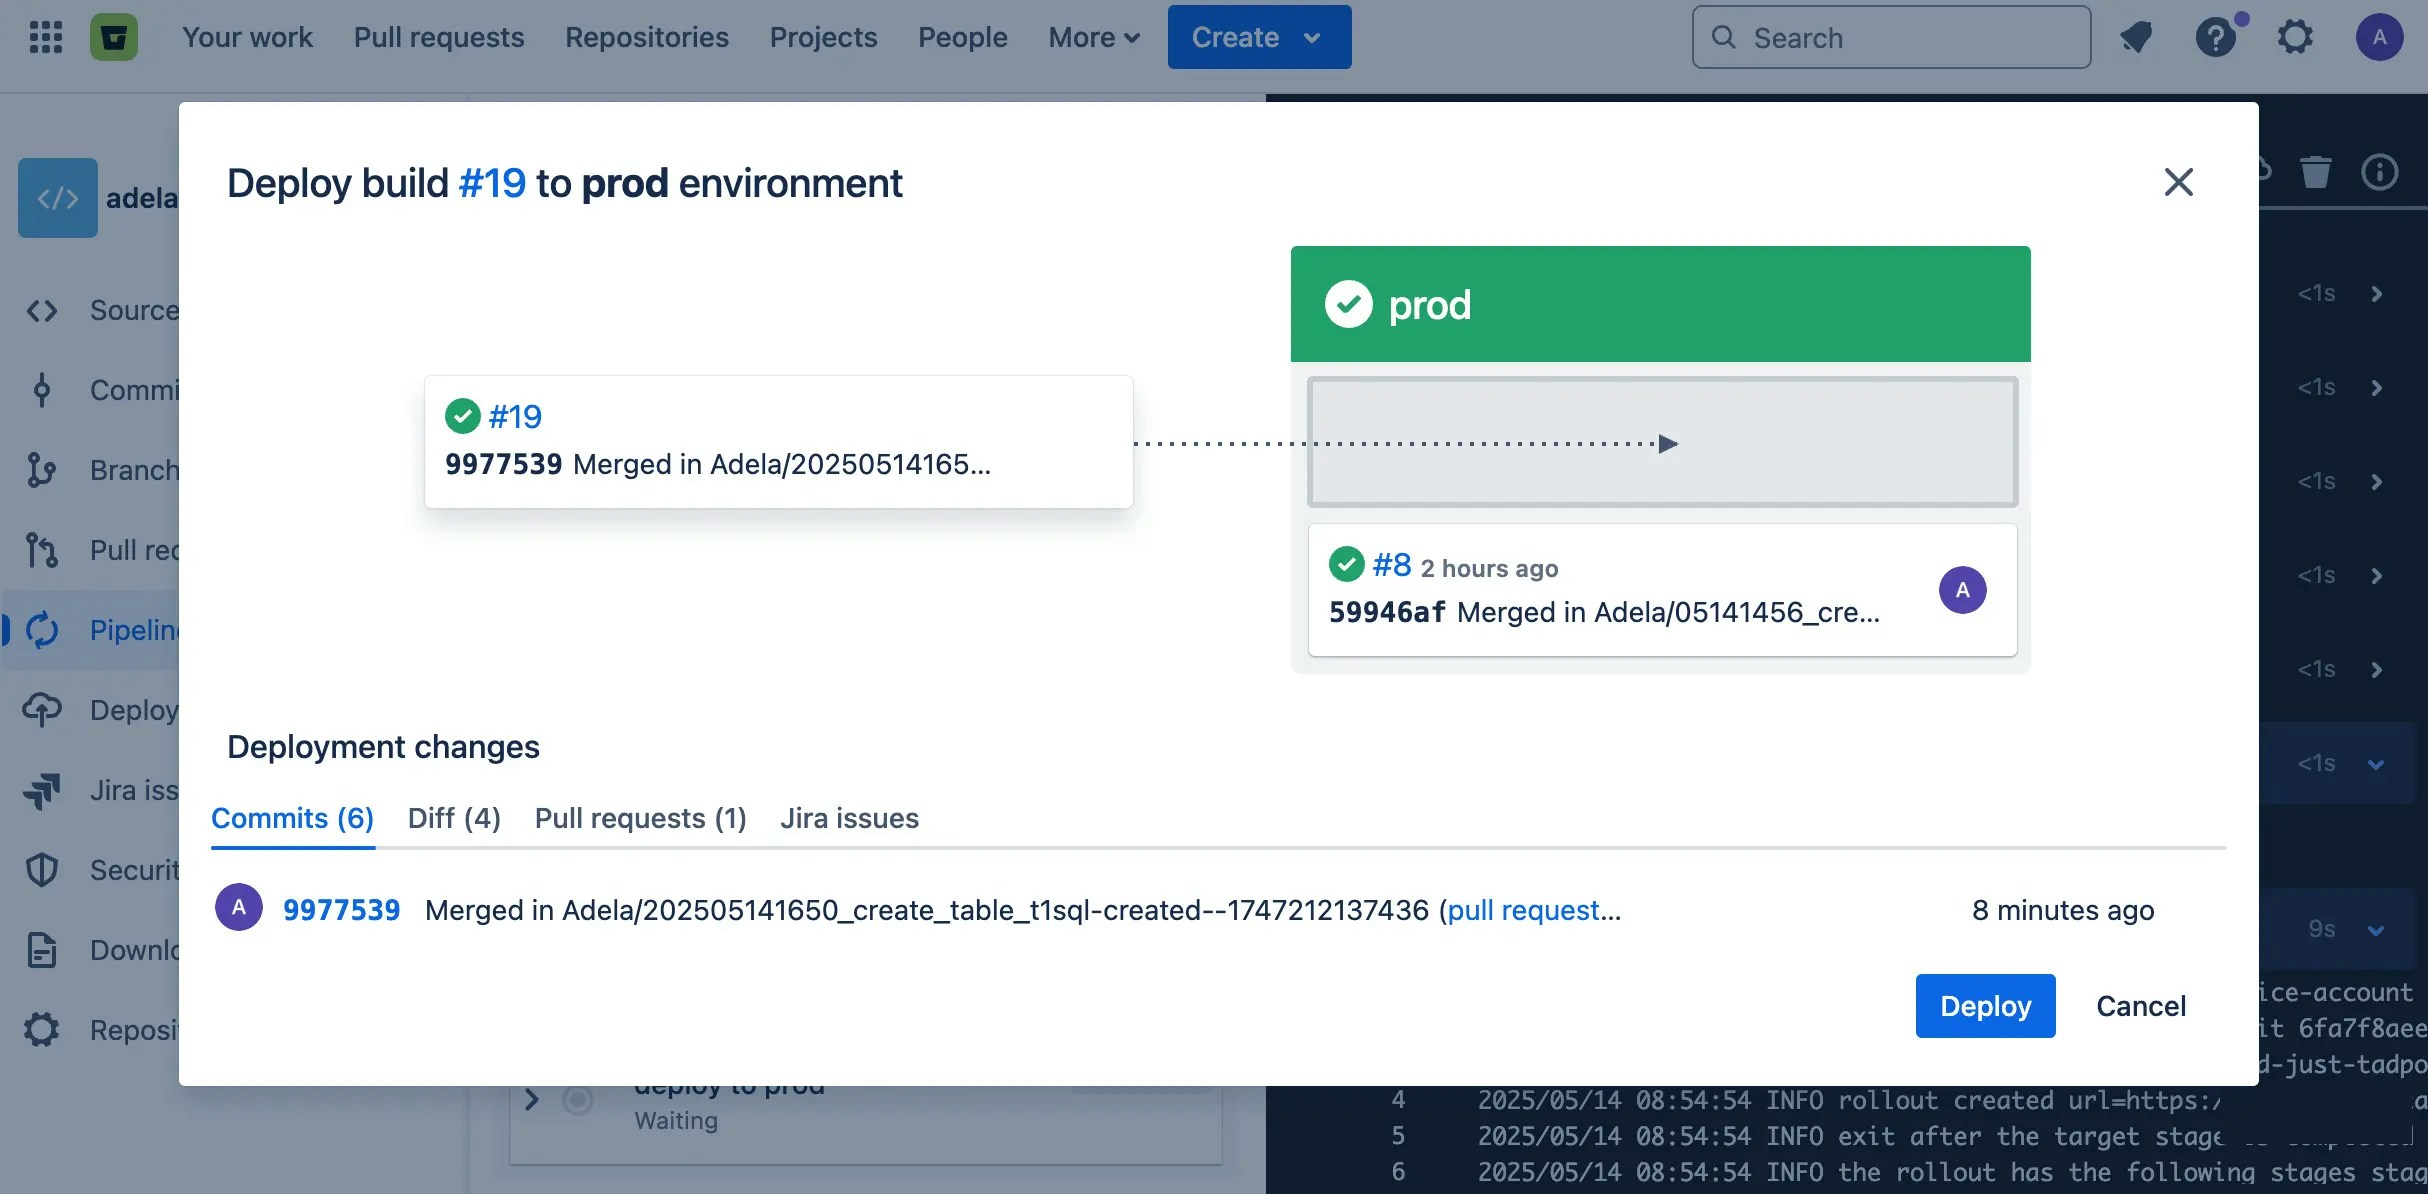
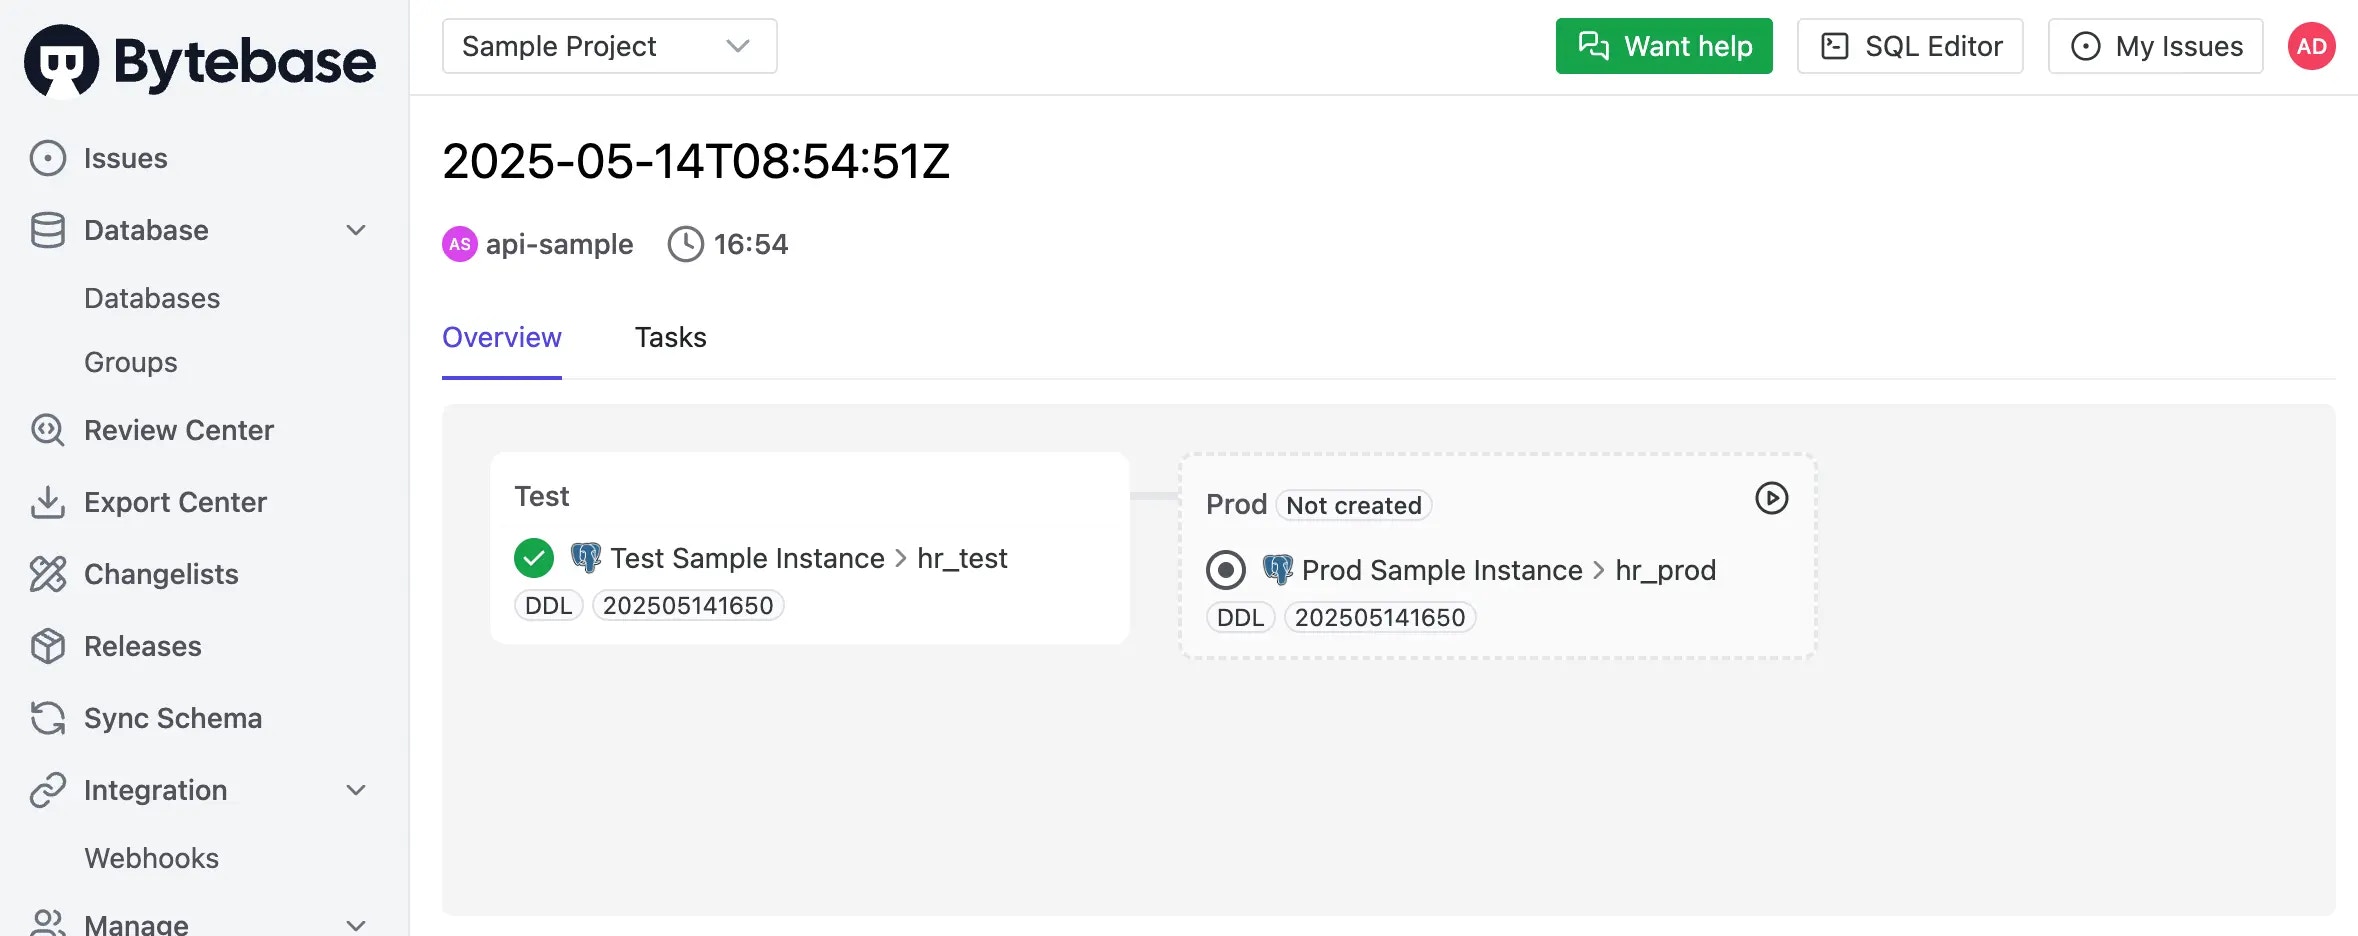 7. Click **Deploy** on deploy-to-prod stage in Bitbucket, the release will be deployed to prod environment.
 ## Summary
Now you have learned how to database GitOps with Bitbucket Pipelines. If you want to trigger a release creation with other git providers (e.g. GitHub, GitLab, Azure DevOps), you may customize the workflow file.
## Summary
Now you have learned how to database GitOps with Bitbucket Pipelines. If you want to trigger a release creation with other git providers (e.g. GitHub, GitLab, Azure DevOps), you may customize the workflow file.