> ## Documentation Index
> Fetch the complete documentation index at: https://docs.bytebase.com/llms.txt
> Use this file to discover all available pages before exploring further.
# Just-in-time Database Access to Amazon Aurora
> In this tutorial, we will demonstrate how to set up Just-in-Time (JIT) access using the Bytebase GUI connecting to Amazon Aurora.
The tutorial uses Amazon Aurora, while the same approach can be applied to Amazon RDS and other database engines as well.
In modern database management, when an incident occurs, developers often need quick access to production databases to troubleshoot and resolve the issue. However, traditional methods, such as using static passwords, can pose security risks and complicate management.
## AWS IAM Auth
For Amazon Aurora and RDS, AWS IAM authentication provides a solution by enabling temporary, secure access without the need for password rotation. With IAM Auth:
* **Short-lived tokens**: Instead of using a static password, a temporary authentication token is generated via AWS SDK or CLI. These tokens are time-limited (by default, valid for 15 minutes).
* **Centralized identity**: Access is controlled via IAM policies rather than within the DB itself, letting you use fine-grained IAM policies and leverage AWS’s centralized identity management.
* **Eliminates hard-coded passwords**: No more storing long-lived passwords in configuration files or environment variables. You simply request a token when you need to connect.
### Limitation
There are still limitations with AWS IAM Auth:
* **Limited DB Engine Support**: Only MySQL, PostgreSQL, and Amazon Aurora (MySQL/PostgreSQL-compatible) support IAM auth. Other RDS engines (e.g., SQL Server, Oracle, MariaDB) do not.
* **Separate DB-Level User Management**: IAM can control who can connect, but once connected, the user’s DB privileges are still governed by database grants (e.g., `GRANT SELECT ON …`). You can’t manage fine-grained table-level permissions solely through IAM.
* **Auditing & Visibility Trade-Offs**: If you opt for one shared database user for everyone, you lose per-user audit trails inside the DB. Creating one DB user per developer (and possibly per IAM identity) can be cumbersome. You do get detailed auditing but at the cost of more management complexity.
* **Complexity with Large Teams & Enterprise Integrations**: AWS SSO/Identity Center integration simplifies IAM user management, but you still need a strategy for mapping many developers to DB users (shared vs. individual). For large teams, mapping roles/groups to DB users can become complex.
## Bytebase
Bytebase is an open-source database DevSecOps solution that complements AWS IAM Auth:
* **More DB Engine Support**: Bytebase supports MySQL, Postgres, Amazon Aurora as well as other RDS engines (e.g., SQL Server, Oracle, MariaDB).
* **Fine-Grained Access via Bytebase**: Even if you opt for a shared DB user in Aurora/RDS (e.g. db\_iam\_dev\_user), Bytebase maintains its own user/role model. Each developer logs into Bytebase with their individual identity (integrated with SSO). You can grant database permission at the table level.
* **Auditing at the Platform Level**: Bytebase tracks exactly which user performed which action, even if the database sees only one shared DB user. This gives you per-user audit trails without the overhead of creating separate Aurora/RDS DB users or separate IAM policies per developer.
## Solution Overview
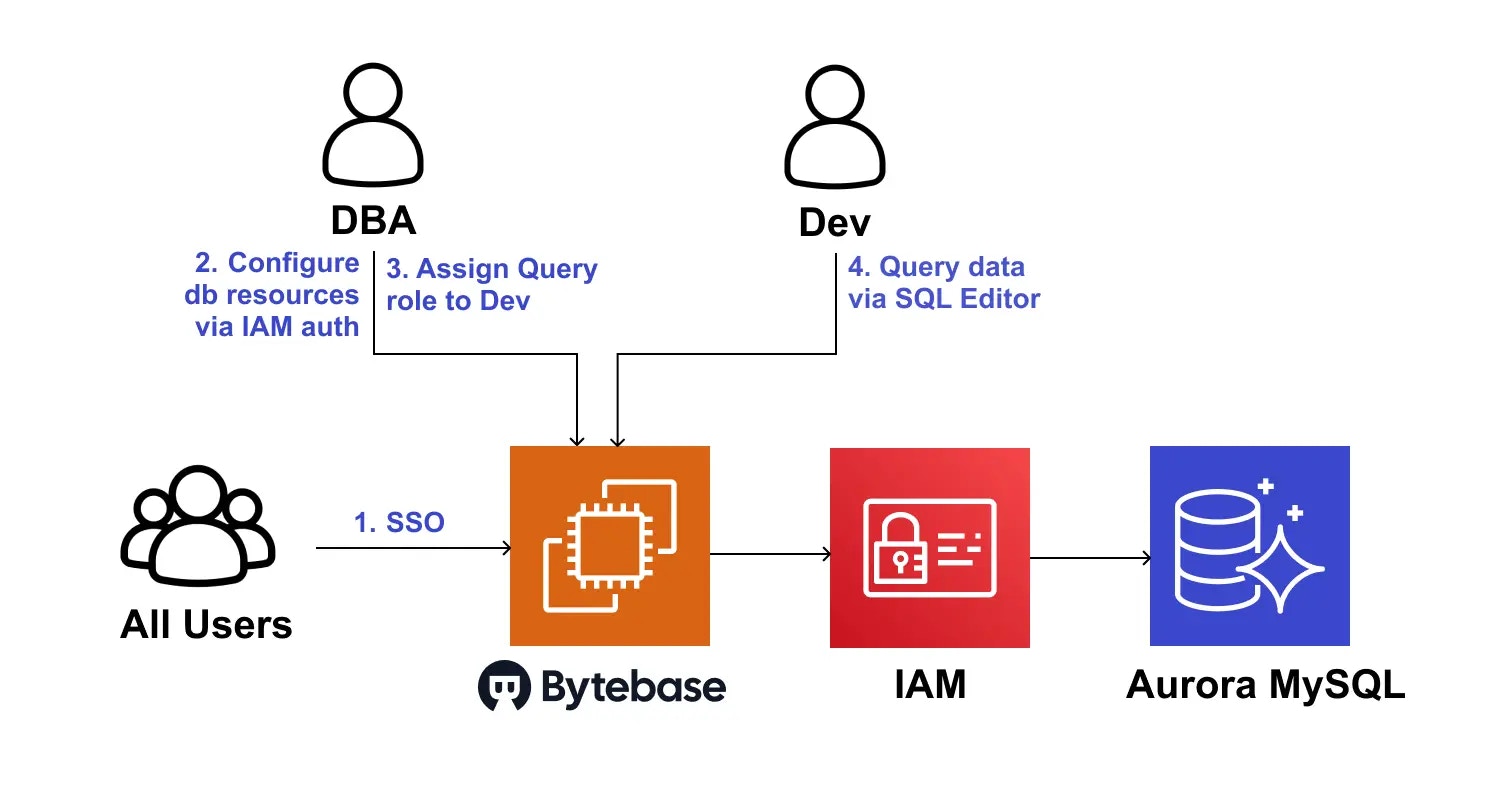
The following architecture shows how Bytebase enables Just-in-Time (JIT) database access for Amazon Aurora:
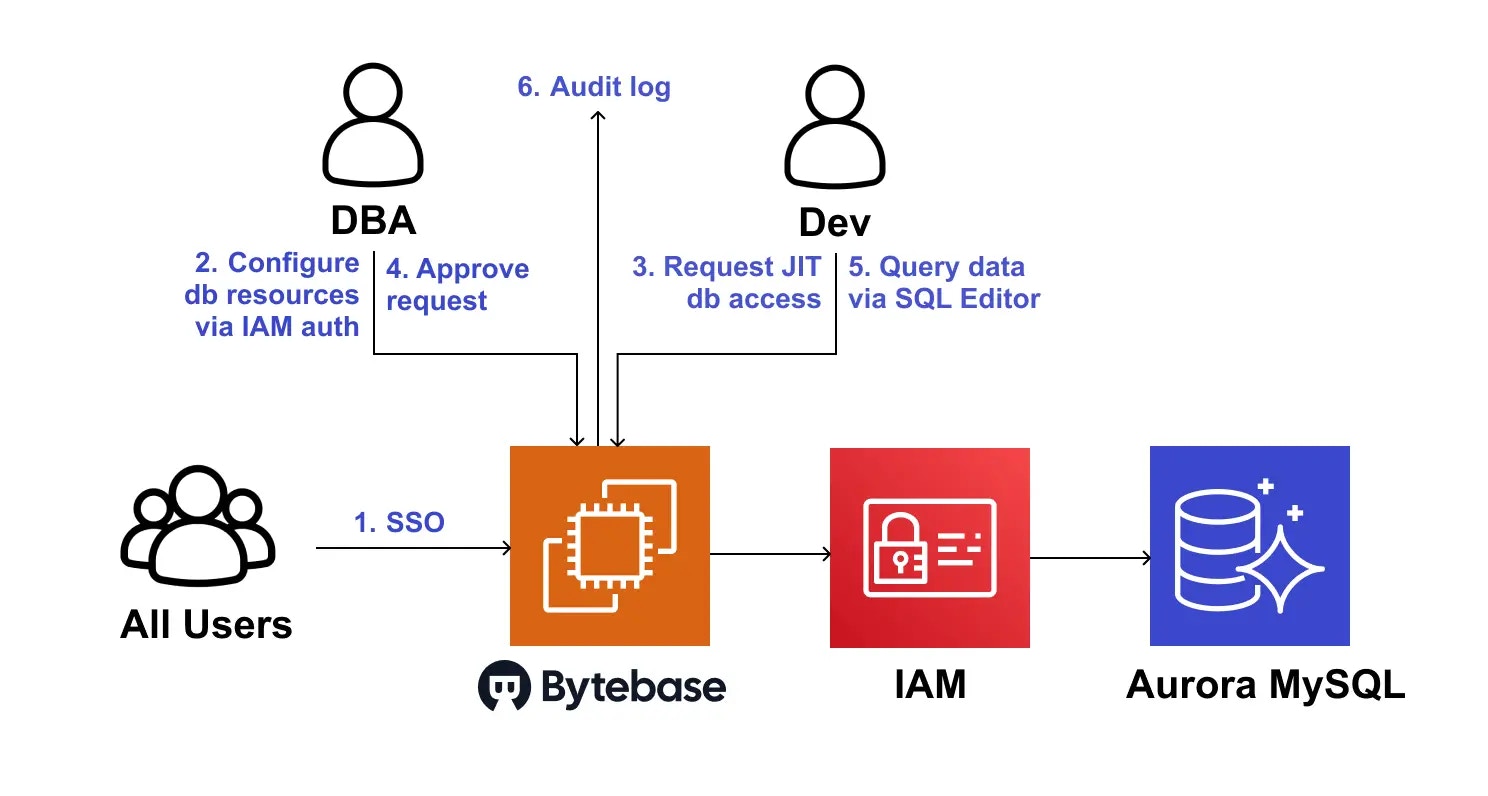 ### Architecture Components
* Bytebase itself can run under an IAM role that can connect to Aurora/RDS using the shared IAM-based user.
* **Developers authenticate to Bytebase** with their corporate IdP (via SSO). Developers don’t need to see or store any DB credentials. Each developer’s actions are tracked individually in Bytebase.
In this model, you don’t have discrete DB users or discrete IAM policies per developer. Bytebase is the gatekeeper, and the real DB connection still use the shared IAM-based user.
### JIT Database Access Workflow
1. All users can authenticate to Bytebase with their corporate IdP (via SSO).
2. DBAs configure Bytebase to connect to your Amazon Aurora MySQL database (Bytebase also supports other RDS engines).
3. Developer requests Just-in-Time (JIT) table-level access with an expiration time directly through Bytebase.
4. DBAs review the request and approve it.
5. Developer can query data via Bytebase SQL Editor.
6. The developer's actions are tracked in Bytebase audit log.
## Prerequisites
For this walkthrough, you need the following:
* An AWS account
* An AWS Identity and Access Management (IAM) user with permissions to connect to Amazon Aurora
* An EC2 instance with Docker installed
* An Amazon Aurora PostgreSQL database for Bytebase metadata
* An Amazon Aurora MySQL database to be managed by Bytebase
## Set up AWS IAM for Aurora MySQL connection
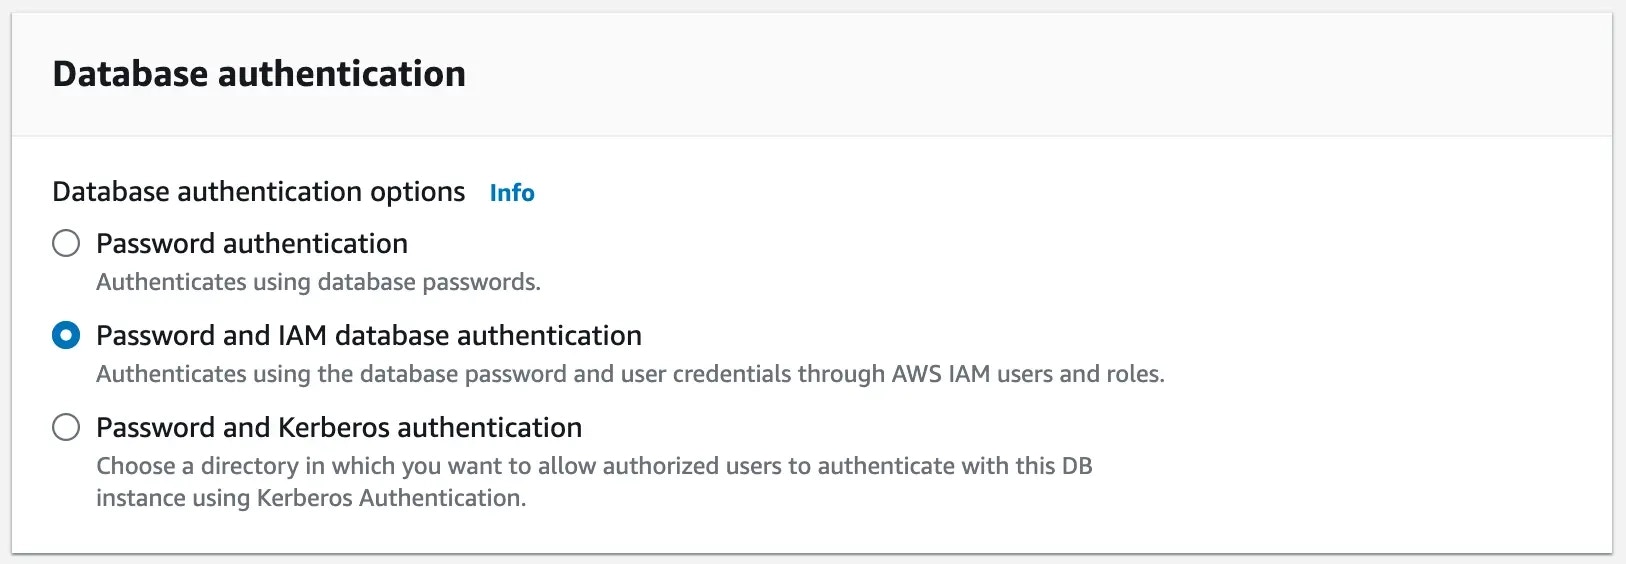
### Enable AWS IAM authentication for Aurora MySQL
While creating Aurora MySQL instance, you need to enable AWS IAM authentication.
### Architecture Components
* Bytebase itself can run under an IAM role that can connect to Aurora/RDS using the shared IAM-based user.
* **Developers authenticate to Bytebase** with their corporate IdP (via SSO). Developers don’t need to see or store any DB credentials. Each developer’s actions are tracked individually in Bytebase.
In this model, you don’t have discrete DB users or discrete IAM policies per developer. Bytebase is the gatekeeper, and the real DB connection still use the shared IAM-based user.
### JIT Database Access Workflow
1. All users can authenticate to Bytebase with their corporate IdP (via SSO).
2. DBAs configure Bytebase to connect to your Amazon Aurora MySQL database (Bytebase also supports other RDS engines).
3. Developer requests Just-in-Time (JIT) table-level access with an expiration time directly through Bytebase.
4. DBAs review the request and approve it.
5. Developer can query data via Bytebase SQL Editor.
6. The developer's actions are tracked in Bytebase audit log.
## Prerequisites
For this walkthrough, you need the following:
* An AWS account
* An AWS Identity and Access Management (IAM) user with permissions to connect to Amazon Aurora
* An EC2 instance with Docker installed
* An Amazon Aurora PostgreSQL database for Bytebase metadata
* An Amazon Aurora MySQL database to be managed by Bytebase
## Set up AWS IAM for Aurora MySQL connection
### Enable AWS IAM authentication for Aurora MySQL
While creating Aurora MySQL instance, you need to enable AWS IAM authentication.
 ### Create IAM policy
1. Go to IAM > Policies and click Create policy.
2. Select `RDS IAM Authentication` for service.
### Create IAM policy
1. Go to IAM > Policies and click Create policy.
2. Select `RDS IAM Authentication` for service.
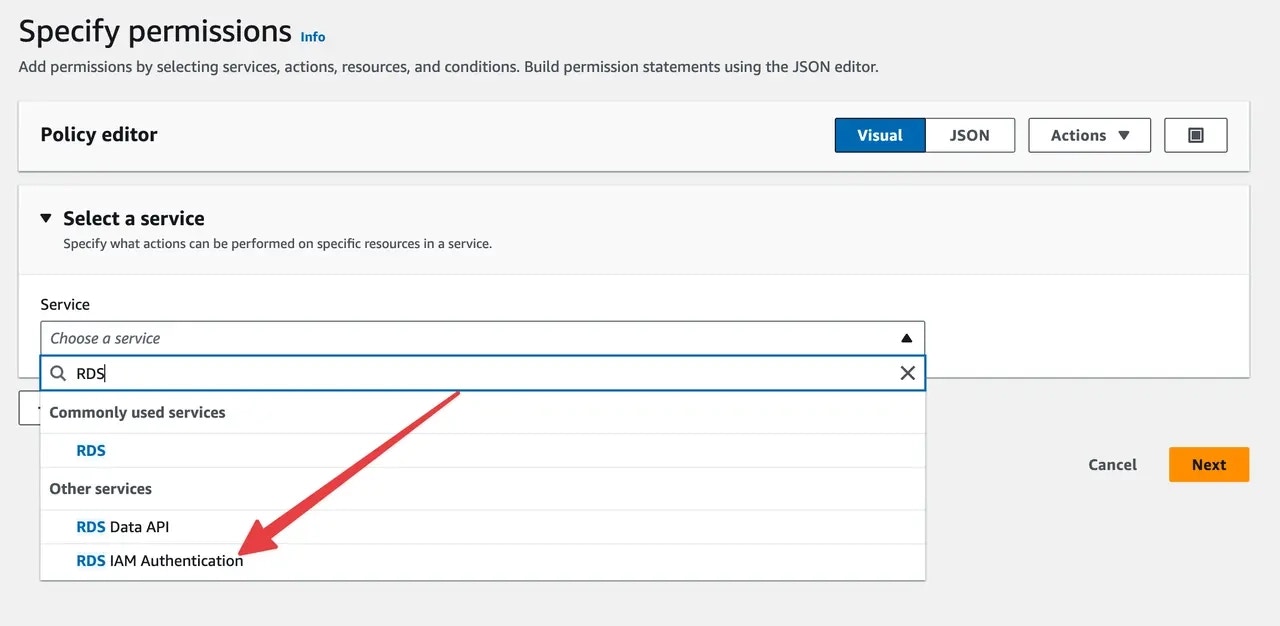 3. Select `connect` permission and `specific` as **Resource**. Check `Any in this account.`
4. Name it `rds-connect` and create this policy.
### Create IAM user
1. Go to **IAM > Users** and click **Create user**. Name it `rds-connector`.
2. Choose `Attach policies directly` and select `rds-connect` policy. Click **Next** and then click **Create user**.
3. On the user detail page, click **Create access key**, and choose `Application running on AWS compute service` as the use case. Because you will run Bytebase in EC2 instance. Click **Next**.
4. Then you can save the `Access key ID` and `Secret access key` for later use.
## Step 1: Run Bytebase in EC2 instance
1. Connect to the Aurora PostgreSQL instance and create a database `bb` for Bytebase metadata.
2. Connect to the EC2 instance and run the following command to start Bytebase. Put your **AWS\_ACCESS\_KEY\_ID**, **AWS\_SECRET\_ACCESS\_KEY**, **AWS\_REGION**, **PG\_URL** in the command.
```bash theme={null}
docker run --init -d \
-e AWS_ACCESS_KEY_ID=AKIxxxxxxxxxxxxxxEB4 \
-e AWS_SECRET_ACCESS_KEY=axBAyxxxxxxxxxxxxxxxxxxxxxxxxxxxxxxQ7yUB \
-e AWS_REGION=ap-xxxxxxx-1 \
-e PG_URL=postgresql://postgres:xxxxx@database-pg-aurora-instance-1.ct4xxxxxxxx5.ap-xxxxx-1.rds.amazonaws.com:5432/bb \
--name bytebase \
--publish 8080:8080 --pull always \
bytebase/bytebase:latest
```
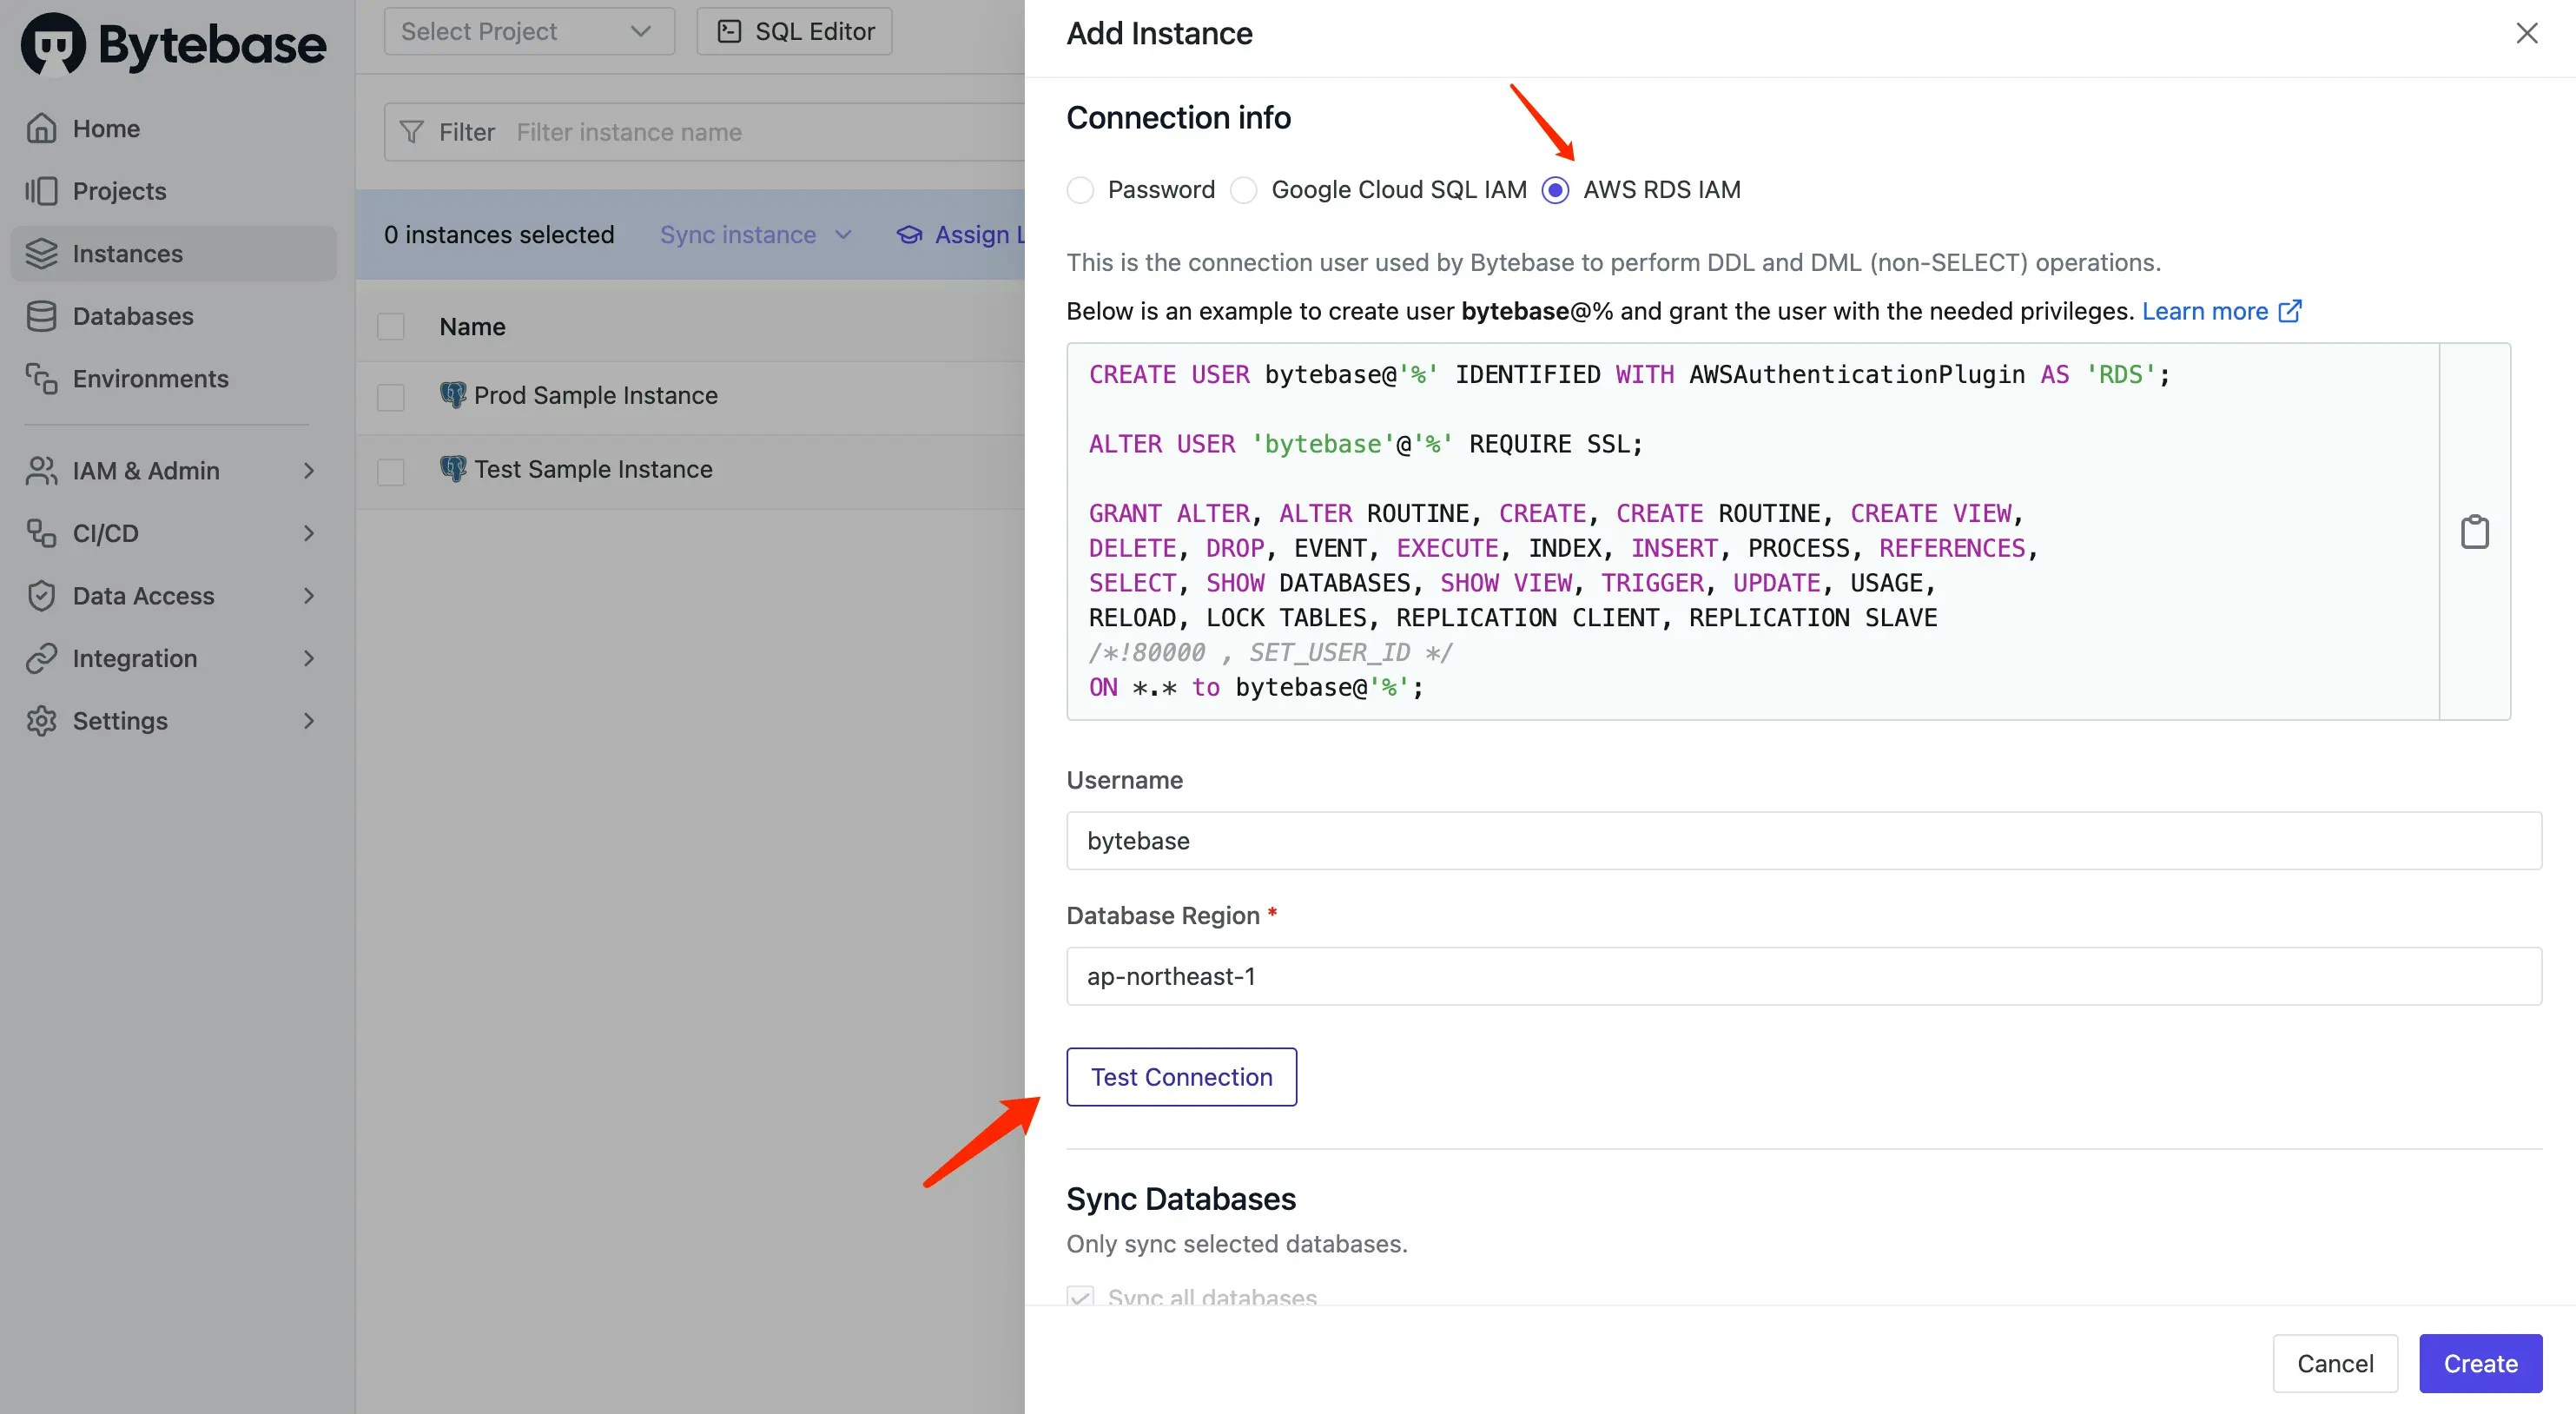
## Step 2: Configure Bytebase to Connect to Aurora MySQL via AWS IAM
1. The first registration will be granted an **admin** role. Log in, click **Instances** on the left bar and click **Add instance**.
2. Select **MySQL** as the database type. Fill in the following information and click **Create**.
* Instance Name: `AWS Aurora MySQL Prod`
* Environment: `Prod`
* Host or Socket: `aurora-mysql-instance-prod.ctxxxxxxx5.ap-xxxxx-1.rds.amazonaws.com`
* Port: `3306`
* Connection Method: `AWS RDS IAM`
* Username: `bytebase`
* Database Region: `ap-xxxxx-1`
3. Select `connect` permission and `specific` as **Resource**. Check `Any in this account.`
4. Name it `rds-connect` and create this policy.
### Create IAM user
1. Go to **IAM > Users** and click **Create user**. Name it `rds-connector`.
2. Choose `Attach policies directly` and select `rds-connect` policy. Click **Next** and then click **Create user**.
3. On the user detail page, click **Create access key**, and choose `Application running on AWS compute service` as the use case. Because you will run Bytebase in EC2 instance. Click **Next**.
4. Then you can save the `Access key ID` and `Secret access key` for later use.
## Step 1: Run Bytebase in EC2 instance
1. Connect to the Aurora PostgreSQL instance and create a database `bb` for Bytebase metadata.
2. Connect to the EC2 instance and run the following command to start Bytebase. Put your **AWS\_ACCESS\_KEY\_ID**, **AWS\_SECRET\_ACCESS\_KEY**, **AWS\_REGION**, **PG\_URL** in the command.
```bash theme={null}
docker run --init -d \
-e AWS_ACCESS_KEY_ID=AKIxxxxxxxxxxxxxxEB4 \
-e AWS_SECRET_ACCESS_KEY=axBAyxxxxxxxxxxxxxxxxxxxxxxxxxxxxxxQ7yUB \
-e AWS_REGION=ap-xxxxxxx-1 \
-e PG_URL=postgresql://postgres:xxxxx@database-pg-aurora-instance-1.ct4xxxxxxxx5.ap-xxxxx-1.rds.amazonaws.com:5432/bb \
--name bytebase \
--publish 8080:8080 --pull always \
bytebase/bytebase:latest
```
## Step 2: Configure Bytebase to Connect to Aurora MySQL via AWS IAM
1. The first registration will be granted an **admin** role. Log in, click **Instances** on the left bar and click **Add instance**.
2. Select **MySQL** as the database type. Fill in the following information and click **Create**.
* Instance Name: `AWS Aurora MySQL Prod`
* Environment: `Prod`
* Host or Socket: `aurora-mysql-instance-prod.ctxxxxxxx5.ap-xxxxx-1.rds.amazonaws.com`
* Port: `3306`
* Connection Method: `AWS RDS IAM`
* Username: `bytebase`
* Database Region: `ap-xxxxx-1`
 3. Click **Select Project** on the top bar and create a new project `Aurora MySQL Project`.
4. (Optional) If you don't have any existing databases in the aurora mysql instance, you can check the [employee small sample data](https://github.com/bytebase/employee-sample-database/tree/main/mysql/dataset_small) and import them into the instance first.
5. Click **Database > Databases** on the left bar, and then click **Transfer in DB** to transfer in existing databases, for the sample data, it's `employee`.
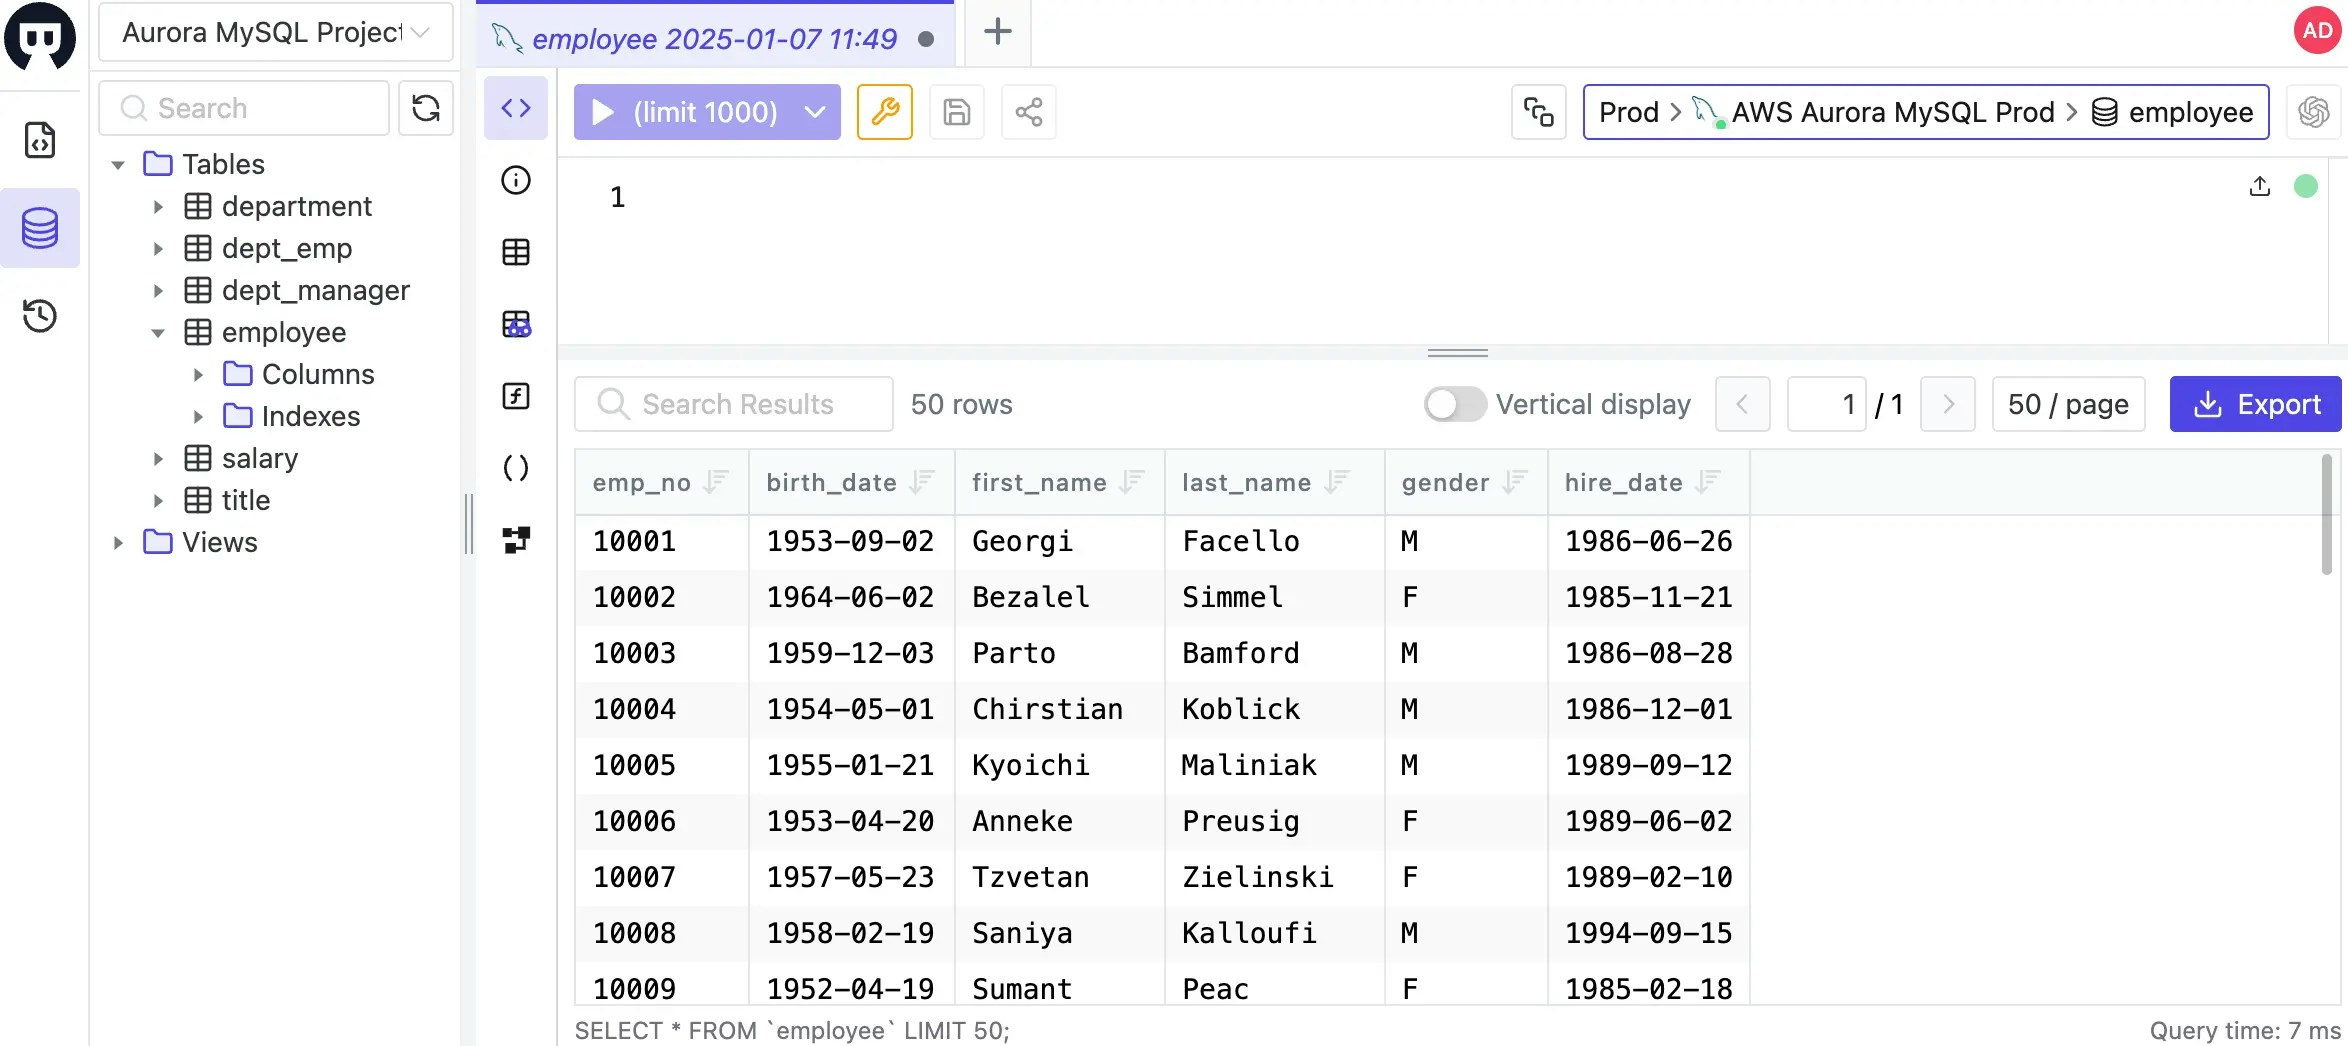
6. Click **SQL Editor** on the top bar, connect to the `employee` database. Double click the `employee` database and you'll see the data.
3. Click **Select Project** on the top bar and create a new project `Aurora MySQL Project`.
4. (Optional) If you don't have any existing databases in the aurora mysql instance, you can check the [employee small sample data](https://github.com/bytebase/employee-sample-database/tree/main/mysql/dataset_small) and import them into the instance first.
5. Click **Database > Databases** on the left bar, and then click **Transfer in DB** to transfer in existing databases, for the sample data, it's `employee`.
6. Click **SQL Editor** on the top bar, connect to the `employee` database. Double click the `employee` database and you'll see the data.
 ## Step 3: Developer requests Just-in-Time (JIT) table-level access through Bytebase
### Register a developer
1. By default, the `(workspace) admin` has the full access to the database. Click **IAM\&Admin > Users\&Groups** on the left bar, and then click **Add user**.
2. Create a user `dev` with the role `Project Developer`. This project-level role will be applied to all projects automatically.
3. Log in as the user `dev`, click **Select Project** on the top sidebar, and choose `Aurora MySQL Project`
4. Click **Database > Databases** on the left bar, you should see two database `employee`.
5. Click **SQL Editor** on the top bar, connecting to the `employee` database is impossible. Because it's **Community Plan**.
### Admin assigns developer access to the database (Community and Pro Plan)
## Step 3: Developer requests Just-in-Time (JIT) table-level access through Bytebase
### Register a developer
1. By default, the `(workspace) admin` has the full access to the database. Click **IAM\&Admin > Users\&Groups** on the left bar, and then click **Add user**.
2. Create a user `dev` with the role `Project Developer`. This project-level role will be applied to all projects automatically.
3. Log in as the user `dev`, click **Select Project** on the top sidebar, and choose `Aurora MySQL Project`
4. Click **Database > Databases** on the left bar, you should see two database `employee`.
5. Click **SQL Editor** on the top bar, connecting to the `employee` database is impossible. Because it's **Community Plan**.
### Admin assigns developer access to the database (Community and Pro Plan)
 In Bytebase **Community** and **Pro Plan**, the Admin/DBA can assign developer access to the database.
1. Login as the `admin` user, go into `Aurora MySQL Project`, click **Manage > Members** on the left sidebar.
2. Click **Grant Access**, select the developer `dev`, select the `SQL Editor User` role, then set 1 day Expiration, and click **Confirm** button. Here you may notice in **Community Plan**, you can only set access to all databases in the project.
In Bytebase **Community** and **Pro Plan**, the Admin/DBA can assign developer access to the database.
1. Login as the `admin` user, go into `Aurora MySQL Project`, click **Manage > Members** on the left sidebar.
2. Click **Grant Access**, select the developer `dev`, select the `SQL Editor User` role, then set 1 day Expiration, and click **Confirm** button. Here you may notice in **Community Plan**, you can only set access to all databases in the project.
 3. After the access is granted, log in as the `dev` user again, you now have access to the production database in SQL Editor. After one day, the access will expire automatically.
 ### Developer requests JIT access to the database (Enterprise Plan)
In Bytebase **Enterprise Plan**, you can request a JIT access to the production database.
1. Login as `admin` user, go into `Aurora MySQL Project` and revoke the `dev` user's access to the production database.
2. Upgrade to the **Enterprise Plan**. You may request a 14-day trial from [here](https://www.bytebase.com/contact-us/).
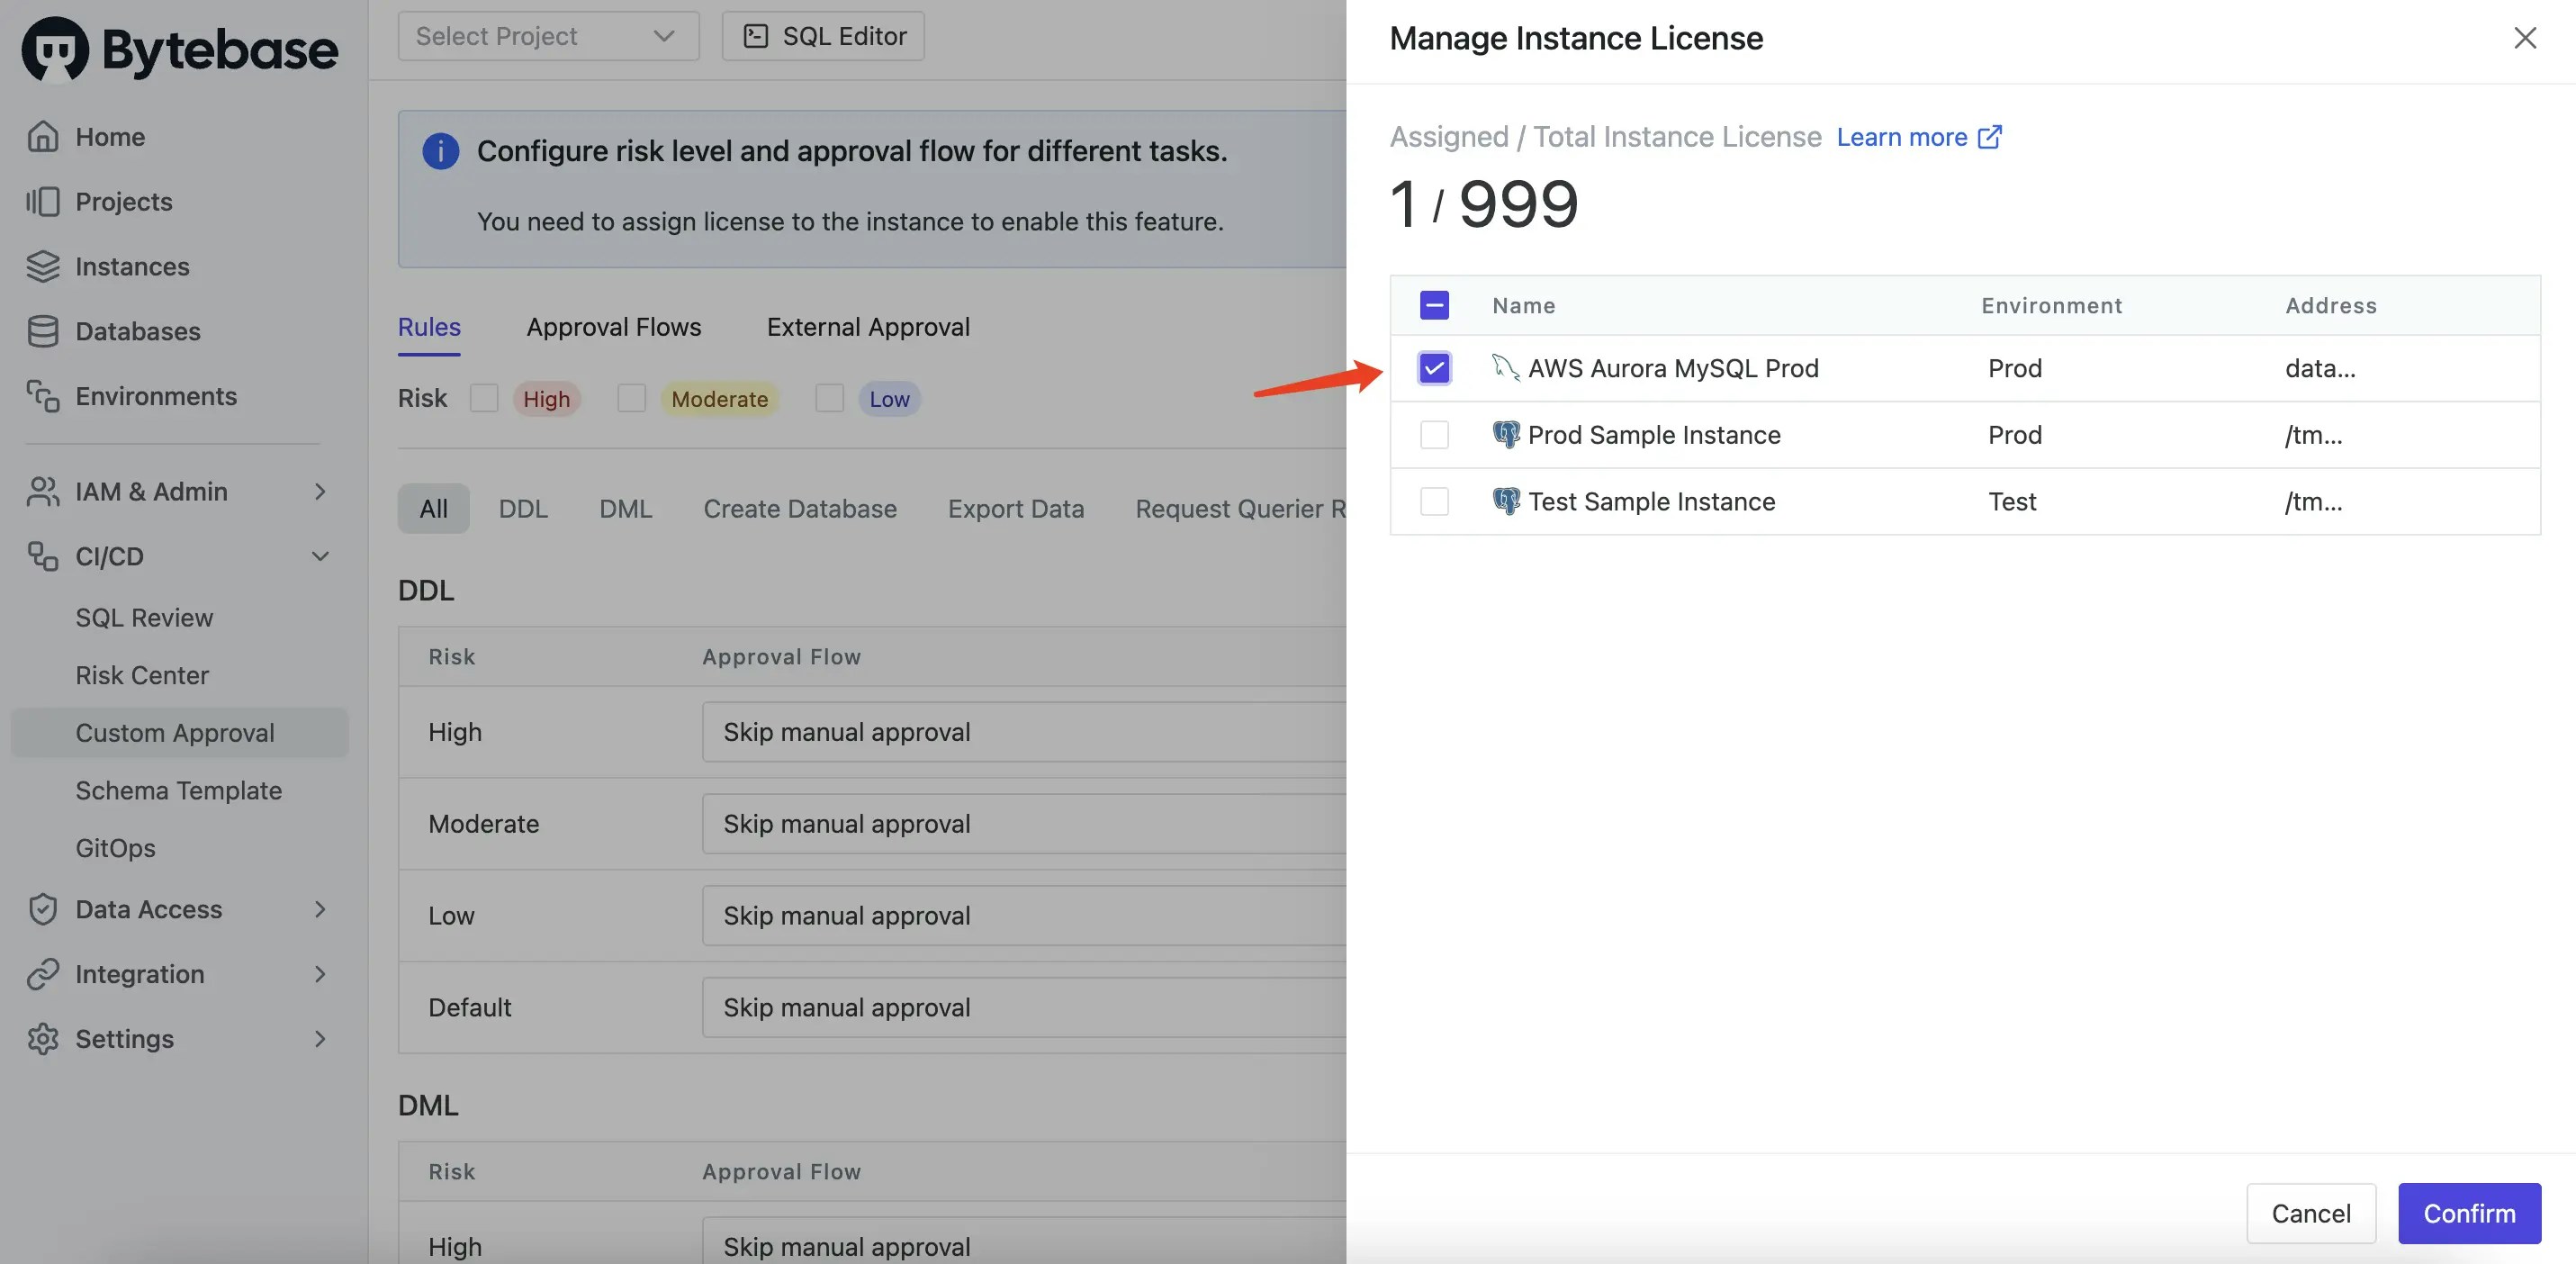
3. Click **CI/CD** > **Custom Approval** on the left sidebar. Assign licenses to the aurora mysql instance to enable this feature.
### Developer requests JIT access to the database (Enterprise Plan)
In Bytebase **Enterprise Plan**, you can request a JIT access to the production database.
1. Login as `admin` user, go into `Aurora MySQL Project` and revoke the `dev` user's access to the production database.
2. Upgrade to the **Enterprise Plan**. You may request a 14-day trial from [here](https://www.bytebase.com/contact-us/).
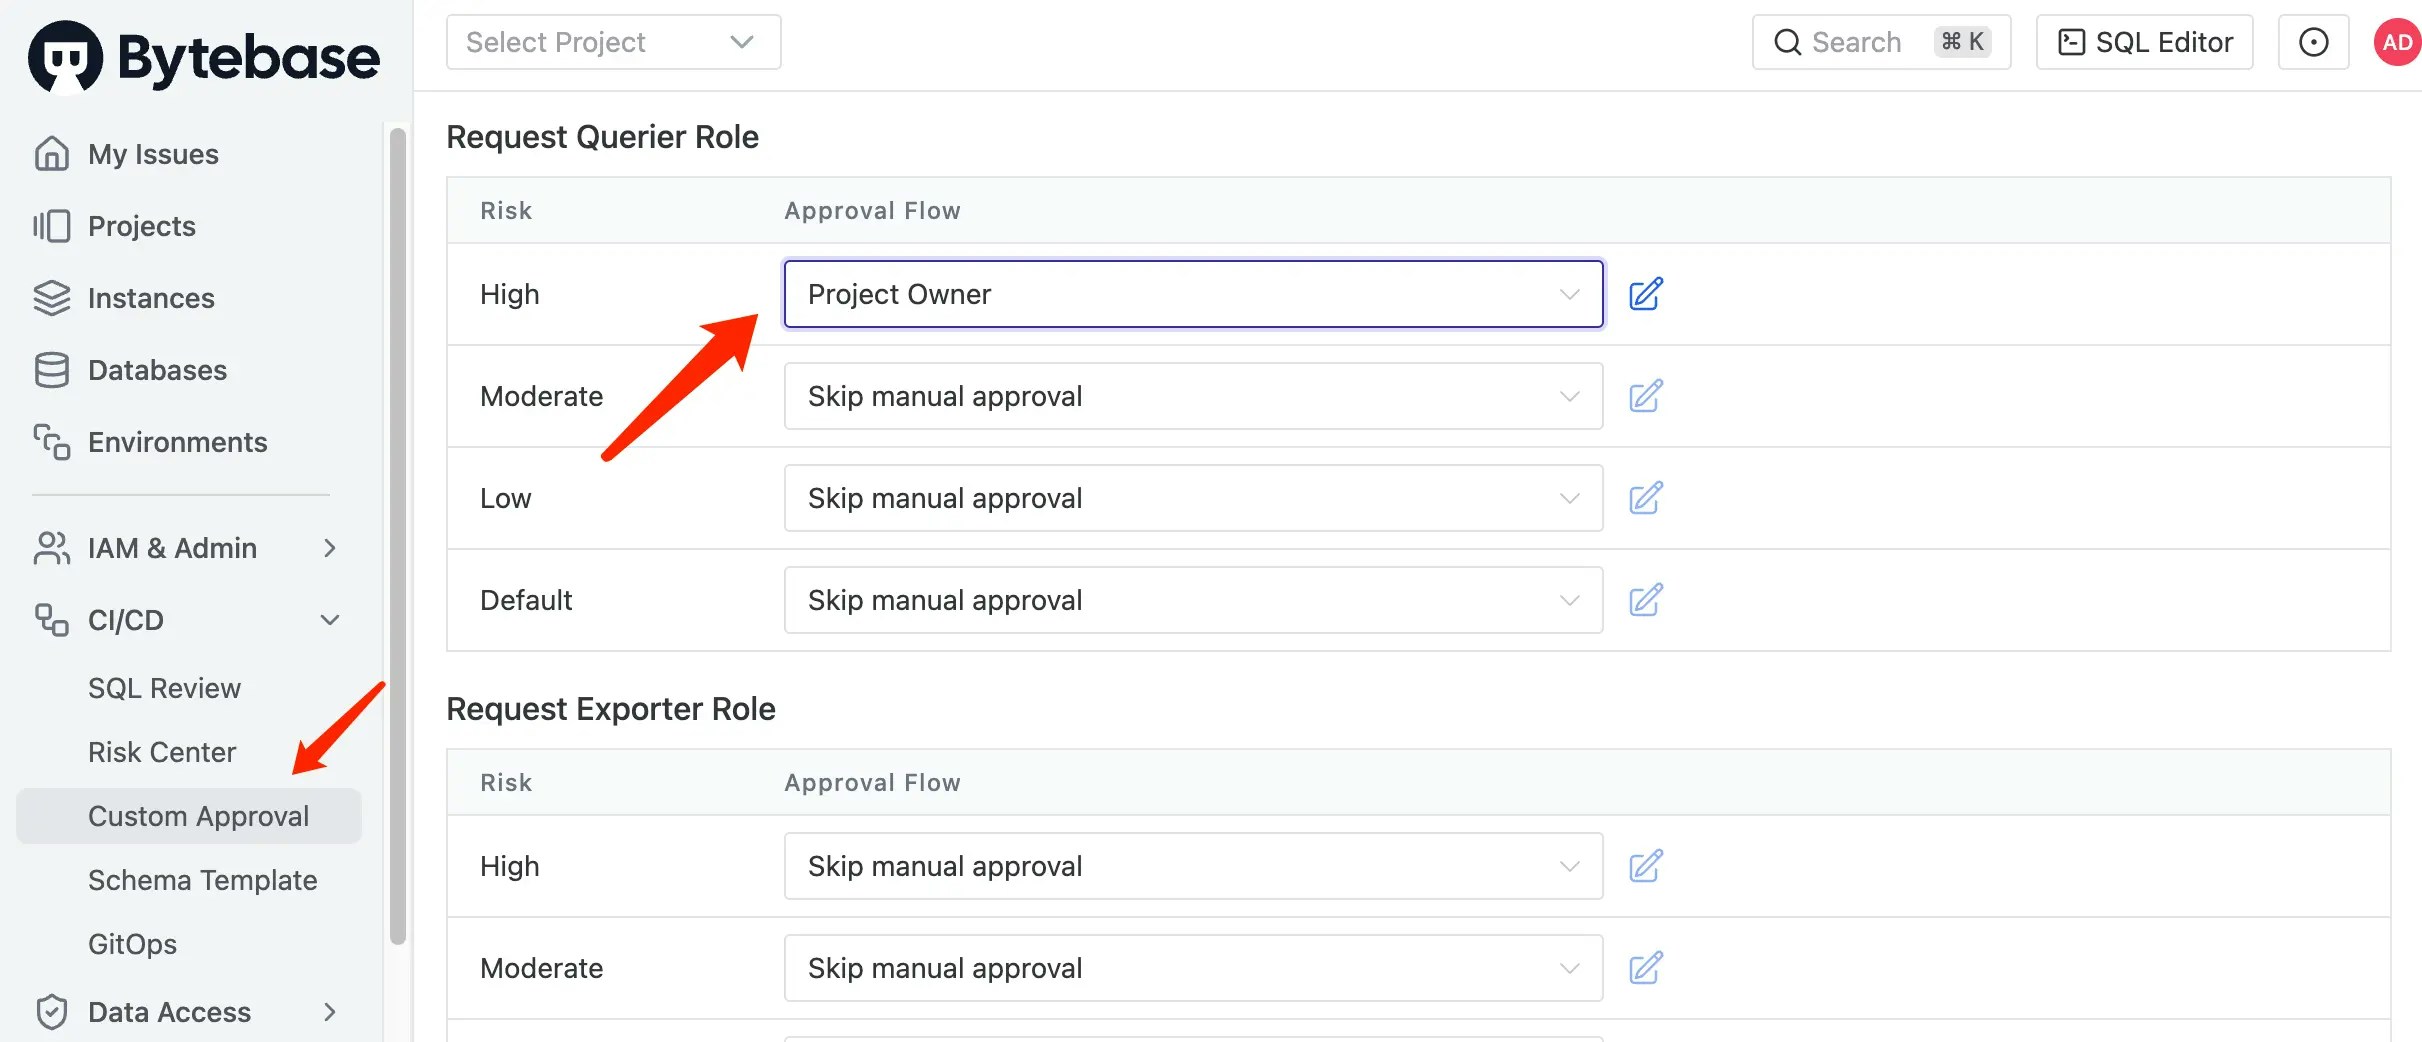
3. Click **CI/CD** > **Custom Approval** on the left sidebar. Assign licenses to the aurora mysql instance to enable this feature.
 To elaborate on custom approval, take a look at the following diagram. By defining a custom approval flow with CEL conditions, Bytebase will automatically trigger the approval flow when the condition is met. In our case, we define an approval rule for `Request Role` which triggers when the environment is `Prod`.
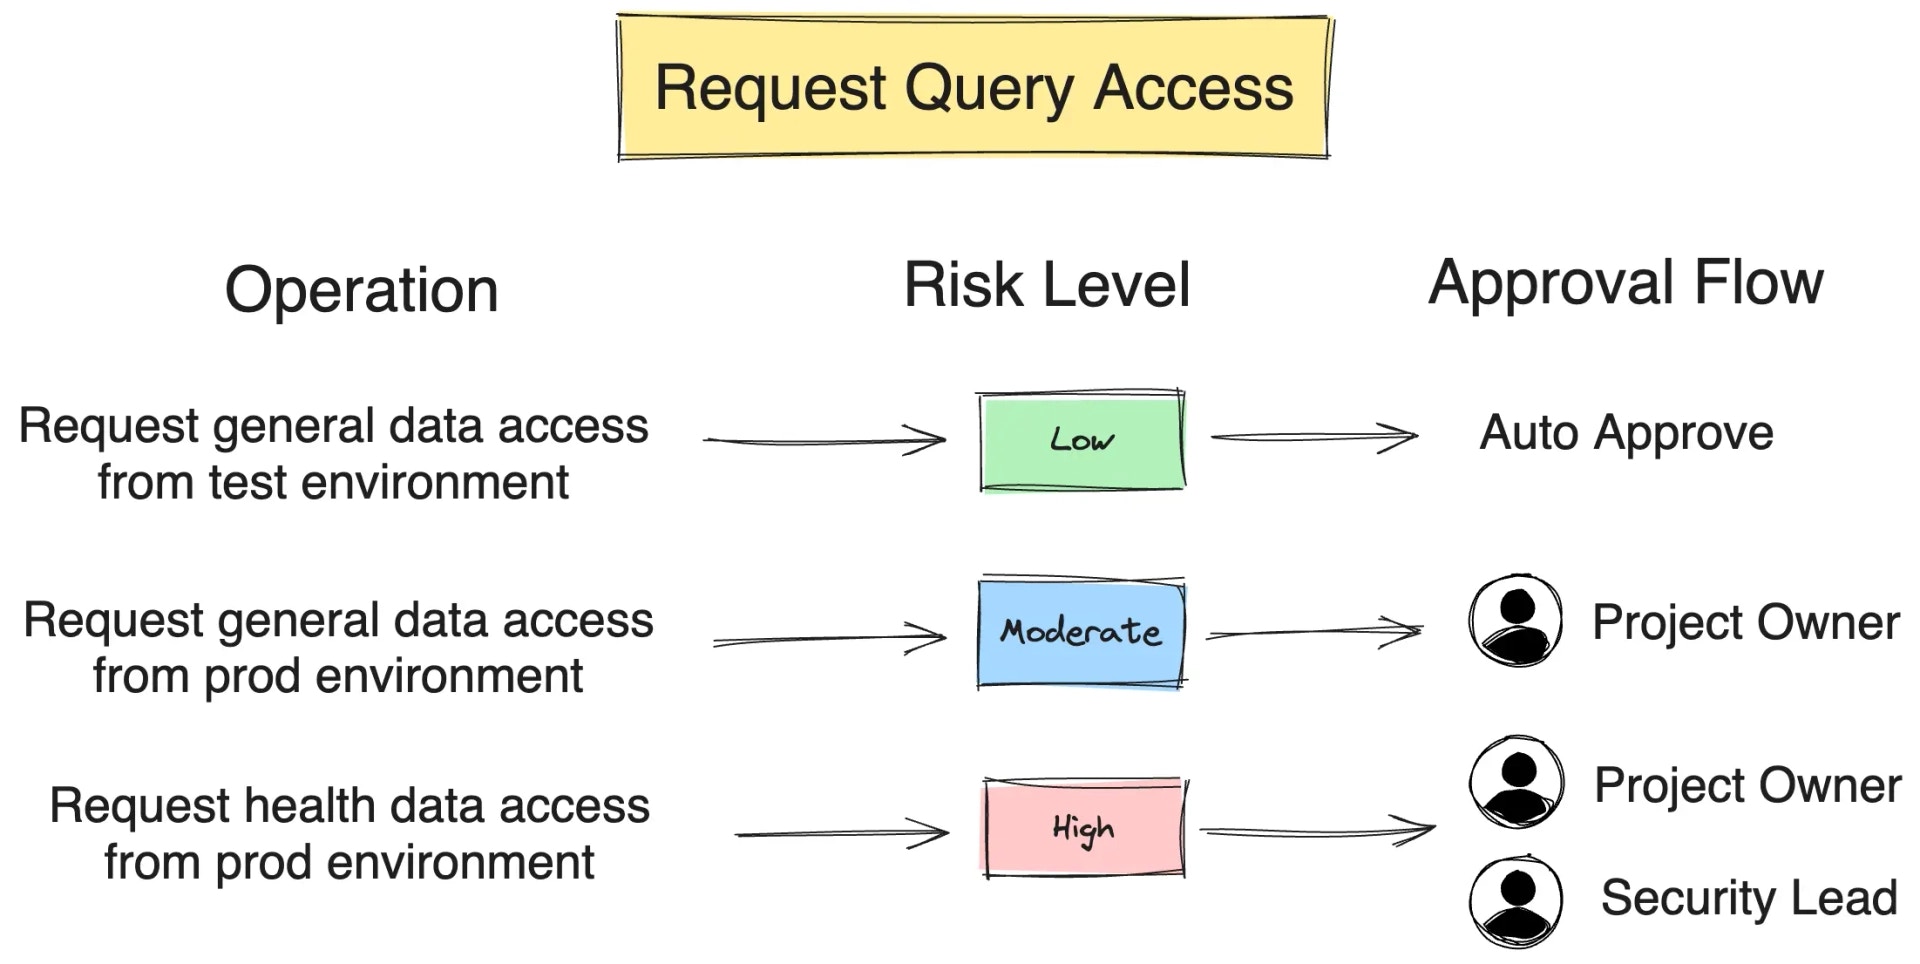 4. Scroll down to **Request Querier Role** section, add `high` risk an approval flow `Project Owner`.
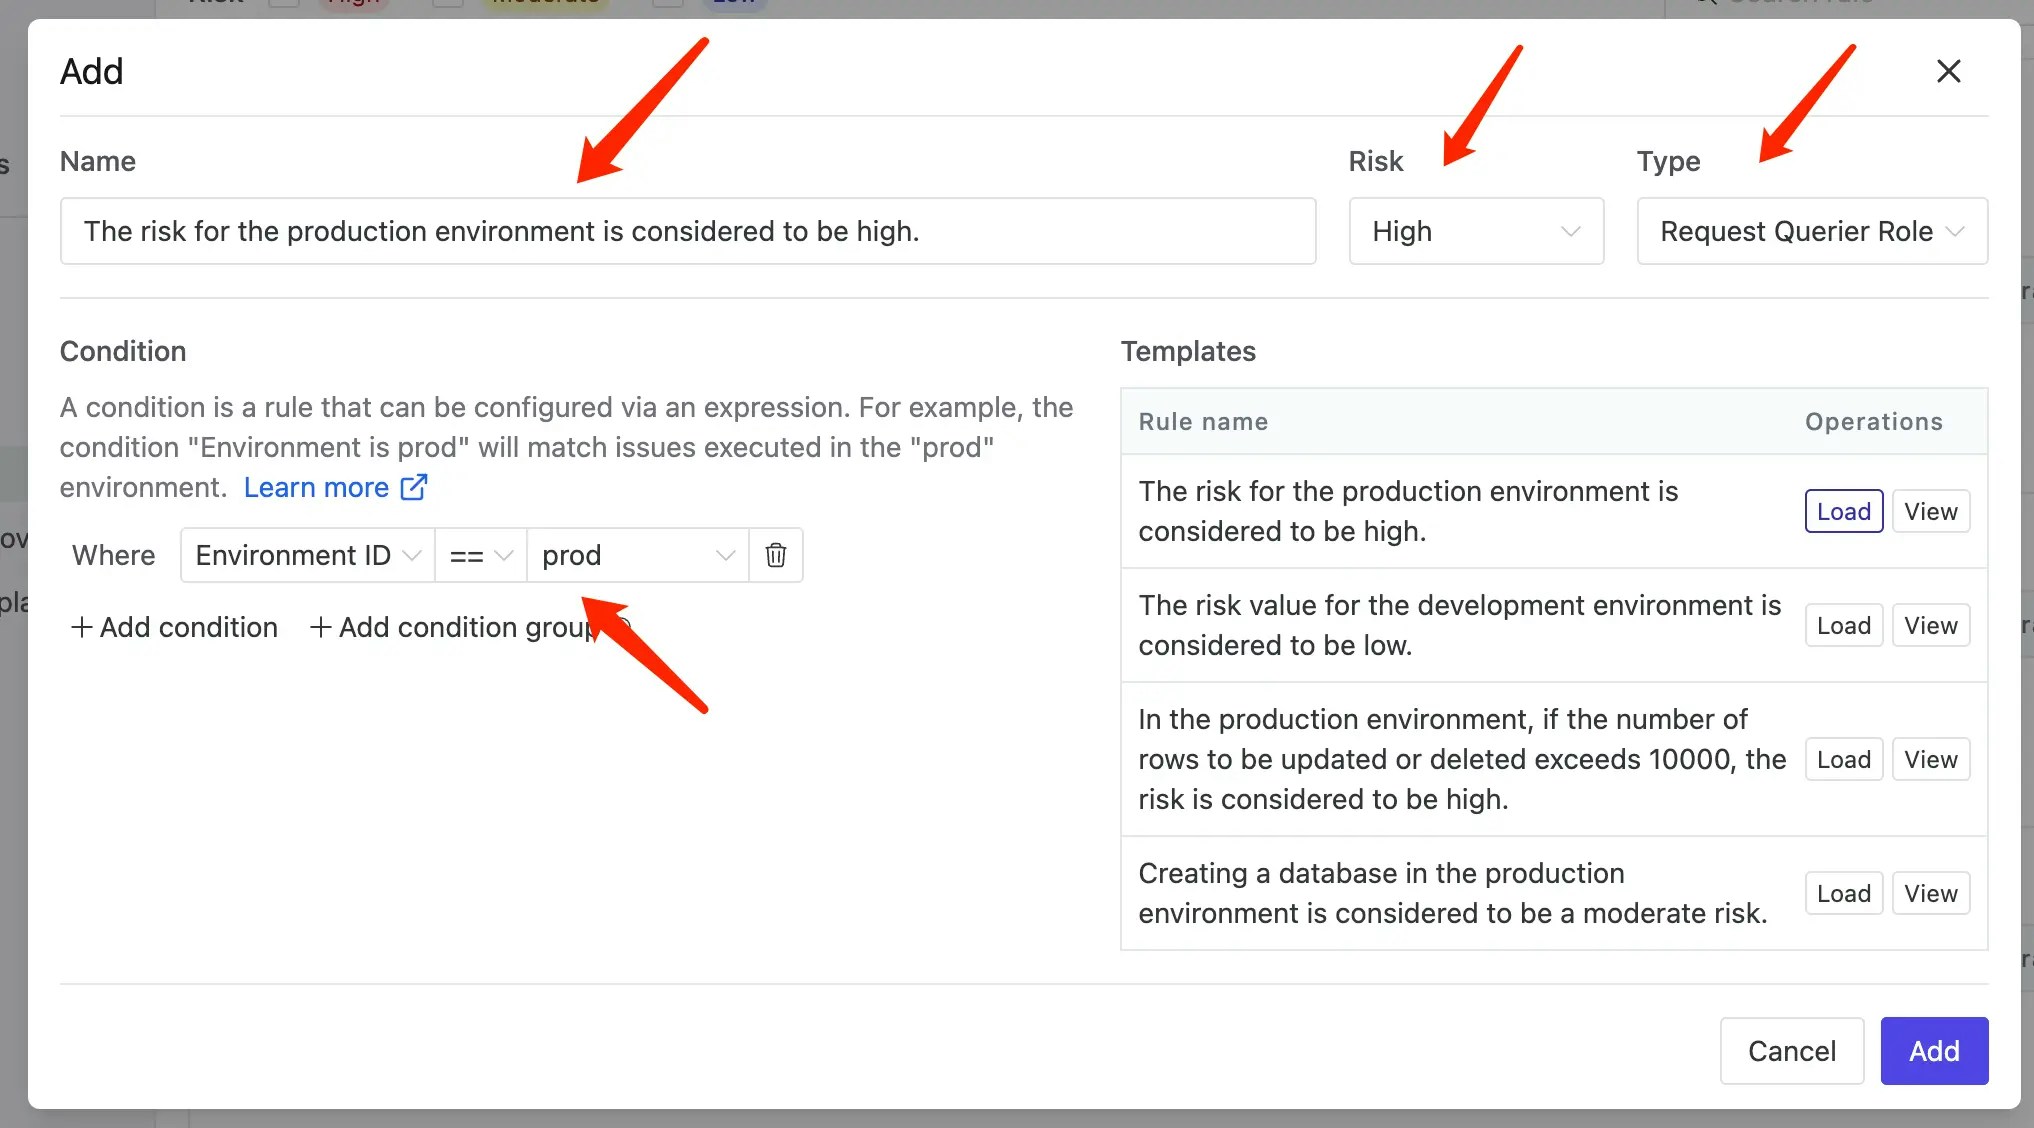
 5. Click **CI/CD** > **Risks** on the left sidebar. Define a High risk policy for `Request Querier Role` which triggers when the environment is `Prod`.
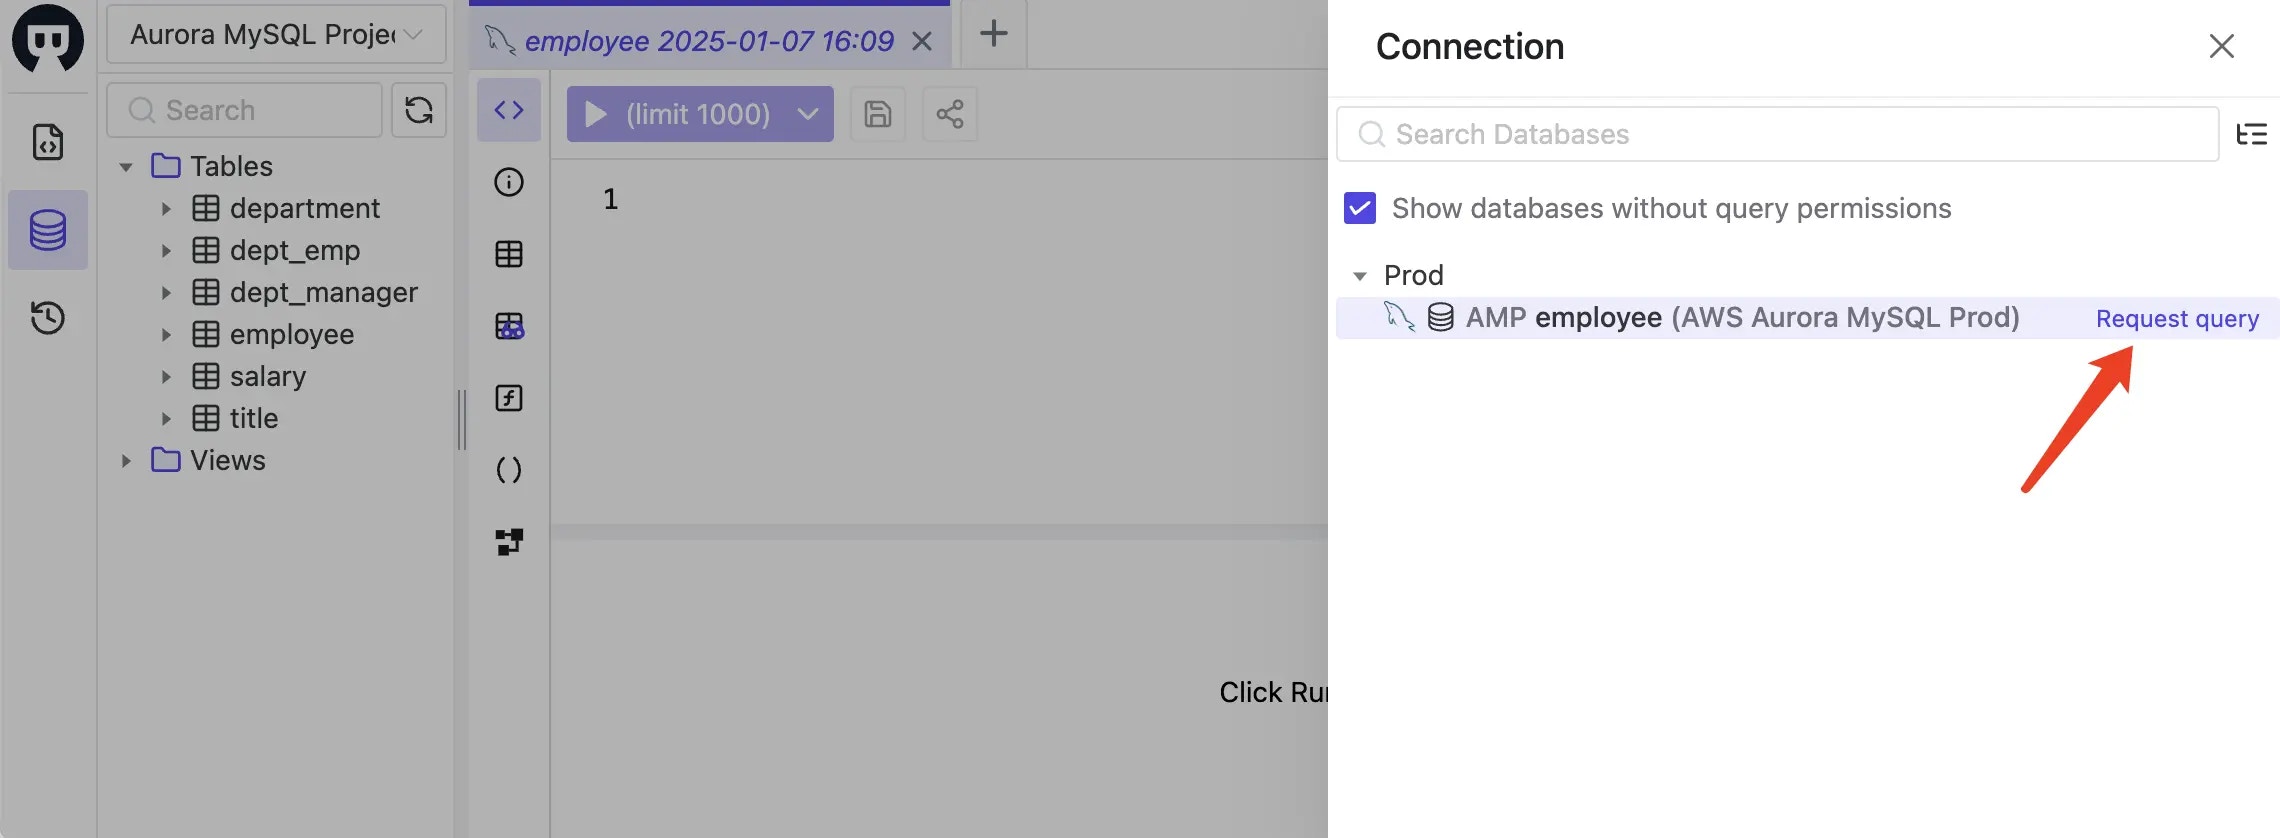
 6. Login as the `dev` user again, then go to SQL Editor page. Click **Connect to a database** or **Select a database to start**. You should see the `hr_prod` and `hr_test` databases listed, click **Request query** to request a JIT access.
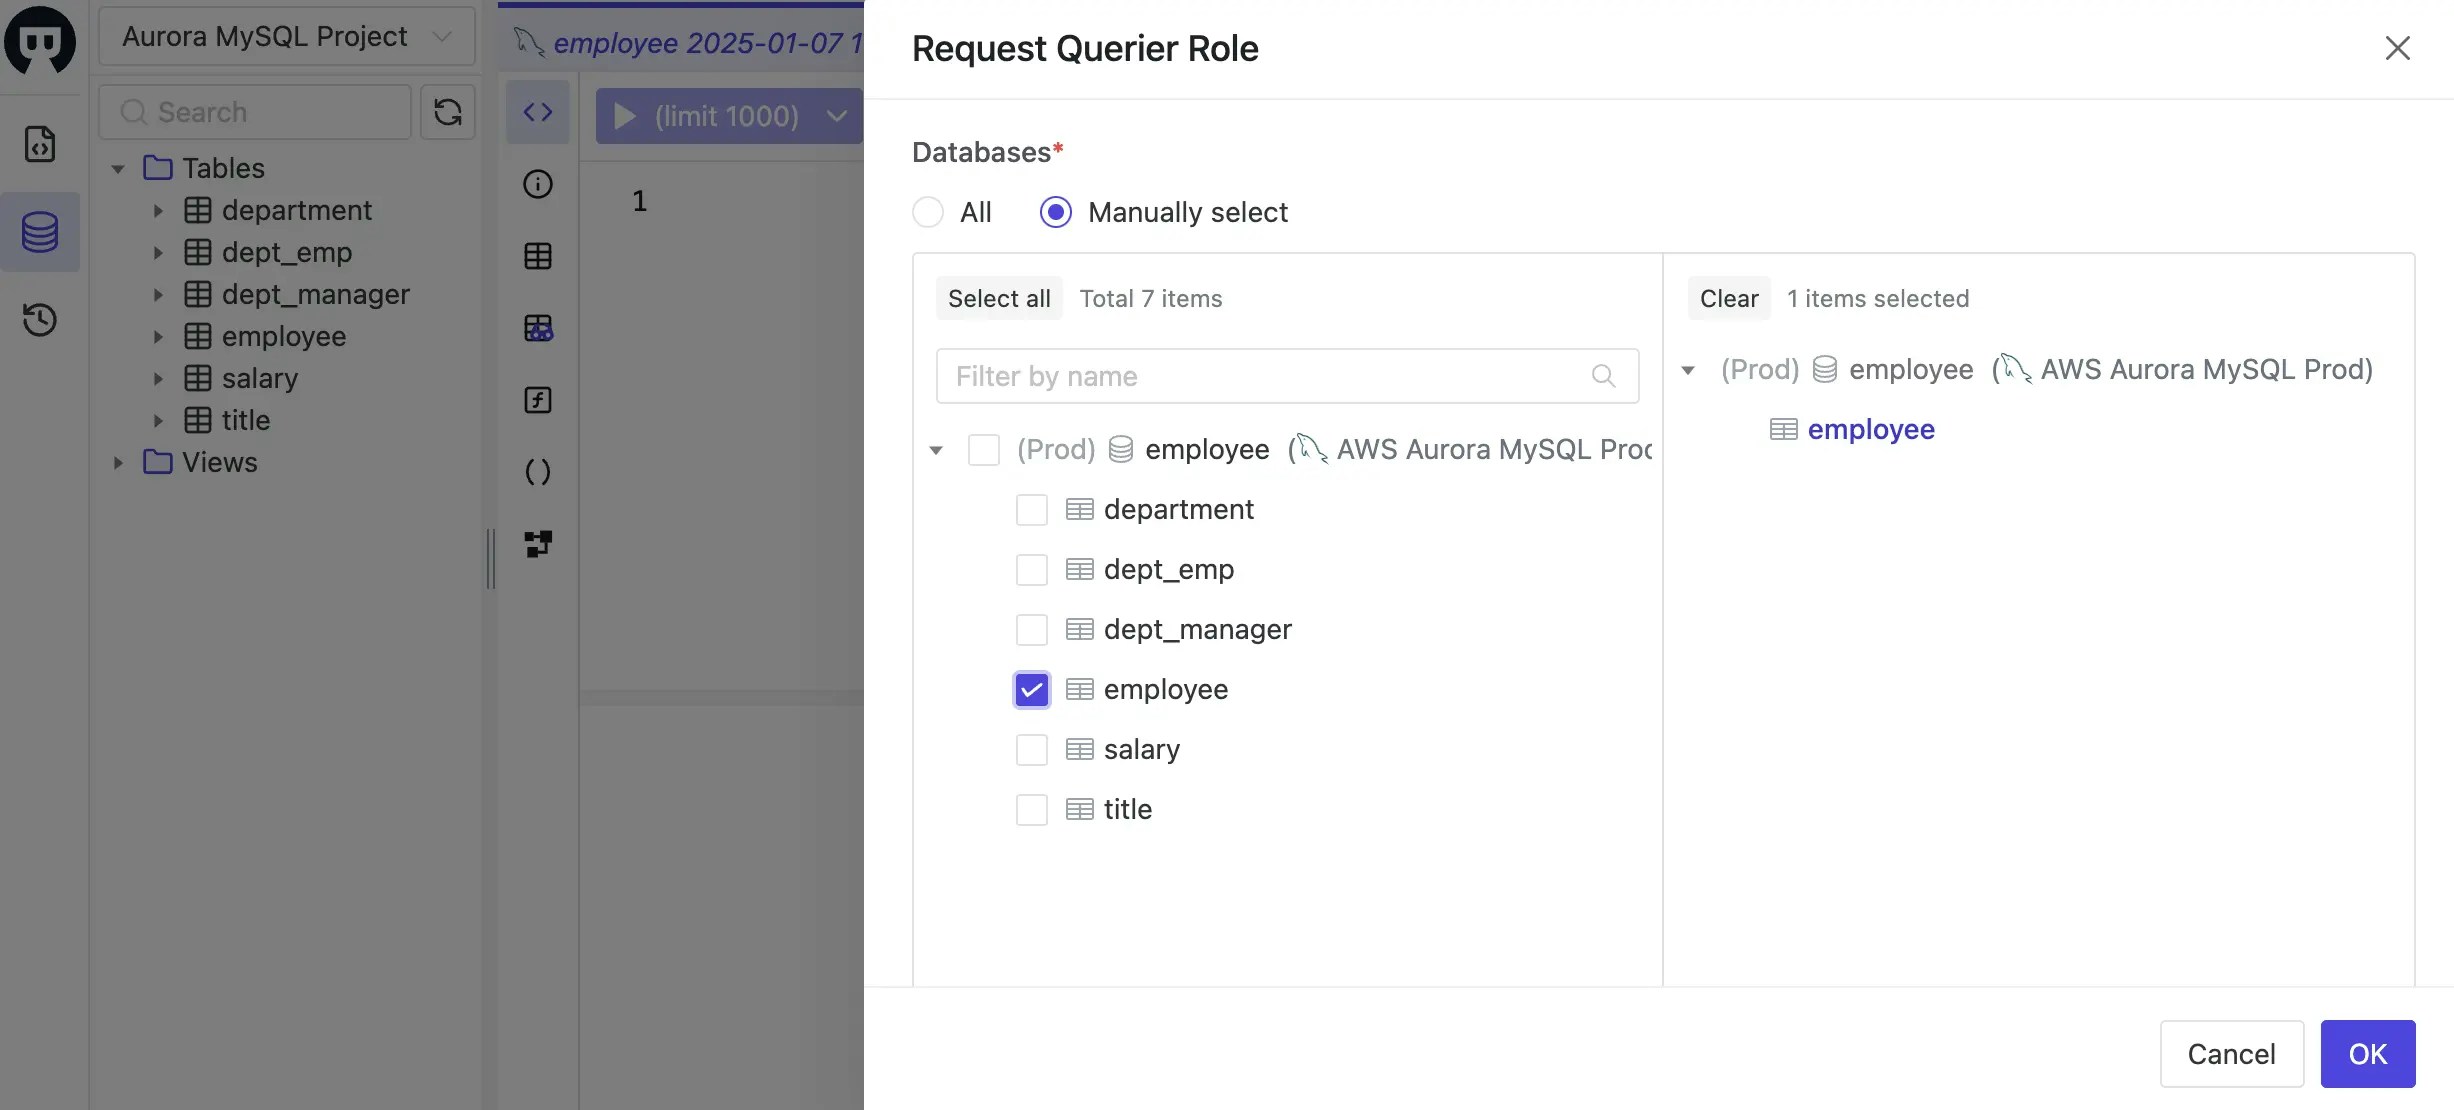
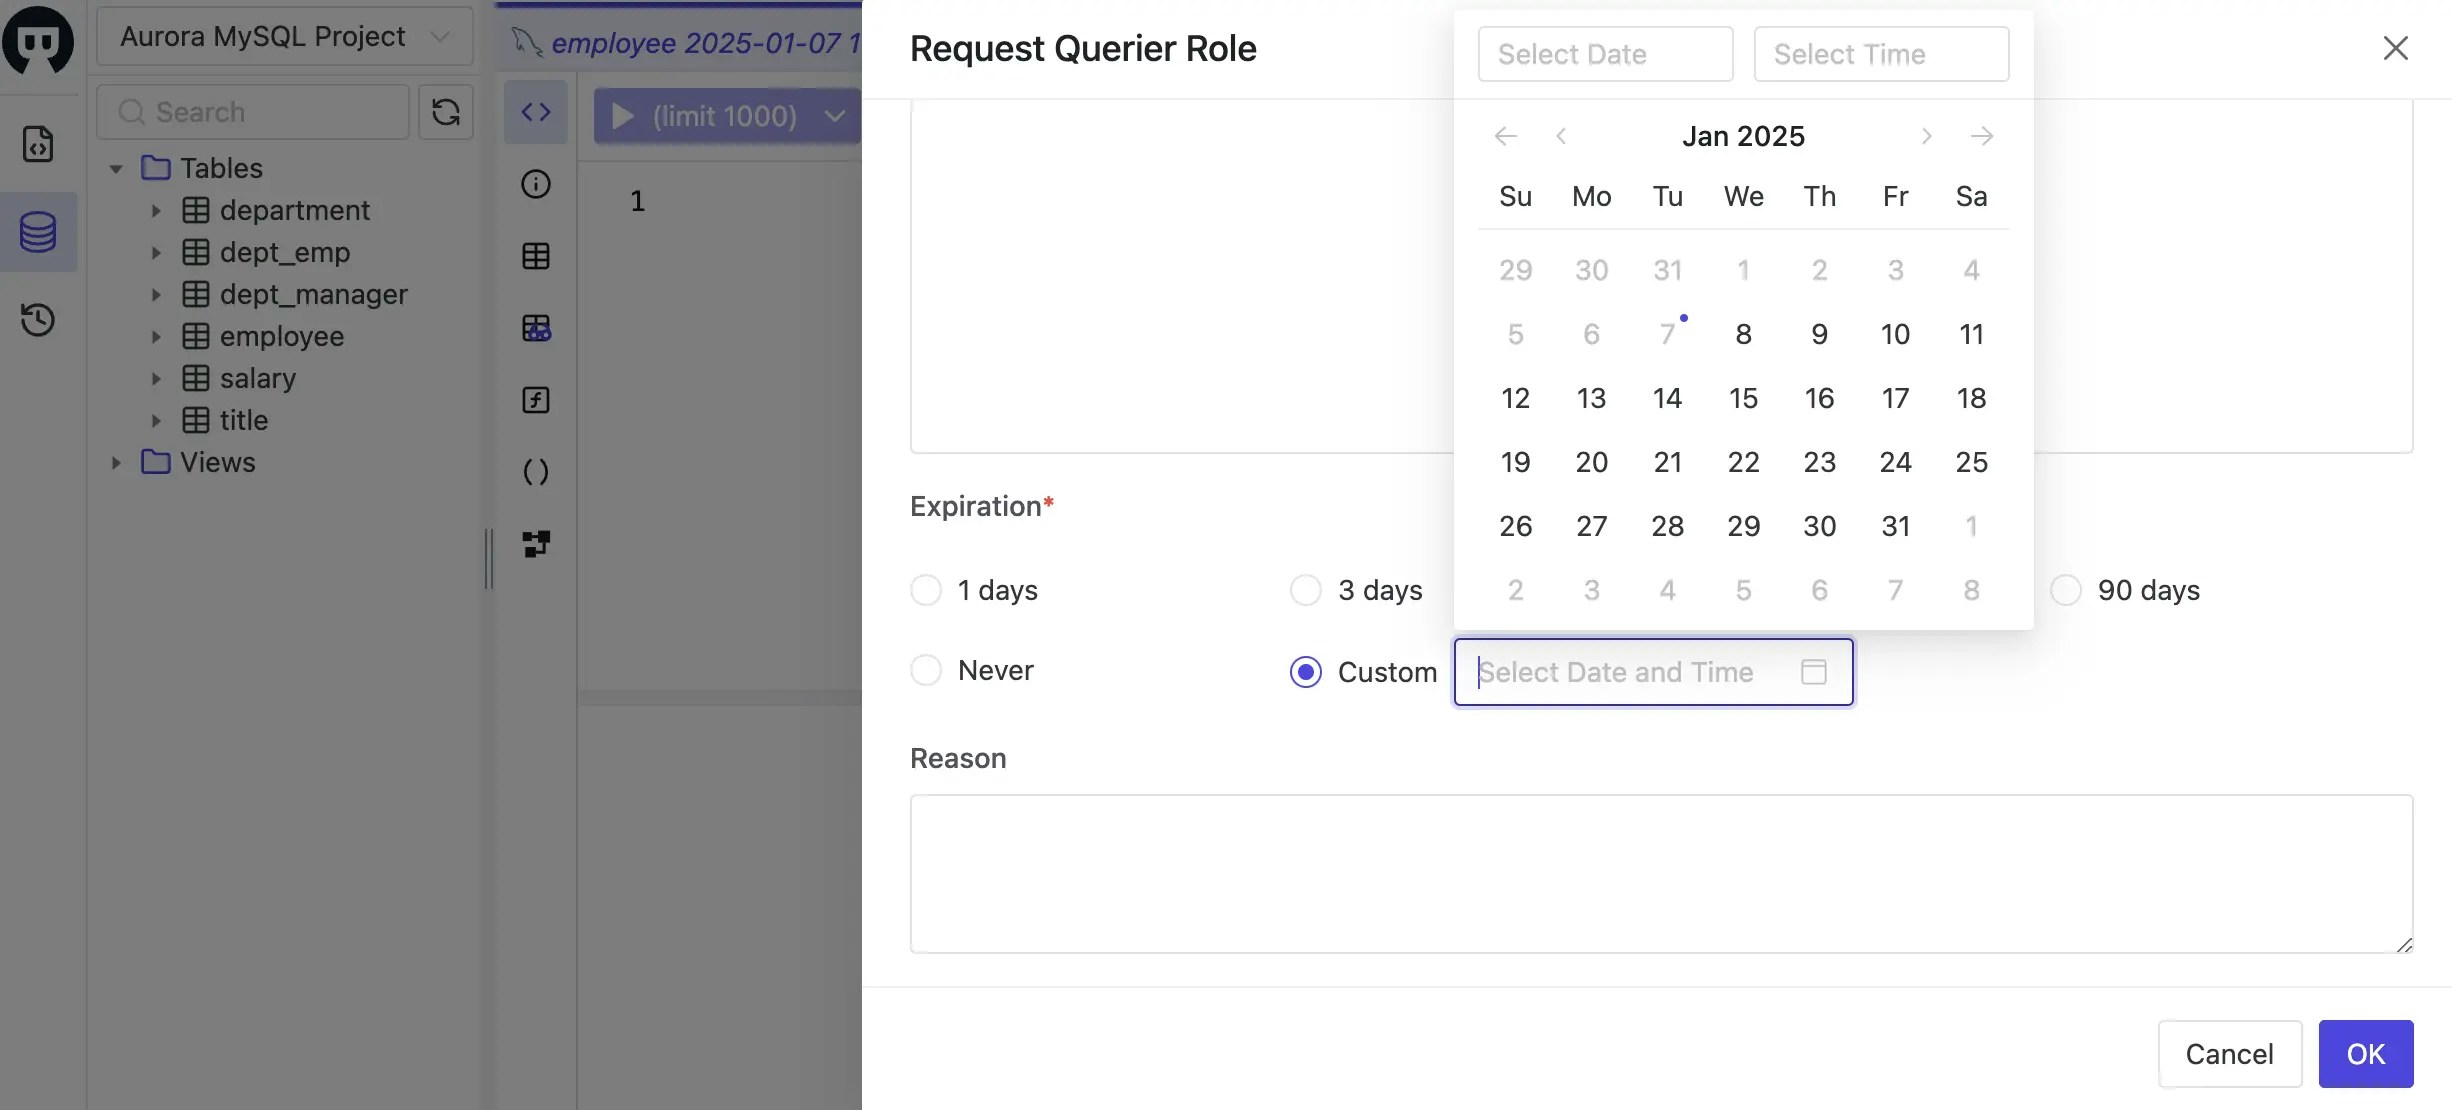
 7. Another way is to go to **Database > Databases** page, click **Request Querier Role**.
8. In the **Request Querier Role** modal, choose **Manually select**, then `employee` `salary` and `title` under `hr_prod` database, and click **OK** button. Here you may also specify the expiration time which can be a specific time, or relative time from now.
7. Another way is to go to **Database > Databases** page, click **Request Querier Role**.
8. In the **Request Querier Role** modal, choose **Manually select**, then `employee` `salary` and `title` under `hr_prod` database, and click **OK** button. Here you may also specify the expiration time which can be a specific time, or relative time from now.
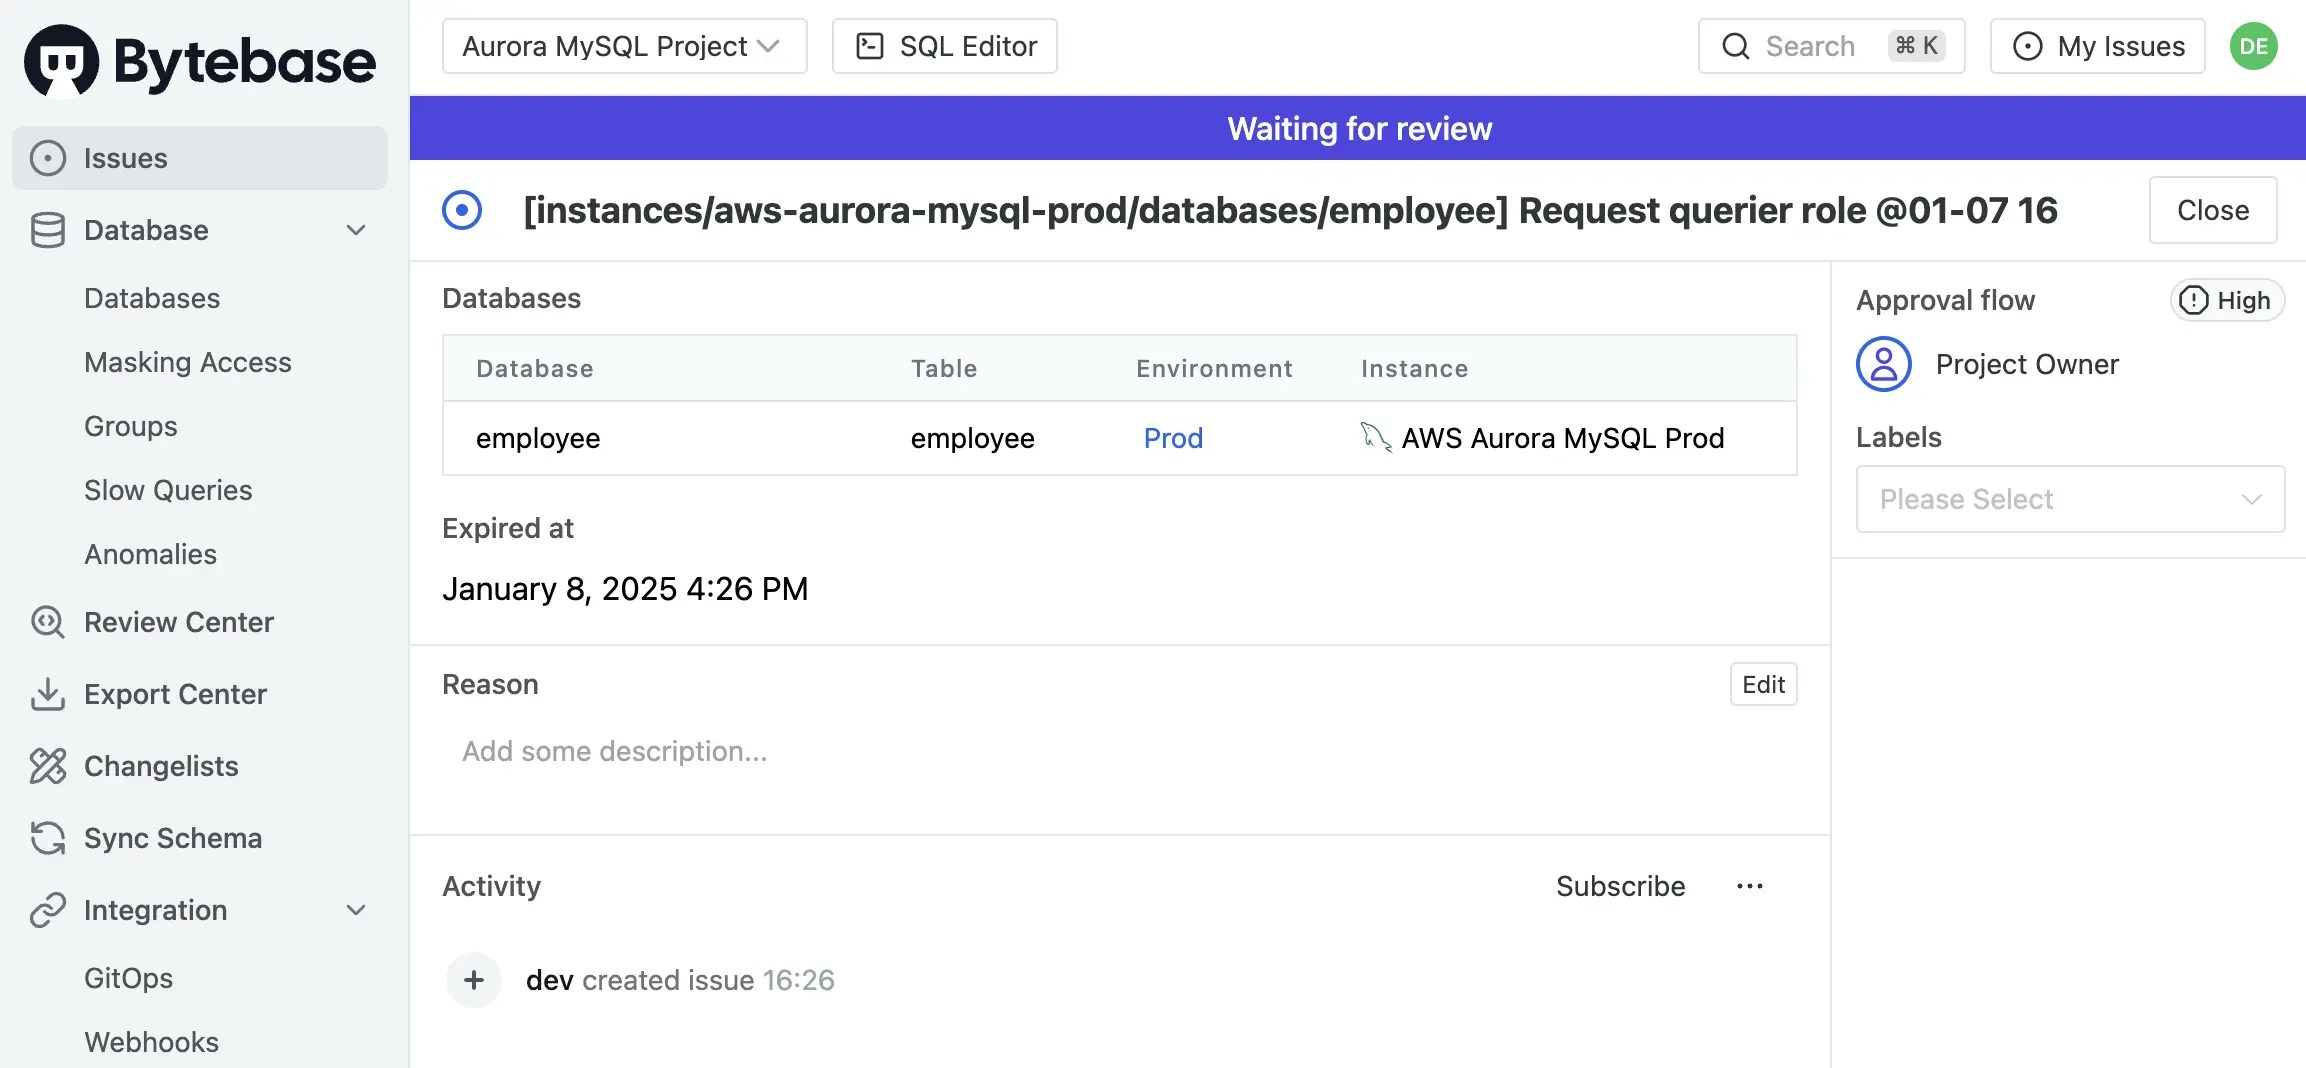
 9. An request issue will be created, switch to the project owner (the admin user), go to **Issue** page, you should see the request issue. Click **Approve** button to approve the request.
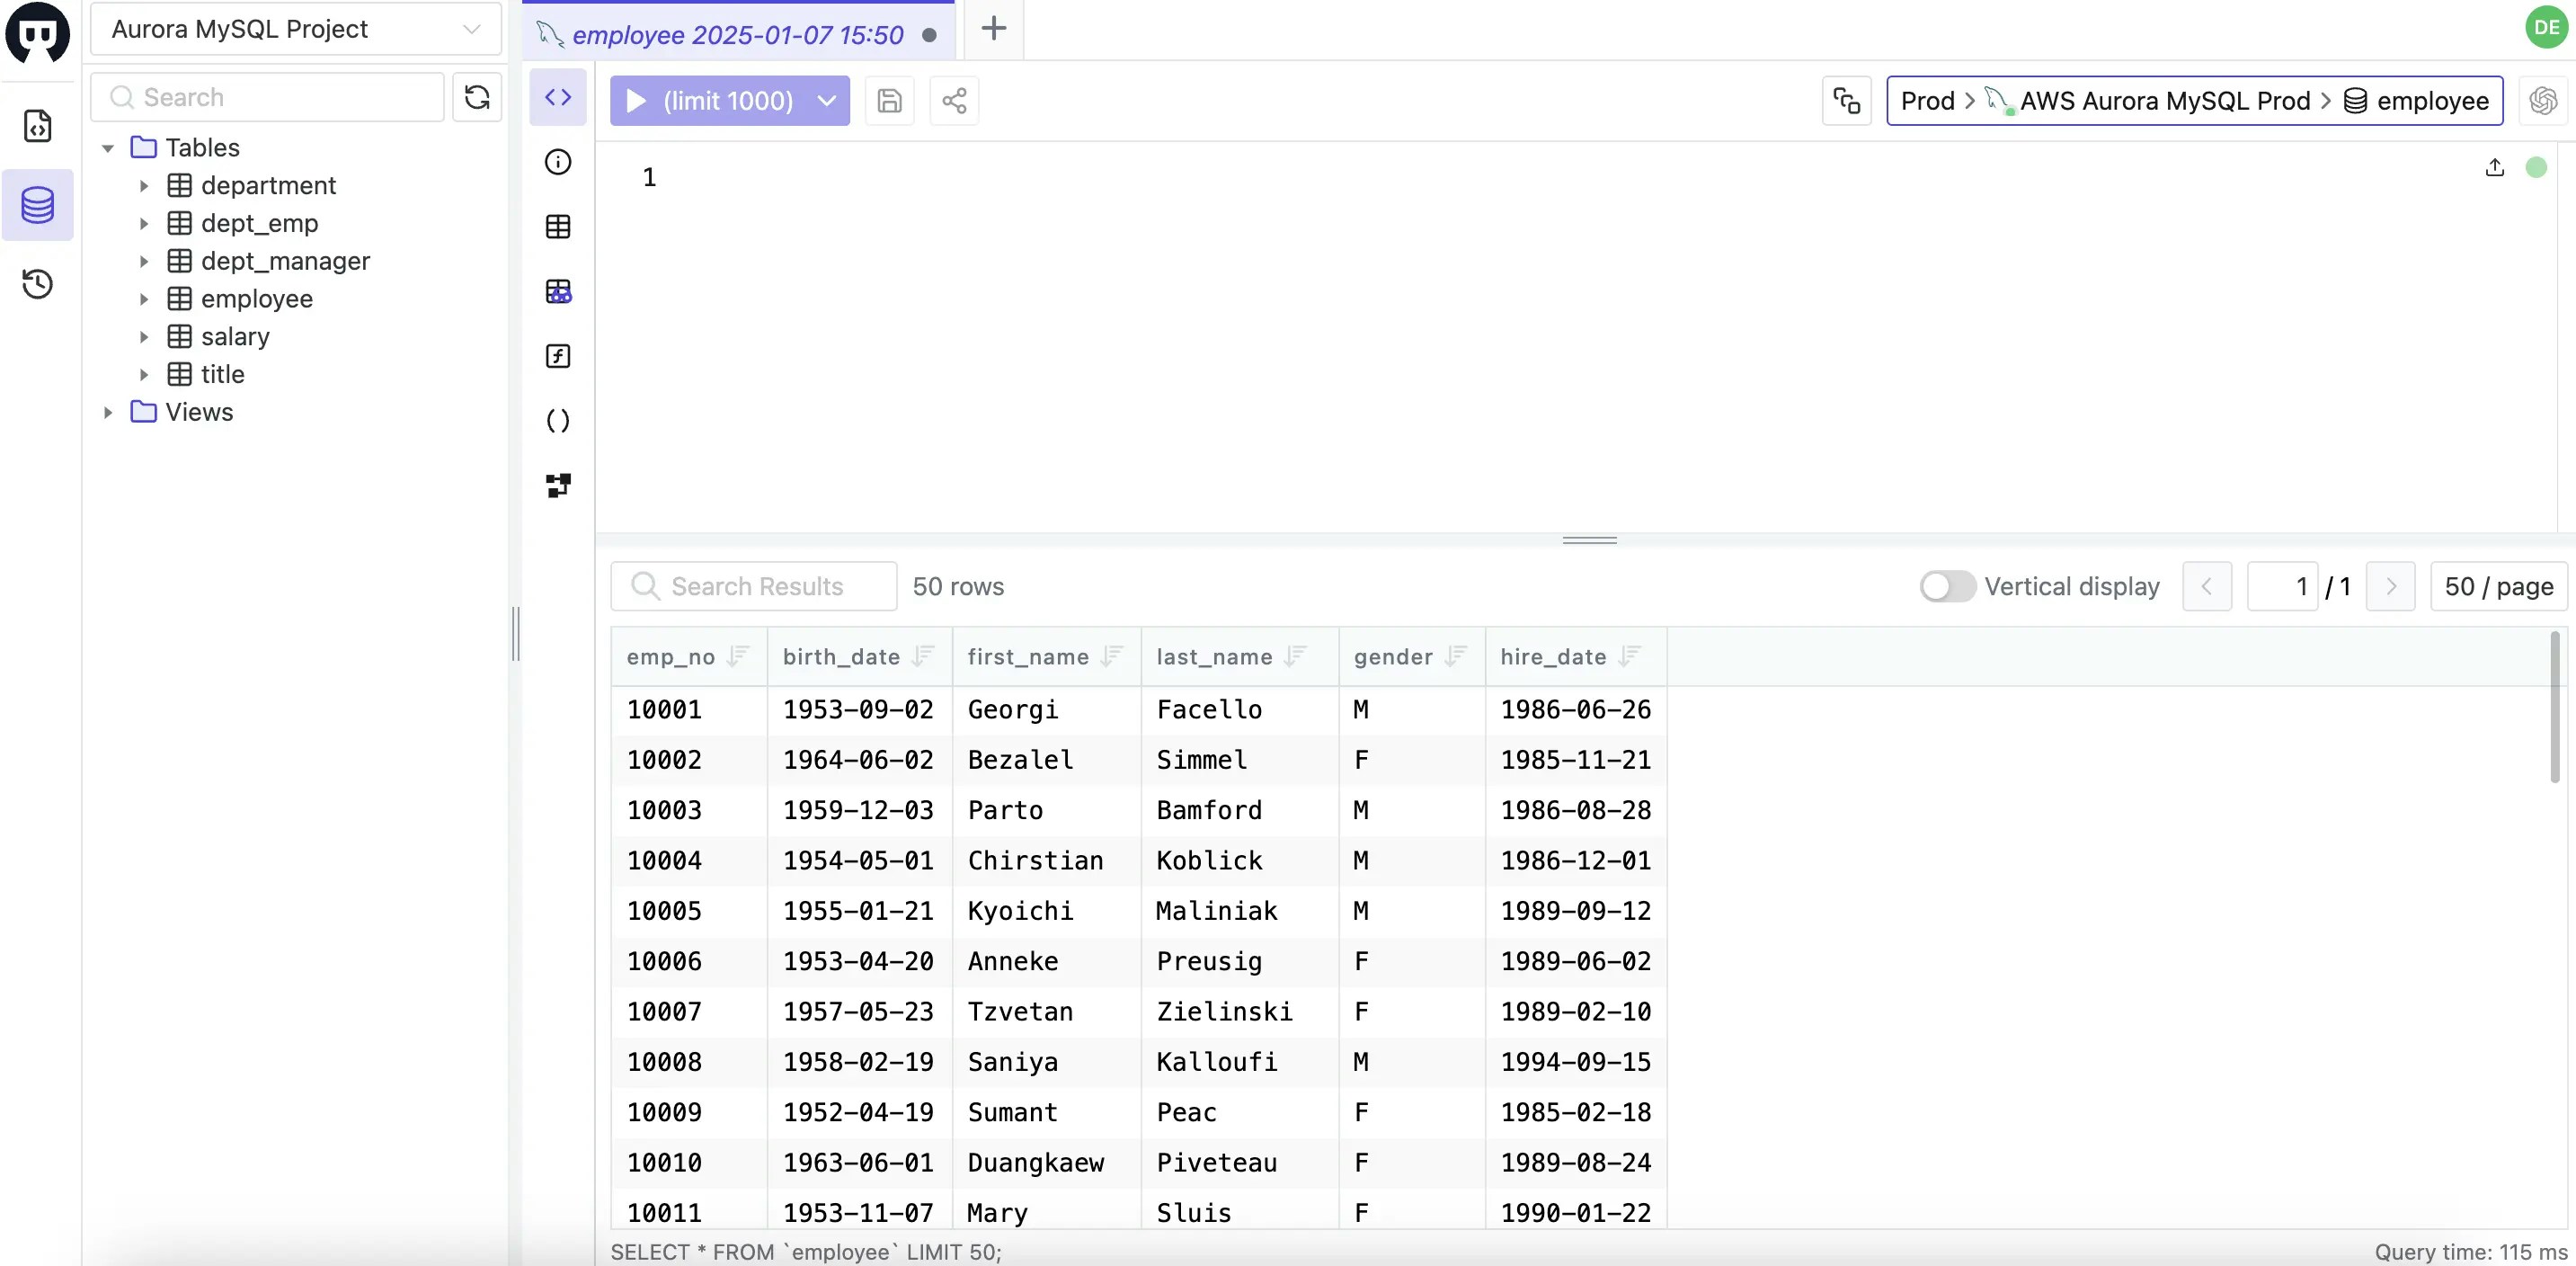
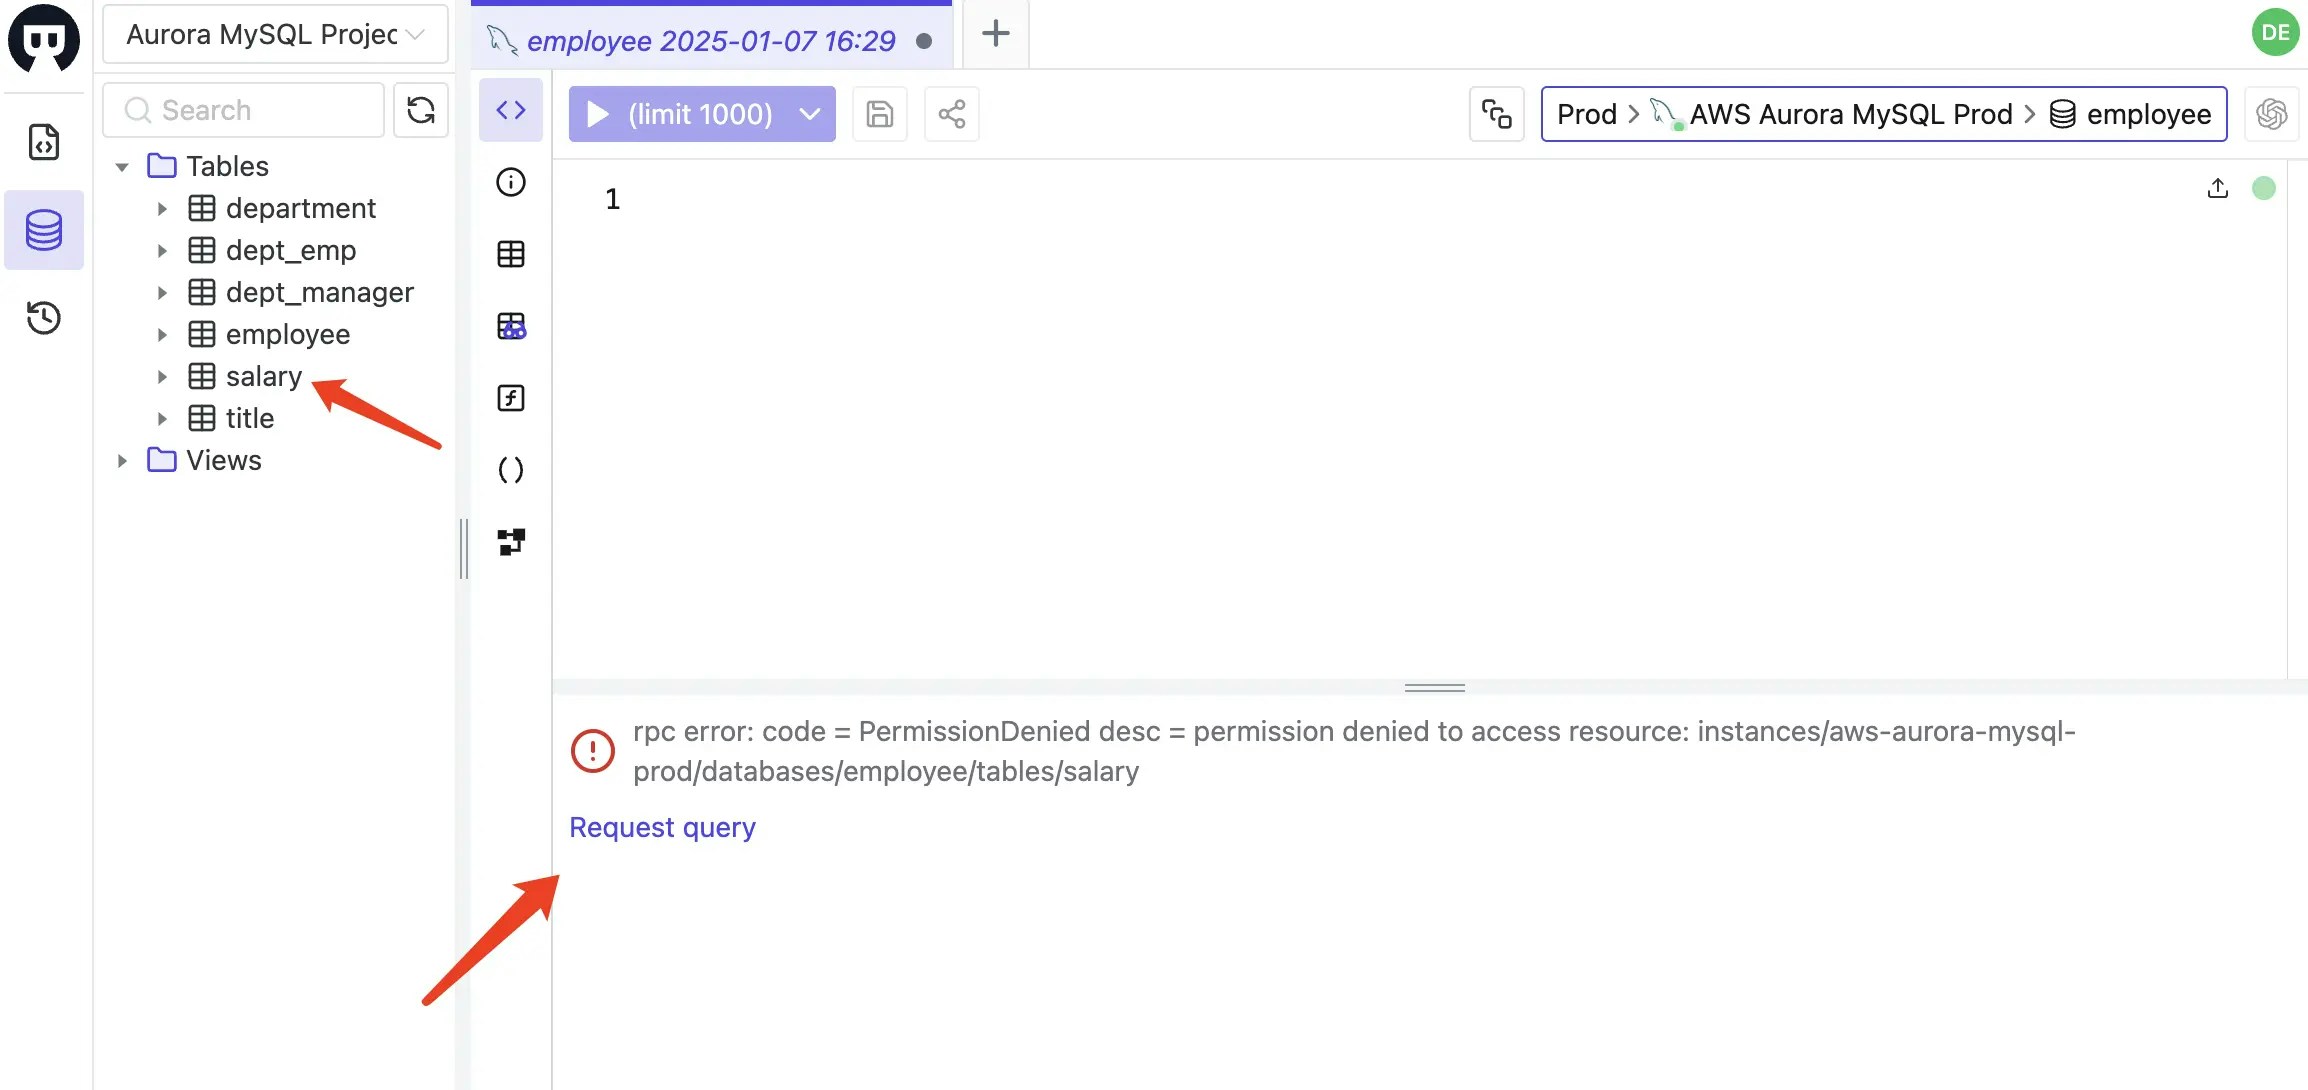
 10. Switch back to the `dev` user, go to **SQL Editor**, you should be able to query from `employee` table. If you query from other tables, you will get errors and suggest to request a JIT access.
 11. After the `dev` user get the access, he can solve the incident. The admin user can revoke the access directly from the **Manage** > **Members** page or wait for the access expiration.
12. `admin` user can also check the audit log by clicking **IAM\&Admin** > **Audit Log** on the left sidebar. The audit log will show all the data access history of the `dev` user.
## Conclusion
In this walkthrough, we explored both the benefits and limitations of using AWS IAM authentication, and demonstrated how Bytebase can complement AWS IAM Auth.
By layering Bytebase on top of AWS IAM, you can achieve a passwordless, self-service JIT database access solution that provides fine-grained access control and per-user auditing—without the complexity of managing numerous users or roles at the database
instance level.
Additionally, you can leverage [Bytebase's API](https://api.bytebase.com/) to further automate the process and integrate with other tools such as Slack.
11. After the `dev` user get the access, he can solve the incident. The admin user can revoke the access directly from the **Manage** > **Members** page or wait for the access expiration.
12. `admin` user can also check the audit log by clicking **IAM\&Admin** > **Audit Log** on the left sidebar. The audit log will show all the data access history of the `dev` user.
## Conclusion
In this walkthrough, we explored both the benefits and limitations of using AWS IAM authentication, and demonstrated how Bytebase can complement AWS IAM Auth.
By layering Bytebase on top of AWS IAM, you can achieve a passwordless, self-service JIT database access solution that provides fine-grained access control and per-user auditing—without the complexity of managing numerous users or roles at the database
instance level.
Additionally, you can leverage [Bytebase's API](https://api.bytebase.com/) to further automate the process and integrate with other tools such as Slack.