> ## Documentation Index
> Fetch the complete documentation index at: https://docs.bytebase.com/llms.txt
> Use this file to discover all available pages before exploring further.
# Just-in-Time Database Access via GUI
In a production environment, an incident arises that requires a developer to access the production database for troubleshooting. However, the developer does not have the necessary access privileges. To address this, the developer can request Just-in-Time (JIT) access to the production database. Bytebase streamlines this process, allowing developers to efficiently request and obtain temporary access when needed.
This tutorial will guide you through setting up Just-in-Time (JIT) access using the Bytebase GUI. In the next tutorial, we will explore automating JIT access through Slack by leveraging Bytebase webhooks and API.
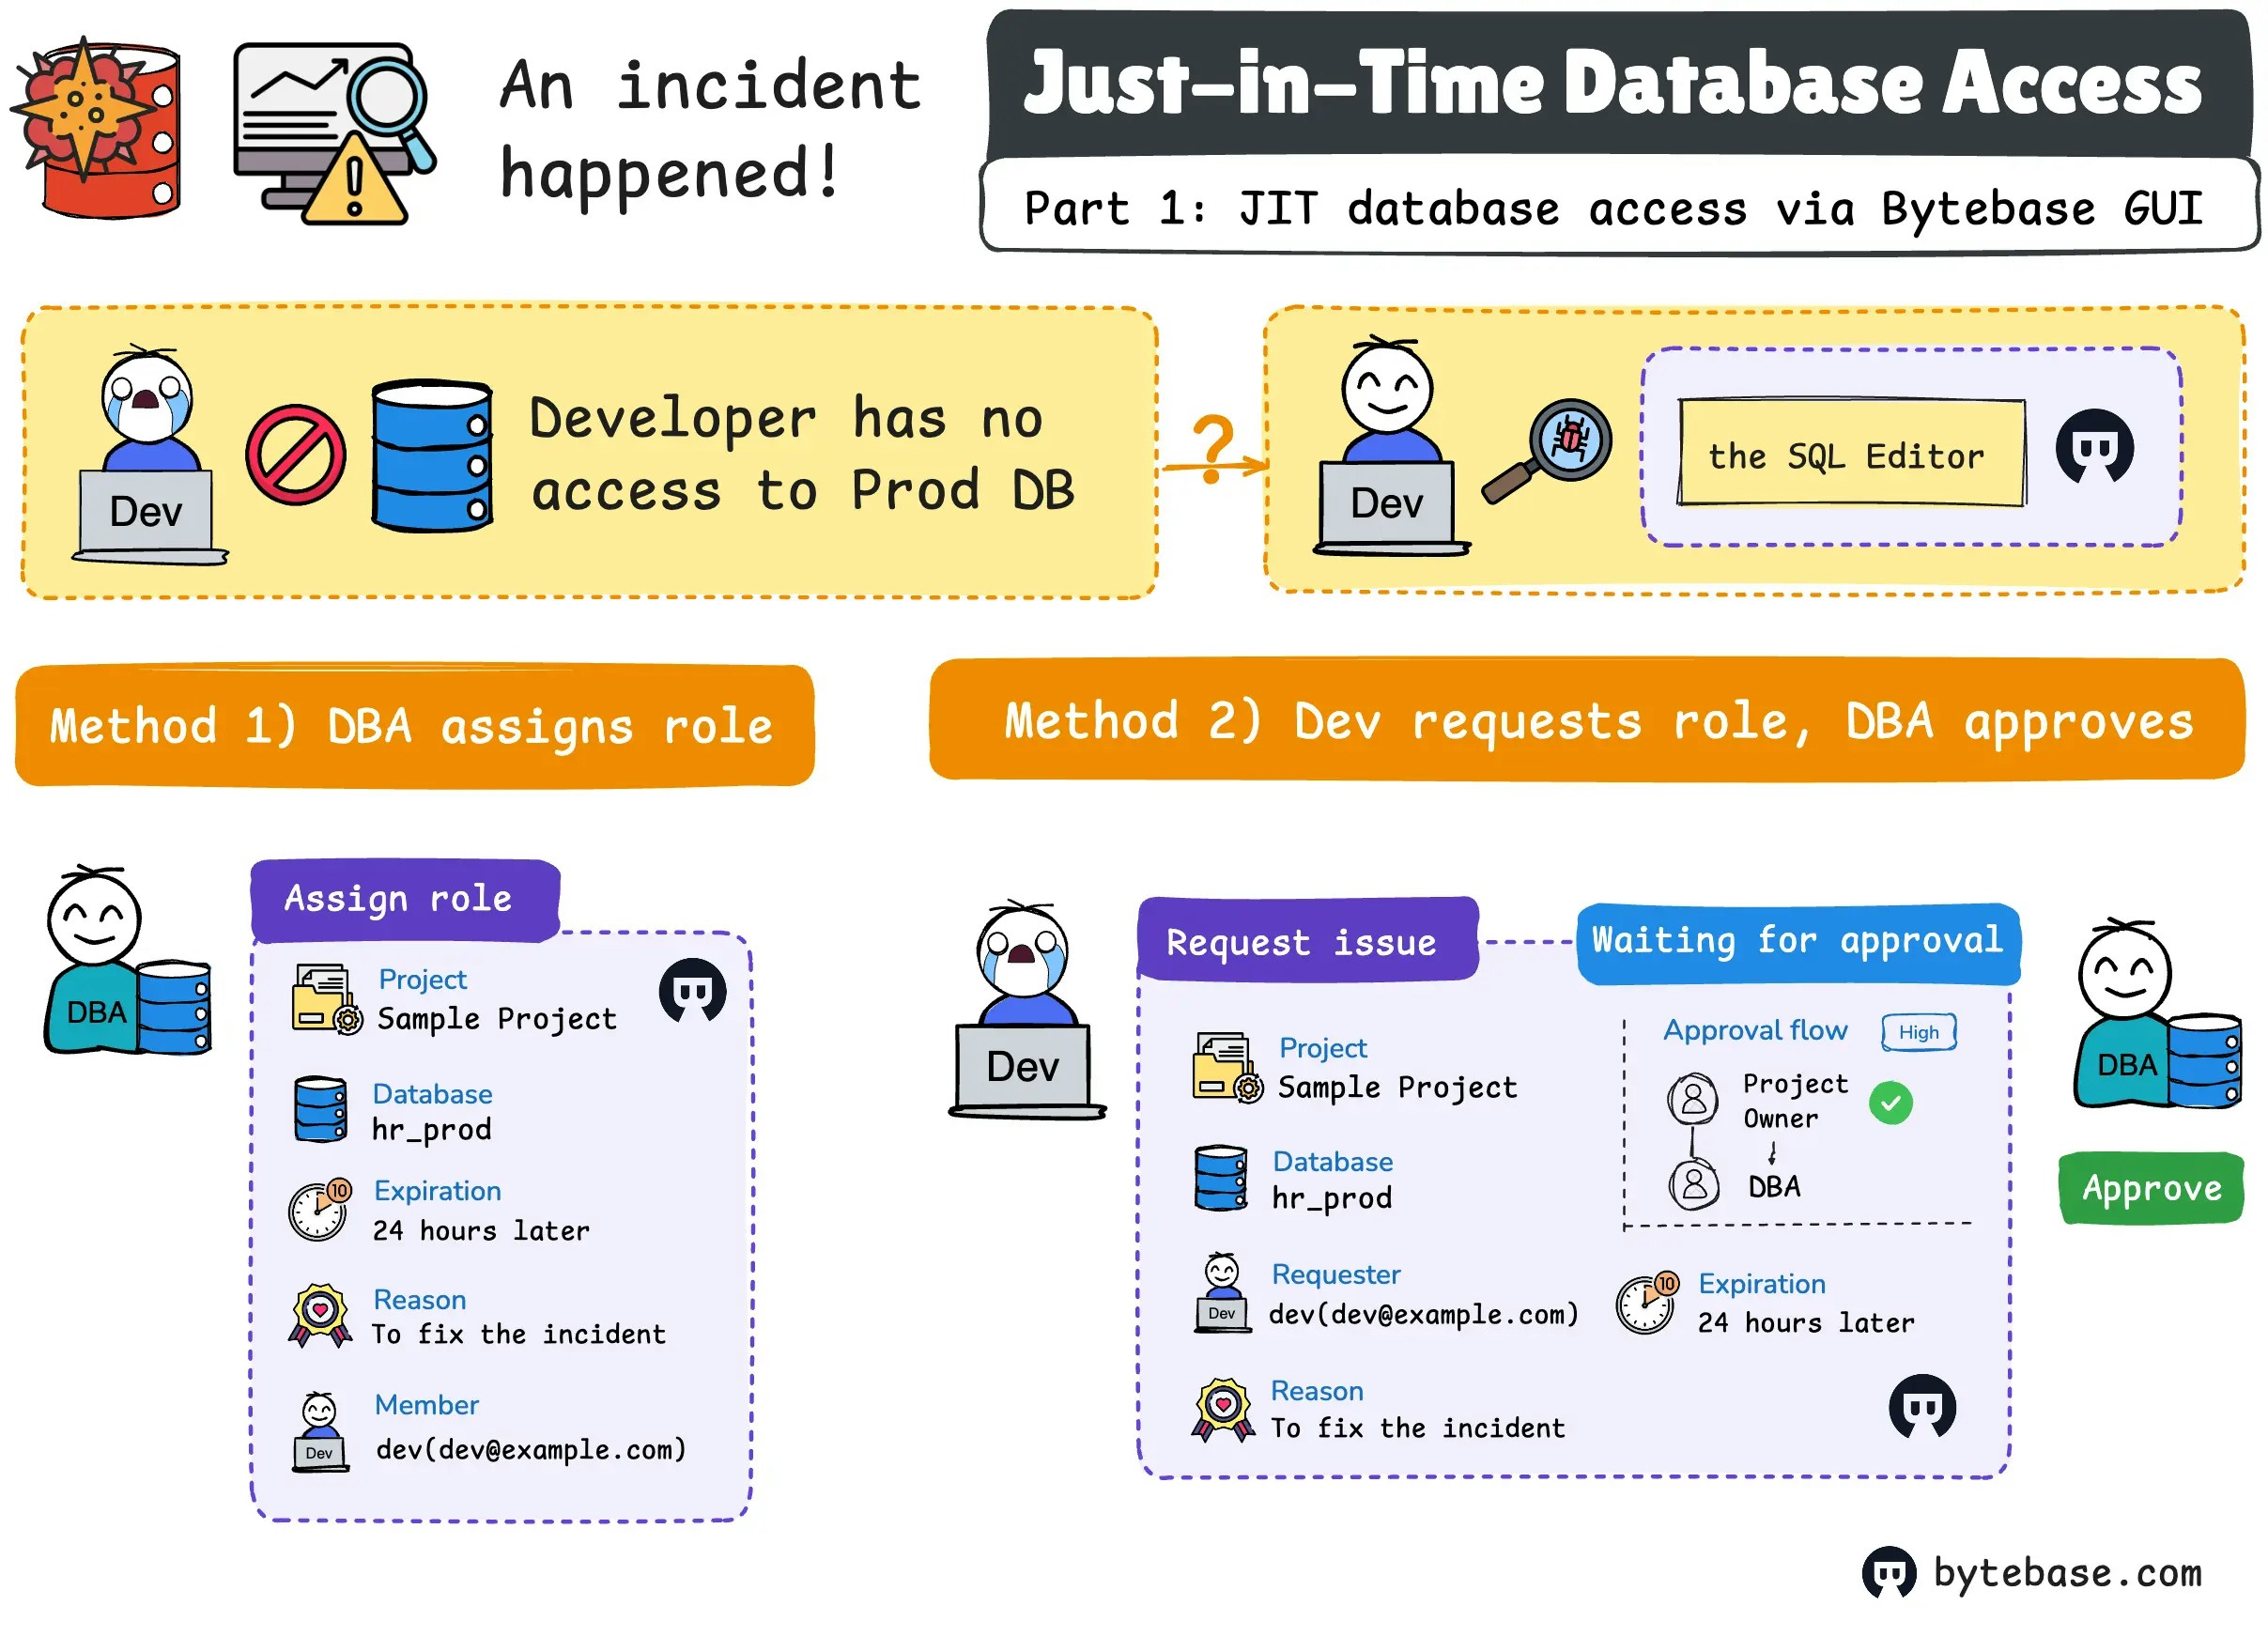 ***
This is Part 1 of our tutorial series on implementing Just-in-Time (JIT) database access:
* Part 1: JIT database access via GUI (this one)
* Part 2: [JIT database access via Slack](/tutorials/just-in-time-database-access-part2)
If you use AWS Aurora/RDS, you can check out [Just-in-time Database Access to Amazon Aurora](/tutorials/just-in-time-database-access-amazon-aurora/) for AWS-specific setup.
## Prerequisites
Before you begin, make sure you have:
* [Docker](https://www.docker.com/) installed
## Step 1 - Run Bytebase in Docker and register a developer user
1. Make sure your docker daemon is running, and start the Bytebase docker container by typing the following command in the terminal.
```bash theme={null}
docker run --rm --init \
--name bytebase \
--publish 8080:8080 --pull always \
--volume ~/.bytebase/data:/var/opt/bytebase \
bytebase/bytebase:latest
```
2. Open your browser and navigate to [http://localhost:8080](http://localhost:8080), you should see the Bytebase Signup page. The first registration user will be granted as the `Workspace Admin`.
3. Go into Bytebase console, click **IAM & Admin > Users & Groups** on the left sidebar, add a new dev user, giving it a `Project Developer` role which will apply to all projects.
## Step 2 - No access to production database
As a developer user, you will not have the access to query the production database by default.
1. Login as the developer user you created in Step 1, click **Select Project** on the top sidebar, choose `Sample Project`.
2. Click **Database** > **Databases** on the left bar, you should see two databases listed: `hr_prod` and `hr_test`.
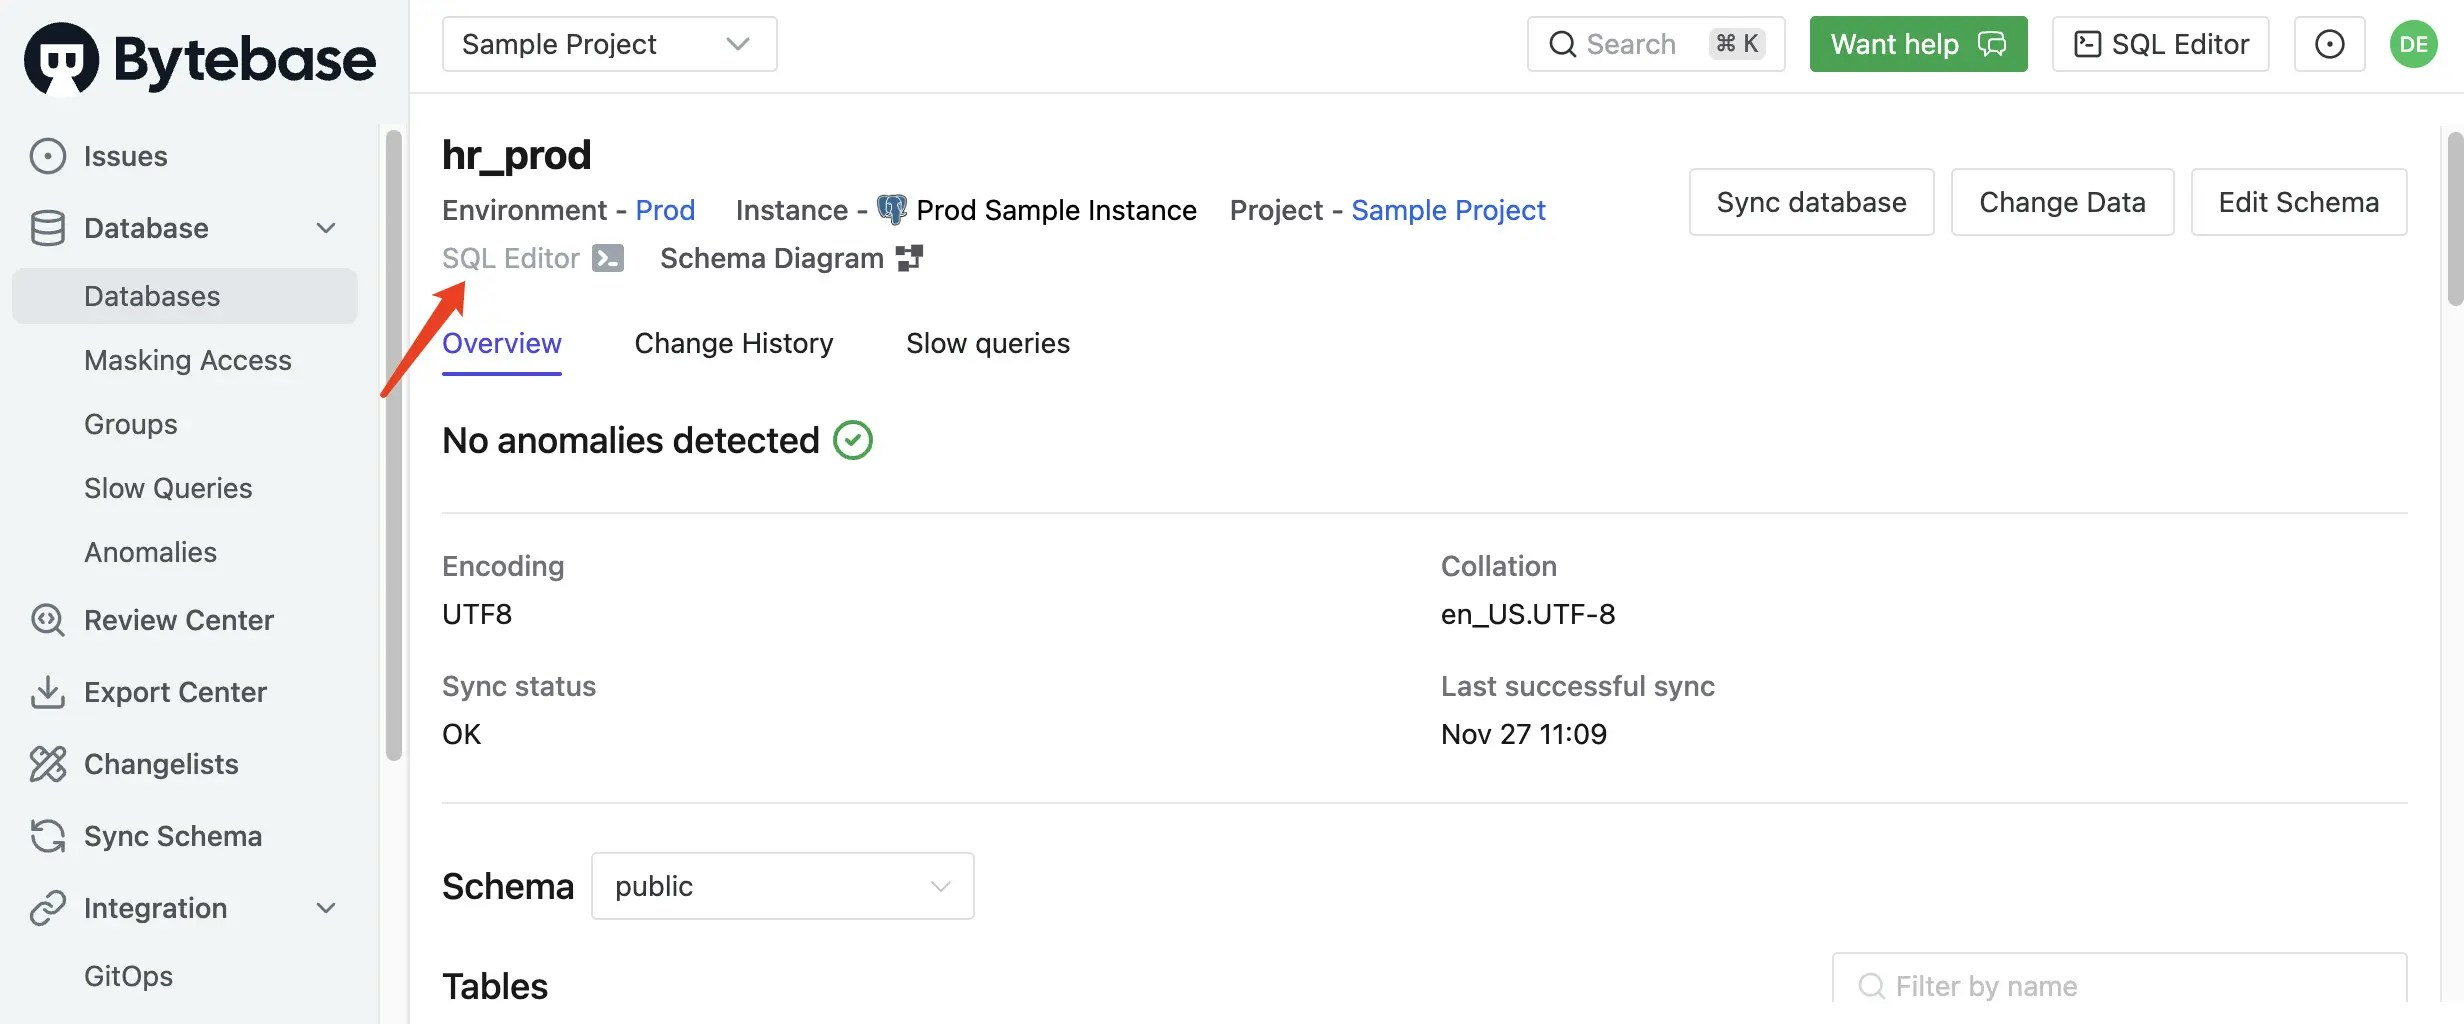
3. Click `hr_prod`, you will see the SQL Editor icon is greyed out, which means you don't have access to this database in SQL Editor. Even you click **SQL Editor** button on the top bar to navigate to the SQL Editor page, you still don't have access to this database.
***
This is Part 1 of our tutorial series on implementing Just-in-Time (JIT) database access:
* Part 1: JIT database access via GUI (this one)
* Part 2: [JIT database access via Slack](/tutorials/just-in-time-database-access-part2)
If you use AWS Aurora/RDS, you can check out [Just-in-time Database Access to Amazon Aurora](/tutorials/just-in-time-database-access-amazon-aurora/) for AWS-specific setup.
## Prerequisites
Before you begin, make sure you have:
* [Docker](https://www.docker.com/) installed
## Step 1 - Run Bytebase in Docker and register a developer user
1. Make sure your docker daemon is running, and start the Bytebase docker container by typing the following command in the terminal.
```bash theme={null}
docker run --rm --init \
--name bytebase \
--publish 8080:8080 --pull always \
--volume ~/.bytebase/data:/var/opt/bytebase \
bytebase/bytebase:latest
```
2. Open your browser and navigate to [http://localhost:8080](http://localhost:8080), you should see the Bytebase Signup page. The first registration user will be granted as the `Workspace Admin`.
3. Go into Bytebase console, click **IAM & Admin > Users & Groups** on the left sidebar, add a new dev user, giving it a `Project Developer` role which will apply to all projects.
## Step 2 - No access to production database
As a developer user, you will not have the access to query the production database by default.
1. Login as the developer user you created in Step 1, click **Select Project** on the top sidebar, choose `Sample Project`.
2. Click **Database** > **Databases** on the left bar, you should see two databases listed: `hr_prod` and `hr_test`.
3. Click `hr_prod`, you will see the SQL Editor icon is greyed out, which means you don't have access to this database in SQL Editor. Even you click **SQL Editor** button on the top bar to navigate to the SQL Editor page, you still don't have access to this database.
 ## Step 3 - DBA assign you access to the production database (Community and Pro Plan)
In Bytebase **Community** and **Pro Plan**, the Admin/DBA can assign you access to the production database.
1. Login as the Admin user, go into `Sample Project`, click **Manage** > **Members** on the left sidebar.
2. Find the developer user you created in Step 1, click **Edit** pen button and then click **Grant Access** button.
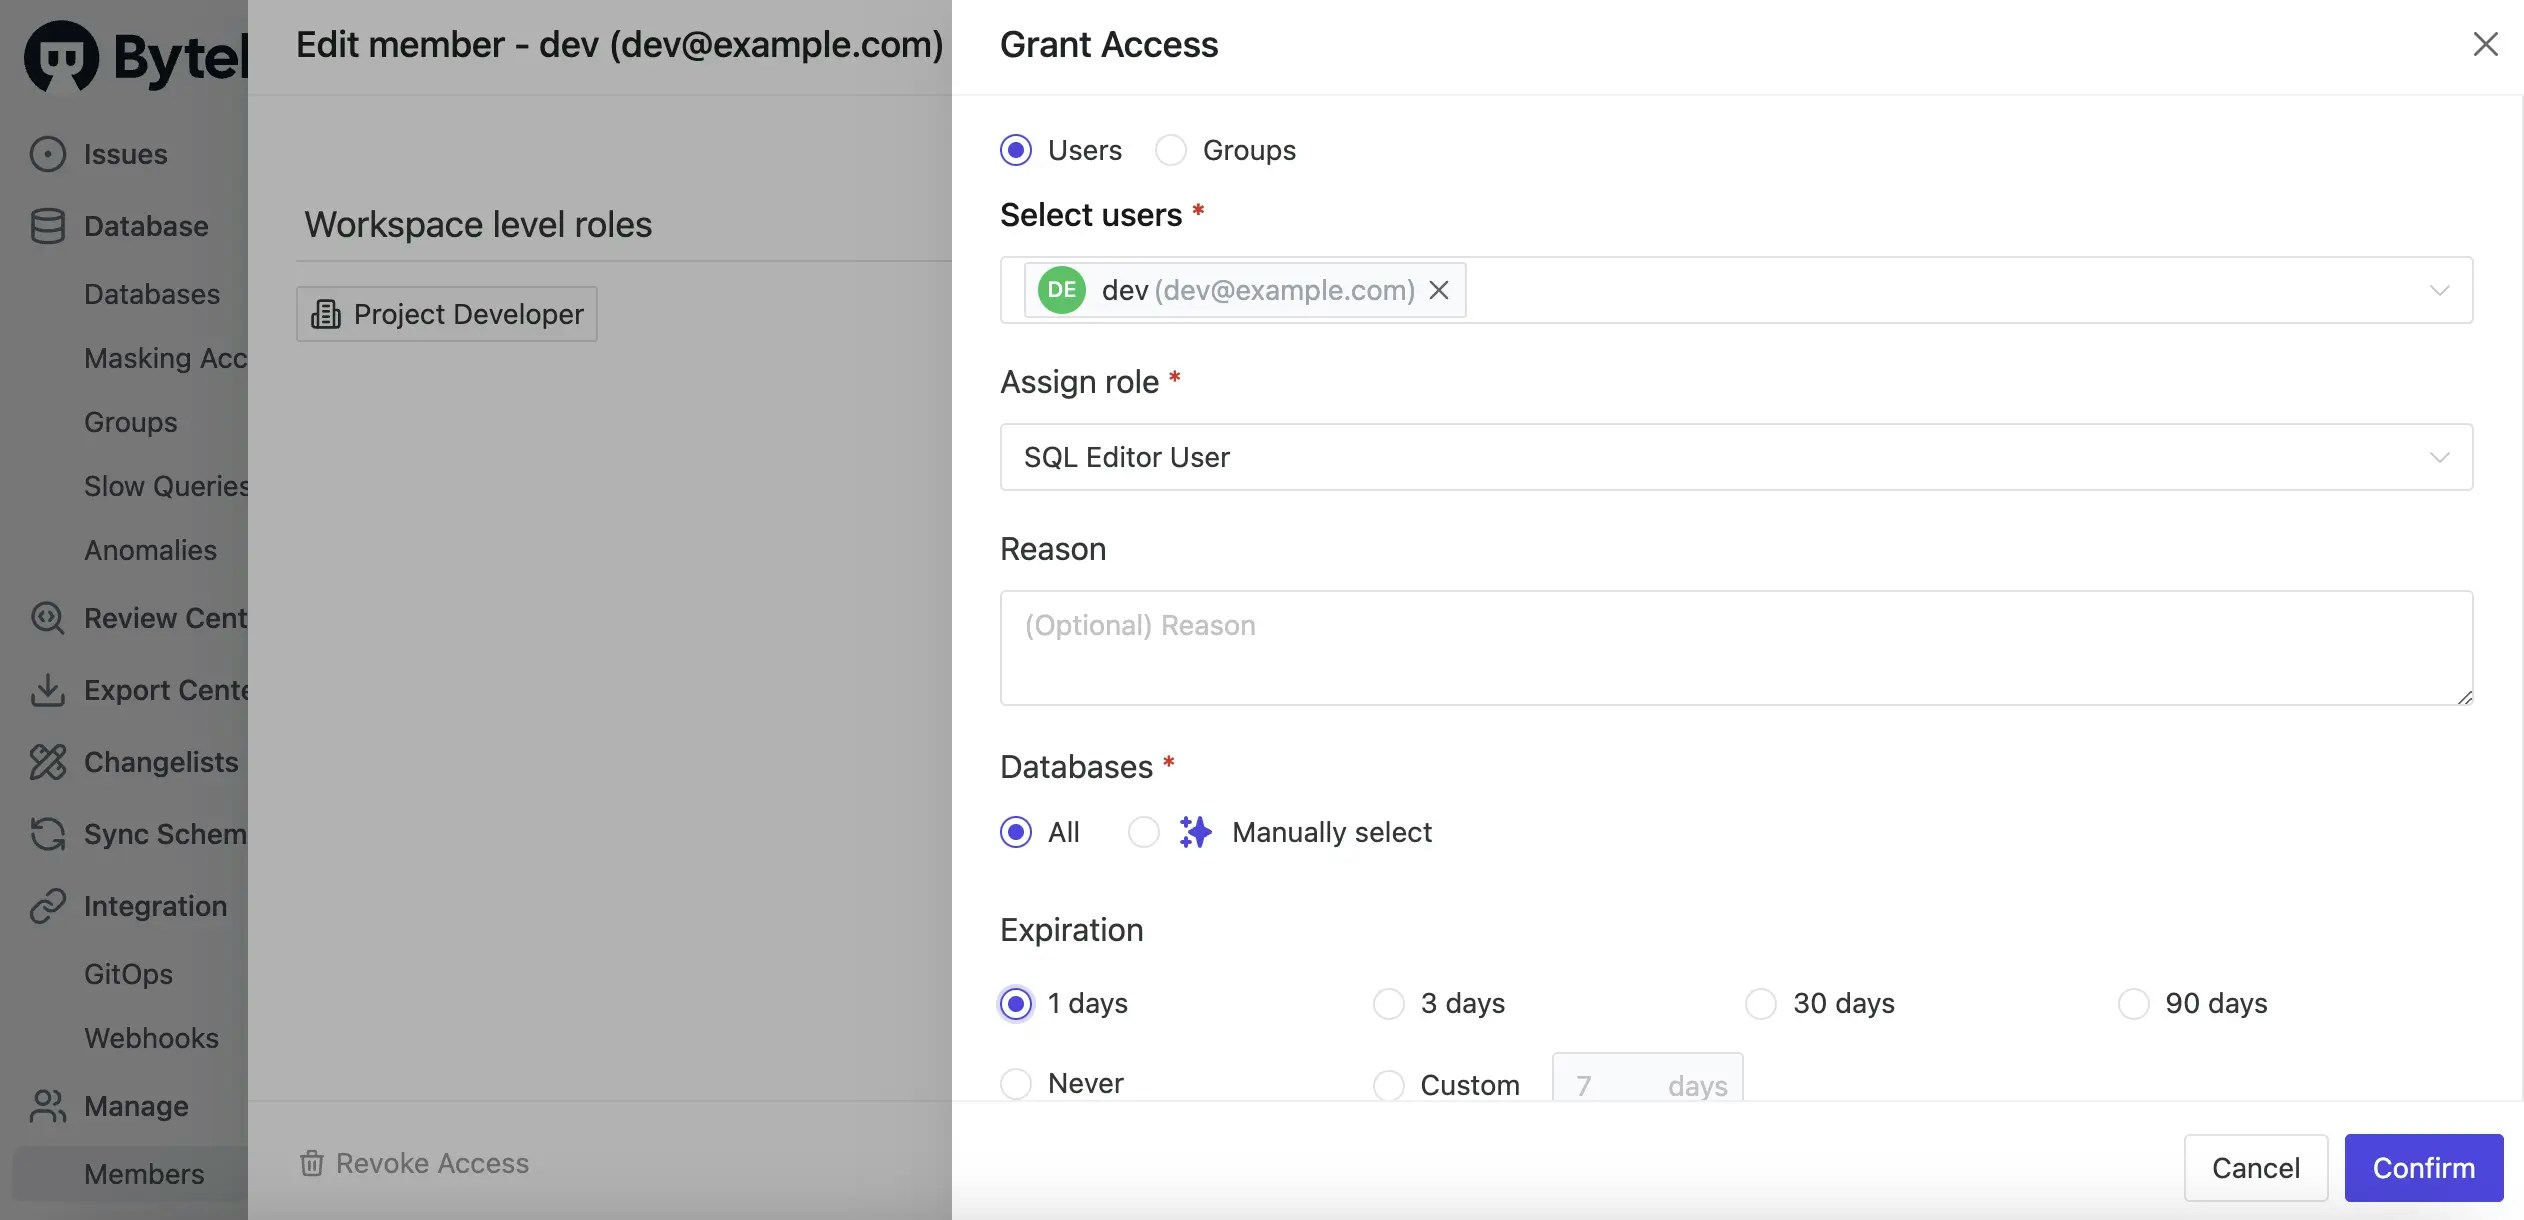
3. In the **Grant Access** modal, select the `SQL Editor User` role, then set 1 day Expiration, and click **Confirm** button. Here you may notice in Community and Pro Plan, you can only set access to all databases in the project.
## Step 3 - DBA assign you access to the production database (Community and Pro Plan)
In Bytebase **Community** and **Pro Plan**, the Admin/DBA can assign you access to the production database.
1. Login as the Admin user, go into `Sample Project`, click **Manage** > **Members** on the left sidebar.
2. Find the developer user you created in Step 1, click **Edit** pen button and then click **Grant Access** button.
3. In the **Grant Access** modal, select the `SQL Editor User` role, then set 1 day Expiration, and click **Confirm** button. Here you may notice in Community and Pro Plan, you can only set access to all databases in the project.
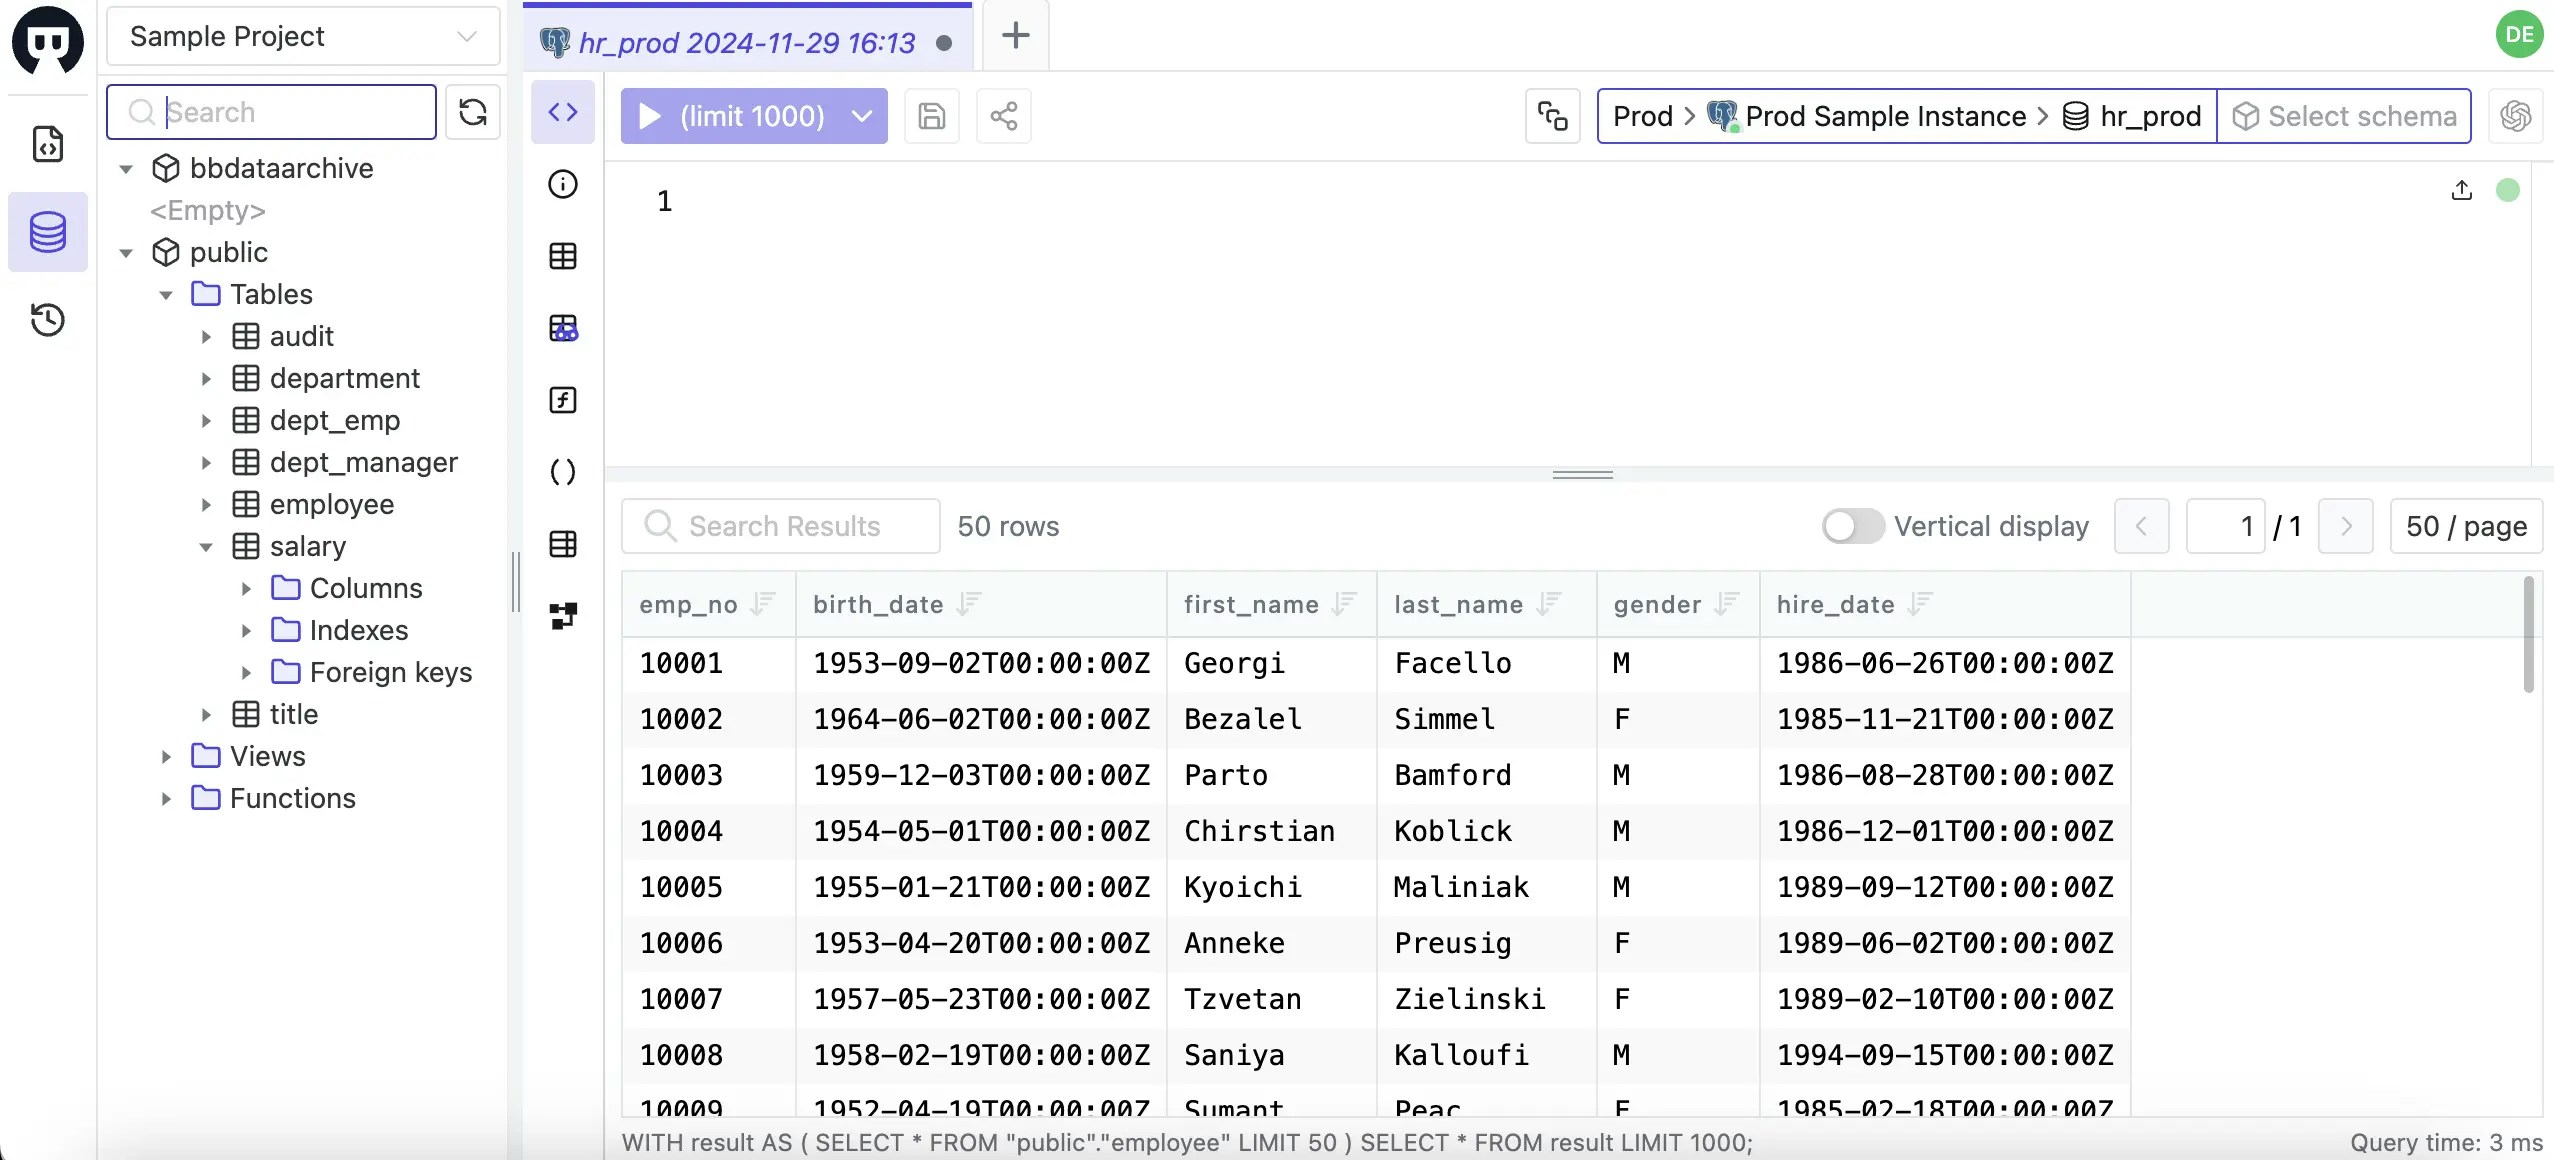
 4. After the access is granted, login as the developer user again, you should see the SQL Editor icon is no longer greyed out, which means you have access to the production database in SQL Editor. After one day, the access will expire automatically.
 ## Step 4 - Request a JIT access to the production database (Enterprise Plan)
In Bytebase **Enterprise Plan**, you can request a JIT access to the production database.
1. Login as Admin user, go into `Sample Project` and revoke the developer user's access to the production database.
2. Upgrade to the **Enterprise Plan**. You may request a 14-day trial from [here](https://www.bytebase.com/contact-us/).
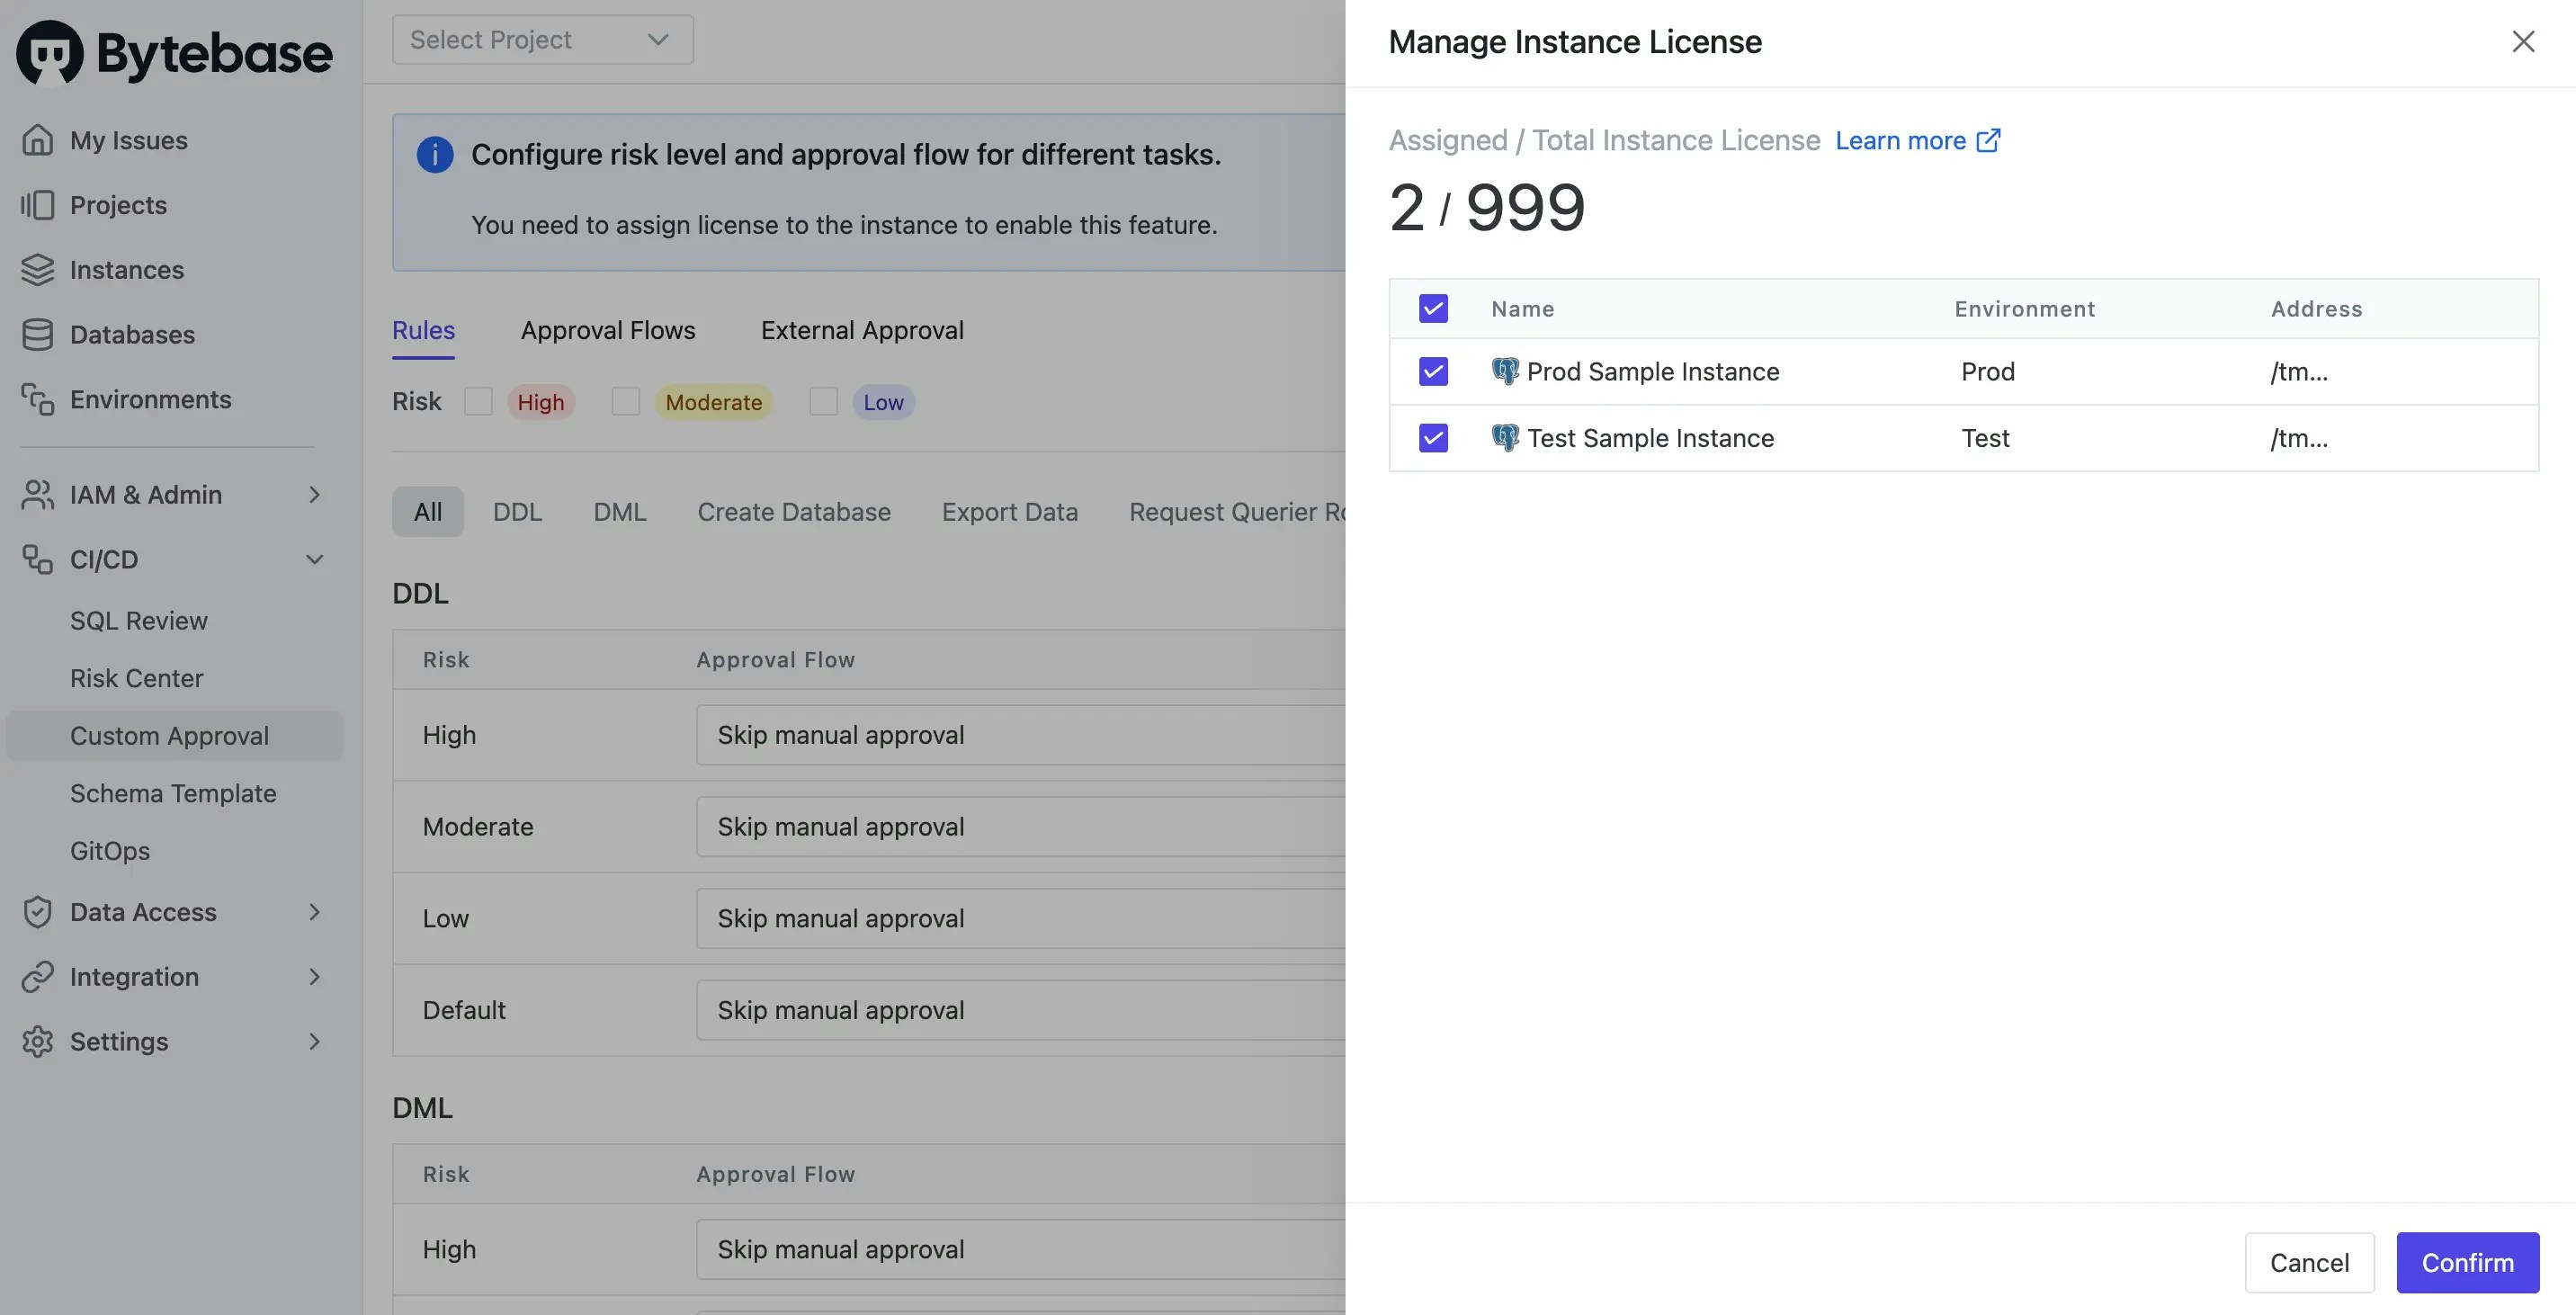
3. Click **CI/CD** > **Custom Approval** on the left sidebar. Assign licenses to the instances to enable this feature.
## Step 4 - Request a JIT access to the production database (Enterprise Plan)
In Bytebase **Enterprise Plan**, you can request a JIT access to the production database.
1. Login as Admin user, go into `Sample Project` and revoke the developer user's access to the production database.
2. Upgrade to the **Enterprise Plan**. You may request a 14-day trial from [here](https://www.bytebase.com/contact-us/).
3. Click **CI/CD** > **Custom Approval** on the left sidebar. Assign licenses to the instances to enable this feature.
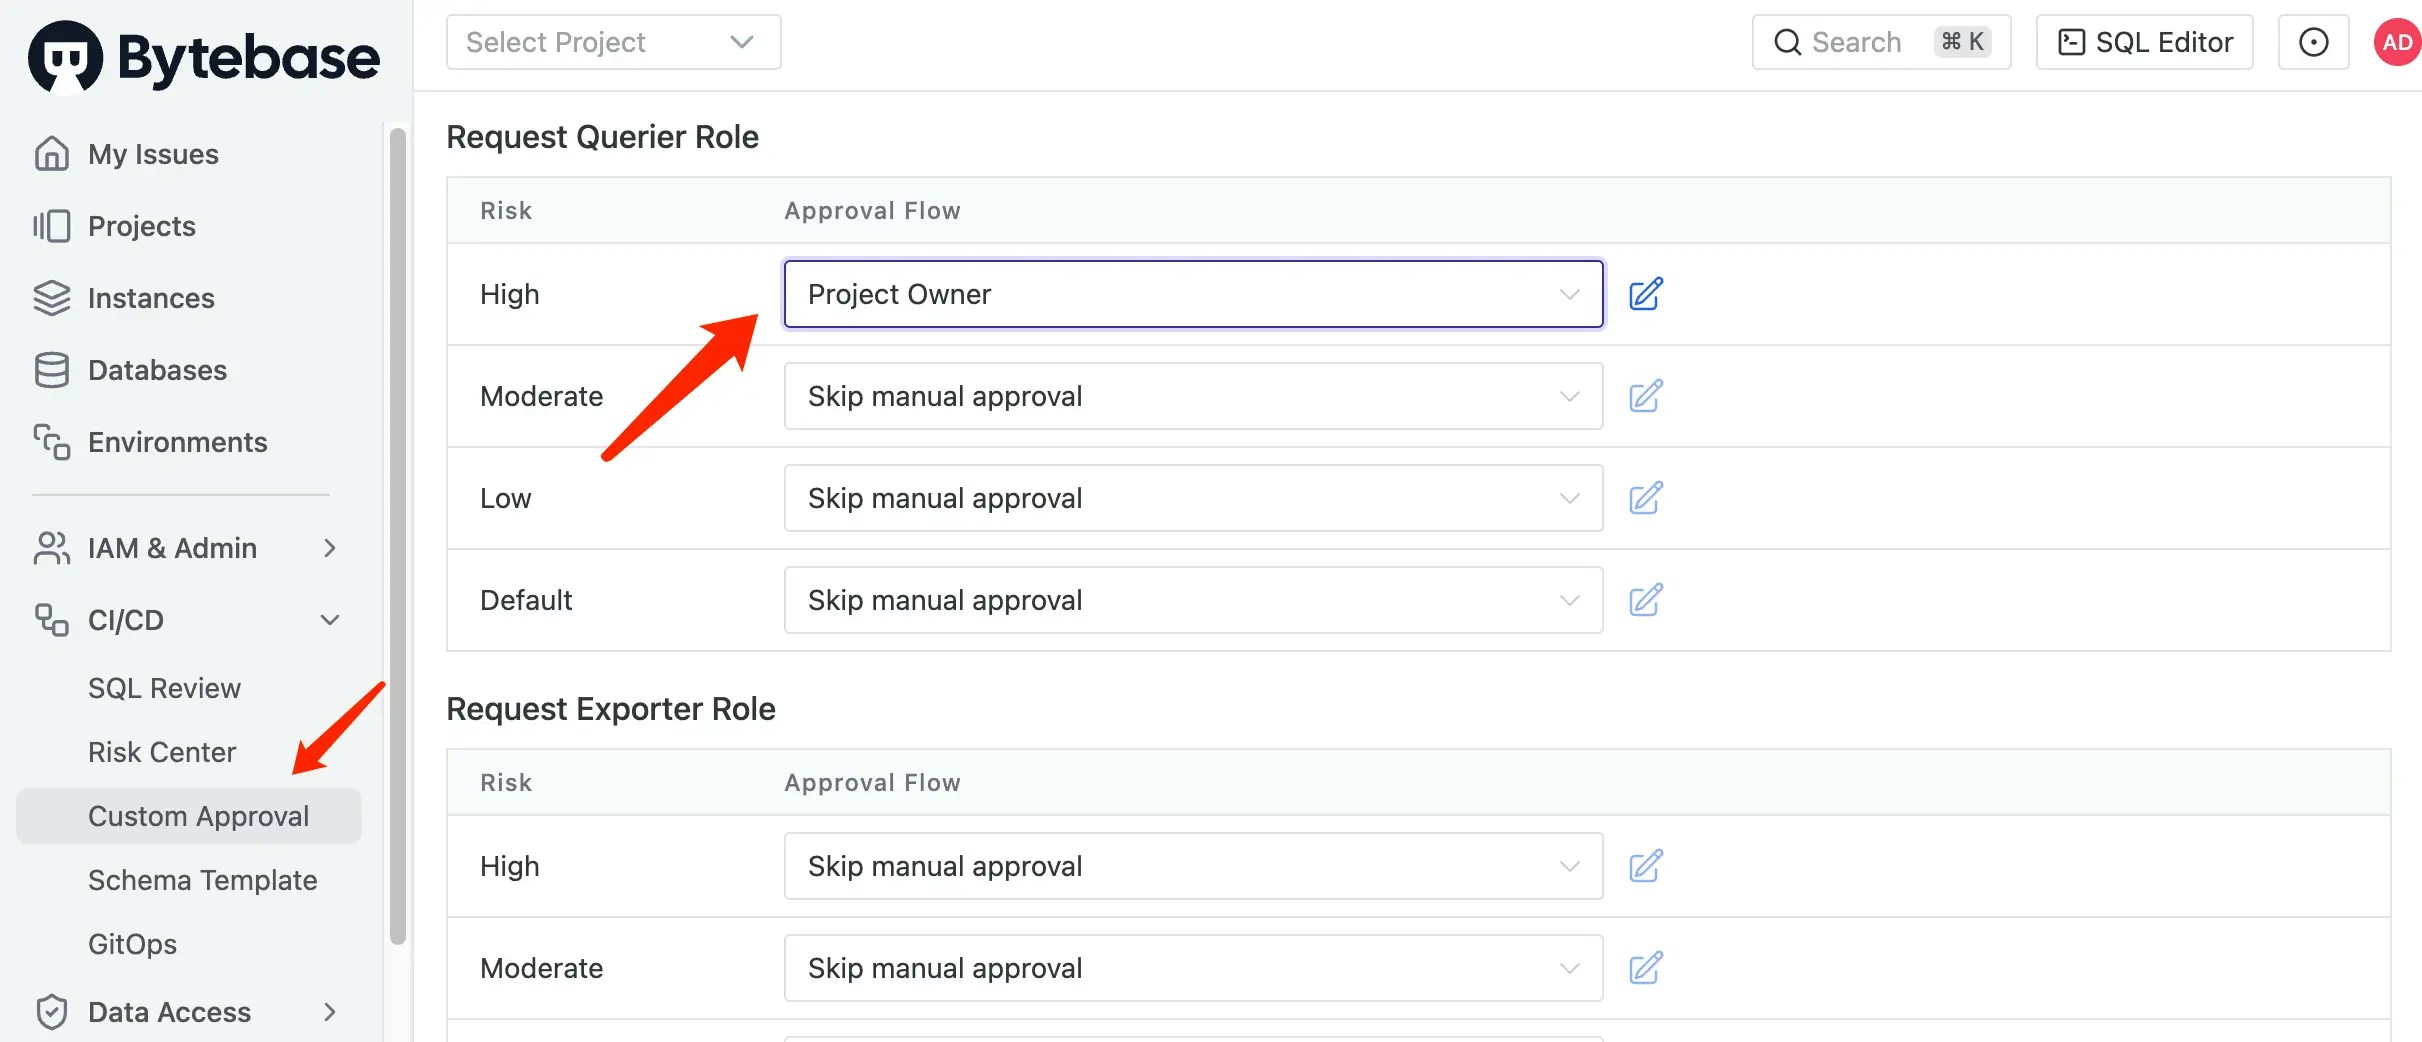
 4. Scroll down to **Request Querier Role** section, add `high` risk an approval flow `Project Owner`.
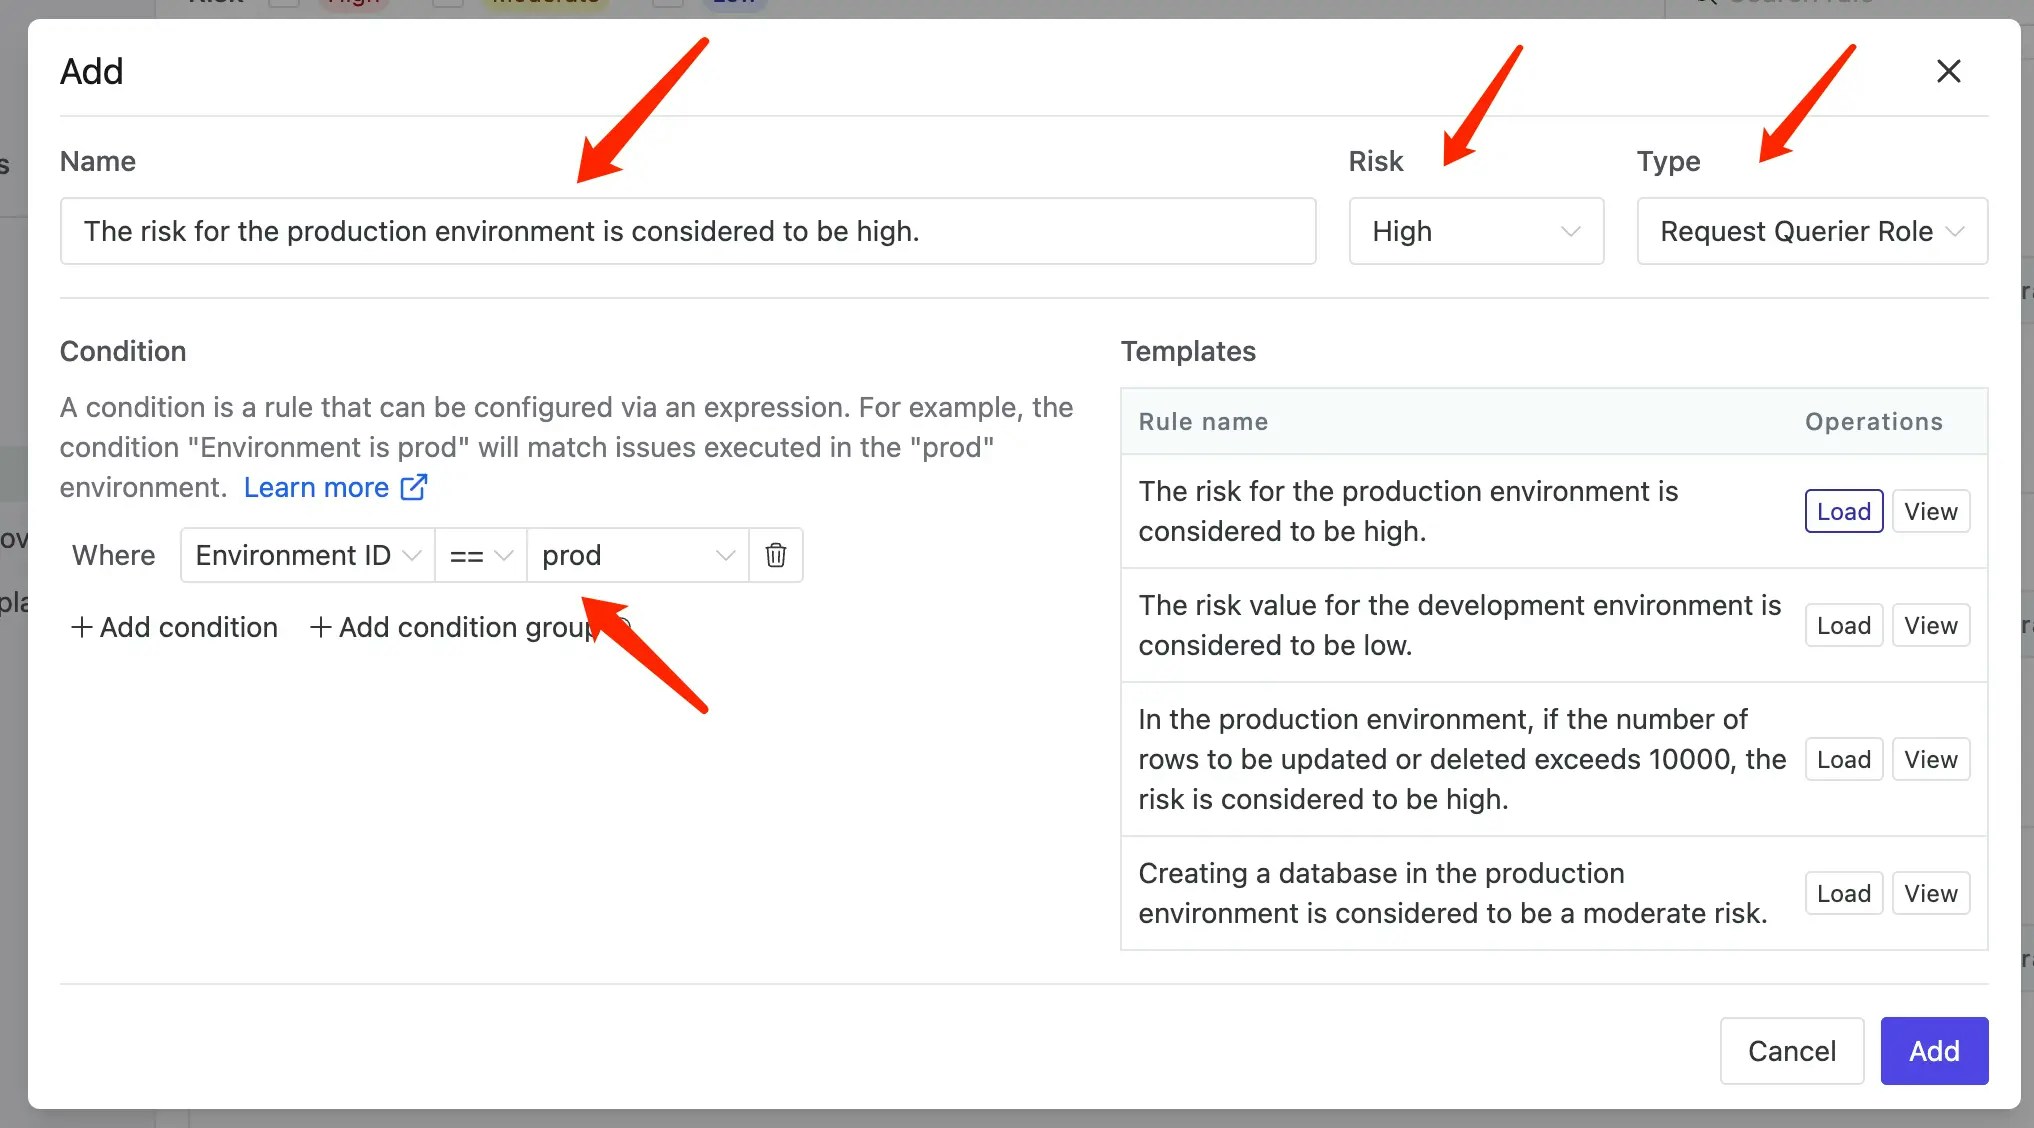
 5. Click **CI/CD** > **Risks** on the left sidebar. Define a High risk policy for `Request Querier Role` which triggers when the environment is `Prod`.
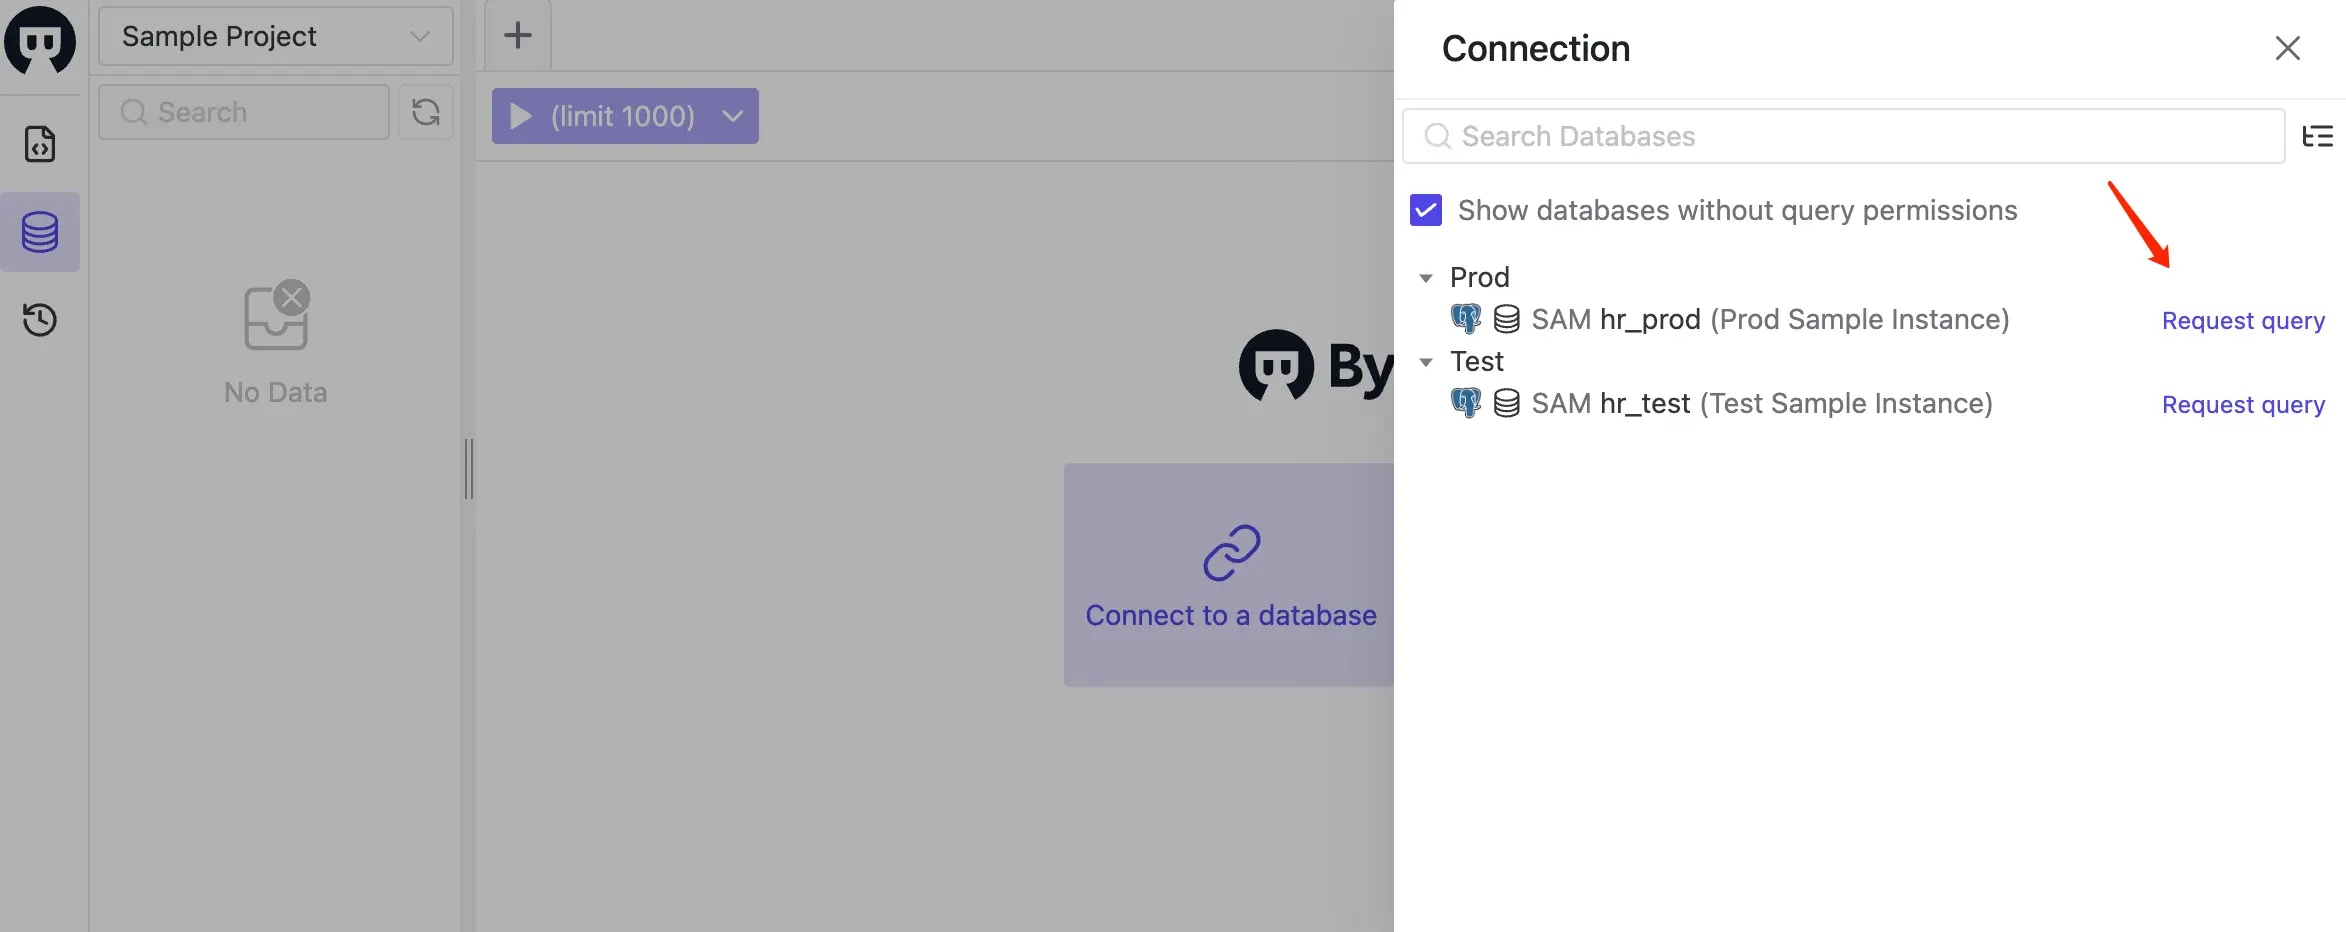
 6. Login as the developer user again, then go to SQL Editor page. Click **Connect to a database** or **Select a database to start**. You should see the `hr_prod` and `hr_test` databases listed, click **Request query** to request a JIT access.
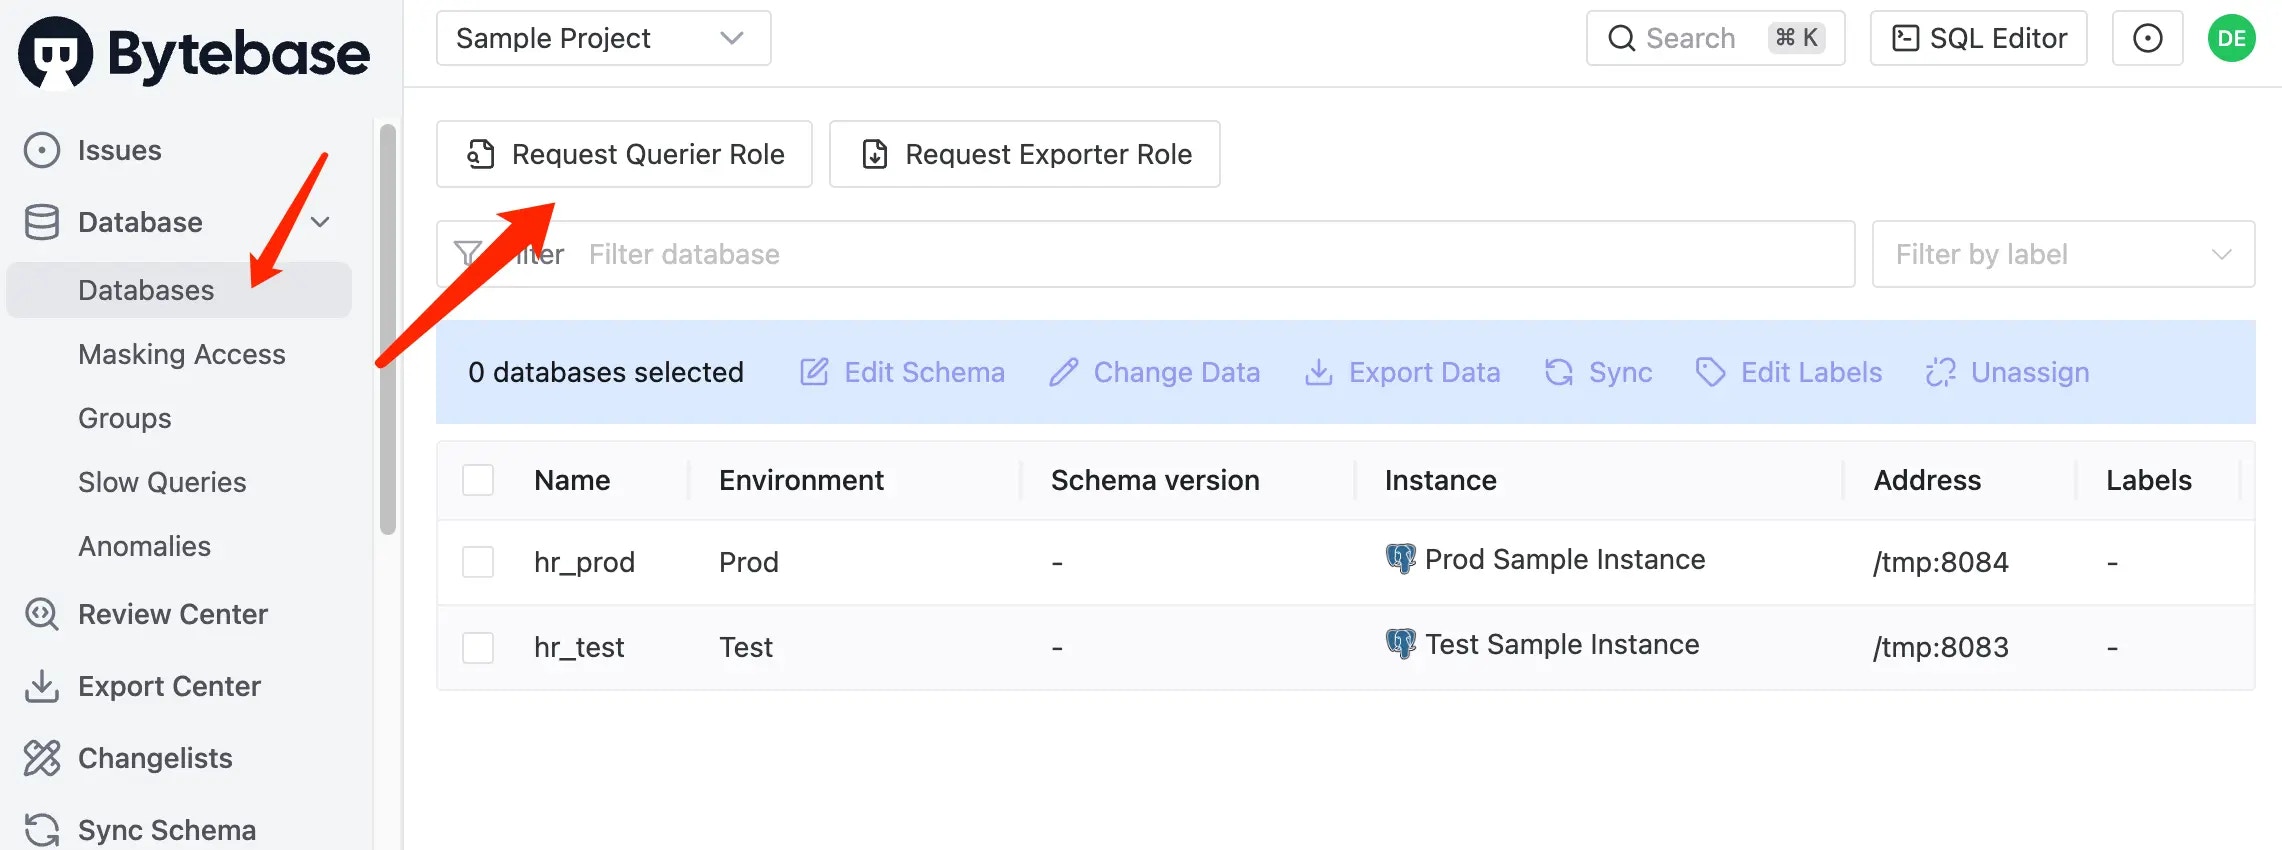
 7. Another way is to go to **Database > Databases** page, click **Request Querier Role**.
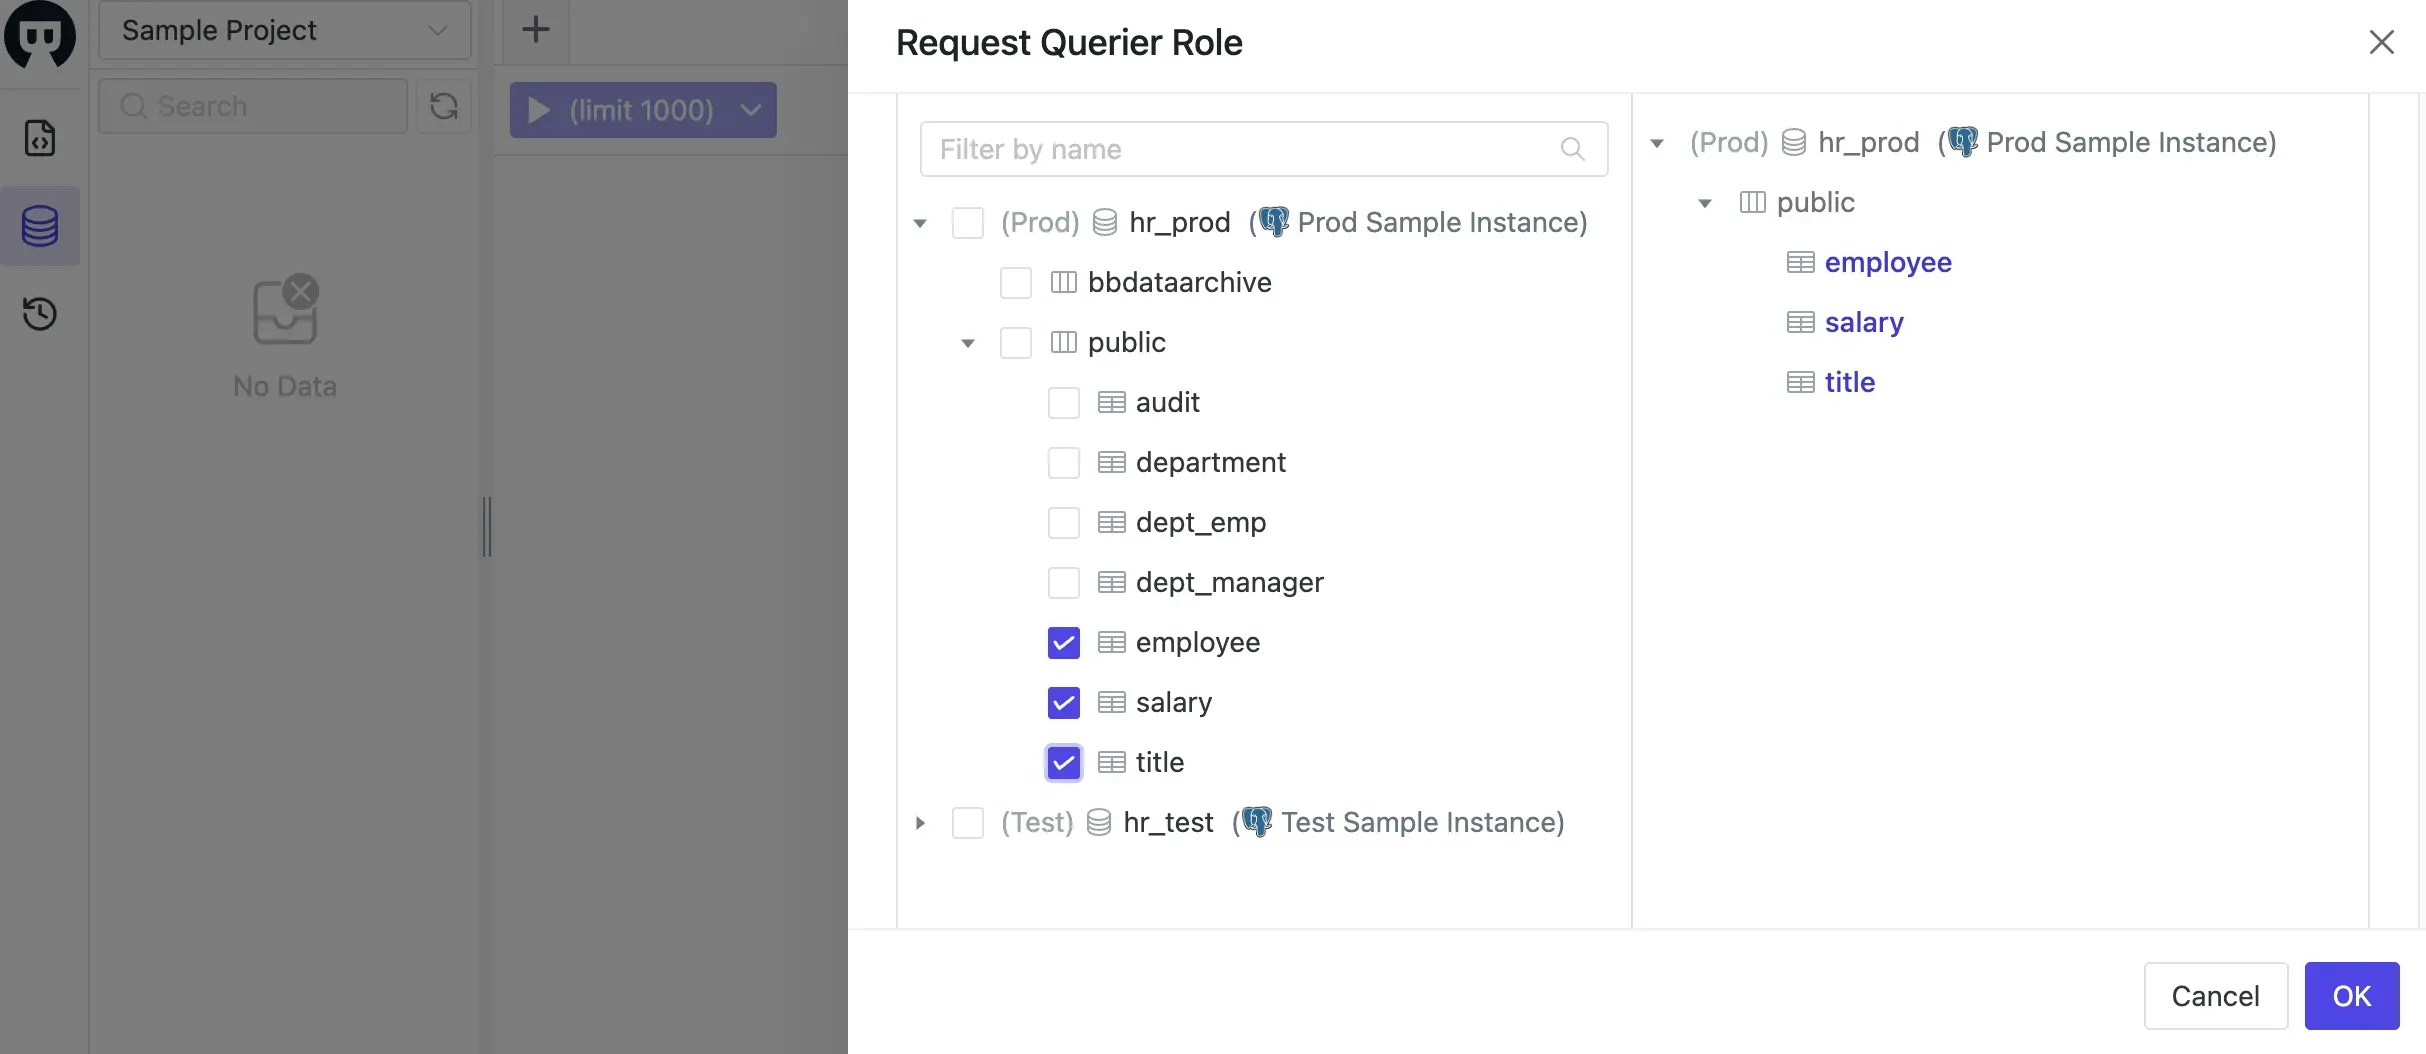
 8. In the **Request Querier Role** modal, choose **Manually select**, then `employee` `salary` and `title` under `hr_prod` database, and click **OK** button. Here you may also specify the expiration time which can be a specific time, or relative time from now.
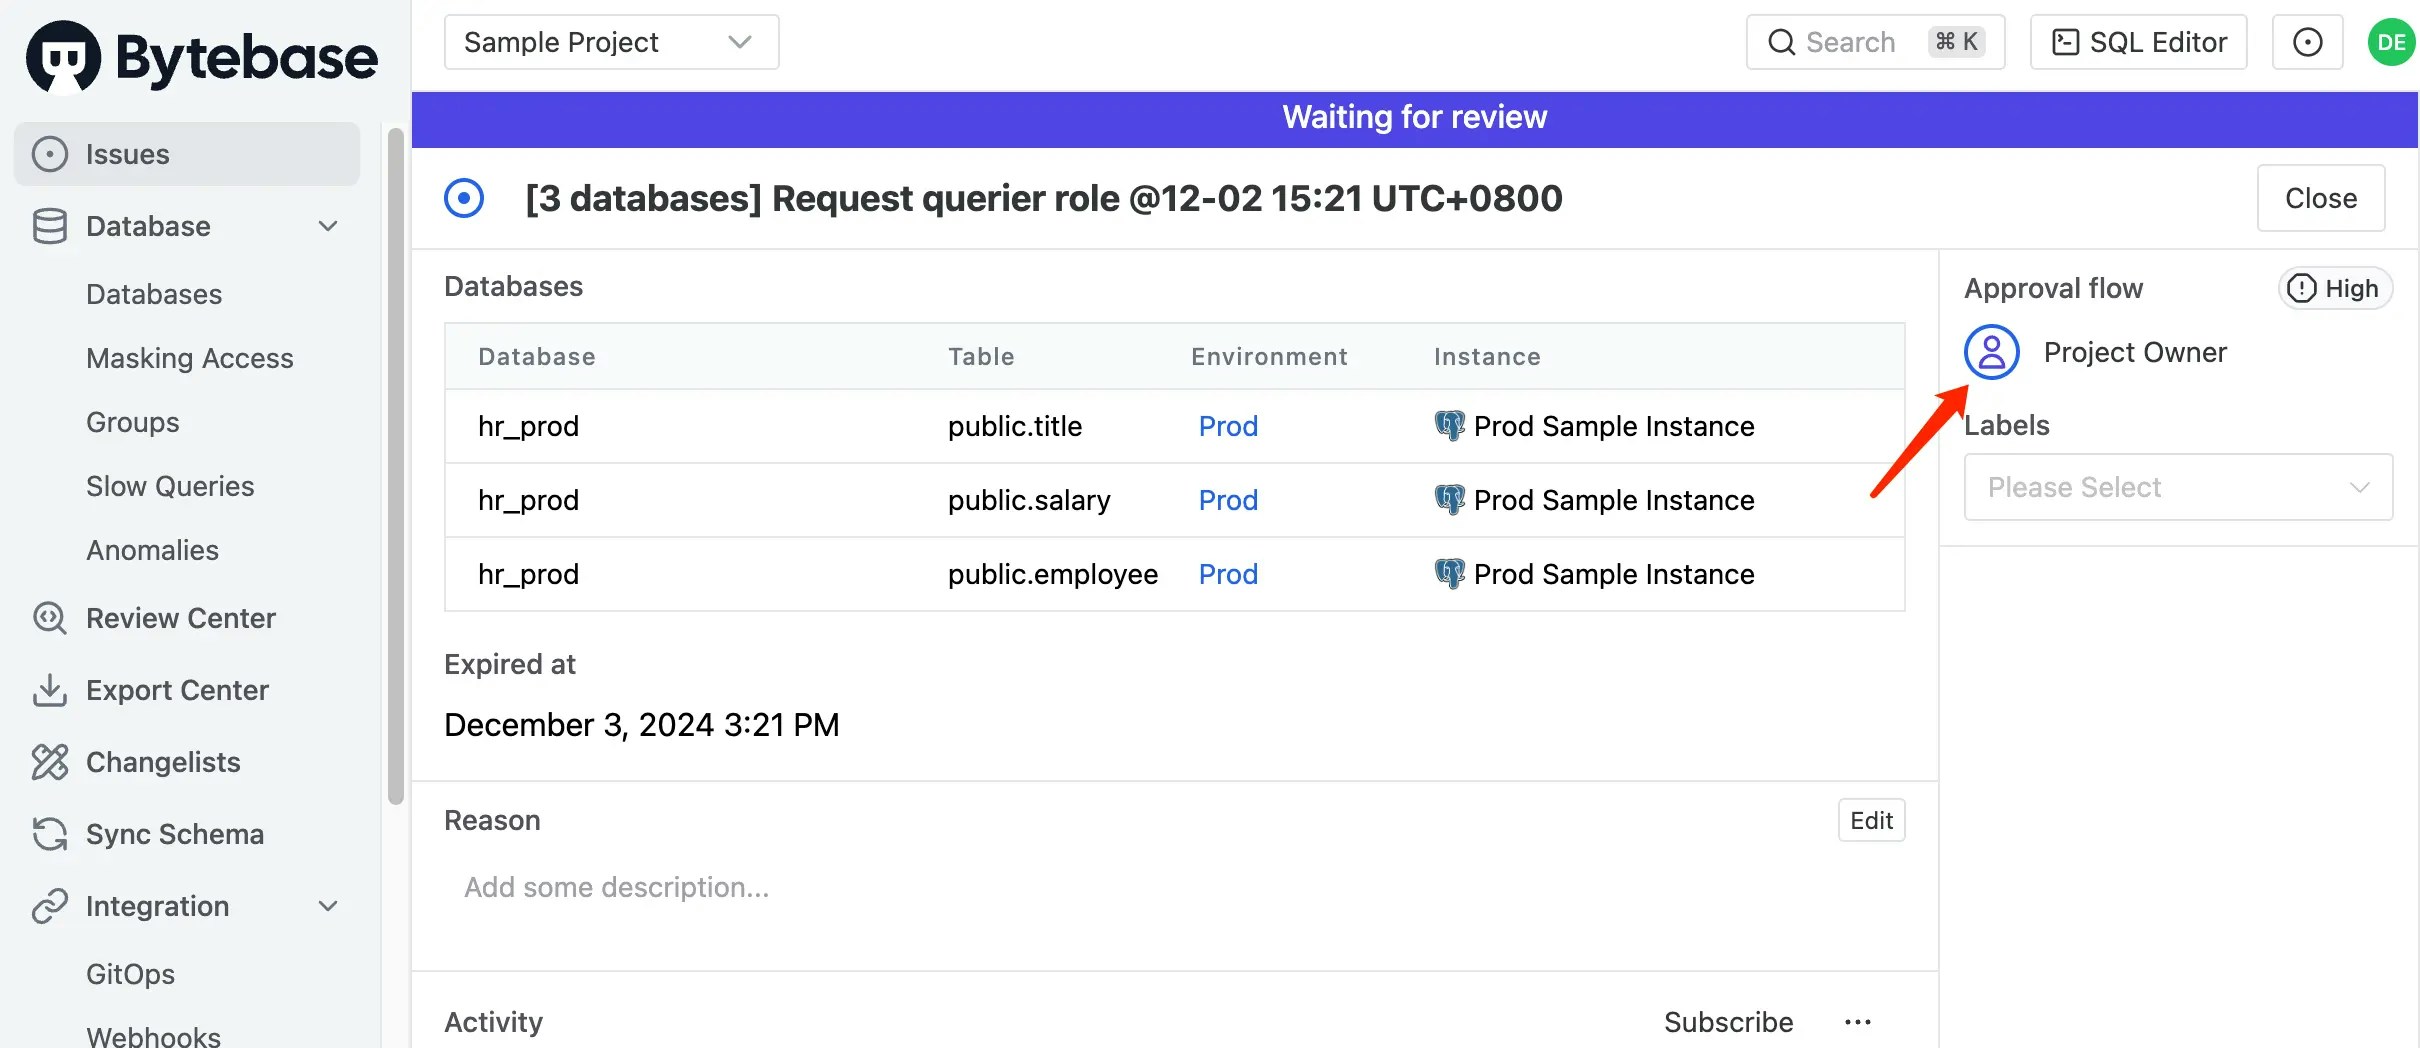
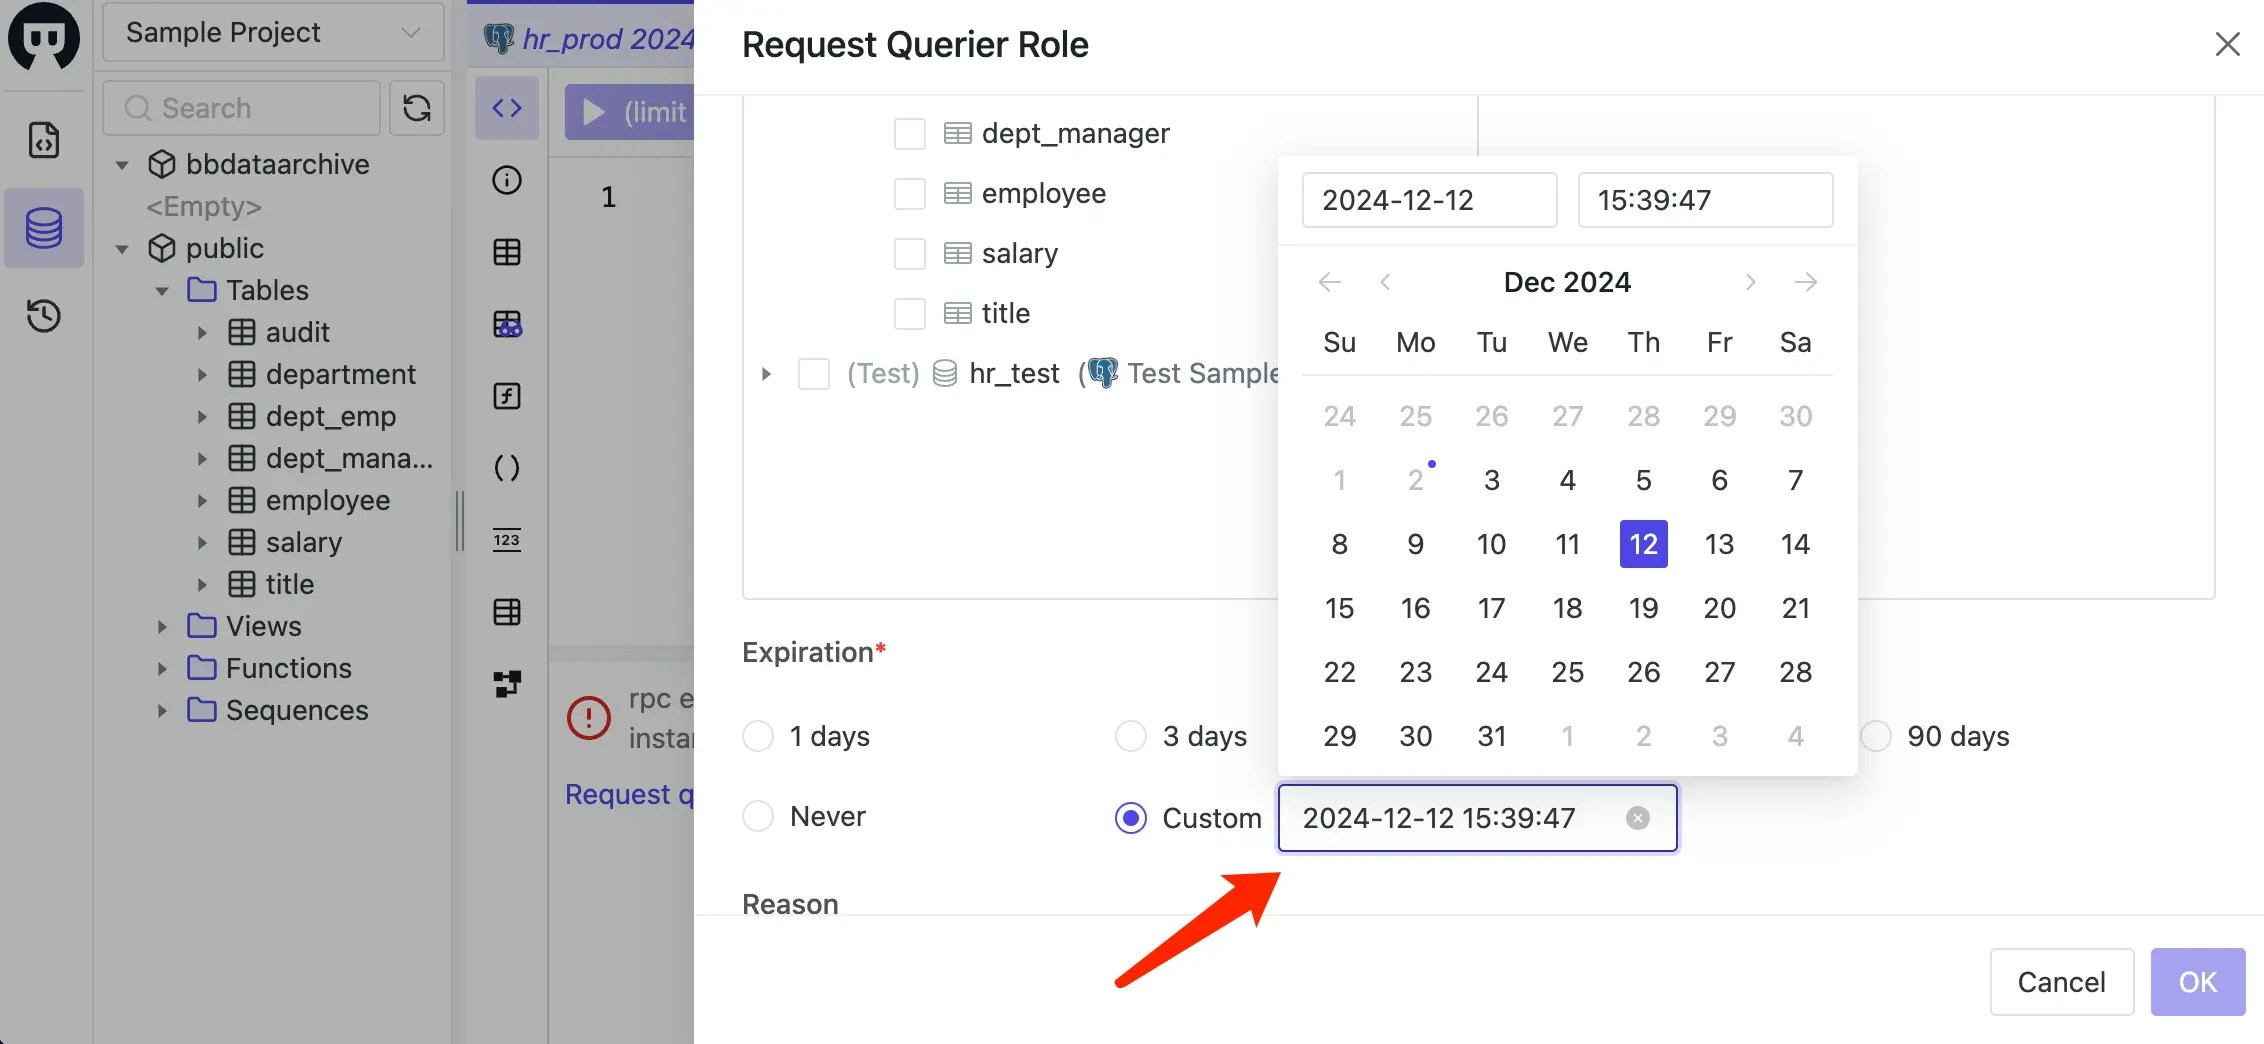 9. An request issue will be created, switch to the project owner (the admin user), go to **Issue** page, you should see the request issue. Click **Approve** button to approve the request.
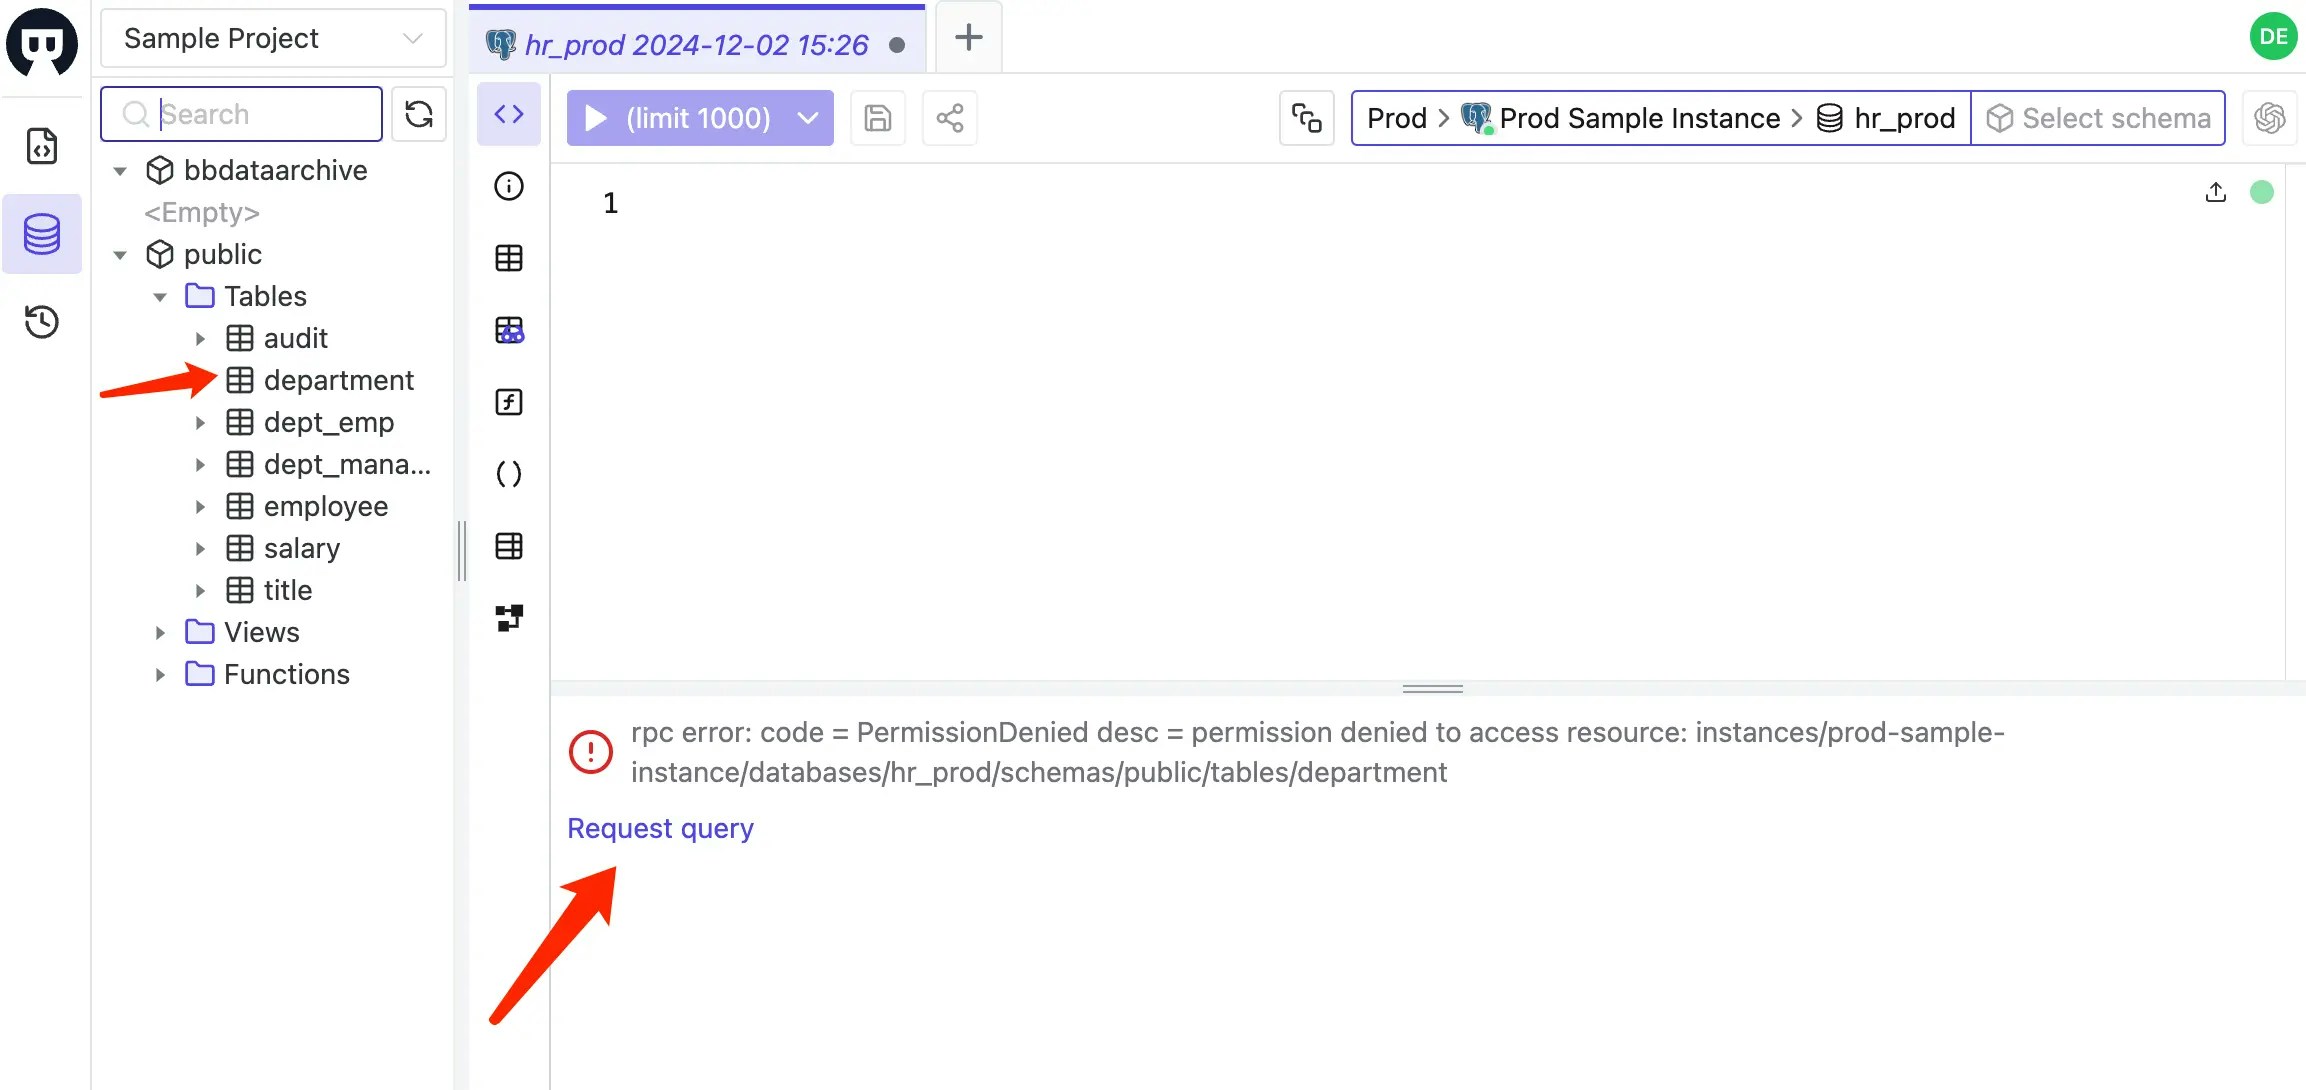
 10. Switch back to the developer user, go to SQL Editor page, you should be able to query from these three tables. If you query from other tables, you will get errors and suggest to request a JIT access.
 11. After the developer user get the access, he can solve the incident. The admin user can revoke the access directly from the **Manage** > **Members** page or wait for the access expiration.
## Conclusion
In this tutorial, we demonstrated how to set up Just-in-Time (JIT) access using the Bytebase GUI. In the next tutorial, we will explore automating JIT access via Slack, utilizing Bytebase webhooks and API. Stay tuned!
11. After the developer user get the access, he can solve the incident. The admin user can revoke the access directly from the **Manage** > **Members** page or wait for the access expiration.
## Conclusion
In this tutorial, we demonstrated how to set up Just-in-Time (JIT) access using the Bytebase GUI. In the next tutorial, we will explore automating JIT access via Slack, utilizing Bytebase webhooks and API. Stay tuned!