> ## Documentation Index
> Fetch the complete documentation index at: https://docs.bytebase.com/llms.txt
> Use this file to discover all available pages before exploring further.
# Just-in-Time Database Access via Slack
In the [previous tutorial](/tutorials/just-in-time-database-access-part1), we demonstrated how to set up JIT access using the Bytebase GUI. In this tutorial, we will cover how to automate JIT access via Slack, utilizing Bytebase webhooks and API.
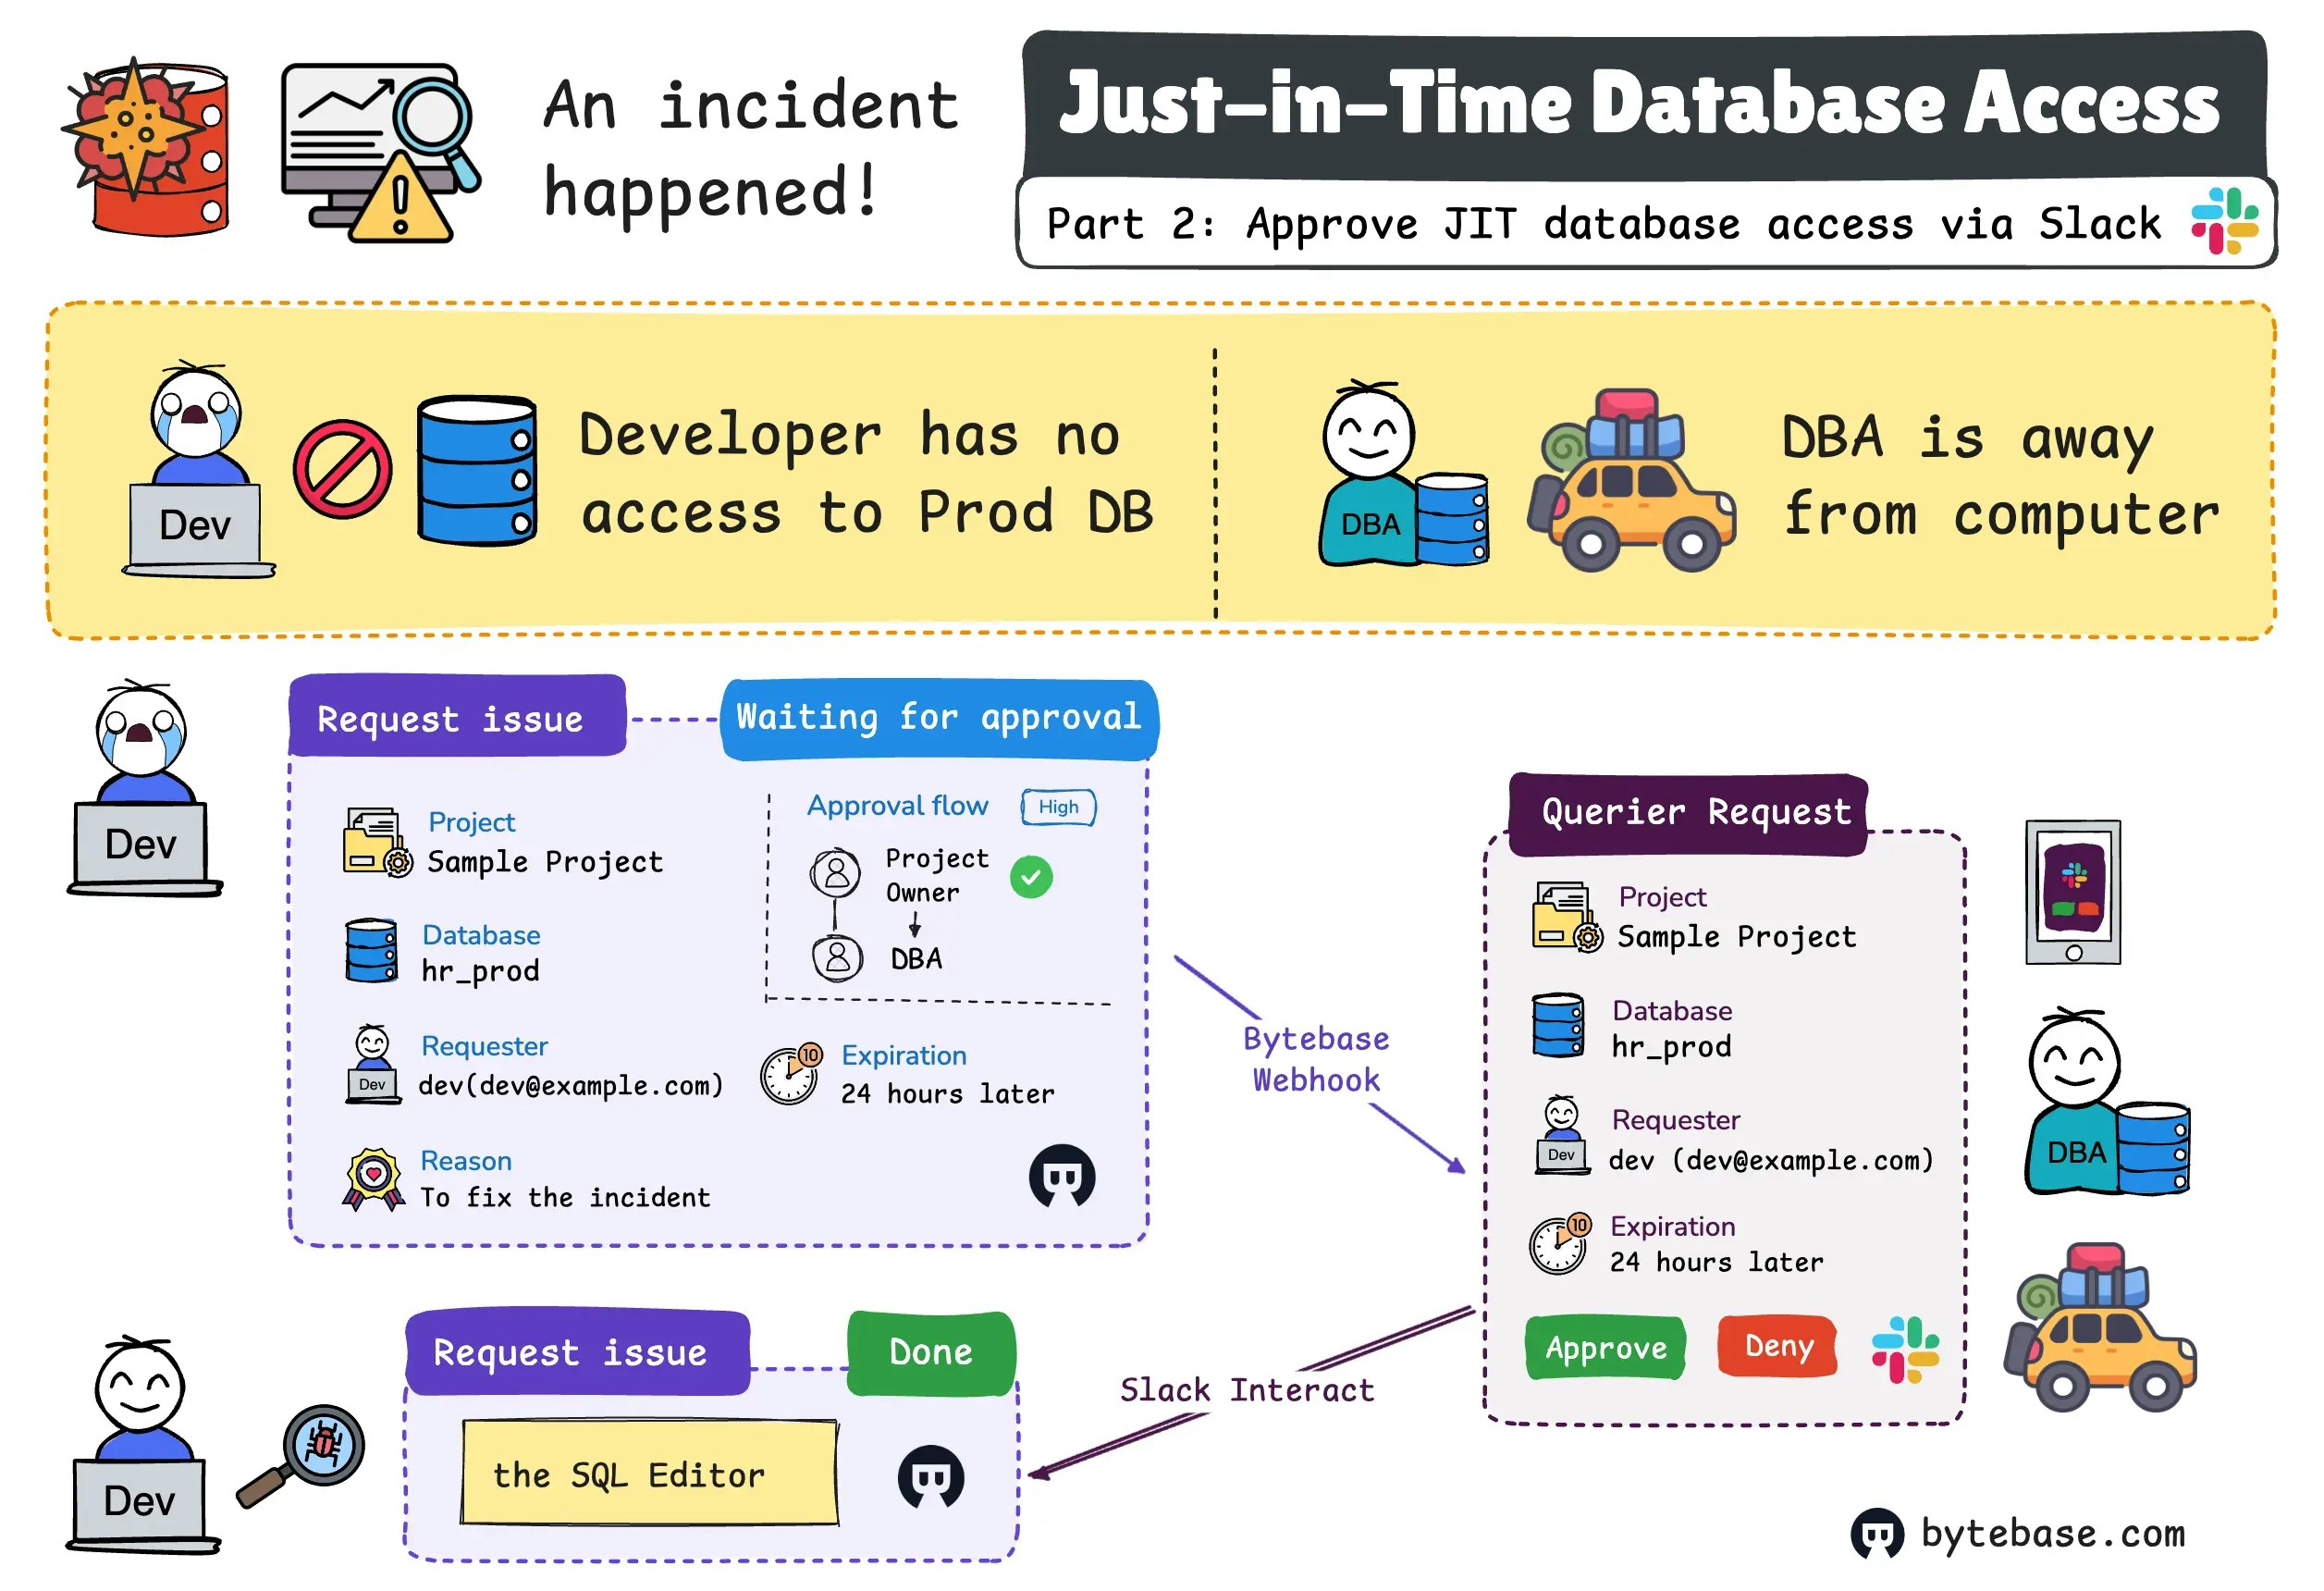
When developers need urgent production database access during incidents but lack permissions, they can request Just-in-Time (JIT) access. By triggering the Bytebase webhook, the DBA will receive a notification in Slack immediately and can approve there.
 ***
This is Part 2 of our tutorial series on implementing Just-in-Time (JIT) database access:
* Part 1: [Grant JIT database access via Bytebase GUI](/tutorials/just-in-time-database-access-part1)
* Part 2: Approve JIT database access via Slack (this one)
## Overview
In this tutorial, you'll learn how to approve JIT access via Slack with the help of Bytebase webhooks and APIs.
The complete code for this tutorial is available at: [example-slack](https://github.com/bytebase/example-slack)
This tutorial skips the Bytebase setup part, if you haven't set up the Bytebase and registered admin and developer users, please follow instructions in the [previous tutorial](/tutorials/just-in-time-database-access-part1).
## Prerequisites
Before you begin, make sure you have:
* [Docker](https://www.docker.com/) installed
* Slack workspace
* VS Code for port forwarding
## Overall Workflow
1. Create a Slack app. The Slack app listens on the webhook notification when someone submits a database access request.
2. Upon receiving the webhook event, the Slack app will present a message card in the configured channel with request details and approve/deny buttons.
3. Upon clicking the approve/deny button, the Slack app will call the corresponding Bytebase API to approve/deny the request.
Another option would require clicking to go to bytebase to approve the request, which can be done by [built-in Slack webhook integration](/change-database/webhook/#slack).
## Step 1 - Finished the previous tutorial
Make sure you finished the [previous tutorial](/tutorials/just-in-time-database-access-part1) and have the Bytebase workspace running. Particularly, pay attention to **Step 4**, which is to request JIT access via Bytebase GUI.
The `Request role` feature is supported by **Enterprise Plan** which will be needed for this tutorial, other plans only allow the `Assign role` feature which is not enough. You may request a trial from [here](https://www.bytebase.com/contact-us/).
## Step 2 - Register a service account in Bytebase
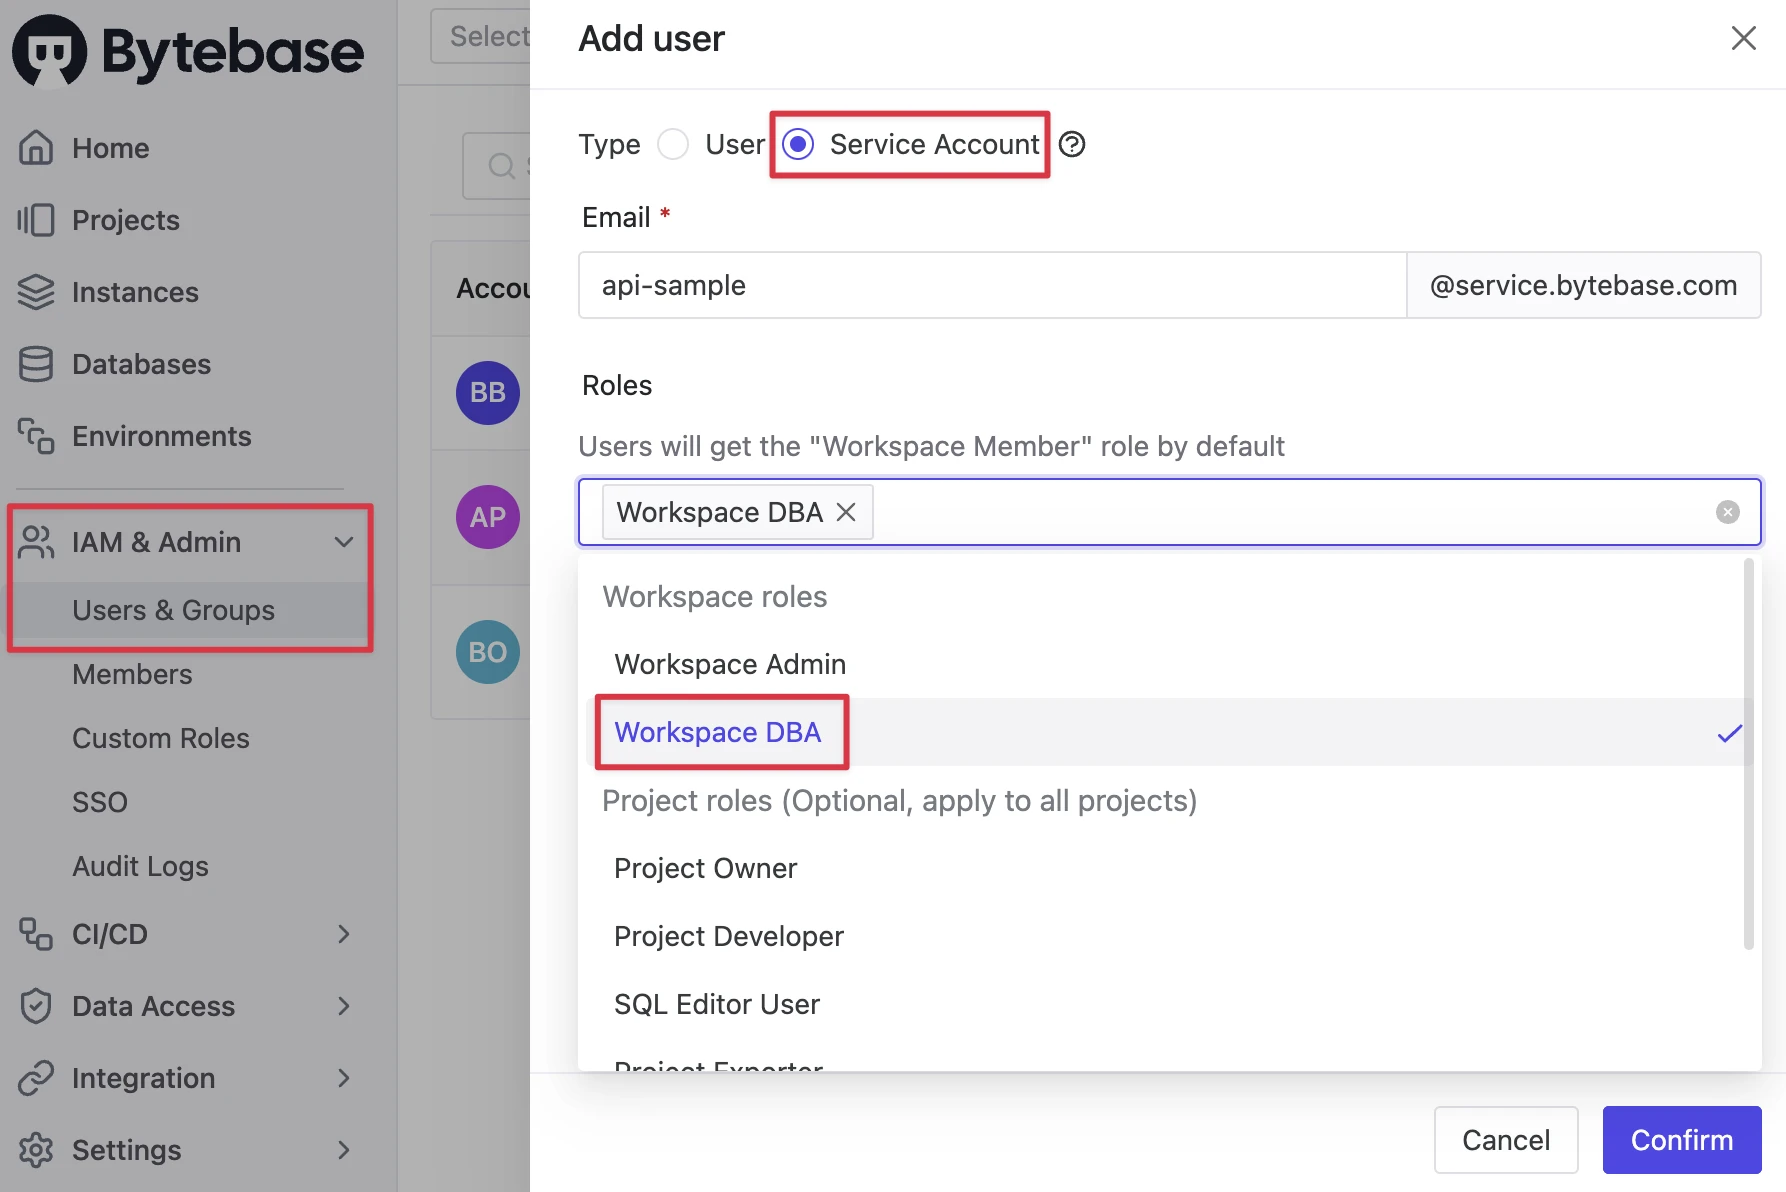
1. Log in as `Workspace Admin`, and go to **IAM & Admin** > **Users & Groups**. Click **+ Add User**, fill in with `api-sample`, choose the `Workspace DBA` role sufficient for this tutorial and click **Confirm**.
***
This is Part 2 of our tutorial series on implementing Just-in-Time (JIT) database access:
* Part 1: [Grant JIT database access via Bytebase GUI](/tutorials/just-in-time-database-access-part1)
* Part 2: Approve JIT database access via Slack (this one)
## Overview
In this tutorial, you'll learn how to approve JIT access via Slack with the help of Bytebase webhooks and APIs.
The complete code for this tutorial is available at: [example-slack](https://github.com/bytebase/example-slack)
This tutorial skips the Bytebase setup part, if you haven't set up the Bytebase and registered admin and developer users, please follow instructions in the [previous tutorial](/tutorials/just-in-time-database-access-part1).
## Prerequisites
Before you begin, make sure you have:
* [Docker](https://www.docker.com/) installed
* Slack workspace
* VS Code for port forwarding
## Overall Workflow
1. Create a Slack app. The Slack app listens on the webhook notification when someone submits a database access request.
2. Upon receiving the webhook event, the Slack app will present a message card in the configured channel with request details and approve/deny buttons.
3. Upon clicking the approve/deny button, the Slack app will call the corresponding Bytebase API to approve/deny the request.
Another option would require clicking to go to bytebase to approve the request, which can be done by [built-in Slack webhook integration](/change-database/webhook/#slack).
## Step 1 - Finished the previous tutorial
Make sure you finished the [previous tutorial](/tutorials/just-in-time-database-access-part1) and have the Bytebase workspace running. Particularly, pay attention to **Step 4**, which is to request JIT access via Bytebase GUI.
The `Request role` feature is supported by **Enterprise Plan** which will be needed for this tutorial, other plans only allow the `Assign role` feature which is not enough. You may request a trial from [here](https://www.bytebase.com/contact-us/).
## Step 2 - Register a service account in Bytebase
1. Log in as `Workspace Admin`, and go to **IAM & Admin** > **Users & Groups**. Click **+ Add User**, fill in with `api-sample`, choose the `Workspace DBA` role sufficient for this tutorial and click **Confirm**.
 2. Find the newly created service account and **Copy Service Key**. We will use this token to authenticate the API calls.
 3) Go to `Sample Project`, click **Manage > Members**, and assign the service account as `Project Owner` which can fit the custom approval set in the previous tutorial.
## Step 3 - Download `example-slack` code and run it
1. Download the [example-slack code](https://github.com/bytebase/example-slack).
2. Go to the `approve-issue` folder and copy the `env-template.local` file to `.env.local`.
3. Paste the registered service account information into the `.env.local` file.
4. By using VS Code's [Port forwarding](https://code.visualstudio.com/docs/editor/port-forwarding), you can forward the local server's ports:
* `3000` for the `example-slack` app
* `8080` for the Bytebase workspace
3) Go to `Sample Project`, click **Manage > Members**, and assign the service account as `Project Owner` which can fit the custom approval set in the previous tutorial.
## Step 3 - Download `example-slack` code and run it
1. Download the [example-slack code](https://github.com/bytebase/example-slack).
2. Go to the `approve-issue` folder and copy the `env-template.local` file to `.env.local`.
3. Paste the registered service account information into the `.env.local` file.
4. By using VS Code's [Port forwarding](https://code.visualstudio.com/docs/editor/port-forwarding), you can forward the local server's ports:
* `3000` for the `example-slack` app
* `8080` for the Bytebase workspace
 5. Copy the 8080 port forwarded address to the `.env.local` file as `BB_HOST`.
6. Also, go to Bytebase, click **Settings > General** to set the address as **External URL**.
## Step 4 - Create Bytebase Webhook
1. Go to Bytebase and select the `Sample Project`.
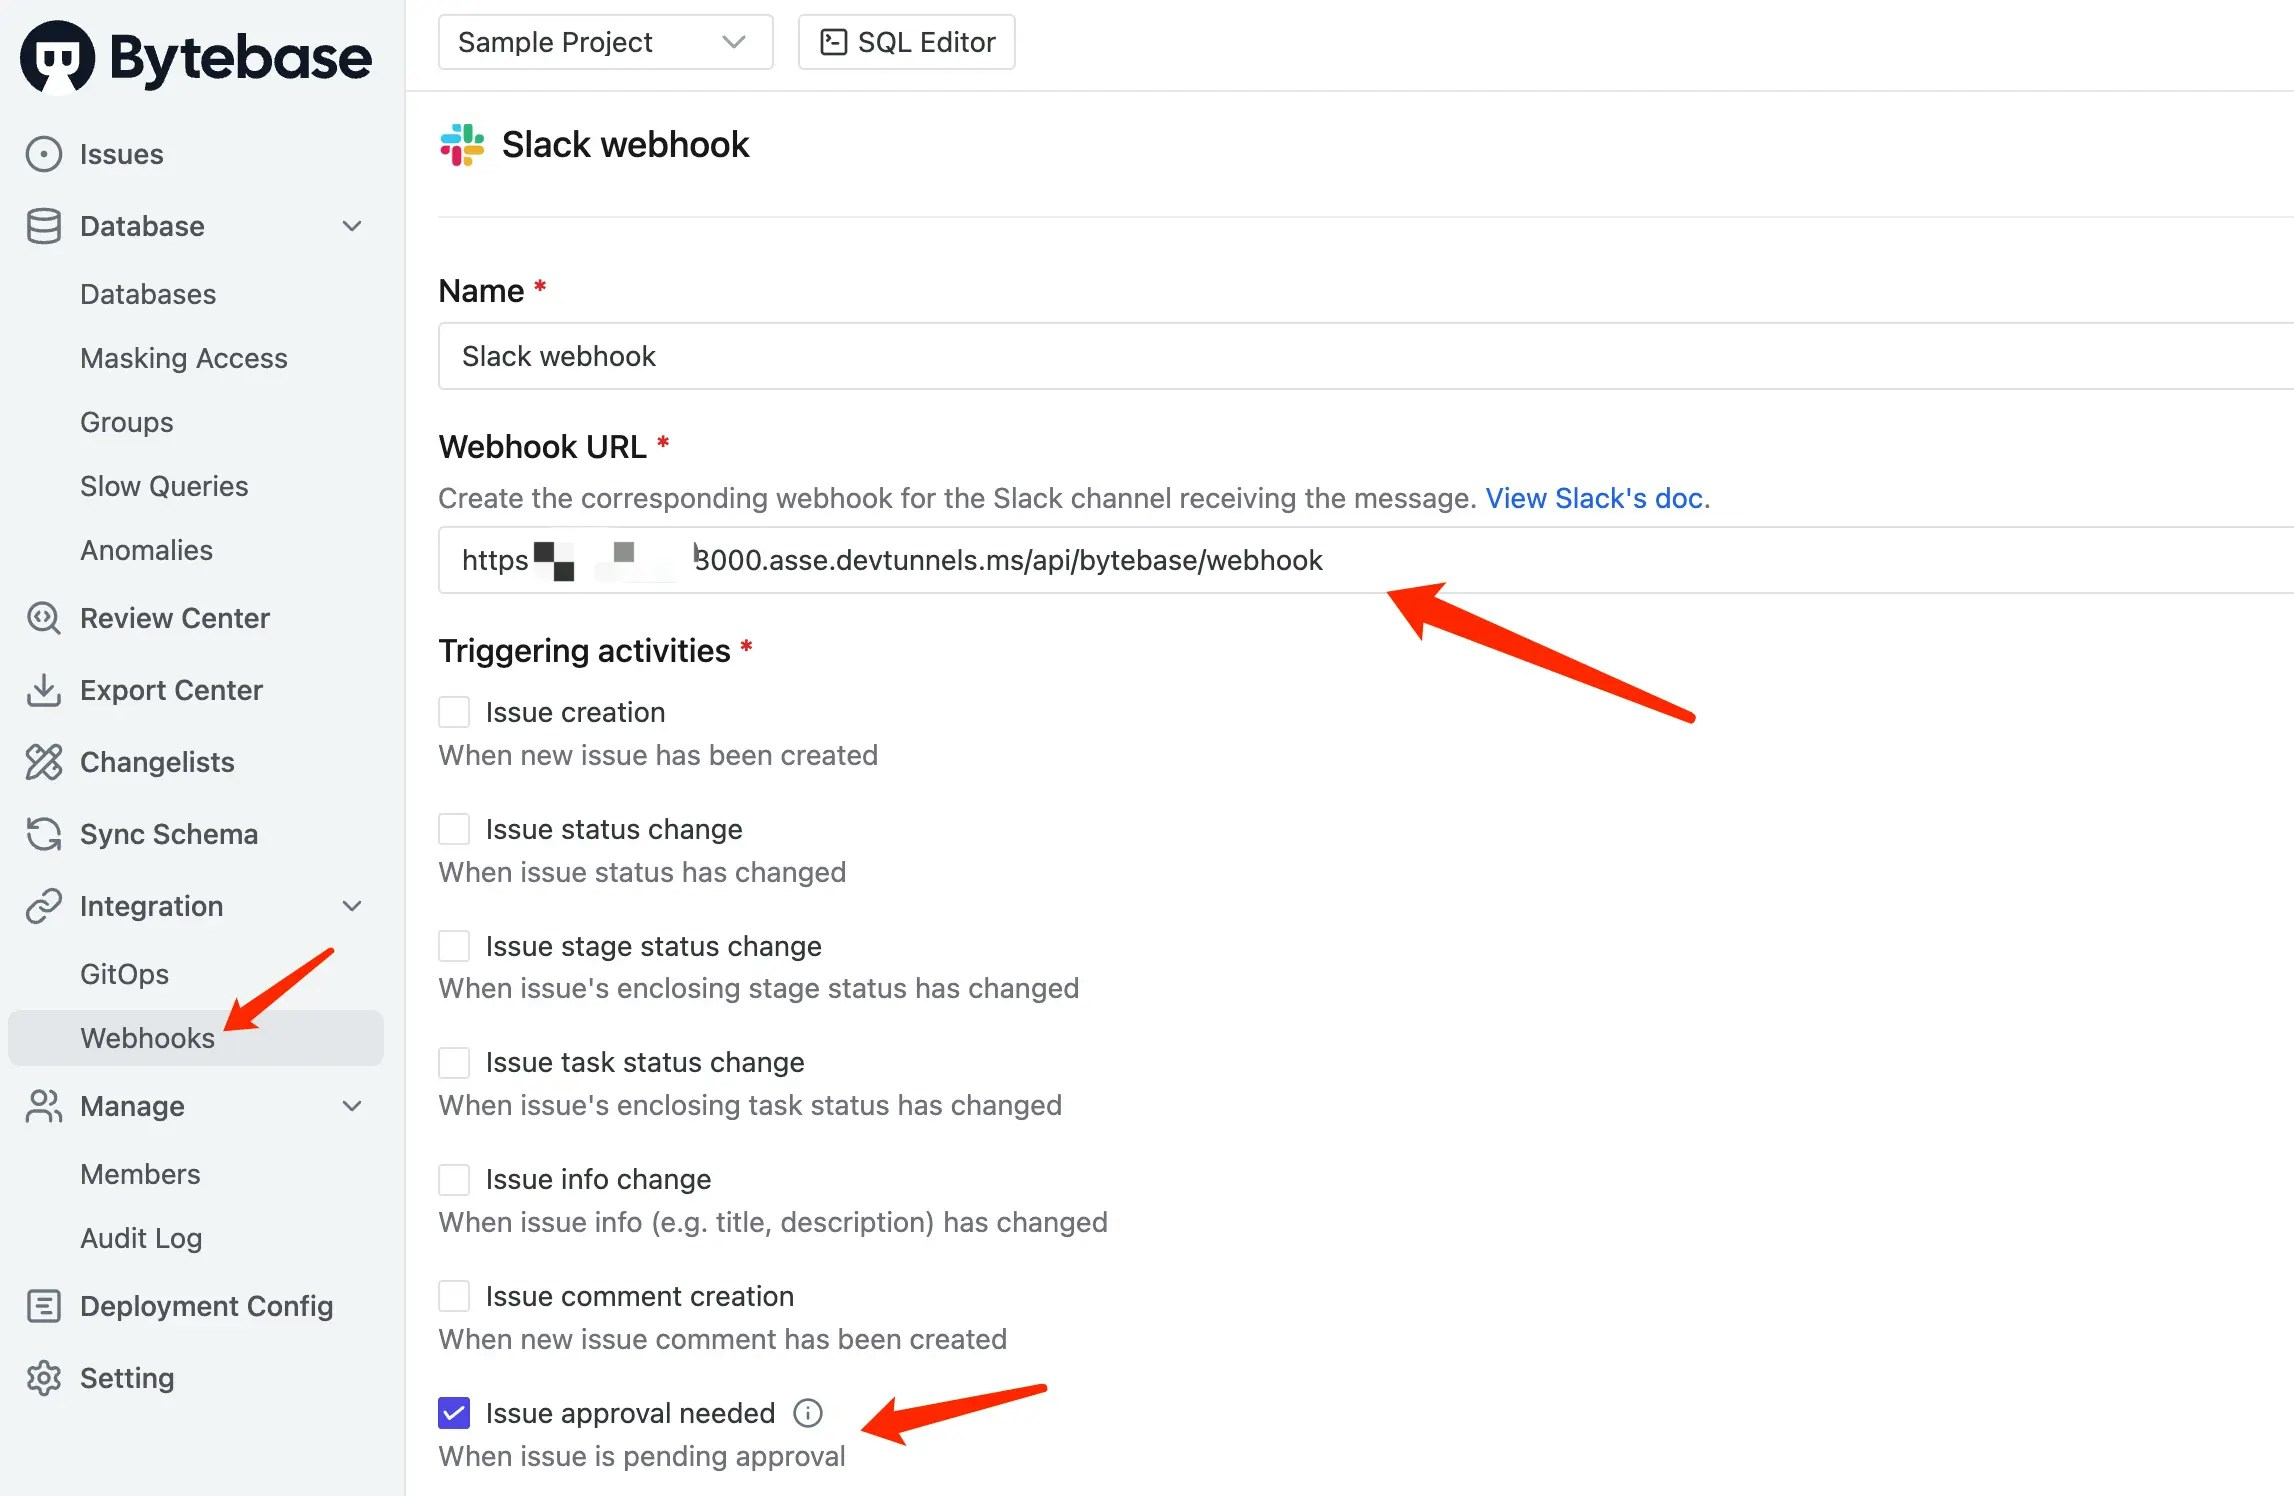
2. Click **Manage > Webhooks** and click **Create**.
3. Set the **Name** as `Slack` webhook, **URL** as `YOUR_3000_FORWARDED_URL/api/bytebase/webhook`.
4. Select `Issue approval needed` as **Triggering activities**.
5. Click **Test webhook** and if it's successful, then click **Create**.
5. Copy the 8080 port forwarded address to the `.env.local` file as `BB_HOST`.
6. Also, go to Bytebase, click **Settings > General** to set the address as **External URL**.
## Step 4 - Create Bytebase Webhook
1. Go to Bytebase and select the `Sample Project`.
2. Click **Manage > Webhooks** and click **Create**.
3. Set the **Name** as `Slack` webhook, **URL** as `YOUR_3000_FORWARDED_URL/api/bytebase/webhook`.
4. Select `Issue approval needed` as **Triggering activities**.
5. Click **Test webhook** and if it's successful, then click **Create**.
 ## Step 5 - Create and invite a Slack bot
1. Go to [Slack apps](https://api.slack.com/apps) and click **Create New App**.
2. Choose **From scratch**, enter the **App name**, and select your **Workspace**.
3. Go to **OAuth & Permissions** and add the following permissions under **Scopes**:
* `chat:write` (send message)
* `channels:read` (read channel id for public channel)
* `groups:read` (read channel id for private channel)
4. Scroll up to **OAuth Tokens**, click **Install to YOUR\_WORKSPACE**, and authorize the app.
5. Copy the **Bot User OAuth Token** and paste it into the `.env.local` file as **SLACK\_BOT\_TOKEN**.
6. Choose a channel and invite the bot to the channel by typing `/invite @YOUR_BOT_NAME`.
7. Go to **Interactivity & Shortcuts** in app settings, turn on **Interactivity** and add the **Request URL**: `YOUR_3000_FORWARDED_URL/api/slack/interact`. Click **Save Changes**.
## Step 6 - Verify the workflow
Now, everything is ready, let's verify the workflow:
1. Go to Bytebase, log in as the developer and go into the `Sample Project`.
2. By default, the developer has no permission to access the database. Click **Manage > Members** and you'll see the devloper only has **Project Developer** role. If you go to **SQL Editor**, you'll see the `hr_prod` database is not accessible.
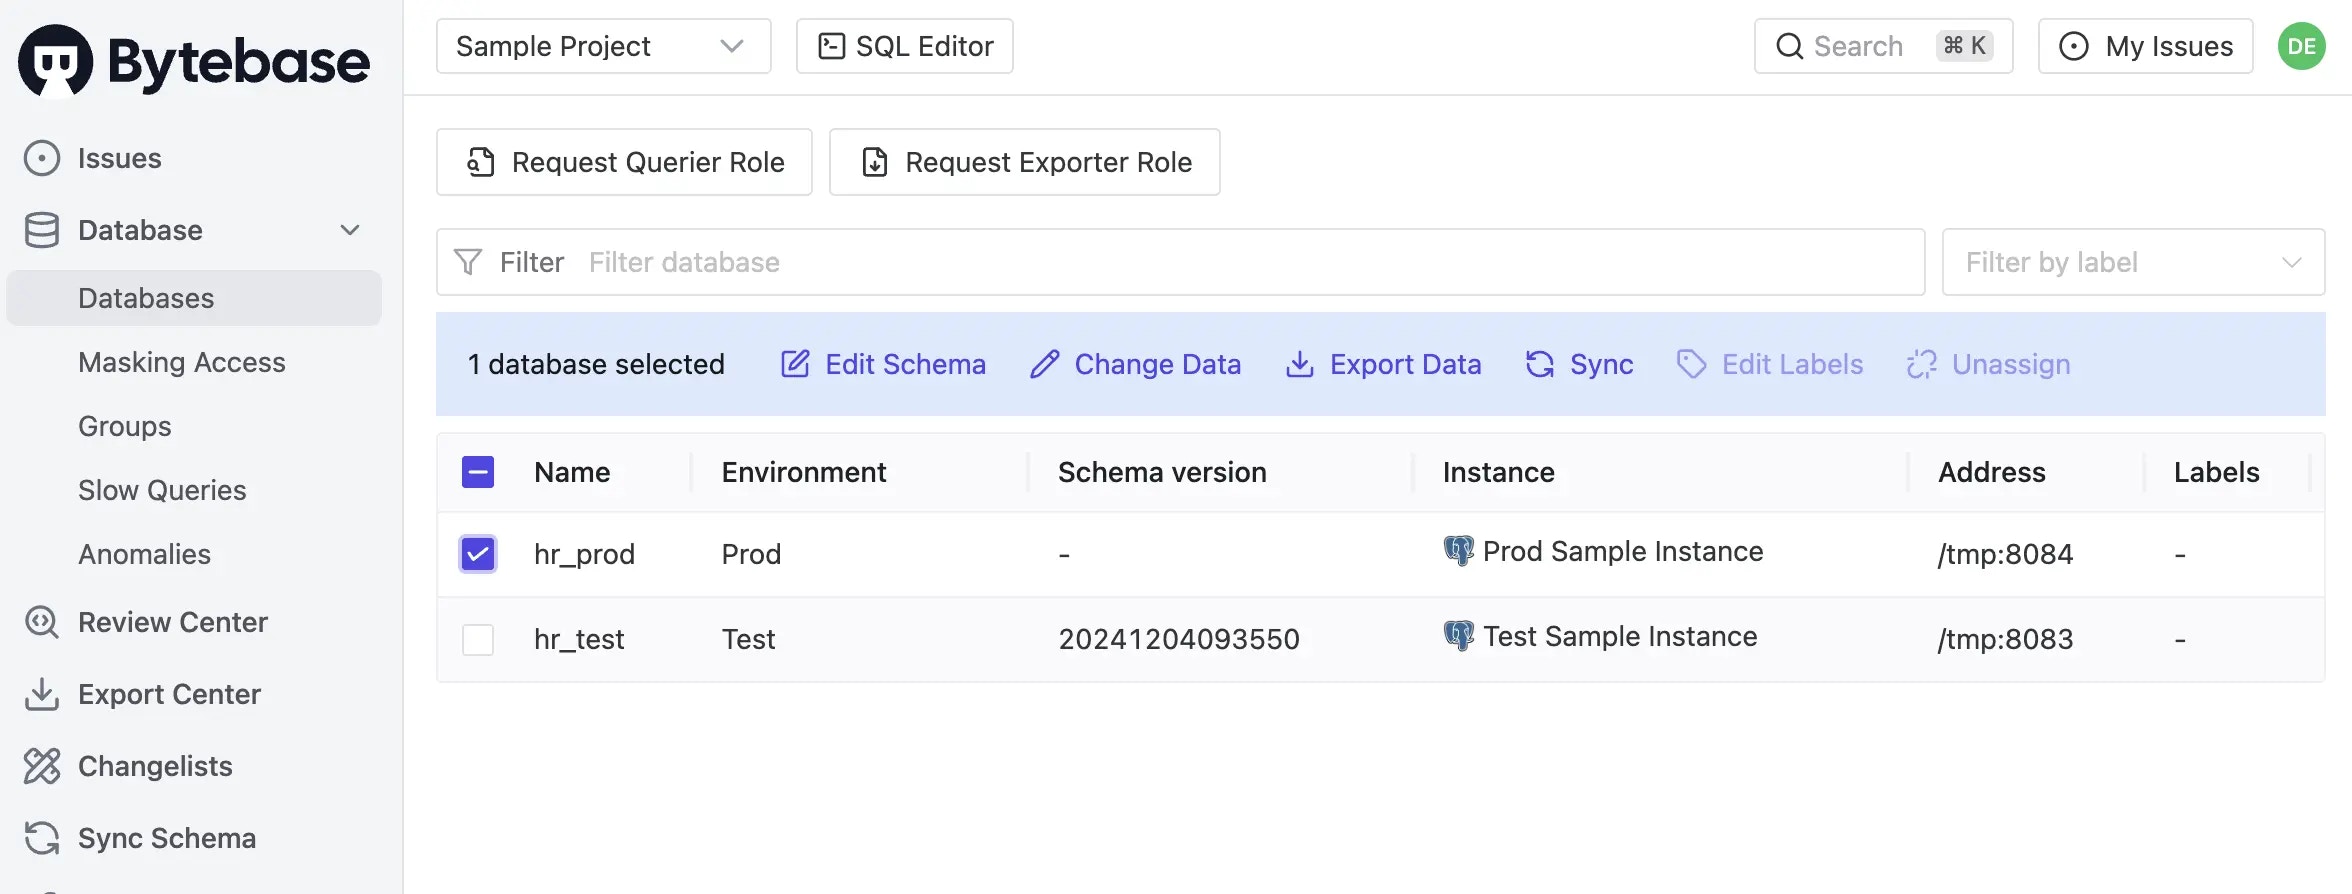
3. Click **Database > databases**, select the `hr_prod` database, and click **Request Querier role**.
## Step 5 - Create and invite a Slack bot
1. Go to [Slack apps](https://api.slack.com/apps) and click **Create New App**.
2. Choose **From scratch**, enter the **App name**, and select your **Workspace**.
3. Go to **OAuth & Permissions** and add the following permissions under **Scopes**:
* `chat:write` (send message)
* `channels:read` (read channel id for public channel)
* `groups:read` (read channel id for private channel)
4. Scroll up to **OAuth Tokens**, click **Install to YOUR\_WORKSPACE**, and authorize the app.
5. Copy the **Bot User OAuth Token** and paste it into the `.env.local` file as **SLACK\_BOT\_TOKEN**.
6. Choose a channel and invite the bot to the channel by typing `/invite @YOUR_BOT_NAME`.
7. Go to **Interactivity & Shortcuts** in app settings, turn on **Interactivity** and add the **Request URL**: `YOUR_3000_FORWARDED_URL/api/slack/interact`. Click **Save Changes**.
## Step 6 - Verify the workflow
Now, everything is ready, let's verify the workflow:
1. Go to Bytebase, log in as the developer and go into the `Sample Project`.
2. By default, the developer has no permission to access the database. Click **Manage > Members** and you'll see the devloper only has **Project Developer** role. If you go to **SQL Editor**, you'll see the `hr_prod` database is not accessible.
3. Click **Database > databases**, select the `hr_prod` database, and click **Request Querier role**.
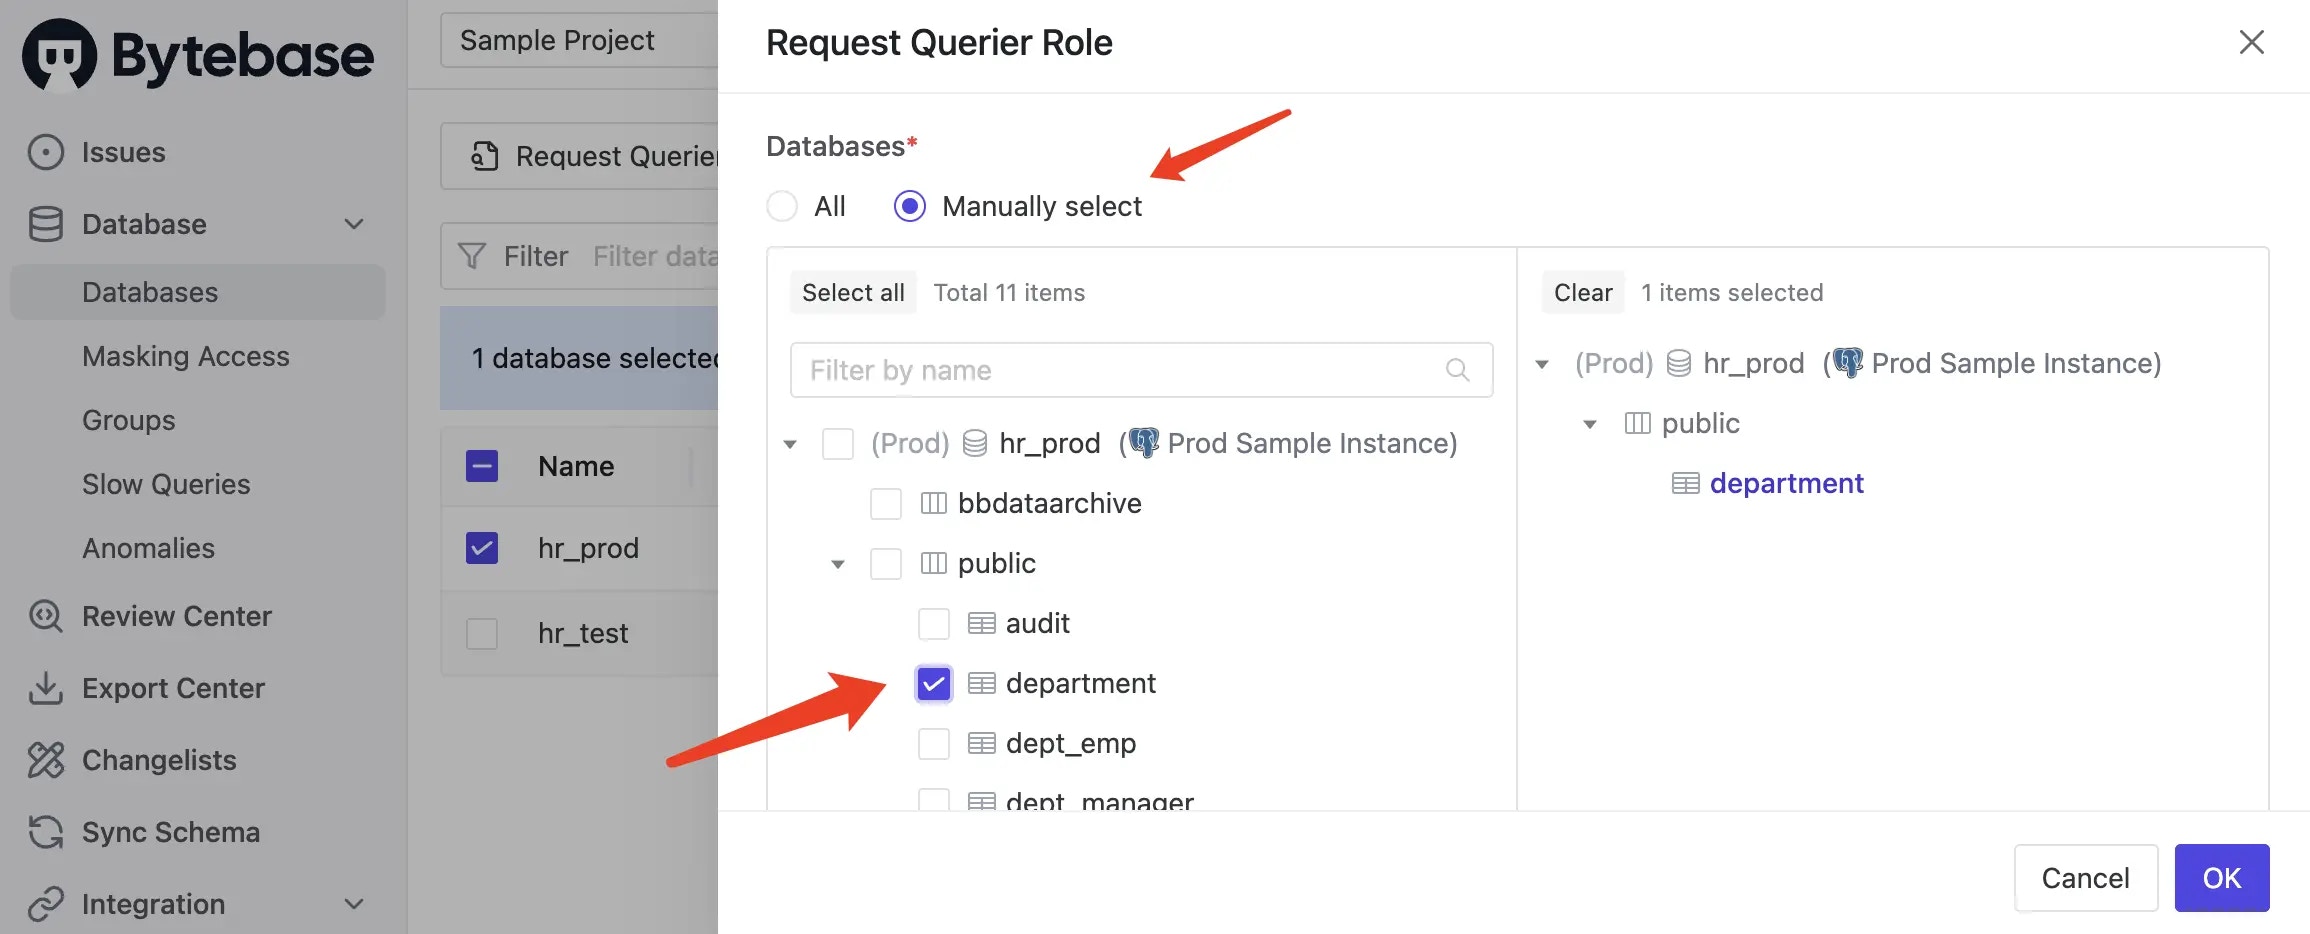
 4. Choose the database or table you want to access, and click **OK**.
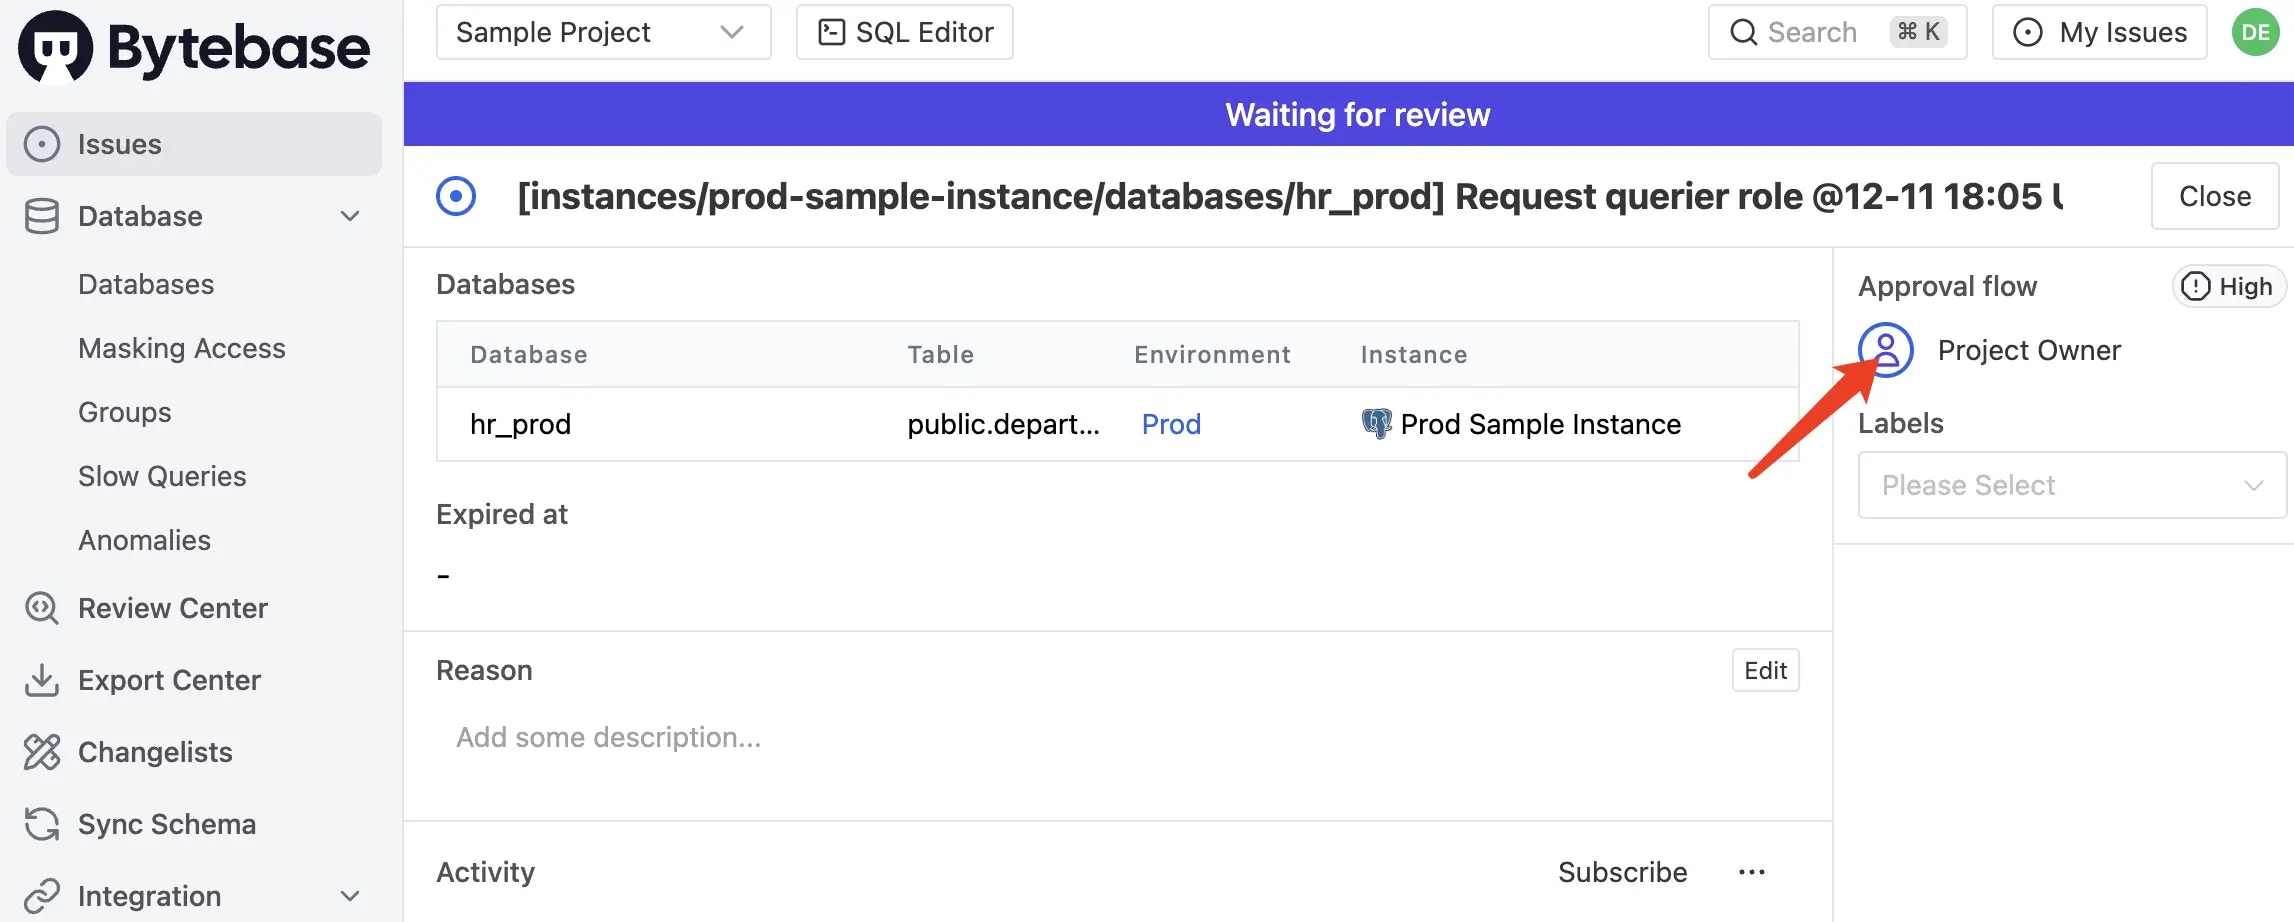
 5. A request issue is created, the configured custom approval flow will be matched.
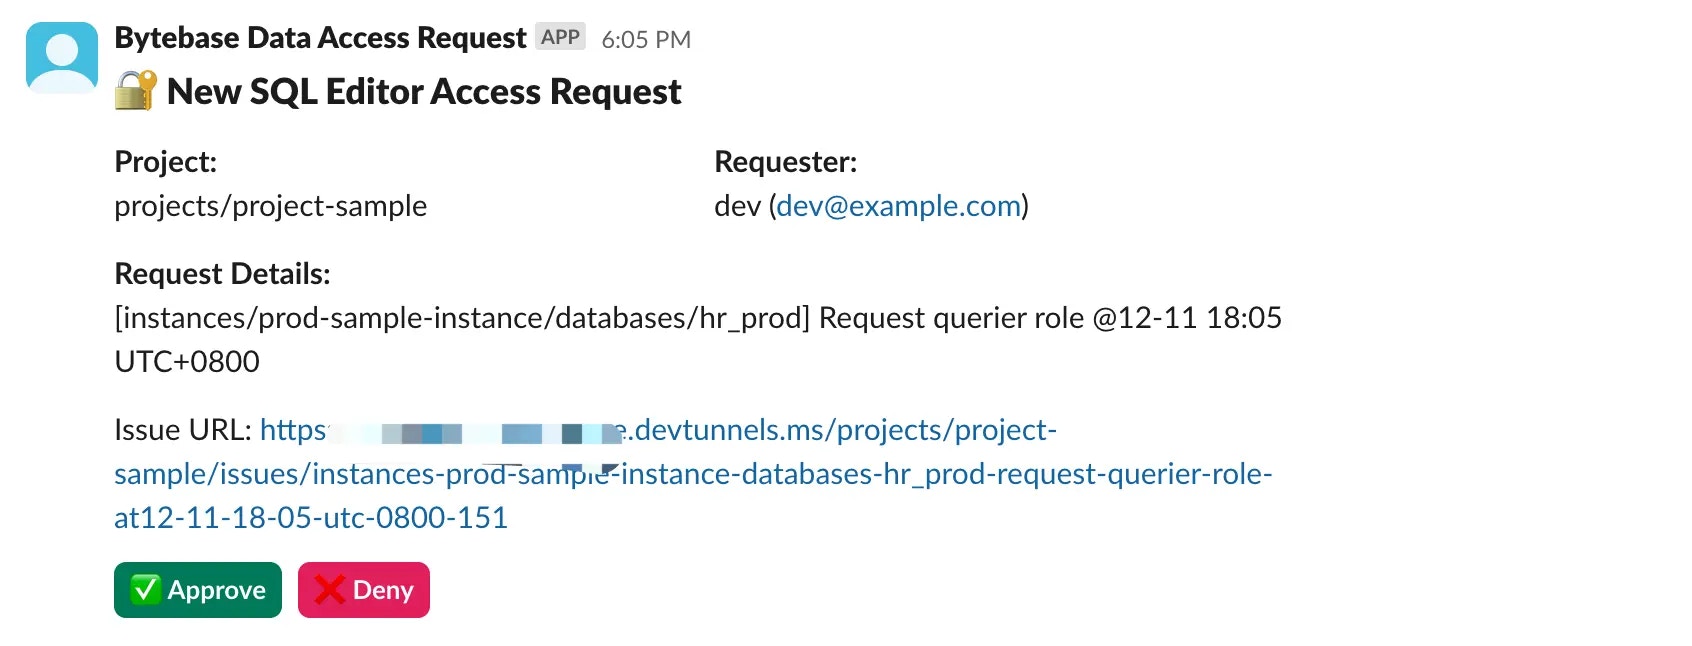
 6. Go to Slack, the bot already sent a message to the channel, which is triggered by the webhook.
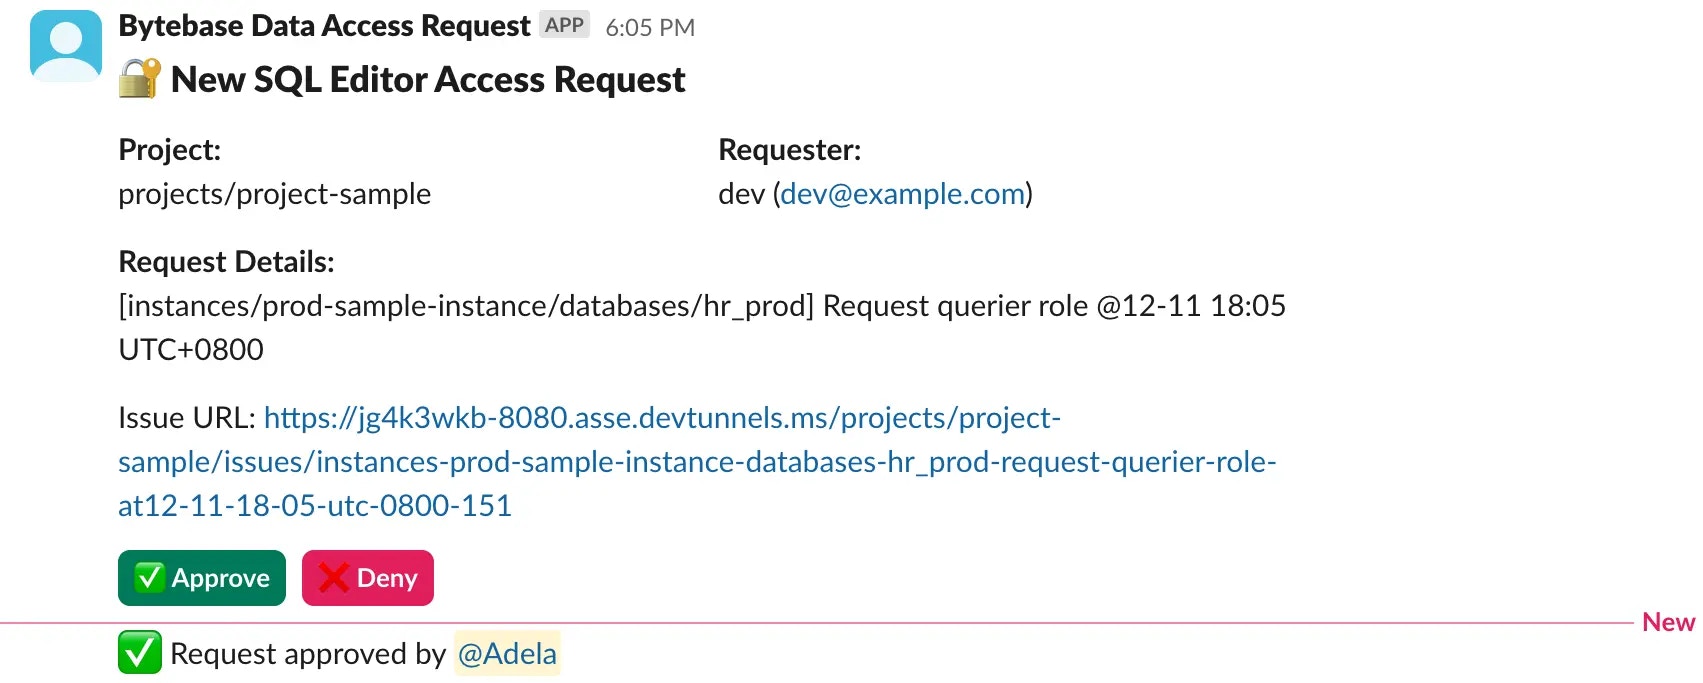
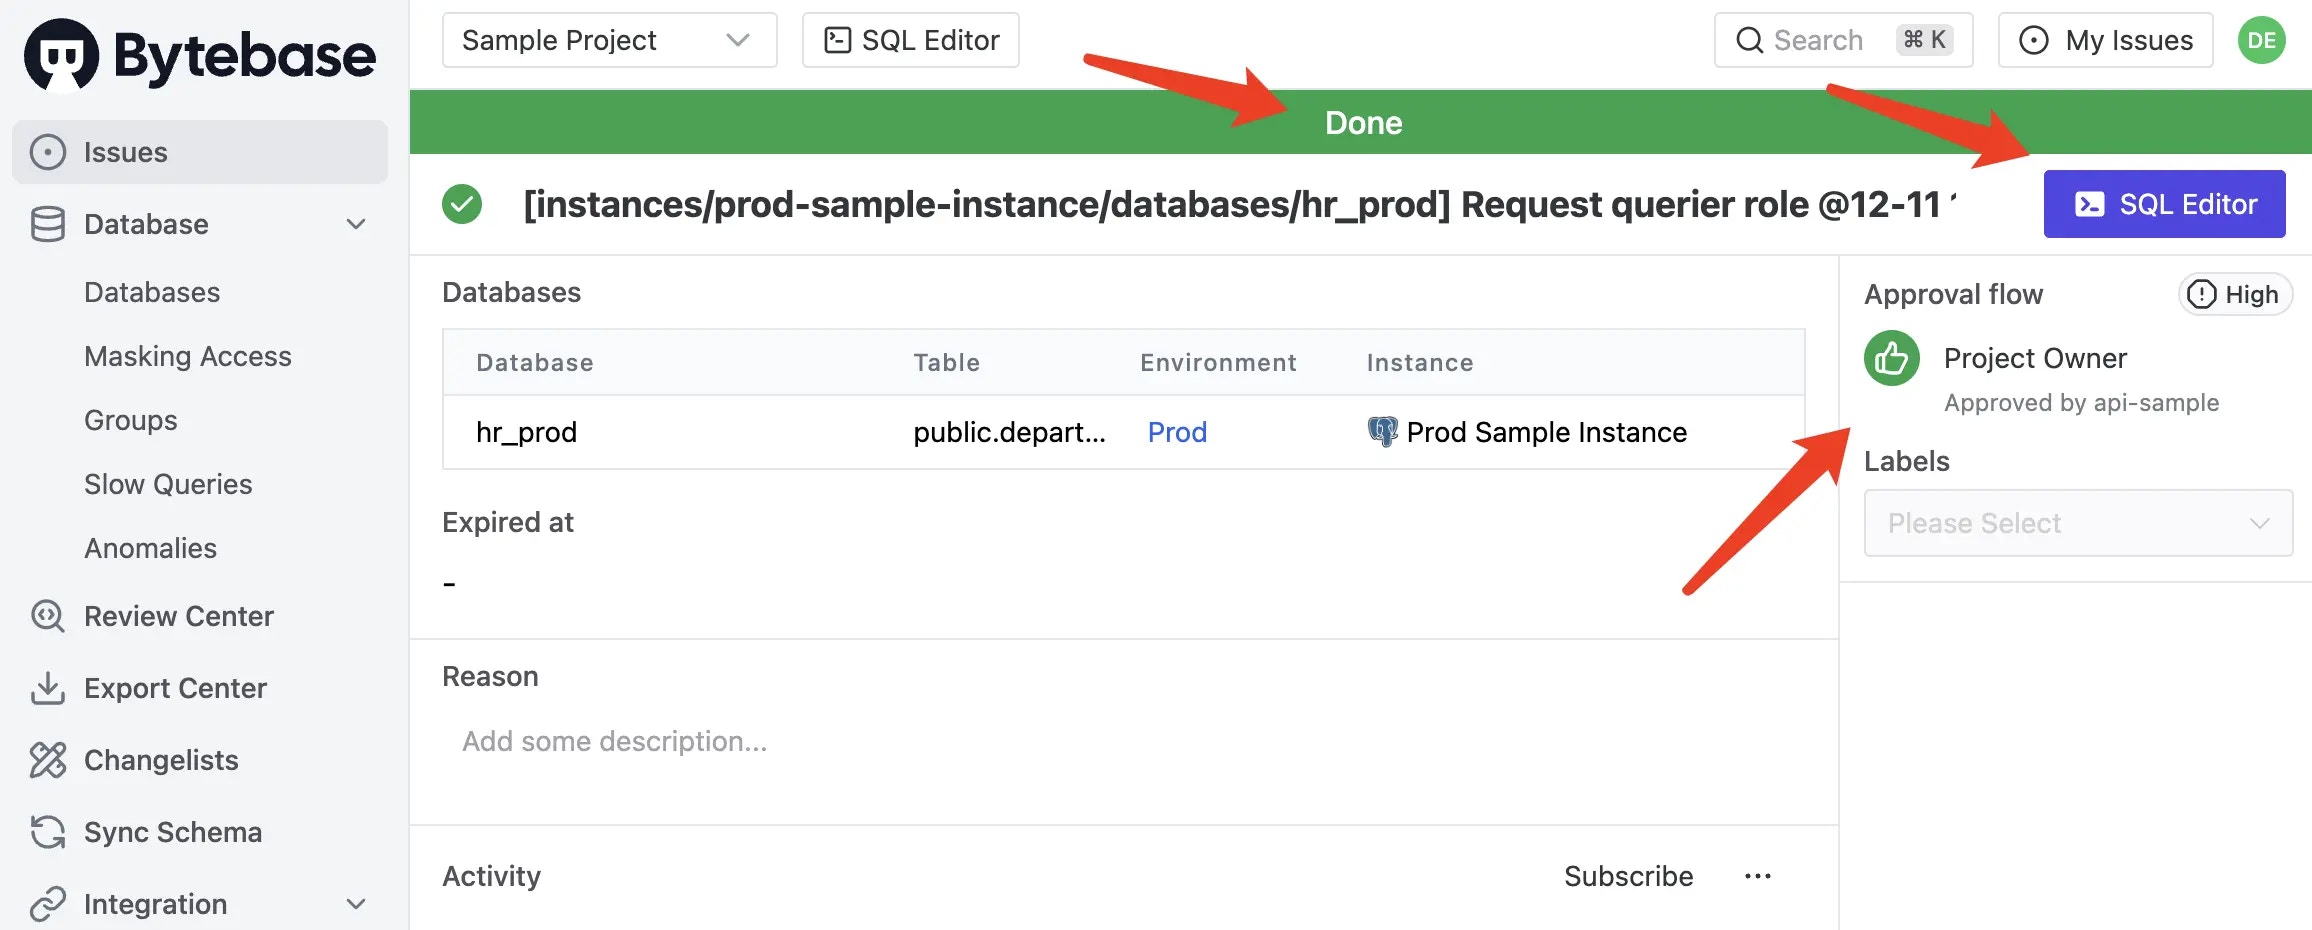
 7. Click **Approve** and the Slack Bot will trigger the interact API, which calls Bytebase API to approve the issue.
 8. Go back to Bytebase, the issue is approved. The developer can access the database now.
 ## Code structure
If digging into the code is your interest, here is a brief explanation of the code structure:
* `src/app/api/bytebase/webhook/route.ts`: handle the webhook from Bytebase.
* `src/app/api/slack/interact/route.ts`: handle the interaction (Approve or Deny) from Slack to Bytebase.
* `src/lib/slack.ts`: send the message to Slack via using the its [web API](https://tools.slack.dev/node-slack-sdk/web-api/).
## Conclusion
Congratulations! You've successfully set up JIT database access via Slack with the help of Bytebase webhooks and APIs.
## Code structure
If digging into the code is your interest, here is a brief explanation of the code structure:
* `src/app/api/bytebase/webhook/route.ts`: handle the webhook from Bytebase.
* `src/app/api/slack/interact/route.ts`: handle the interaction (Approve or Deny) from Slack to Bytebase.
* `src/lib/slack.ts`: send the message to Slack via using the its [web API](https://tools.slack.dev/node-slack-sdk/web-api/).
## Conclusion
Congratulations! You've successfully set up JIT database access via Slack with the help of Bytebase webhooks and APIs.